


Hot on the heels of the groundbreaking release of ASP.NET MVC CTP 1 in December of 2007, an open source project called MvcContrib came to life.
MvcContrib has enjoyed tens of thousands of downloads since it started in December of 2007. In this article, I will explain MvcContrib; it’s major components, how to use it, and how to get involved in its continued development.
MvcContrib from 30,000 Feet
MvcContrib is a .NET 3.5 SP1 library that provides extensions for use with Microsoft’s ASP.NET MVC Framework. MvcContrib does not provide replacements for parts of ASP.NET MVC. Rather it includes features and components that compliment and extend ASP.NET MVC. The MVC Framework provides many extension points, and MvcContrib leverages many of them. From controller factories to grid components to view automation helpers, MvcContrib is the first place you should look for the extras to make your MVC applications great.
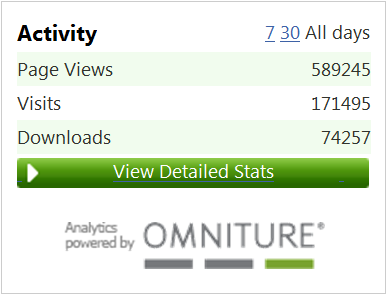
MvcContrib is the first and oldest open source project based on ASP.NET MVC. Based on the stats at CodePlex, it may also be the most popular community-based library for the ASP.NET MVC Framework. Figure 1 shows the stats widget from the project site at http://mvccontrib.org.
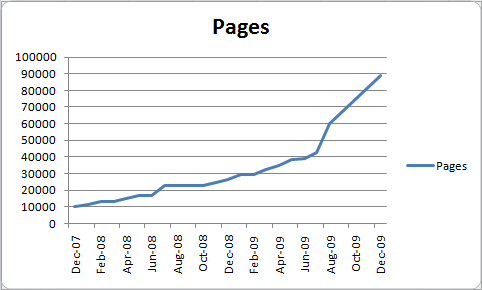
In preparation for this article, I also did some quick search engine analysis to see how many pages, blog posts, articles and the like are talking about MvcContrib. I did time-bounded searches and came up with the following chart in Figure 2 that shows the trend of MvcContrib community growth. You can see now that there are around 90,000 web pages on the Internet that mention MvcContrib.
Before going further, it is important to have some basic information about the MvcContrib project. Table 1 gives overview information.
MvcContrib has kept pace with the latest releases of ASP.NET MVC. At press time, MvcContrib builds against ASP.NET MVC 2 RC, although you can still download previous builds that are built against ASP.NET MVC 1 from http://mvccontrib.org. I covered MvcContrib in my book, ASP.NET MVC in Action, published by Manning Publications Co. You can find out more at http://mvcbook.jeffreypalermo.com/">http://mvcbook.jeffreypalermo.com/.
The CodePlex Foundation has received an application from MvcContrib requesting acceptance into the ASP.NET gallery. By the time you are reading this article, the result of that application will likely be known.
Throughout the rest of this article, I will walk through the high points of MvcContrib and demonstrate some of the key features that you don’t want to miss. I’ll start by showing you how to obtain and use MvcContrib. Then I’ll walk through the major features contained in the library and show samples. Then I’ll dive into the source and find out how to get involved with the continued development of MvcContrib.
How to Get and Use MvcContrib
The first step to using MvcContrib is to download the latest release. Go to http://mvccontrib.org and click the download button on the CodePlex project site. Look for a distribution file called MVCContrib.release.zip. Download it and extract it locally. Then create a new ASP.NET MVC project and add a project reference to MvcContrib.dll as shown in Figure 3. There is also a zip file called “extras”. This file is much larger and contains the features that are by nature coupled to larger dependencies, like controller factories and view engines.

I will run through a very quick example of using the MvcContrib grid as well as ViewDataExtensions. The example display some of the type members in a grid. Figure 4 shows the page I’ll show you how to create.
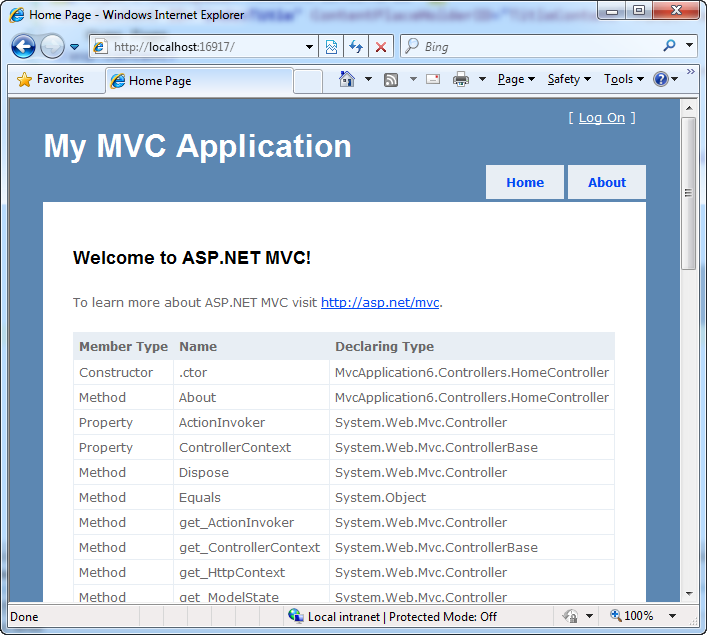
This example needs a listing of MemberInfo objects and a grid with columns “Member Type”, “Name”, and “Declaring Type”. The first bit of code I need to write is a short snippet in the Index action of the HomeController.
public ActionResult Index()
{
	IOrderedEnumerable<MemberInfo> members
		= from MemberInfo m
in GetType().GetMembers()
orderby m.Name ascending
select m;

	ViewData.Add(members);
	ViewData["Message"]
		= "Welcome to ASP.NET MVC!";
return View();
}
I slipped in some usage of the MvcContrib ViewDataExtensions here by using the single-parameter Add() method. This extension uses the object type as the dictionary key. This is very useful when you only have one object of a certain type in view data, and you are not using polymorphism between the controller and view. Next, in the view, I will add a small snippet to the default Index.aspx page as follows:
<%=Html.Grid(
   ViewData.Get<IOrderedEnumerable<MemberInfo>>())
    .Columns(column =>
    {
         column.For(x => x.MemberType);
         column.For(x => x.Name);
         column.For(x => x.DeclaringType);
    })%>
That’s it! Hit CTRL+F5 to run the project without debugging, and you will see a screen similar to Figure 3.
Now that you’ve already seen how to start using MvcContrib, I will move into a more detailed walkthrough of the major MvcContrib features.
Major Feature Tour
MvcContrib is loaded with features and it would take much more than this article to explain them all. MvcContrib is not just the work of a handful of individuals. Rather, MvcContrib has received contributions from over one hundred individuals. I will go over a few major features in detail here, but first, here is a quick rundown of the breadth of MvcContrib.
- XmlResult. A custom ActionResult.
- Lots of extra action filters
- Subcontrollers. Allows a controller to package a controller and view and send it to any view for execution.
- Route debugger. Visualizes routes in the browser.
- Input builders. Builds on top of Html.DisplayFor and Html.EditorFor to eliminate view code duplication.
- Three custom view engines
- Fluent html. Builds html with C#.
- Include handling
- Controller factories for four popular Inversion of Control libraries.
- Test helpers. Makes route testing a 1-line task, among other benefits.
- Portable areas. Packages up an entire area in a single DLL for distribution and use in any ASP.NET application, including Web Forms.
I’ll cover a few of these features in more depth below. I have chosen these few because I believe they are the most broadly applicable to a wide range of projects. MvcContrib offers a very broad set of extensions, and I encourage you to explore its full feature set on your own.
Subcontrollers
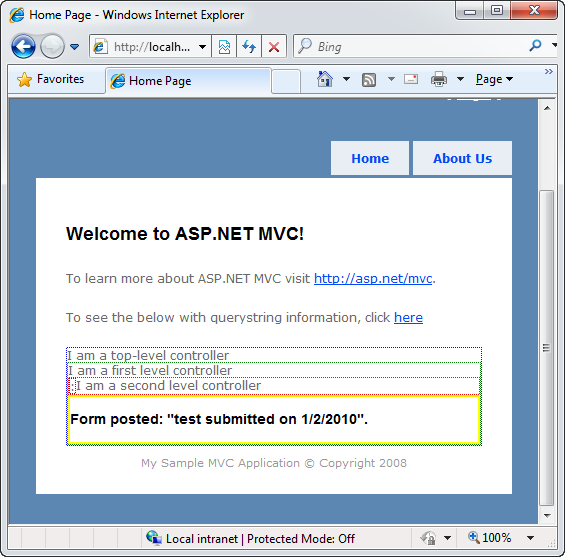
Subcontrollers are a feature that is likely not going to be implemented by Microsoft, and that is probably because it serves an uncommon need. That need is when you need to package a controller and view and render it in a view that has no knowledge of what controller is in play. While Html.RenderAction() is more broadly applicable in most scenarios, Html.RenderAction() has the view make the decision about which controller to invoke. Conversely, when using a subcontroller, the controller makes the decision about which controller to invoke. Figure 5 shows the result of an example that uses several levels of nested subcontrollers. You can see this sample in the MvcContrib samples as well.
A subcontroller can do everything a regular controller can do. It can model bind action arguments and respond to form posts at the same time. A subcontroller can also nest other subcontrollers within it. When you want the controller to decide which controller to nest, use a subcontroller over Html.RenderAction(). Doing this allows the view to remain ignorant about which controller is being nested.
The top level controller in this example uses the following action signature:
[HandleError]
[SubcontrollerActionToViewData]
public class HomeController : Controller
{
public ActionResult Index(
		FirstLevelSubcontroller firstLevel)
	{
		ViewData["Title"] = "Home Page";
		ViewData["Message"] =
                 "Welcome to ASP.NET MVC!";
		ViewData["text"] =
                 "I am a top-level controller";

return View();
	}
}
The HomeController obtains the subcontroller through model binding. It requires one line in the Global.asax.cs file.
protected void Application_Start()
{
	RegisterRoutes(RouteTable.Routes);
	ModelBinders.Binders.DefaultBinder
		= new SubcontrollerBinder();
}
When this is set up, the subcontroller will be treated just as any other controller and created with the default controller factory. Notice that the HomeController merely has to declare that the subcontroller is needed. It doesn’t need to put it in view data or call an operation on it. By convention, the SubcontrollerActionToViewData action filter applied to the controller takes the subcontroller and places it in view data. In cases where you need to call a method or set a property on the subcontroller before it goes to view data, you can certainly do that in the action method that declares it. Listing 1 shows the full source of the subcontroller base class.
The view for HomeController is very simple and has no knowledge of FirstLevelSubcontroller. The snippet that is affected in the HomeController’s Index view is as follows.
<% ViewData
     .Get<Action>("firstLevel")
     .Invoke(); %>
This example uses MvcContrib’s ViewDataExtensions to use generics to avoid a cast in the retrieval of the subcontroller from view data. The key that it uses matches with the action method argument in HomeController. Subcontrollers are bundled up in a closure using the System.Action() object. Invoking the closure processes the subcontroller using the normal MVC controller pipeline.
The next snippet shows the definition of FirstLevelSubcontroller. You can see that it looks very similar to a regular controller.
public class FirstLevelSubController :
SubController
{
   public ViewResult FirstLevel(
          SecondLevelSubController secondLevel)
   {
      ViewData["text"] =
            "I am a first level controller";
      return View();
   }
}
You can see here that the controller derives from subcontroller, which in turn derives from System.Web.Mvc.Controller. The one convention that you must remember is that by default the execution of a subcontroller looks for an action name that matches the controller name. The controller name in this case is “FirstLevel”. It, in turn, can nest other subcontrollers.
Portable areas allow an entire area to be distributed as a single .NET assembly.
The sample has four levels of nested controllers just to prove the breadth of functionality, and you can access all the code in the MvcContrib samples. Nested four levels deep, the FormSubmitController renders a form and accepts a form post.
public class FormSubmitController :
SubController<DateTime>
{
   [AcceptVerbs("POST")]
   public ViewResult FormSubmit(string
                                sometextbox)
   {
      ViewData["sometextbox"] = sometextbox +
               " submitted on " +
               Model.ToShortDateString();
      return View("posted");
   }

   [AcceptVerbs("GET")]
   public ViewResult FormSubmit()
   {
      return View();
   }
}
You can see that a subcontroller is a real controller that is merely package up for passage to a view and delayed execution. Subcontrollers are meant for use when you want the controller to decide which controller to nest and keep the view ignorant of that decision. If it is appropriate to have the view decide which controller to nest, use Html.RenderAction() instead.
Input Builders
Input builders have been thoroughly covered in a blog post series by Eric Hexter on his blog at http://hex.lostechies.com">http://hex.lostechies.com. Input builders build on the templated helpers in ASP.NET MVC 2 and use Html.EditorFor, Html.DisplayFor as well as many other HTML helpers. The biggest two extensibility points that make input builders a boon to driving consistency throughout the UI are:
- Input builder conventions
- Field-level master pages
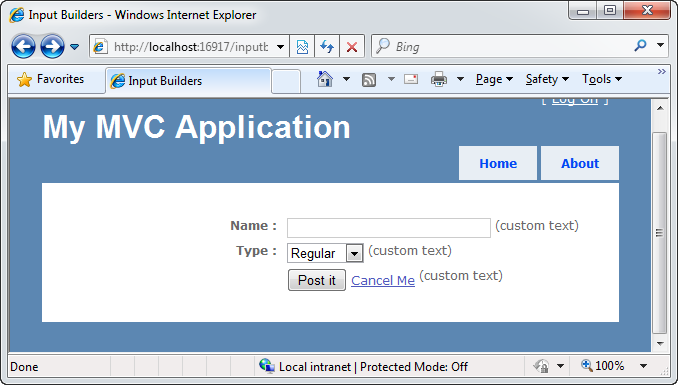
The conventions allow a series of objects to evaluate the property of the view model as well as other factors when deciding which input builder to use to render the view model property. Let’s quickly see an example of input builders at work. While you can see comprehensive examples in the MvcContrib samples, here is a very small example illustrating how to get started with input builders. I’ll show you how to render a small input form for a simple Customer addition as in Figure 6.
Before I explore this sample, it is important to note that Input builders are built on top of the templated helpers in ASP.NET MVC 2. The first version of input builders were standalone about one year ago. Since then, Microsoft began work on templated helpers and the code has been refactored to leverage the power of the built-in features as well as deliver enhanced functionality leveraging the extensibility points of template helpers as well as creating some new ones.
Templated helpers, and by extension input builders, use the strongly typed view model to define the structure of the rendered view. The view model CustomInput class is as follows.
public class CustomerInput
{
public string Name { get; set; }
public CustomerType Type { get; set; }
}
The CustomerType can be Regular or Preferred, so I will add a drop-down. ASP.NET MVC 2 gives developers drop-downs for enums out of the box, so that isn’t that interesting. What is interesting is how you get the “(custom text)” next to every field, and how you get the customized buttons on the form. The controller is not very interesting.
public class InputBuilderController
   : Controller
{
   public ViewResult Index()
   {
      var input = new CustomerInput();
      return View(input);
}
}
The view, however, is what is very interesting. Like template helpers, the view code is very small.
<asp:Content
    ContentPlaceHolderID="MainContent"
    runat="server">
    <%=Html.InputForm()%>
</asp:Content>
That’s all that is necessary to render this form that has two custom aspects to it. The first custom aspect is to get both the submit and cancel buttons to be different from the default.
The extensibility mechanism inside input builders is based on the IPropertyViewModelFactory interface. Implement this interface to register a convention for view model properties that match a certain pattern.
public interface IPropertyViewModelFactory
{
   bool CanHandle(PropertyInfo propertyInfo);

   PropertyViewModel Create(PropertyInfo
                            propertyInfo,
                            object model,
                            string name,
                            Type type);
}
The rest of extensibility is through views. ASP.NET MVC already includes a well-defined order by which views are located. Input builders leverage this very powerful location mechanism by fully leveraging partial views and master pages to provide custom view sections that can be overridden by application and by controller. Input builders come with a custom view engine that knows how to resolve the embedded partial views and master pages that ship with MvcContrib. To set up input builders for use, you must register this view engine as an additional one in when the application starts.
InputBuilder.BootStrap();
That’s it. Now you are free to use Html.InputForm() in any of your views. Input builders will kick in, use ASP.NET MVC 2 templated helpers for all of their power as well as provide extra extensibility. Let me dig into how to get custom submit buttons on the form. Input builders define a partial view called Submit.aspx. Yes, aspx. Input builders leverage partial view pages, not partial view user controls. Because all of the partials are view pages, each partial can use a master page. Field-level master pages provide full control over how each field is rendered in the view. By defining a Submit.aspx partial in a special /InputBuilders folder, that view will be picked up and used instead of the default. Figure 7 shows the /Views folder and the Submit.aspx partial defined.
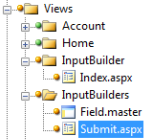
You also see a master page called Field.Master defined here. Listing 2 shows the source for Field.Master. A quick look inside this file will reveal that “(custom text)” was placed at the end of the field area. This master page wraps every form line. Because master pages are resolved using path precedence just like views and partial views, you can override this for the whole application or just one controller.
Because input builders use view pages for every partial view as well as a master-page-view-field, the view engine mechanism provides a high-degree of customization. Some developers have reported that the code that is necessary in input views has shrunk dramatically. Reduction in code is good, especially when view code tends to contain a high degree of duplication. It has also been said that input builders bring object-orientation to view code.
Portable Areas
Portable areas are MvcContrib’s newest feature. Aimed at being a component model for ASP.NET, portable areas allow an entire ASP.NET MVC 2 area to be packaged up in a single .NET assembly. Along with simple area registration provided by the MVC Framework, portable areas provide a means to distribute multiple routes, controllers, and views in a single dll. Just activate the portable area and your site instantly has many more pages active in it.
Portable areas have two core pieces:
- MvcContrib’s embedded view engine for view resolution.
- An application bus for communication between the areas and the host application.
MvcContrib has a sample showing how to develop and use a portable area. Figure 8 shows this project structure.
The interesting part is that all you have to do to use a portable area is call the normal area registration.
AreaRegistration.RegisterAllAreas();
At this time, the area is active, and the routes contained therein are active. Besides distributing an entire area as an assembly, which I predict will become the .NET 4.0 ASP.NET component model; the application bus is very interesting. You can see the source for the ApplicationBus class in Listing 3. On application start, you can register message handlers on the bus using the following line of code.
Bus.AddMessageHandler(
     typeof(ForgotPasswordHandler));
Each message handler is an observer of all messages. It is left up to you whether you want to restrict a message to just one handler or to let all handlers take a part in responding. That detail depends on how you implement your handlers. The ForgotPasswordHandler is coded to handle the LoginPortableArea.Login.Messages.ForgotPasswordInputMessage. The message is defined as follows.
public class ForgotPasswordInputMessage :
          ICommandMessage<ForgotPasswordResult>
{
  public ForgotPasswordInput Input { get; set; }
  public ForgotPasswordResult Result { get; set; }
}
Every message has an input and has a result. There are three types of messages for the portable areas bus:
- IEventMessage
- ICommandMessage
- IQueryMessage
IEventMessages have no result. Commands and queries do. The IMessageHandler interface is required for registering a type on the bus; therefore, ForgotPasswordHandler implements the following.
public interface IMessageHandler
{
    void Handle(object message);
    bool CanHandle(Type type);
}
This handler doesn’t do much in the sample, but you can imagine how it may send a new password to the e-mail address on file. Another interesting part about message handlers for portable areas is that you can use your own factory for the handlers. Just like ASP.NET MVC controllers need you in control over their construction, message handlers are no different. Register your factory with the bus, and you will be good to go.
Bus.Instance.SetMessageHandlerFactory(
     //IMessageHandlerFactory)
Portable areas don’t have flashy visual demos, but with .NET 4.0 the VirtualPathProvider class now works under medium trust. Portable areas depend on the VirtualPathProvider for retrieving views and other resources from the .NET assembly. With .NET 4.0, portable areas can be used in hosting environments where medium trust is enforced. ASP.NET controls have been the component model for 9 years. Now with ASP.NET MVC 2 and MvcContrib’s portability of those areas, my hope is that Microsoft and component vendors will start using some of these ideas to provide even larger, multi-page components.
Now that you have seen three of the major features of MvcContrib, you may be interesting in working with the source and even contributing back.
Test Helpers
MvcContrib test helpers are a very interesting feature. The most exciting test helper is the one for testing routes. Testing custom routes can be very difficult out of the box. With MvcContrib’s test helpers, you can use the following test.
"~/funky/bar/widget".Route()
     .ShouldMapTo<FunkyController>(x =>
     x.Bar("widget"));
Routes can become very complex if you are using heavy customization in your URLs. Once you start using a single custom route, you really need to test the routes. Using extension methods off of System.String, these route testers encapsulate all the setup necessary to run a route through the routing pipeline to find out what controller, action, and variable came out the other end. You can see examples of all the route testers in Listing 4.
Working with the MvcContrib Source
This year, MvcContribmoved the source from Subversion to Git. With as many patches as MvcContrib was receiving, Jeremy Skinner was having a hard time keeping up. Jeremy Skinner is the most active committer, and he has done a tremendous job evaluating and accepting patches and then committing them to the project. We reject patches without automated test coverage, and we also monitor dependencies very closely. The move to Git for version control makes accepting contributions much easier. Because Git uses the concept of a pull request instead of a patch, the contribution can be evaluated right away without worrying about merge conflicts of applying a patch.
You can find the MvcContrib source on http://GitHub.com/mvccontrib/ since GitHub provides free Git source hosting. Downloading the source is a breeze since GitHub provides a single URL to download the HEAD of the master branch at any time (master is the term Git uses for a trunk). GitHub will zip up the source on the fly for you to download. You can download the latest MvcContrib source at any time using the “Download Source” button on the top-right of the MvcContrib GitHub page shown in Figure 9. You can also bookmark this link: http://github.com/mvccontrib/MvcContrib/zipball/master. It is currently an 8MB download.

Whether you want to run the samples (/src/Samples) or just explore the features, you will want to run the automated build first. Run the file called “Click To Build.bat”. You must have .NET 3.5 SP1 installed for the build to work. Figure 10 shows what you will see when you unzip the source distribution.
If you are interested in developing for MvcContrib and contributing back, you will want to “fork” the repository on GitHub so that you have access to your own Git repository. You can then commit until you are ready to submit your patch. Git doesn’t actually call it a patch. Instead, you will use GitHub.com to submit a “pull request.” This notifies the MvcContrib committers that you have a fork that you’d like to be integrated back into the origin.
Getting started with Git and GitHub can be a bit daunting if you had no idea what Git was before this article. Rails and the Linux kernel use Git for source control, and GitHub.com supports commercial and private source repositories as well, so it is not an immature version control system. Most of the MvcContrib committers never worked with Git before the move, but it has made accepting contributions so much easier that with Subversion.
In order to clone your fork of MvcContrib, you will want to review Jeremy Skinner’s MvcContrib GitHub tutorial located at http://mvccontrib.github.com/MvcContrib/">http://mvccontrib.github.com/MvcContrib/. It explains how to get Git working on your machine and how to work with MvcContrib to submit code back to the project.
TortoiseGit is a shell add-in very similar to TortoiseSVN that has proven to be very easy to use for visualization of commits, pulls, and pushes. You can find TortoiseGit at http://code.google.com/p/tortoisegit/downloads/list">http://code.google.com/p/tortoisegit/downloads/list.
Summary
MvcContrib is a self-contained, non-intrusive library that can be easily used with ASP.NET MVC and ASP.NET MVC 2 web application. In this article, I have given an overview of MvcContrib as well as taught you how to obtain and work with the library. I have shown you some of the major features including subcontrollers, input builders, portable areas, and the test helpers. There are many, many more features contained in MvcContrib, and I encourage you to download it to explore further.
The project welcomes community contributions. Anything from documentation to testing to samples helps. If you just want to keep up with the project, join the e-mail list at http://groups.google.com/group/mvccontrib-discuss">http://groups.google.com/group/mvccontrib-discuss, submit a question, or answer questions submitted by others
