


Karl Moore exposes some of the most hidden .NET secrets.
In this article, Karl uncovers a bundle of nifty Windows Form tricks.
To call Visual Studio .NET "pretty cool" is getting a little cliche. You know it. I know it. We've created Web applications in minutes, figured out the power behind the .NET Framework and read how to create a Windows service without needing to plug into the devilish delights of C++.
As the Microsoft advertisement I read this morning quite rightly points out: it'll save you thousands of development hours and position you far in front of your competitors.
Unless, of course, your competitors are also using Visual Studio .NET. To stay ahead of the field you, need to re-figure out all those nifty little secrets you learned in Visual Basic 6. Let's dig into some great Windows Forms tricks along those lines.
Making Your Form Transparent
You can give your Windows Forms a great transparent look by altering its Opacity property. Set this anywhere between 0% (completely transparent) and 100% (regular opaque) to see the windows underneath your application.
Who Stole the ToolTips?
If you haven't already noticed, someone stole the ToolTip property in .NET. If you want little popup messages to appear when you hover your mouse over a button or whatever, you'll need to figure out the ToolTip control.
Here's how it works. First, you add an instance of the ToolTip control to your form. This is an invisible component that actually displays the message. You can alter its properties through the Property window, such as whether tool tips are active or how long a tool tip takes to display (Active and AutoPopDelay properties respectively).
Next, you need to add the actual ToolTip messages. Click on any of your controls and scroll down to the Misc section (presuming you order your property list by category). You'll see a property called something like ToolTip on TextBox1. The ToolTip extender adds new properties to your form controls.
Simply set this property to your ToolTip message.
Tricks of the Trade: Resizing Made Easy!
When the user resizes your Windows Form at run time, by default all of your controls will stay in place. They will not automatically resize with the form. You can change this behavior by editing the Anchor property of a control.
Anchor determines which sides of a form that control will stretch with. After the default, the most common setting for this property is "Top, Bottom, Left, Right" ? meaning the control will stretch with all sides of your form, behaving like the majority of resizable Windows applications.
You can also use the Dock property of a control when positioning and resizing controls. It allows you to dock a control to a particular side of a form and stick with that side, regardless of how the form is resized. To set this, simply select a new region via the Dock property drop-down.
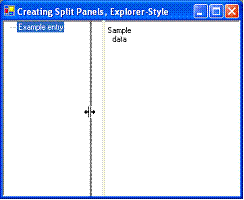
Creating Split Panels, Explorer-Style
If want to create the split panel look seen in many modern applications, the .NET Splitter control can help you achieve exactly that effect.
Follow these simple steps to recreate the split panel look in your own programs:
- Add the control you want to appear down the left of your screen to your form. This could be a TreeView control if you're going for the Explorer effect, or a Panel control if you want to add numerous controls (such as a list of icons for a menu, Outlook-style).
- Set the Dock property of this control to Left.
- Add a Splitter control to your form. It should automatically set its Dock property to Left. This is the widget your users will "grab" to resize the panels.
- Add your final control to your form. If you're continuing that elusive Explorer look, this will probably be the ListView control.
- Set the Dock property of this control to Fill (click the box in the center).
That's it! Try running your application (Figure 1). Your users will be able to drag the Splitter and your two controls/panels will automatically resize.
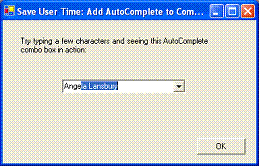
Save User Time: Add AutoComplete to Combo Boxes
Develop an application in a program such as Microsoft Access and all your combo boxes will incorporate "AutoComplete" by default that ability to be able to tap a few characters in a drop down and have the nearest matching selection picked out for you. In Visual Basic however, there's no such intrinsic support. If you want AutoComplete, you've got to do it yourself.
Simply add the following methods to your form. The first is called AutoCompleteKeyUp and accepts a combo box and KeyEventArgs object as arguments. You need to call these in the KeyUp event of your combo box: it looks at what the user has typed and selects the most appropriate match. The second is called AutoCompleteLeave and should be called when the Leave event of your combo box is fired. This one simply takes whatever you've finally chosen and cases it properly, as per the matching selection in the combo box. You can see those functions in Listing 1 and the functioning form in Figure 2.
And here's how you may call these functions from your combo box:
Private Sub ComboBox1_KeyUp(ByVal sender As _
   Object, ByVal e As _
    System.Windows.Forms.KeyEventArgs) Handles _
    ComboBox1.KeyUp
    AutoCompleteKeyUp(ComboBox1, e)
End Sub
Private Sub ComboBox1_Leave(ByVal sender As _
    Object, ByVal e As System.EventArgs) _
    Handles ComboBox1.Leave
    AutoCompleteLeave(ComboBox1)
End Sub
That's all you need to create your own AutoComplete combo boxes. And if you're feeling really adventurous, you might even want to wrap all of this up into a neat little user control.
The Power of Command-Line Parameters
Command line parameters can be incredibly useful. They allow users or other applications to pass startup information to your program. For example, if your program was called MyApp.exe, they might run the following.
MyApp.exe /nodialogs
MyApp.exe has one command line parameter, "/nodialogs". In VB6, we could read this using the Command property. In VB.NET, this has been replaced with the System.Environment.GetCommandLineArgs function, which returns an array of the passed parameters.
And here's a chunk of code to show you just how to read them.
Dim MyStartupArguments() _
  As String
Dim intCount As Integer

MyStartupArguments = _
System.Environment.GetCommandLineArgs

For intCount = 0 To UBound(MyStartupArguments)
    MessageBox.Show(MyStartupArguments(intCount)._
                                        ToString)
Next
