


In my last two articles, I showed you how to build an end-to-end mobile solution targeting either Office 365 or on-premises SharePoint. Since a mobile app cannot be a WSP, it had to be code running somewhere other than the server.
This idea of code running somewhere else is not going away. You saw Microsoft's first take on it with the App Model. You are seeing a second take of it when they talk about the Office 365 APIs. Even though the App Model and Office 365 APIs are both code running somewhere else, fundamentally Office 365 APIs is a major refinement of the concept. It's a better refinement at that and one that depends on Azure AD.
If you intend to write code against Office 365, you must learn Azure AD very well. In fact, I would even argue that Azure AD is that fundamental building-block that you must learn, even if you never wish to touch SharePoint or Office or Office 365. Here are my reasons for saying so:
- You get an Azure AD when you sign up for Office 365. There is no way around it; it is the non-replaceable and default choice. And given how much interest I see from Microsoft for their on-premises products (little to none), fast forward five years into the future, if you are still using Microsoft Word, you will be using Office 365. I'm writing this article on Microsoft Word 2013 running on a Windows 8 VM on my Mac.
- Azure AD is free, up to half a million users. There are also paid SKUs that add more functionality, but many organizations won't need those features. Now, whether or not you feel Azure AD is good or bad, free and backed by Microsoft's cash is not a force you can argue with. And really, although it could use some improvement, it's certainly usable.
- Azure AD has around 2500 SaaS apps signed up for it. If your organization uses Citrix GoToMeeting, DropBox, etc., you can use Azure AD identities backed by your Active Directory identities to sign into those SaaS apps. Even Google Apps is available as an SaaS app in Azure AD.
- Azure AD has helper libraries for every major operating system and platform. They call them ADAL or Azure Active Directory Authentication Library. Those libraries simplify token management and authentication for you.
- Azure AD, put simply, is all your APIs, all your apps, and Azure AD supporting all the standards, such as WS-Fed, WS-Trust, OAuth2, etc. So you can finally focus on writing your app, and not worry about identity. Authentication is very complex and very risky. The more you can outsource it to experts, the better it is for you. And you can author your WCF services and WebAPIs to participate in Azure AD also.
Long story short, you need to learn Azure AD. So this article will dive into the depths of Azure AD, the stuff you need to know as a developer and not just a SharePoint developer.
What is Azure AD
The first and most important thing to know about Azure AD is that it's not a replacement for Windows Active Directory. You still need Windows Active Directory to do authentication, provide service accounts, manage computers, etc. But Windows Active directory (on-premises) is not going to work for the cloud. On the cloud, authentication protocols such as NTLM and Kerberos are not the right fit. Claims-based identities rule the cloud, and standards such as WS-Fed, WS-Trust, and OAuth2 are in common use for very good reasons.
Azure AD is something you provision in Microsoft Azure, where you can:
- Manage user identities
- Manage your APIs and apps
- Consume SaaS apps
- And a few other things
Managing User Identities in Azure AD
When you provision an Azure AD for yourself, by default, you get user accounts and passwords hosted by Azure AD, but you can choose to sync your on-premises accounts into the cloud either with or without passwords. When you sync them without passwords, you need to configure your Azure AD to federate authentication to on-premises AD using ADFS or any standards-compliant authentication endpoint.
These identities can be either on a <somethingunique>.onmicrosoft.com domain or ending in a domain that you own. If you synch your on-premises AD identities into Azure AD, you must use your own domain. There are some additional restrictions as well. Microsoft has created an Office 365 deployment readiness tool that you can run against your AD to see if your identity can be synced. You can find the Office 365 deployment readiness tool at Use the Readiness Toolkit to assess application compatibility for Microsoft 365 Apps.
Manage Your APIs and Apps
Azure AD allows you to publish your APIs (WCF services or WebAPIs) into Azure AD. Azure AD also lets you register your client apps into Azure AD.
When you publish your services in Azure AD, Azure AD isn't hosting them for you. You can run them anywhere: on-premises, even on localhost IIS express, on Azure websites, or really anywhere. By publishing your services, you're making Azure AD responsible for authentication before your APIs can be accessed, and it allows you to choose who can use your APIs. The choice you get is single-tenant or multi-tenant. Single-tenant APIs are for consumption only within your tenancy. A tenancy is your Azure AD. Multi-tenant APIs can be used in other tenancies and organizations as well. Programmatically speaking, in order to get an access token to call your service, a client also needs to pass in a Tenant ID. A Tenant ID is a claim that Azure AD issues. All of this will become a lot clearer when I show some code at the end of this article.
You might ask, can I choose which tenancy gets to access my APIs? Yes you can, but that falls under authorization, and that logic can be built into your API.
When you publish your client app inside Azure AD, again, Azure AD isn't actually hosting your binaries for you. Azure AD is merely acting as the authentication bridge, where you also get to specify that “My app shall use the following APIs.” And when I say the “following APIs,” the choices you have today include Azure AD graph explorer to query the Azure AD objects, and yes, the Office 365 APIs are nothing but APIs that Microsoft has chosen to expose in Azure AD.
Really, nothing stops you from publishing your own APIs inside Azure AD either, just like the Mobile architecture I showed in my previous two articles in CODE Magazine. The current Office 365 APIs are a miniscule set of the total capabilities of Office 365. You can always choose to extend them using the classic App model and registering your own API, and then do the switch when Microsoft supports the APIs you need natively.
Consume SaaS Apps
Organizations frequently use a smattering of products from other organizations. For instance, your company may use Office 365, but they may also use Box.net for file storage and sharing. Microsoft has made it possible for any SaaS provider to register their app in Azure AD. This means that using the same identity connected to Azure AD, your employees will be able to access SaaS apps. You can also manage access using groups. Imagine: Wouldn't it be nice if new hires automatically get access to everything they need and departing employees get their access revoked the moment they leave? Also if DropBox username passwords don't follow corporate IT standards, such as password complexity or two factor auth, with Azure AD, you can enable that for DropBox because it has one identity flowing through all apps.
This as you can imagine, is ridiculously powerful and valuable.
And A Few Other Things
Technically speaking, this “few other things” falls into the Consume SaaS apps bucket. But this is so powerful that I decided to give it its own section. This will be the year when enterprises finally figure out proper mobile security. Mobile device management, as of today, is a mixture of fragmented standards and products. Windows Intune is pretty good at managing your mobile apps and devices. And with Office 365 Enterprise SKUs, you get these MDM capabilities included, for free. You can learn more about this offering here: http://channel9.msdn.com/events/TechEd/Europe/2014/OFC-B330. I'm not trying to be a salesman for Microsoft; actually far from it, but MDM is a tough and expensive nut to crack, and I'm thrilled to see Microsoft solve this in an enterprise-ready manner.
I'm sure as time goes, we'll see even more value added into Azure AD and Office 365. This is why, I feel, you must learn Azure AD.
The History of Azure AD
When Microsoft created Office 365, they needed a place to store Microsoft-issued credentials. What I mean by Microsoft-issued credentials is a user ID and password that Microsoft stores for you in a Microsoft database somewhere. This couldn't be Live ID because their plans were grander than Live ID. As soon as you signed up for Office 365, you'd want to use a username that ends in your own domain, not @hotmail.com, etc. Azure AD made both scenarios possible. As soon as you signed up for Office 365, you got an Azure AD tenancy.
From there, it grew to support federated authentication, so you could use tools such as DirSync and the recently added Windows Azure AD Azure Connect tools to support both sync from on-premises to cloud, and, in some scenarios, even support writeback to on-premises.
And then Microsoft opened it up to more than just Office 365. They made it free for most scenarios and introduced paid SKUs of Azure AD Basic and Azure AD Premium. They also introduced ADAL (Azure Active Directory Authentication Libraries) for iOS, Android, Windows desktop, WPF, Windows Store apps, and Windows Phone.
Where we stand today is that Azure AD is going to replace Azure ACS, and more and more apps and features are being added to Azure AD all the time. Even if you never write code against Office 365, there is a good chance that you'll need to learn Azure AD.
Azure AD, the Technical Stuff
Okay enough background, value proposition, manager talk, and history. It's time to see some code. What I'm going to write is a simple Windows EXE and ASP.NET WebAPI using MVC5. And I'll register both my WebAPI and my native client in Azure AD. I'll then demonstrate calling my WebAPI from my Windows App in a single-tenant mode. I'll subsequently change my WebAPI to be multi-tenant, and demonstrate calling my WebAPI from my Windows app in a multi-tenant fashion.
So let's get started.
Creating an Azure AD
To create an Azure AD, you'll need either an Office 365 subscription or an Azure account. If you have an Office 365 subscription, just sign in as an administrator, go to the admin portal, click on the settings gear on the right hand top, and choose Azure AD. You'll be walked through steps, and by the end, you'll have a fully functional Azure AD all setup. Note that this is the same Azure AD that your Office 365 subscription is sharing, so I would be a bit careful of making changes here.
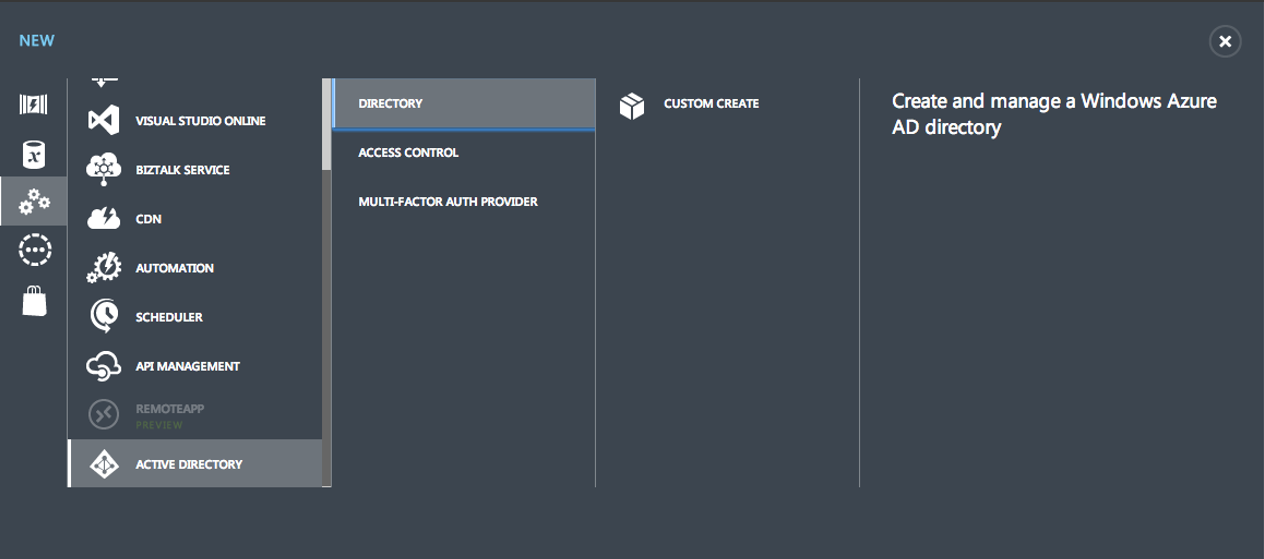
Technically speaking, Azure AD is part of Azure and is therefore exposed in the Azure portal. So sign into your Azure Portal and choose to create a new directory, as shown in Figure 1.
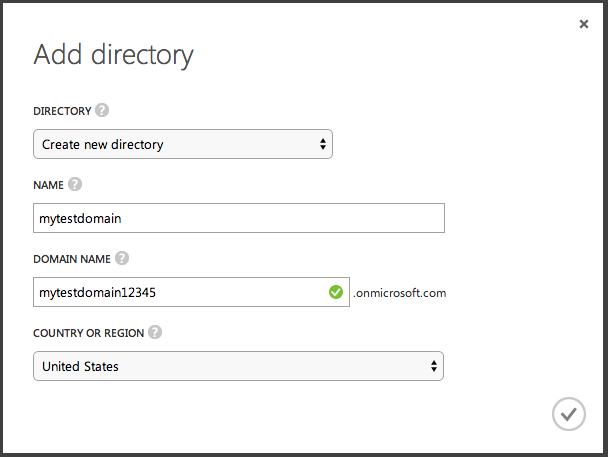
Here you will be asked to provide a unique name to your directory, as shown in Figure 2.
Once your Azure AD is fully functional, you should see the various choices in your newly created Azure AD as shown in Figure 3.

Click on the Users tab and create a “Global Administrator” user. The reason you're creating a global administrator is because this user will also have the ability to provision applications in Azure AD, especially from Visual Studio. Once the global administrator is created, you'll receive a temporary password, which you should reset. Open a new private browser window, and choose to sign into Azure Portal with this newly created global administrator user. Although you won't be able to see the Azure Portal because no azure subscriptions are associated with this new user, the sign-on process will allow you to reset the password to something you can remember.
Creating the WebAPI
Now that the Azure AD has been provisioned, it's time to create an ASP.NET WebAPI project and register that inside Azure AD. I'll demonstrate the steps using MVC5 and WebAPI2. At the time of writing this article, MVC6 doesn't work with Azure AD. However, I have no doubts that MVC6 will soon work with Azure AD also.
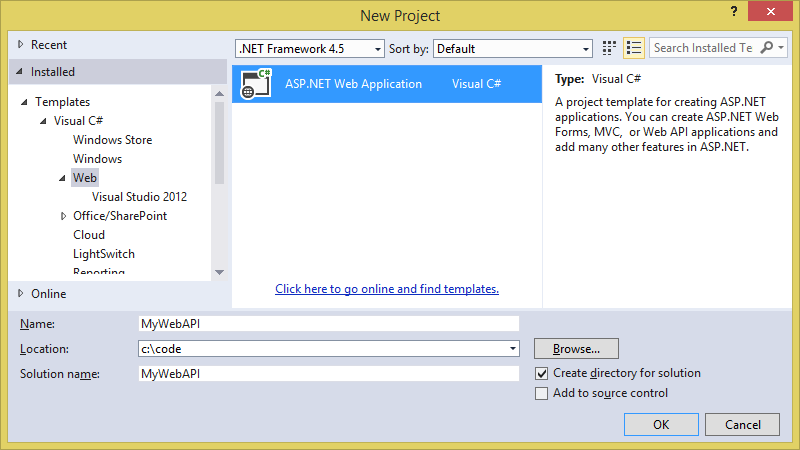
To get started, launch Visual Studio, and create an ASP.NET Web application project targeting .NET Framework 4.5. This can be seen in Figure 4.
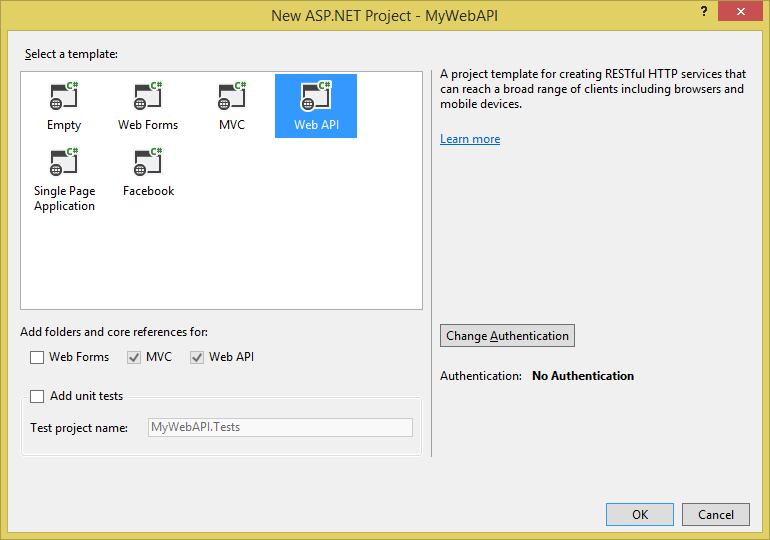
In the project settings, make sure that you target MVC and WebAPI, as shown in Figure 5. Click on the change authentication button, and choose to go with the organizational accounts, as shown in Figure 6.
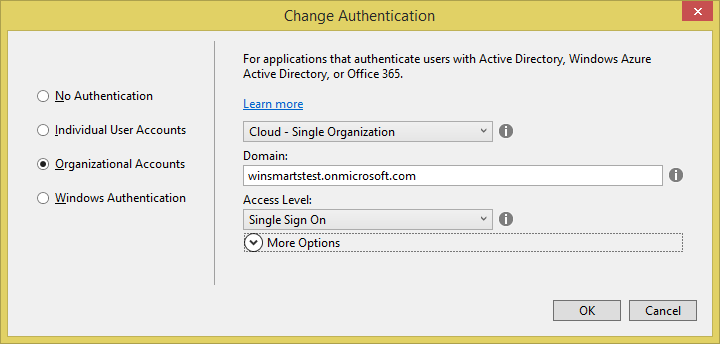
You might notice that when you're using WebAPI, you can only target “Cloud - single organization”. This is a Visual Studio limitation. I expect this limitation to be removed in a future version of Visual Studio. However, you can easily turn this into a multi-tenant application, which I'll demonstrate later.
When you click Okay, you'll be asked to provide credentials for Azure AD. Ensure that you enter the same username password that you created for the global administrator. After your project is created, visit the Azure portal and verify that your application is shown, as in Figure 7.

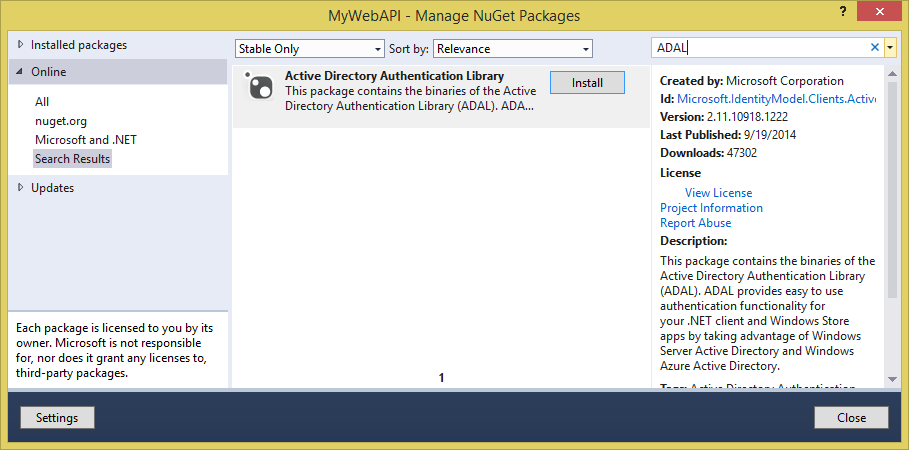
Next, in the same solution, add another project that's a Windows Forms project targeting .NET Framework 4.5. Call it “WebAPIClient”. Once the new Windows Forms project is created, right-click on it and choose to manage NuGet packages. In the dialog box that pops up, search for ADAL, and add the Azure ADAL, as shown in Figure 8.
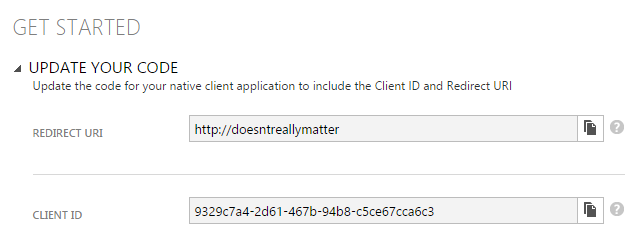
Next you also need to tell Azure AD about your native client. Visit the Azure portal and choose to add an application, but this time, choose to add a native application, as shown in Figure 9.
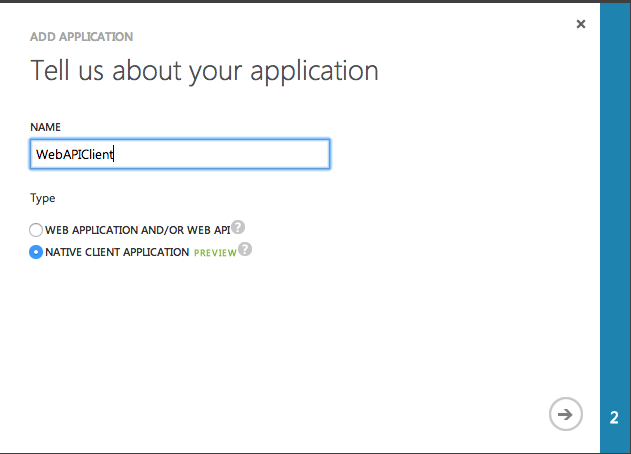
You'll also be asked to provide a redirect URI. I choose to enter "http://doesntreallymatter" here. You can enter whatever you wish; the only purpose of this is to redirect back to your client application. You'll see later that when your authentication dialog pops open, it's essentially a hosted webview. That webview closes as soon as a redirect occurs to this URL. So enter whatever you wish, just make sure that you remember what you entered. If you were writing a Windows Store app, for security purposes, your app is restricted to a specific URL, which you must obtain from the Windows Store portal and provide that specific URI. I'll leave those specific steps for another article.
Now, the really cool thing about Azure AD is that you WebAPI needs to know nothing about Azure AD. You can write business logic as usual. But the fact is that the entire project has been configured to be protected using Azure AD authentication, so I get to ride for free.
In your WebAPI project, go ahead and add the controller shown in Listing 1.
Listing 1: The WebAPI Controller
[Authorize]
public class TasksController : ApiController
{
    public IHttpActionResult Get()
    {
        var tasks = new List<Models.Task>() {
            new Models.Task(){
                TaskID = 1,
                TaskDescription = "Prepare course material"},
            new Models.Task(){
                TaskID = 2,
                TaskDescription = "Water the plants"},
            new Models.Task(){
                TaskID = 3,
                TaskDescription = "Ask girlfriend why is she mad"},
            new Models.Task(){
                TaskID = 4,
                TaskDescription = "Remember to be sensitive"},
            new Models.Task(){
                TaskID = 5,
                TaskDescription = "What is the problem honey"},
            new Models.Task(){
                TaskID = 6,
                TaskDescription = "I am the problem honey"},
        };
        return Ok(tasks);
    }
}
It goes without saying that to support the above TaskController, I also had to add a simple model to represent the task. There's nothing special about that Model, it's just a simple business object with two properties.
Also note that this controller has been protected with the Authorize attribute. This means that I cannot call this controller unless I authenticate first. Authentication will be done by Azure AD.
Now, before we dive into the details of the client, let's take a quick detour and understand how OAuth works.
OAuth Primer
OAuth falls into the token-based authentication mechanism, which is different from the session-based authentication mechanism. By session-based authentication mechanism, I mean an NTLM header, FedAuth cookie, or similar, which must be passed to the Web server when you're using a protected resource. Session-based authentication is extremely limited and is prone to CSRF attacks. Also the classic “remember me” functionality that everyone wants requires us to store credentials on the client.
Token-based authentication, and therefore OAuth, is different. OAuth requires you to get a token from an issuing authority. The token, typically a JWT (pronounced JOT) token, is a JSON-serialized token that contains various information, such as the validity of the token, a digital signature, issuer information, and also, claims to identify the user being authorized. With every single request, this token, also known as an “access token,” must be put in the “Authorization” header with a value of "Bearer <accesstoken>". This approach is more secure and more flexible than typical session-based authentication and authorization.
However, there's a big problem with this approach. The problem is that if you can get my access token, you can party as me. The solution to that is keeping my access token's duration as short as possible. Typical durations are no more than 30 minutes. The problem that this causes is that every 30 minutes, the user must be asked for credentials again. We know users are not going to like that.
The second problem with this approach is that once an access token has been issued, there's no way to revoke it from the server.
To solve both of these challenges, use a refresh token. A refresh token is issued with an access token. The difference is that a refresh token is much longer in duration, and it's also stored on the server in some persistent storage, such as SQL Server. This means that the refresh token can be revoked from the server at any time. This also means that the client must store the refresh token securely, and the client can request a new access token five minutes before the access token is about to expire. The best thing is that the user doesn't have to be prompted before the access token is renewed. So to the user, it feels like an ongoing session.
The even better part is that ADAL abstracts all of these details away from us. I still feel that in many instances you'll need to manage tokens yourself. A common scenario is in enterprise mobile apps where you wish to encrypt these refresh tokens with a key that is being issued to you by the mobile applications administrator. Luckily, ADAL has enough hooks to let you access the refresh token if need be.
Now, back to the client. In the client project, go ahead and drop a button onto the surface of the form, and in the button Click event, add the code shown in Listing 2.
Listing 2: Client-side code calling the API
private async void button1_Click(object sender, EventArgs e)
{
    string authority = "https://login.windows.net/winsmartstest.onmicrosoft.com";;
    string resourceURI = "https://winsmartstest.onmicrosoft.com/MyWebAPI";;
    string clientID = "9329c7a4-2d61-467b-94b8-c5ce67cca6c3";
    Uri returnURI = new Uri("http://doesntreallymatter");

    AuthenticationContext authContext = new AuthenticationContext(authority);
    AuthenticationResult authResult =
        authContext.AcquireToken(resourceURI, clientID, returnURI);

    string authHeader = authResult.CreateAuthorizationHeader();

    // don't do this in prod
    System.Net.ServicePointManager.ServerCertificateValidationCallback =
        ((s, c, c2, se) => true);

    HttpClient client = new HttpClient();
    HttpRequestMessage request =
        new HttpRequestMessage(HttpMethod.Get, "https://localhost:44300/api/tasks");
    request.Headers.TryAddWithoutValidation("Authorization", authHeader);
    var response = await client.SendAsync(request);
    string responseString = await response.Content.ReadAsStringAsync();
    MessageBox.Show(responseString);
}
You can see the code from Listing 2 is divided into parts. There's a part above the comment “don't do this in prod” that does authentication and gets an access token, and another part above that comment that calls the resource with the access token.
As you can see, in getting the access token, I have to specify the same returnURI that I've used to register my native application. Additionally, I also have to specify a resource URI and client ID.
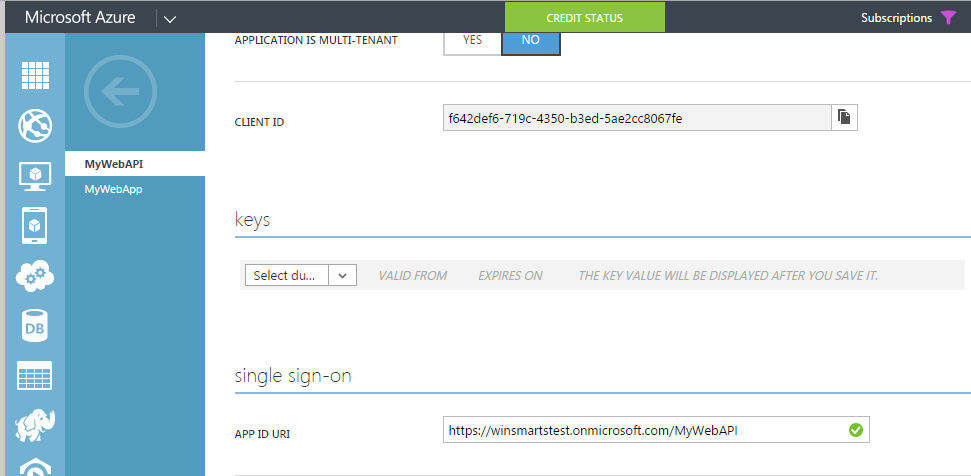
You can get the resource URI from the WebAPI project registered in Azure AD as shown in Figure 10.
The client ID is the unique ID of the native application. Note that it's not the ID of the WebAPI. In this case, that client is the native application.
You can get the client ID from the properties of the native application registered, as shown in Figure 11.
You're more or less done. But there is one big problem. You haven't yet allowed the WebAPI by the Native Client. Think of it this way, you want some level of control around who can call which API, right? This can be set under the configure tab of the native client, but unfortunately when I try to set this, I don't see my WebAPI there, I only see the applications shown in Figure 12.
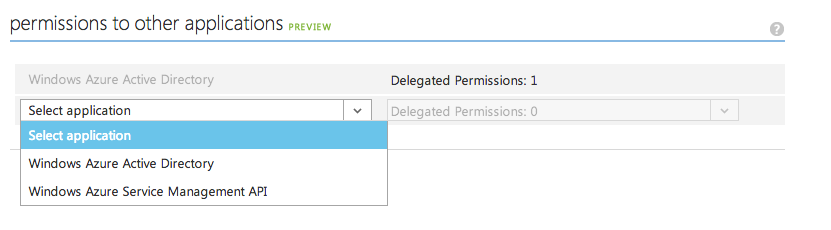
Note that if you were using an Azure AD tied to Office 365, you would also see Office 365 APIs there. But nowhere in there can I find my WebAPI.
So how do you get our WebAPI into that list?
Registering Your WebAPI as Callable
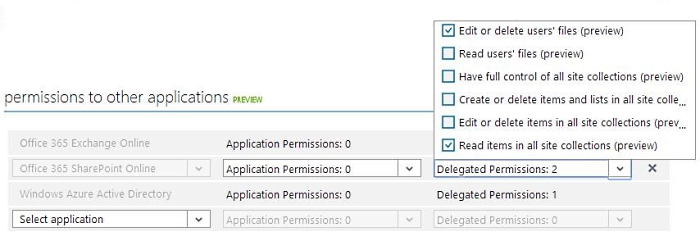
The reason Microsoft has created something called the “common consent framework” is because they want to make things easier both for users and for application developers. Application developers can set up and manage their APIs in one place. This can be seen in Figure 13.
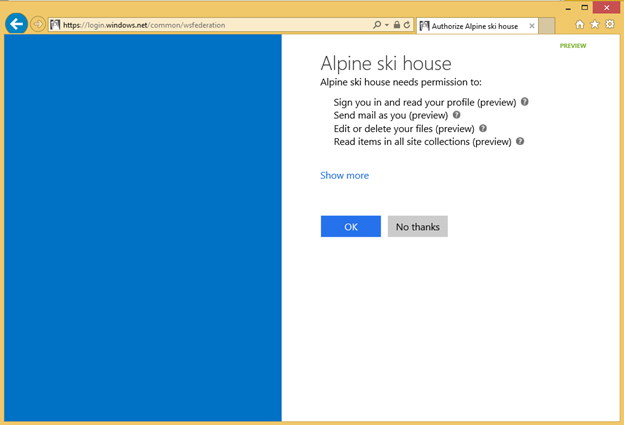
Users see a simple screen where they can grant or deny access to what they wish. This can be seen in Figure 14.
In order to register the WebAPI in that list, you have to do three simple steps:
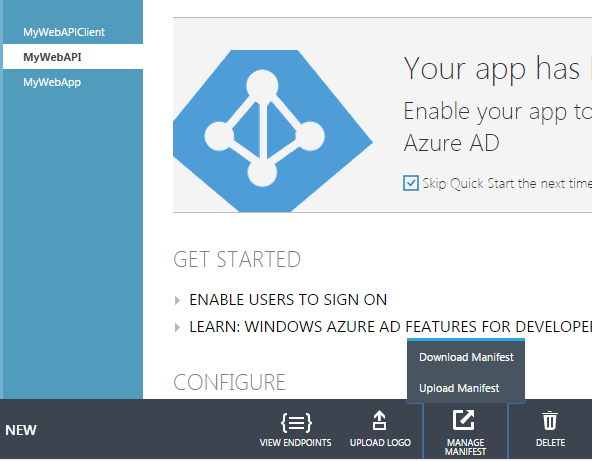
- Download the API Manifest.
- Make some changes to the API manifest.
- Upload the API Manifest back into Azure.
You can upload and download the API manifest very easily, as shown in Figure 15.
The changes you need to make to your application manifest are that you need to add an oauth2Permissions section, as shown in Listing 3, Note that the “id” section has a GUID, which is a newly created unique GUID.
Listing 3: The oauth2Permissions block
"oauth2Permissions": [
    {
        "adminConsentDescription": "Allow the application full access to
        your API on behalf of the signed-in user",
        "adminConsentDisplayName": "Have full access",
        "id": "A1AED6C3-1897-4919-B06E-CDB5B6AF1BD5",
        "isEnabled": true,
        "origin": "Application",
        "type": "User",
        "userConsentDescription": "Allow the application full access to
        the service on your behalf",
        "userConsentDisplayName": "Have full access to the service",
        "value": "user_impersonation"
    }
]
You might be asking how exactly, on the server-side, do you differentiate for authorization, if you wish to have multiple such permissions. The answer is simple. All enabled permissions are available to you on the server-side as claims. Nothing really stops you from using proper roles-based security now.
All enabled permissions are available to you on the server-side as claims.
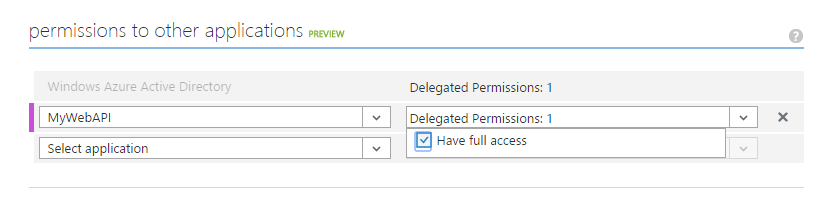
When this manifest is uploaded, you should be able to grant the permission, as shown in Figure 16.
That's it. You're now ready to run, debug, and test the app.
Running and Debugging the Single-Tenant App and API
When you run the app, you'll be prompted to sign in, as shown in Figure 17.
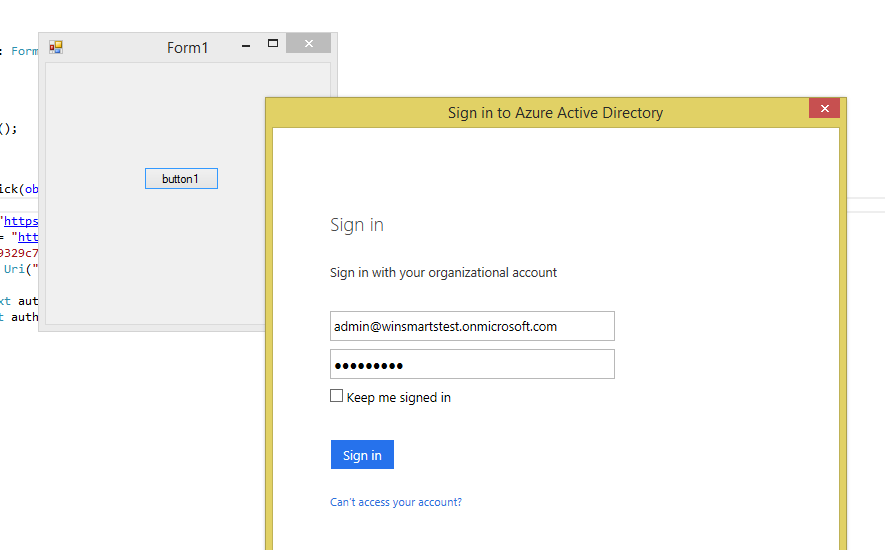
Note that this dialog box is very familiar because a number of Microsoft products also use Azure AD. Provide the global administrator credentials here, or if you wish, provide other user credentials as long as they're registered in your AD.
Once signed in and in debug mode, you should also be able to verify that you can see your access token, as shown in Figure 18.

If you wish, you can also copy and paste that access token, and choose to decode it on anyone of the JWT decoders on the Internet. The one I like is at http://jwt.io.
Finally, if you continue debugging, verify that you're able to call your WebAPI, that the user's identity is available as claims in the WebAPI, and that you are able to get results back.
Converting the App into Multi-Tenant
Sometimes you're writing code that will be consumed not only by your organization, but by a number of others as well. A typical example of this is writing for a store app, or perhaps software as a service API.
In such scenarios, you want to make the WebAPI multi-tenant. The client's logic will also change slightly.
Making the WebAPI Multi-Tenant
Once again, the good news is that making a WebAPI multi-tenant requires almost no changes to the code itself. I say almost because sometimes you wish to support multi-tenancy in a way that affects your code logic. You can easily differentiate one tenant from another using the Tenant ID claim, and that's where some changes to your business logic may need to be made.
In this example, I'll keep things simple. All you need to do is visit the Azure Portal, change your WebAPI to multi-tenant, and generate a key, as shown in Figure 19.
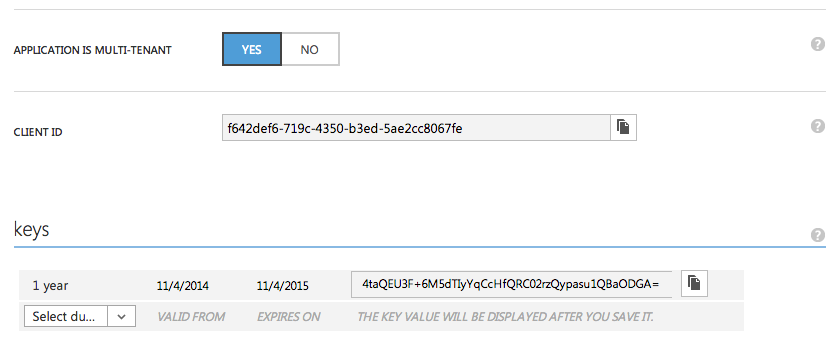
Note that this change may take a few minutes to take effect.
Making the Client a Multi-Tenant Client
Remember when I showed you code that was single-tenant? I said that the code had two parts. The first part gets an access token and the second part is the actual business logic. Again, the good news is that only the part that deals with getting the access token changes. The actual business logic remains unchanged.
The code change you need to do in order to make the client get an access token for a multi-tenant app is as shown in Listing 4.
Listing 4: Getting the access token in a multi tenant way
    string aadInstance = "https://login.windows.net/{0}";
    string tenant = "winsmartstest.onmicrosoft.com";
    string authority = String.Format(CultureInfo.InvariantCulture,
        aadInstance, tenant);
    string appPrincipalID = "f642def6-719c-4350-b3ed-5ae2cc8067fe";
    string appKey = "4taQEU3F+6M5dTIyYqCcHfQRC02rzQypasu1QBaODGA=";
    string resourceURI = "https://winsmartstest.onmicrosoft.com/MyWebAPI";;

    AuthenticationContext authContext = new AuthenticationContext(authority);
    ClientCredential credential = new ClientCredential(appPrincipalID, appKey);
    AuthenticationResult assertionCredential =
        authContext.AcquireToken(resourceURI, credential);
    string authHeader = assertionCredential.CreateAuthorizationHeader();
Notice that I'm passing in the App Key. This is the key you generated when you changed your WebAPI into a multi-tenant API. You should be able to run your application now, and it should function just like before. The difference is that now, your WebAPI is multitenant.
Summary
This article familiarized you with the basics of Azure Active Directory. Azure AD forms the fundamental building block of Office 365 APIs.
Azure AD-based common-consent framework and Office 365 APIs are a much better approach than the App Model that was introduced when SharePoint 2013 RTMed. Even so, I feel a bit disappointed that the App Model has been dropped for this new shiny toy, and I can't help but think that we were handed a sandbox solution v2. Even though I like the Office 365 API approach, the current Office 365 APIs are quite limited in what they can do. I also wish that they weren't tied to only Azure AD. There are companies out there, such as Auth0, who are doing some fantastic work in the identity space. But still, as a developer and consultant, I must learn what might pay my bills for the next few years. Also, I find myself - yet again - hopeful that this may be the new developer story that the world needs. Time will tell. But all hail the new emperor; let's hope he has clothes on this time.
Happy coding!
