


In most business applications, you're going to want to disable, or make invisible, various features such as menu items, buttons, and other UI items, based on who's logged in and what roles or permissions they have. Angular doesn't have anything built-in to help you with this, so you must create it yourself.
Related Articles
- Part 2: Security in Angular: Part 2
- Part 3: Security in Angular: Part 3
There are two aspects of security to worry about with Angular applications. First, you must develop client-side security objects to control access to your HTML UI elements. Second, you must secure your Web API calls to ensure that only authorized persons can access them. In this series of articles, you're going to be introduced to a few different methods of securing the client-side objects. For the Web API, you're going to use JSON Web Tokens to secure your method calls.
Approaches to Security
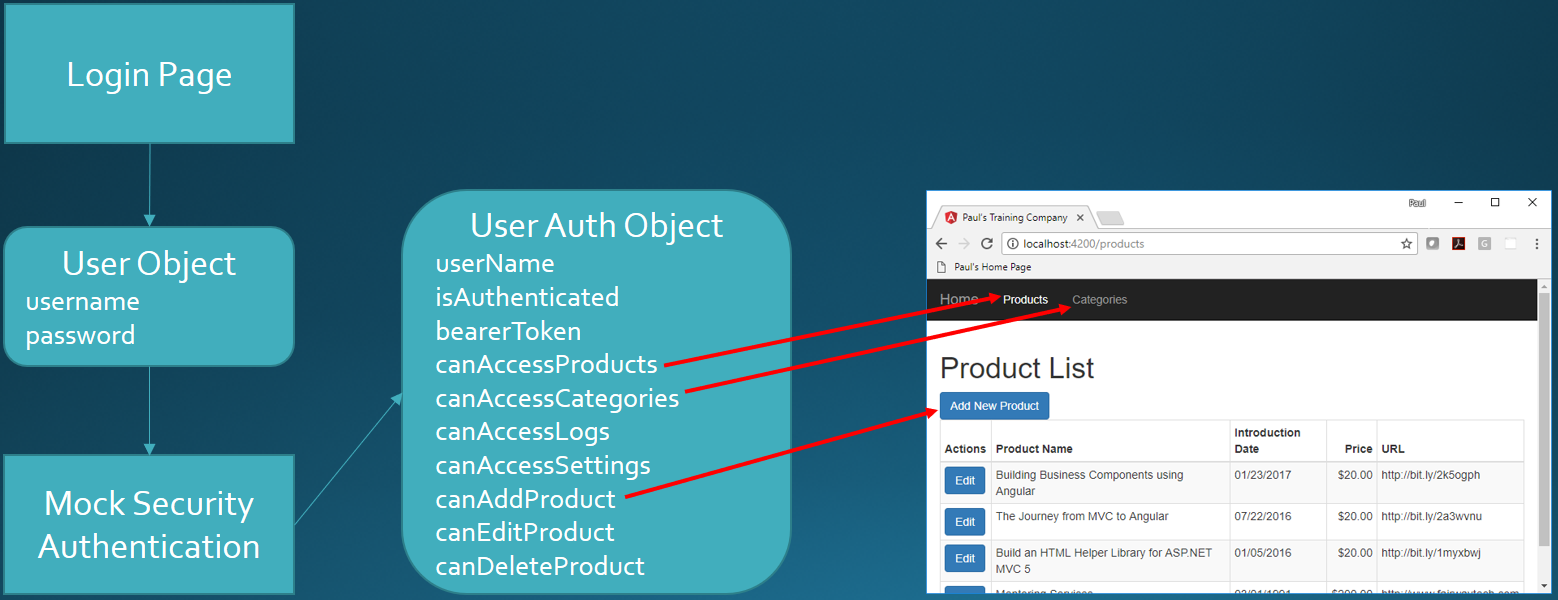
There are many different approaches that you can take to securing HTML items in Angular. You can create a simple security object that has one property for each item in your application that you wish to secure, as illustrated in Figure 1. This approach is great for small Angular applications, as you won't have many items to secure. For large Angular applications, you'll want to employ a claims-based and/or a role-based solution.
This first article focuses on the simple security object with one property for each item to secure. This approach helps you focus on how to accomplish security before you tackle claims and roles. This article uses mock security objects, so you don't need to use any Web API calls. You're going to learn to retrieve security objects from a Web API in the next article.
Preparing for This Article
To demonstrate how to apply security to an Angular application, I created a sample application with a few pages to display a list of products, display a single product, and display a list of product categories. You can download the sample from the CODE Magazine page associated with this article. You can also download this sample from http://pdsa.com/downloads; select “PDSA/Fairway Articles” from the Category drop-down, then choose “CODE Magazine: Security in Angular - Part 1”.
This article assumes that you have the following tools installed:
- Visual Studio Code
- Node
- Node Package Manager (npm)
- Angular CLI
A Look at the Sample Application
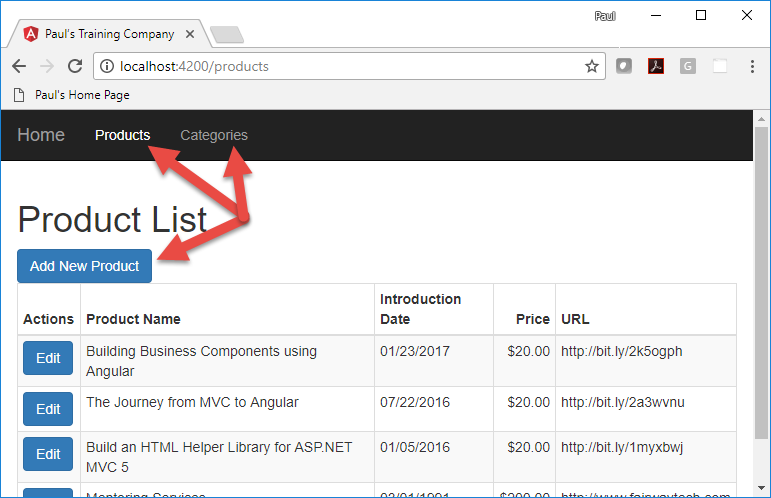
There are two menus in the sample you downloaded, Products and Categories (Figure 2), that you may wish to turn off, based on permissions assigned to a user. On the product and category list page (Figure 2), you may want to turn off the Add New Product button based on permissions, too.
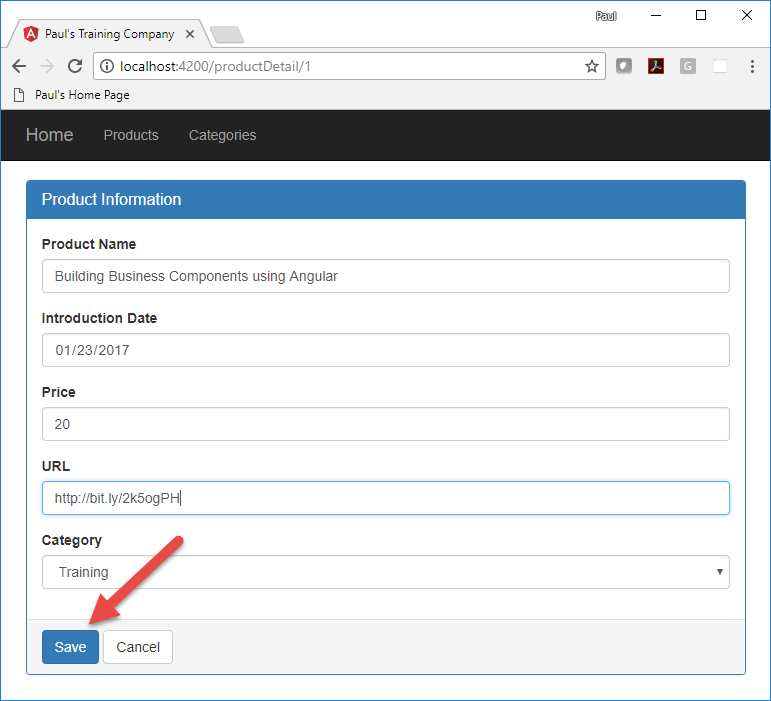
On the product detail page (Figure 3), the Save button may be something you wish to turn off. Perhaps you want to let someone view product details but not modify the data.
Perhaps you want to let someone view product details but not modify the data.
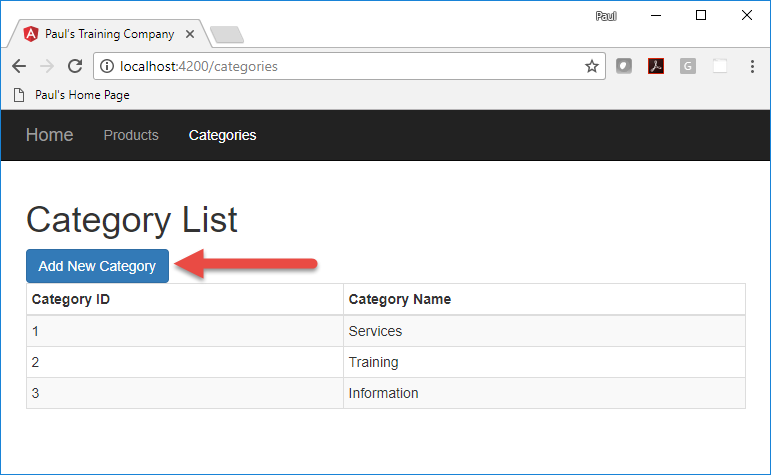
Finally, on the Categories page (Figure 4), you may wish to make the Add New Category button invisible for some users.
Create User Security Classes
To secure an application, you need a couple of classes to hold user information. A user class holds the user name and password entered on a log in page. After these values are entered on a log in page, they're passed to a security service class to perform the verification of the user name and password. In this article, a mock array of logins is used to validate against. A user authorization class is returned from the security service class after the verification of the user. This authorization class has one property for each item in your application that you wish to secure. You bind the properties in this class to turn on and off different menus, buttons, or other UI elements on your pages.
User Class
Let's start creating each of these security classes. Open Visual Studio Code and load the sample project that you downloaded. Create the user class to hold the user name and password that the user types into a log in page. Right mouse-click on the \src\app folder and add a new folder named security. Right mouse-click on the new security folder and add a file named app-user.ts. Add two properties into this AppUser class, as shown in the following code:
export class AppUser  {
    userName: string = "";
    password: string = "";
}
User Authorization Class
It's now time to create the authorization class to turn menus and buttons off and on. Right mouse-click on the security folder and add a new file named app-user-auth.ts. This class contains the username property to hold the user name of the authenticated user, a bearerToken to be used when interacting with Web API calls, and a Boolean property named isAuthenticated, which is only set to true when a user has been authenticated. The rest of the Boolean properties contained in this class are specific for each menu and button you wish to secure.
export class AppUserAuth {
    userName: string = "";
    bearerToken: string = "";
    isAuthenticated: boolean = false;
    canAccessProducts: boolean = false;
    canAddProduct: boolean = false;
    canSaveProduct: boolean = false;
    canAccessCategories: boolean = false;
    canAddCategory: boolean = false;
}
Login Mocks
In this article, keep all authentication and authorization local within this Angular application. Create a file with an array of mock logins. Right mouse-click on the security folder and add a new file named login-mocks.ts. Create a constant named LOGIN_MOCKS that's an array of AppUserAuth objects (see Listing 1). Create a couple of literal objects to simulate two different user objects that you might retrieve from a database on a back-end server.
Listing 1: Create a class of mock login objects
import { AppUserAuth } from "./app-user-auth";

export const LOGIN_MOCKS: AppUserAuth[] = [
    {
        userName: "PSheriff",
        bearerToken: "abi393kdkd9393ikd",
        isAuthenticated: true,
        canAccessProducts: true,
        canAddProduct: true,
        canSaveProduct: true,
        canAccessCategories: true,
        canAddCategory: false
    },
    {
        userName: "BJones",
        bearerToken: "sd9f923k3kdmcjkhd",
        isAuthenticated: true,
        canAccessProducts: false,
        canAddProduct: false,
        canSaveProduct: false,
        canAccessCategories: true,
        canAddCategory: true
    }
];
Security Service
Angular is all about services, so it makes sense that you create a security service class to authenticate a user and return the user's authorization object with all of the appropriate properties set. Open a VS Code terminal window and type in the following command to generate a service class named SecurityService. Add the -m option to register this service in the app.module file.
ng g s security/security --flat -m app.module
Open the generated security.service.ts file and add the following import statements.
import { Observable } from 'rxjs/Observable';
import { of } from 'rxjs/observable/of';
import { AppUserAuth } from './app-user-auth';
import { AppUser } from './app-user';
import { LOGIN_MOCKS } from './login-mocks';
Add a property to the SecurityService class to hold the user authorization object. Initialize this object to a new instance of the AppUserAuth class so it creates the object in memory.
securityObject: AppUserAuth = new AppUserAuth();
Reset Security Object Method
The securityObject property is going to be bound to other security objects in your application. Because of this, you don't want to ever set this property to a new instance of the AppUserAuth, as this can cause those bindings to be released. Instead, just change the properties of this object based on a new user who logs in. Add a method to reset the properties of this security object to default values. Also, notice in this code that you're removing the bearer token property from local storage. You're going to learn why this is necessary in the next article.
resetSecurityObject(): void {
    this.securityObject.userName = "";
    this.securityObject.bearerToken = "";
    this.securityObject.isAuthenticated = false;
    this.securityObject.canAccessProducts = false;
    this.securityObject.canAddProduct = false;
    this.securityObject.canSaveProduct = false;
    this.securityObject.canAccessCategories = false;
    this.securityObject.canAddCategory = false;
    localStorage.removeItem("bearerToken");
}
Login Method
In the next section of this article, you're going to create a log in component. That log in component creates an instance of the AppUser class and binds to the properties of the input fields on the log in page. Once the user has typed in a user name and password, this instance of the AppUser class is going to be passed to a login() method in the SecurityService class to determine if the user exists. If the user exists, the appropriate properties are filled into a AppUserAuth object and returned from the login() method.
login(entity: AppUser): Observable<AppUserAuth> {
    this.resetSecurityObject();
    Object.assign(this.securityObject, LOGIN_MOCKS.find(user => user.userName.toLowerCase() === entity.userName.toLowerCase()));
    if (this.securityObject.userName !== "") {
        localStorage.setItem("bearerToken", this.securityObject.bearerToken);
    }
    return of<AppUserAuth>(this.securityObject);
}
In the code above, the first thing that happens is that you reset the security object. Next, use the Object.assign() method to replace all the properties in the securityObject property with the properties from the AppUserAuth object returned from the find() method on the LOGIN_MOCKS array. If the user is found, the bearer token is stored into local storage. This is for when you need to pass this value to the Web API. My next article will cover the reason for storing this token into local storage.
My next article will cover the reason for storing the bearer token into local storage.
Logout Method
If you have a login() method, you should always have a logout() method. The logout() method resets the properties in the securityObject property to empty fields, or false values. By resetting the properties, any bound properties, such as menus, reread those properties and may change their state from visible to invisible.
logout(): void {
    this.resetSecurityObject();
}
Login Page
Now that you have a security service to perform a log in, you need to retrieve a user name and password from the user. Create a log in page by opening a terminal window and type in the following command to generate a log in page and component.
ng g c security/login --flat -m app.module
Open the login.component.html file and delete the HTML that was generated. Create three distinct rows on the new log in page (see Listing 2):
- A row to display “Invalid User Name/Password”
- A row to display the instance of the
securityObjectproperty - A panel for entering user name and password
Use Bootstrap styles to create each of these rows on this log in page. The first div tag contains a *ngIf directive to only display the message if the securityObject exists and the isAuthenticated property is false. The second div tag contains a binding to the securityObject property. This object is sent to the JSON pipe to display the object as a string within a label. You don't need this row for your final application, but it's useful while debugging to see the values returned in the user authorization class. The last row is a Bootstrap panel into which you place the appropriate user name and password input fields.
Listing 2: Create a login page to bind to the user name and password properties.
<div class="row">
    <div class="col-xs-12">
        <div class="alert alert-danger" *ngIf="securityObject && !securityObject.isAuthenticated">
            <p>Invalid User Name/Password.</p>
        </div>
    </div>
</div>

<!-- TEMPORARY CODE TO VIEW SECURITY OBJECT -->
<div class="row">
    <div class="col-xs-12">
        <label>{{securityObject | json}}</label>
    </div>
</div>

<form>
    <div class="row">
        <div class="col-xs-12 col-sm-6">
            <div class="panel panel-primary">
                <div class="panel-heading">
                    <h3 class="panel-title">Log in</h3>
                </div>
                <div class="panel-body">
                    <div class="form-group">
                        <label for="userName">User Name</label>
                        <div class="input-group">
                            <input id="userName" name="userName" class="form-control" required [(ngModel)]="user.userName" autofocus="autofocus" />
                            <span class="input-group-addon"><i class="glyphicon glyphicon-envelope"></i></span>
                        </div>
                    </div>
                    <div class="form-group">
                        <label for="password">Password</label>
                        <div class="input-group">
                            <input id="password" name="password" class="form-control" required [(ngModel)]="user.password" type="password" />
                            <span class="input-group-addon"><i class="glyphicon glyphicon-lock"></i></span>
                        </div>
                    </div>
                </div>
                <div class="panel-footer">
                    <button class="btn btn-primary" (click)="login()">Login</button>
                </div>
            </div>
        </div>
    </div>
</form>
Modify Login Component TypeScript
As you can see from the HTML you entered into the login.component.html file, there are two properties required for binding to the HTML elements: user and securityObject. Open the login.component.ts file and add the following import statements, or if you wish, use VS Code to insert them for you as you add each class.
import { AppUser } from './app-user';
import { AppUserAuth } from './app-user-auth';
import { SecurityService } from './security.service';
Add two properties to hold the user and the user authorization objects.
user: AppUser = new AppUser();
securityObject: AppUserAuth = null;
To set the securityObject property, you need to inject the SecurityService into this class. Modify the constructor to inject the SecurityService.
constructor (private securityService: SecurityService) { }
The button in the footer area of the Bootstrap panel binds the click event to a method named login(). Add this login() method as shown here.
login() {
    this.securityService.login(this.user).subscribe(resp => {
        this.securityObject = resp;
    });
}
The login() method on the SecurityService class is subscribed to, and the response that's returned is assigned into the securityObject property defined in this log in component. This is done only for the purpose of debugging. Upon successful return of the login() method, you'd most likely redirect to a home page. Later in this article, you'll learn how to redirect.
Secure Menus
Now that you have the log in working and a valid security object, you need to bind this security object to the main menu. The menu system is created in the app.component.html file. Open that file and add the HTML in the next snippet below the closing </ul> tag used to create the other menus. This HTML creates a right-justified menu that displays the word “Login” when the user is not yet authenticated. Once authenticated, the menu changes to "Logout <User Name>".
<ul class="nav navbar-nav navbar-right">
    <li>
        <a routerLink="login" *ngIf="!securityObject.isAuthenticated">Login</a>
        <a href="#" (onclick)="logout()" *ngIf="securityObject.isAuthenticated">Logout {{securityObject.userName}}</a>
    </li>
</ul>
Modify the other two menu items on this page to check the security object to determine if they need to be displayed or not. Use the *ngIf directive to check the securityObject property you're going to add to the AppComponent class. Now you see how the Boolean properties you added in the user authorization class correspond to each HTML element you wish to control.
<li>
    <a routerLink="/products" *ngIf="securityObject.canAccessProducts">Products</a>
</li>
<li>
    <a routerLink="/categories" *ngIf="securityObject.canAccessCategories">Categories</a>
</li>
Modify the AppComponent Class
As you saw from the HTML you entered, you need to add the securityObject property to the component associated with this page. Open the app.component.ts file and add the securityObject property. Set it equal to a null value to start with so the “Invalid User Name/Password” message doesn't show.
securityObject: AppUserAuth = null;
Modify the constructor of the AppComponent class to inject the SecurityService and assign the securityObject property to the property you just created.
constructor(private securityService: SecurityService) {
    this.securityObject = securityService.securityObject;
}
Add a logout() method in this class to call the logout() method on the security service class. This method is bound to the click event on the Logout menu item you added in the HTML.
logout(): void {
    this.securityService.logout();
}
Add Login Route
To get to the login page, you need to add a route. Open the app-routing.module.ts file and add a new route like the one shown next.
{
    path: 'login',
    component: LoginComponent
},
Try It Out
Save all the changes you've made so far. Start the application using npm start. Click the Login menu, log in with “psheriff”, and notice the properties that are set in the returned security object. Click the log out button, then log back in as “bjones” and notice that different properties are set, and the Product menu disappears. This is because the canAccessProducts property in the LOGIN_MOCKS array for BJones is set to false.
Open the logins-mock.ts file and set the canAccessProducts property to true for the “BJones” object. You're going to try out some of the different authorization properties later in this article, so this property needs to be set to true to try them out.
{
    userName: "BJones",
    bearerToken: "sd9f923k3kdmcjkhd",
    isAuthenticated: true,
    canAccessProducts: true,
    canAddProduct: false,
    canSaveProduct: false,
    canAccessCategories: true,
    canAddCategory: true
}
Secure Buttons
In addition to the permissions you added to the menus, you might also want to apply the same to buttons that perform actions. For example, adding a new product or category or saving product data. For this article, you're only learning how to hide HTML elements. If there were Web API method calls behind these buttons, those are not being secured here. You need to secure the Web API using some sort of token system. Those techniques will be covered in the next article.
Secure the Add New Product button by using the security object created after logging in. Open the product-list.component.html file and modify the Add New Product button to look like the following:
<button class="btn btn-primary" (click)="addProduct()" *ngIf="securityObject.canAddProduct">Add New Product</button>
Open the product-list.component.ts file and add a property named securityObject that is of the type AppUserAuth. You're going to want to add this same property to any component in which you wish to use security.
securityObject: AppUserAuth = null;
Assign the securityObject property you just created to the securityObject property in the SecurityService class. Inject the service in the constructor and retrieve the security object.
constructor (private productService: ProductService, private router: Router, private securityService: SecurityService) {
    this.securityObject = securityService.securityObject;
}
Open the product-detail.component.html file and modify the Save button to bind to the canSaveProduct property on the securityObject property. The *ngIf directive causes the button to disappear if the canSaveProduct property is false.
<button class="btn btn-primary" (click)="saveData()" *ngIf="securityObject.canSaveProduct">Save</button>
Open the product-detail.component.ts file and add the securityObject property, just as you did in the product-list.component.ts file.
securityObject: AppUserAuth = null;
Modify the constructor to inject the SecurityService and to assign the securityObject property from the SecurityService to the securityObject property you just created in this class.
constructor (private categoryService: CategoryService,
    private productService: ProductService,
    private route: ActivatedRoute,
    private location: Location,
    private securityService: SecurityService) {
        this.securityObject = securityService.securityObject;
}
Open the category-list.component.html file and modify the Add New Category button to bind to the canAddCategory property on the securityObject property.
<button class="btn btn-primary" (onclick)="addCategory()" *ngIf="securityObject.canAddCategory">Add New Category</button>
Open the category-list.component.ts file and add the securityObject property.
securityObject: AppUserAuth = null;
Modify the constructor to inject the SecurityService and to assign the securityObject property from the SecurityService to the securityObject property you just created in this class.
constructor (private categoryService: CategoryService, private securityService: SecurityService) {
    this.securityObject = securityService.securityObject;
}
Try It Out
Save all the changes you've made and go to your browser. Click the Login menu, log in as the user “psheriff”, and notice the properties that are set in the returned security object. Open the Products page and you can click on the Add New Product button. If you click on an Edit button next to one of the products, you can see the Save button on the product detail page. Open the Category page and notice that the Add New Category button isn't visible to you.
Notice the properties that are set in the returned security object.
Click the logout menu, then log in as the “bjones” user. Notice that different properties are set on the security object. Open the Products page and notice the Add New Product button isn't visible. If you click on an Edit button next to one of the products, the Save button on the product detail page isn't visible to you. Open the Category page and notice that the Add New Category button is visible.
Secure Routes Using a Guard
Even though you can control the visibility of menu items, just because you can't click on them doesn't mean you can't get to the route. You can type the route directly into the browser address bar and you can get to the products page even if you don't have the canAccessProducts property set to true.
To protect the route, you need to build a Route Guard. A Route Guard is a special class in Angular to determine if a page can be activated or deactivated. Let's learn how to build a CanActivate guard. Open a terminal and create a new guard named AuthGuard.
ng g g security/auth --flat -m app.module
To protect a route, open the app-routing.module.ts file and add the canActivate property to those paths you wish to secure, as shown in Listing 3. The canActivate property is an array, so you may pass one or multiple guards to this property. In this case, add the AuthGuard class to the array of guards. For each route, you also need to specify the name of the property to check on the security object that's associated with this route. Add a data property, pass in a property named claimName, and set the value of that property to the name of the property associated with the route. This data property is passed to each Guard listed in the canActivate property.
Listing 3: Secure routes using a Route Guard.
{
    path: 'products',
    component: ProductListComponent,
    canActivate: [AuthGuard],
    data: {claimName: 'canAccessProducts'}
},
{
    path: 'productDetail/:id',
    component: ProductDetailComponent,
    canActivate: [AuthGuard],
    data: {claimName: 'canAccessProducts'}
},
{
    path: 'categories',
    component: CategoryListComponent,
    canActivate: [AuthGuard],
    data: {claimName: 'canAccessCategories'}
},
Authorization Guard
Let's write the appropriate code in the AuthGuard to secure the route. As you're going to need to access the property passed in via the data property, open the auth-guard.ts file and add a constructor to inject the SecurityService.
constructor (private securityService: SecurityService) { }
Modify the canActivate() method to retrieve the claimName property in the data property. Remove the return true statement and add the following lines of code in its place:
canActivate(next: ActivatedRouteSnapshot, state: RouterStateSnapshot): Observable<boolean> | Promise<boolean> | boolean {
    // Get property name to check
    let claimName: string = next.data["claimName"];
    return this.securityService.securityObject.isAuthenticated && this.securityService.securityObject[claimName];
}
Retrieve the property name to check on the security object using the next parameter. This property is an ActivatedRouteSnapshot and contains the data object passed via the route you created earlier. A true value returned from this guard means that the user has the right to navigate to this route. Check to ensure that the isAuthenticated property on the securityObject is a true value and that the property name passed in the data object is also a true value.
Try It Out
Save all the changes you have made, go to the browser, and type directly into the browser address bar: http://localhost:4200/products. If you're not logged in, you're not able to get to the products page. Your guard is working; however, it ends up displaying a blank page. It would be better to redirect to the login page.
Redirect to the Login Page
To redirect to the login page, modify the AuthGuard class to perform the redirection if the user isn't authorized for the current route. Open the auth-guard.ts file and inject the Router service into the constructor.
constructor (private securityService: SecurityService, private router: Router) { }
Locate the canActivate() method, remove the current return statement, and replace it with the following lines of code.
if (this.securityService.securityObject.isAuthenticated && this.securityService.securityObject[claimName]) {
    return true;
}
else {
    this.router.navigate(['login'], { queryParams: { returnUrl: state.url } });
    return false;
}
If the user is authenticated and authorized, the Guard returns a true and Angular goes to the route. Otherwise, use the Router object to navigate to the login page. Pass the current route the user was attempting to get to as a query parameter. This places the route on the address bar that the login component retrieves and uses to go to the route requested after a valid login.
Try It Out
Save all your changes, go to the browser, and type directly into the browser address bar: http://localhost:4200/products. The page resets, and you're directed to the login page. You should see a returnUrl parameter in the address bar. You can log in, but you won't be redirected to the products page; you need to add some code to the login component first.
Redirect Back to Requested Page
If the user logs in with the appropriate credentials that allows them to get to the requested page, you want to direct them to that page after log in. The LoginComponent class should return the returnUrl query parameter and attempt to navigate to that route after successful login. Open the login.component.ts file and inject the ActivatedRoute and the Router objects into the constructor.
constructor (private securityService: SecurityService, private route: ActivatedRoute, private router: Router) { }
Add a property to this class to hold the return URL if any is retrieved from the address bar.
returnUrl: string;
Add a line to the ngOnInit() method to retrieve this returnUrl query parameter. If you click on the Login menu directly, the queryParamMap.get() method returns a null.
ngOnInit() {
    this.returnUrl = this.route.snapshot.queryParamMap.get('returnUrl');
}
Locate the login() method and add code after setting the securityObject to test for a valid URL and to redirect to that route if there is one.
login() {
    this.securityService.login(this.user).subscribe(resp => {
        this.securityObject = resp;
        if (this.returnUrl) {
            this.router.navigateByUrl(this.returnUrl);
        }
    });
}
Try It Out
Save all your changes, go to the browser, and type directly into the browser address bar: http://localhost:4200/products. You'll be directed to the log in page. Log in as “psheriff” and you're redirected to the products list page.
Summary
In this article, you learned to add client-side security to your Angular applications. Using a class with properties to represent each permission you want to grant to each user makes securing menu links and buttons easy. Apply Route Guards to your routes to ensure that no one can get to a page by typing directly into the address bar. Everything was done client-side in this article, but you can authenticate users and return a security authorization object using a Web API call. You'll learn how to connect to a Web API in the next article in this series on Angular security.
