


With explosive App Store growth now surpassing 1.2 million applications available (WWDC 2014), creating a stand-out app has become an increasingly difficult challenge. That marketplace density gives the user choice and variety, which in turn, results in developers needing more than just a good idea to find success. Now the idea becomes merely a stepping-stone, and how you decide to execute that idea carries most of the merit.
So how do you create something that stands out? The answer lies in the details. Famous architect Charles Eames said, “The details are not details. They make the design.” The same holds true for app development. Paying close attention to those details in design and in development can make all the difference later down the road when it comes time to release.
One of those details often overlooked is animation. Every app contains some form of animation whether it's feedback when a button is pressed or a keyboard sliding up from the bottom of the screen. How awkward would an application feel without a sliding transition when you move from view to view? As developers, we subconsciously use these basic techniques without giving them much thought. However, if you consider what the experience would be like without them, it becomes easy to see why they are so important. When you start to take these animations outside the confines of their basic uses and creatively apply them to other aspects of your application, you can give your application life and personality that will help it stand out in the crowd.
Traditionally, in iOS development, animation is handled in one of two ways: with higher-level UIKit methods for basic animations or with the Core Animation framework for more custom solutions. In addition to the more traditional approaches, plenty of third-party libraries and solutions exist to help expedite the coding of these interactions. Facebook's Pop animation engine for iOS, for instance, expands on what we already know from working with Core Animation and makes adding eye-catching animations to your application easier than ever.
Facebook's Pop animation engine for iOS expands on what we already know from working with Core Animation and makes adding eye-catching animations to your application easier than ever.
What is Pop?
Pop is the dynamic animation engine that drives Facebook's app called Paper, which re-envisions your traditional news feed into a more fluid storytelling experience (https://itunes.apple.com/app/id794163692). From the subtle bounce of the Like icon to the unfolding of an article as you flick it up into full screen, Paper pays close attention to the details, and Pop makes it all possible.
A few months after Facebook released Paper, they also released Pop under an open-source BSD License, allowing iOS and OSX developers to take advantage of it. Alongside traditional basic animations, Pop also supports spring and decay animations, making it easier to create more realistic and physics-based movement and interaction. Out-of-the-box, Pop can animate virtually any property of an Objective-C object and the framework is fully extensible, allowing developers to customize the animations as they see fit.
That Looks Familiar
If you've ever worked with Core Animation's explicit animations, using Pop should seem completely natural. For example, let's take a look at the methods you might use to start and stop an animation via Core Animation.
@interface CALayer

//Attach an animation to the layer
- (void)addAnimation:(CAAnimation *)anim forKey:(NSString *)key;

//Remove all animations attached to the layer
- (void)removeAllAnimations;

//Remove animations attached to the layer for key
- (void)removeAnimationForKey:(NSString *)key;
Now let's take a look at how you would do the same thing with Pop's API.
@interface NSObject (pop)

//Attach an animation to the layer
- (void)pop_addAnimation:(POPAnimation *)anim forKey:(NSString *)key;

//Remove all animations attached to the layer
- (void)pop_removeAllAnimations;

//Remove animations attached to the layer for key
- (void)pop_removeAnimationForKey:(NSString *)key;
Notice that the animation type changes from CAAnimation to Pop's animation type: POPAnimation. The category addition on NSObject grants further flexibility, allowing any object to be animated, but other than that, the API remains unchanged.
Pop's Animation Types
The aforementioned POPAnimation comes in one of four types: spring, decay, basic, and custom.
Spring, as you may have guessed, will result in a bounce effect and can be created using a POPSpringAnimation. Setting the corresponding springBounciness and springSpeed properties higher or lower will increase or decrease the amount of bounce respectively. Additionally, you can tweak the velocity property to alter the object's initial speed as it moves into the bounce.
A decay animation allows you to have the object slow over time. This effect can give an object realistic weight and physics. Think of a hockey puck sliding across the ice. When first launched, it has some initial velocity that continues to decrease as time passes until the puck comes to rest. In the same manner, you can set the velocity property of a POPDecayAnimation prior to the start of the animation to indicate the initial velocity of the object. Once the animation is in progress, the velocity property reflects the object's current velocity at that point in time. You can also set the deceleration property to a value between 0 and 1 to indicate the rate at which the object comes to a halt (the default value is 0.998)
A decay animation allows you to have the object slow over time. This effect can give an object realistic weight and physics.
The POPBasicAnimation type allows you to animate from one fixed point to another using the traditional ease-in, ease-out or linear style timing. Set the duration property to indicate how long the animation should last (the default value is 0.4). Common applications of a basic animation might include fading in a view from alpha 0.0 to 1.0.
Pop also supports a custom type allowing you to tailor the animation to your exact needs.
Getting Started with Pop
Pop requires very little set up to use. You can add Pop to your project using the iOS8 embedded framework or by manually adding the project to your workspace, but the easiest way to install Pop is via CocoaPods. For the sake of this walkthrough, I'll assume that you have a working understanding of how to install a library using CocoaPods (If not, please refer to the sidebar for additional information on how to use CocoaPods or where you can locate additional installation instructions). Simply add the following line to your Podfile to get started.
pod 'pop', '~> 1.0'
At any place you want to use Pop within your project, include the following import.
#import <pop/POP.h>
Using Pop in Your Projects
Now that you have a basic understanding of how to add the Pop engine to your project, let's dive into some practical applications. The source code for each of the examples covered here has been included on the CODE download page for your convenience.
Before I begin, let me point out two constants that I'll use throughout the examples. They are simple width and height variables that indicate the size of the current device's screen.
#define SCREENHEIGHT    (int)[[UIScreen mainScreen]bounds].size.height
#define SCREENWIDTH    (int)[[UIScreen mainScreen]bounds].size.width
Peppy Modal
Certain aspects of development, like a simple error or message modal, can often get overlooked when it comes to design. In this sample, I'll cover a proven technique used to turn those mundane elements into something eye-catching and impressive.
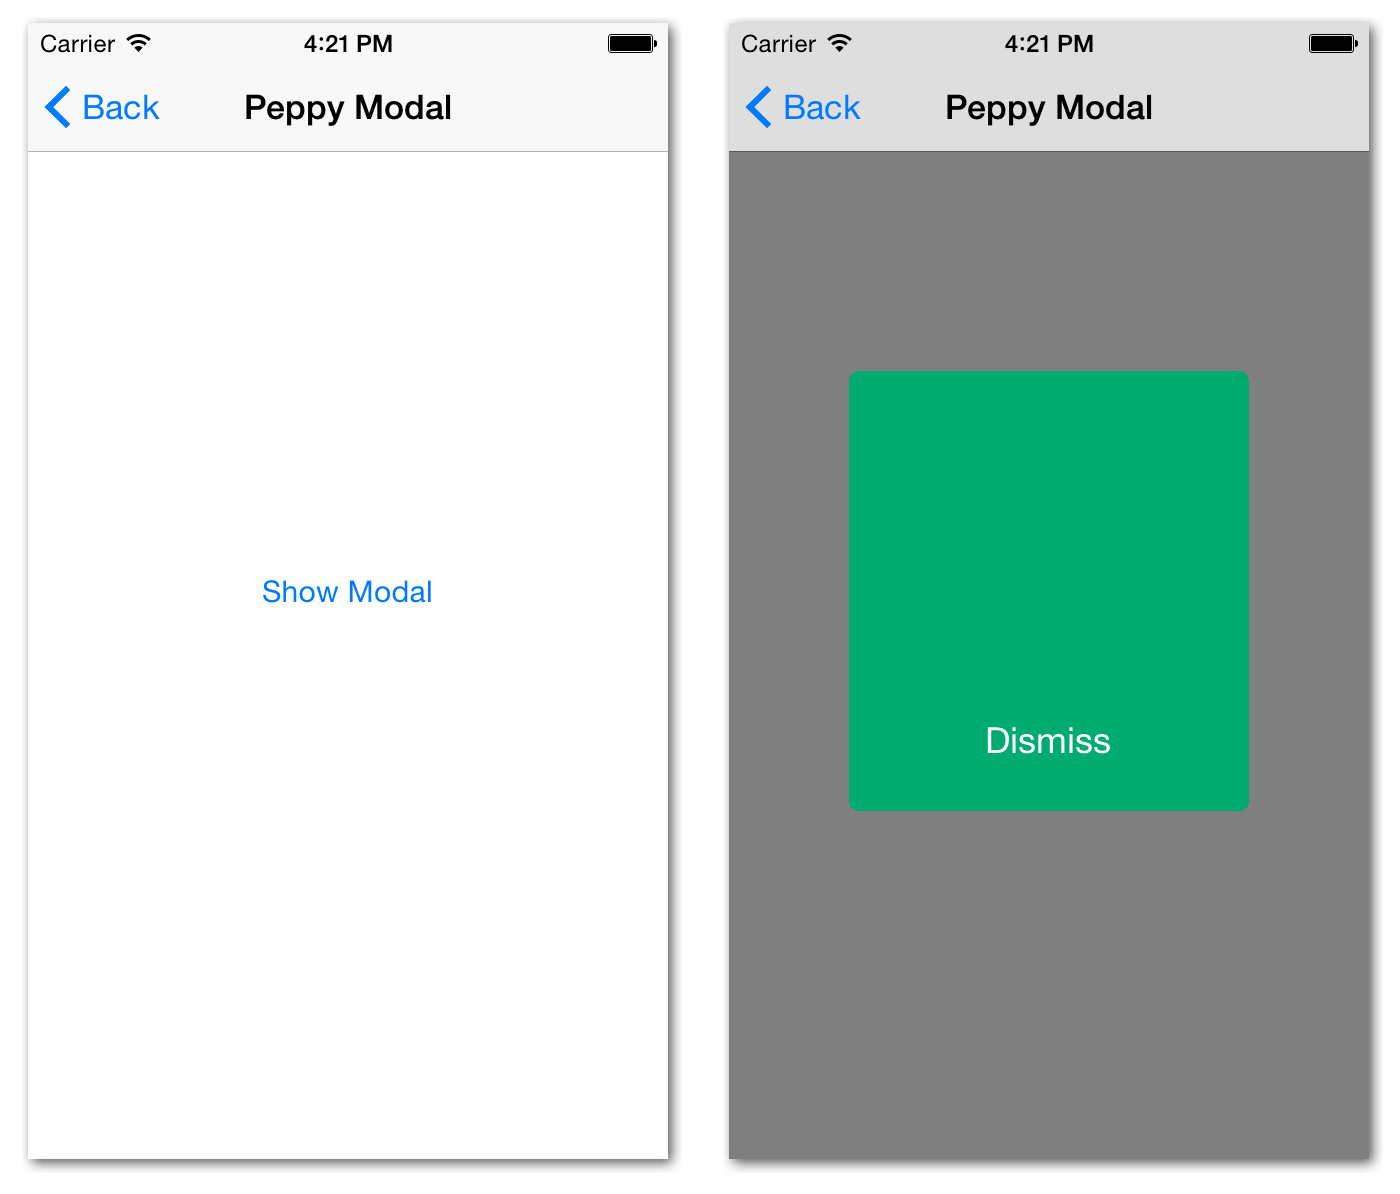
Effect: A UIView modal that animates onto the screen from off-screen. Rather than simply coming to a halt, the modal passes its final resting place and then has an elasticity effect, springing back and forth until it settles. The size of the modal also has a subtle spring animation applied to it for a more complete effect. While the modal moves into place, a dimming overlay fades in behind to draw emphasis to the modal.
Animations used: POPSpringAnimation and POPBasicAnimation
This sample animation consists of several components: a button to launch the modal, a UIView that serves as the modal itself, a UIButton to dismiss the modal, and finally a UIView for the dimming overlay. Start off by creating a PeppyModalViewController and declaring any variables you need. The modal and the dimmer need to be accessed throughout the controller, so let's make them available to the entire class.
@interface PeppyModalViewController(){
    UIView* modalView;
    UIView* dimOverlay;
}
Next up, let's write a method that initializes and configures both the modalView and the dimOverlay. Listing 1 shows the code for this.
Listing 1: Create a method to configure both the modalView and the dimOverlay
-(void)configureModalView{
    //init the modal and center it horz and off-screen vertically
    modalView = [[UIView alloc] initWithFrame:
        CGRectMake((SCREENWIDTH - 200) / 2, -220, 200, 220)];

    //set the modal bg color and corner radius
    [modalView setBackgroundColor:
        [UIColor colorWithRed:0.0 green:0.67 blue:0.44 alpha:1]];
    [modal.layer setCornerRadius:5];

    //create a dismiss button to add to the modal
    UIButton* dismissBtn = [UIButton buttonWithType:UIButtonTypeCustom];

    //customize the button's look and position as you see fit
    //then set the button's action and add it to the modal
    [dismissBtn addTarget:
        self action:@selector(dismiss)forControlEvents:
        UIControlEventTouchUpInside];
    [modalView addSubview:dismissBtn];

    //set up the dimOverlay
    dimOverlay = [[UIView alloc] initWithFrame:self.view.bounds];
    [dimOverlay setBackgroundColor:[UIColor blackColor]];
    [dimOverlay.layer setOpacity:0.0];

    //lastly add the overlay and the modal to the view
    [self.view addSubview:dimOverlay];
    [self.view addSuvbiew:modalView];
    }
Calling configureModalView from Listing 1 within the controller's viewDidLoad method creates the modal and adds it to the view. Initially the modal's position is off-screen, so you won't be able to see it. You'll need to write a method to animate the modal on screen with the effects described above. You also want to write a method to dismiss the modal when you're done with it. Listing 2 demonstrates these methods.
Listing 2: Methods to animate in and dismiss the modal view using Pop spring and basic animations
-(void)showModal{
    //create a spring animation to animate the modal's position
    POPSpringAnimation *positionAnimation = [POPSpringAnimation
        animationWithPropertyNamed:kPOPLayerPositionY];
    positionAnimation.toValue = @(self.view.center.y);
    positionAnimation.springBounciness = 10;

    //create a spring animation to animate the modal's scale
    POPSpringAnimation *scaleAnimation = [POPSpringAnimation
        animationWithPropertyNamed:kPOPLayerScaleXY];
    scaleAnimation.springBounciness = 20;
    scaleAnimation.fromValue = [NSValue valueWithCGPoint: CGPointMake(1.2, 1.4)];

    //animation to fade in the dimOverlay
    POPBasicAnimation *opacityAnimation = [POPBasicAnimation
        animatonWithPropertyNamed:kPOPLayerOpacity];
    opacityAnimation.toValue = @(0.5);

    //apply the animations to their respective layers
    [modalView.layer pop_addAnimation:
        positionAnimaton for_key:@"positionAnimation"];
    [modalView.layer pop_addAnimation:
        scaleAnimation for_key:@"scaleAnimation"];
    [dimOverlay.layer pop_addAnimation:
        opacityAnimatiofor_key:@"opacityAnimation"];
}

-(void)dismiss{
    //create a basic animation to fade out the overlay
    POPBasicAnimation *opacityAnimation = [POPBasicAnimation
        animationWithPropertyNamed:kPOPLayerOpacity];
    opacityAnimation.toValue = @(0.0);

    //create a basic animation to move the modal off-screen
    POPBasicAnimation* positionAnimation = [POPBasicAnimation
        animationWithPropertyNamed:kPOPLayerPositionY];
    positionAnimation.toValue = @(-1 * modalView.frame.size.height);

    //apply the animations to their respective layers
    [modalView.layer pop_addAnimation:positionAnimation forKey:@"positionAnimation"];
    [dimOverlay.layer pop_addAnimation:opacityAnimation forKey:@"opacityAnimation"];
}
Lastly, create a UIButton and add it to the main view so you can use it to trigger the showModal method that you wrote in Listing 2. Make sure to add that button to the view before calling configureModalView, as you want the modal to show on top of all other view contents. Figure 1 shows what the end result might look like. The left image in Figure 1 shows the view with the button that launches the modal. The right image shows the modal after the animation has completed.
Circle Progress Loader
Sometimes you need the flexibility and control to be able to animate any shape or figure you wish. This task can prove difficult when those shapes or figures become something non-linear, like a circle. In this sample, you can see how Pop simplifies this process.
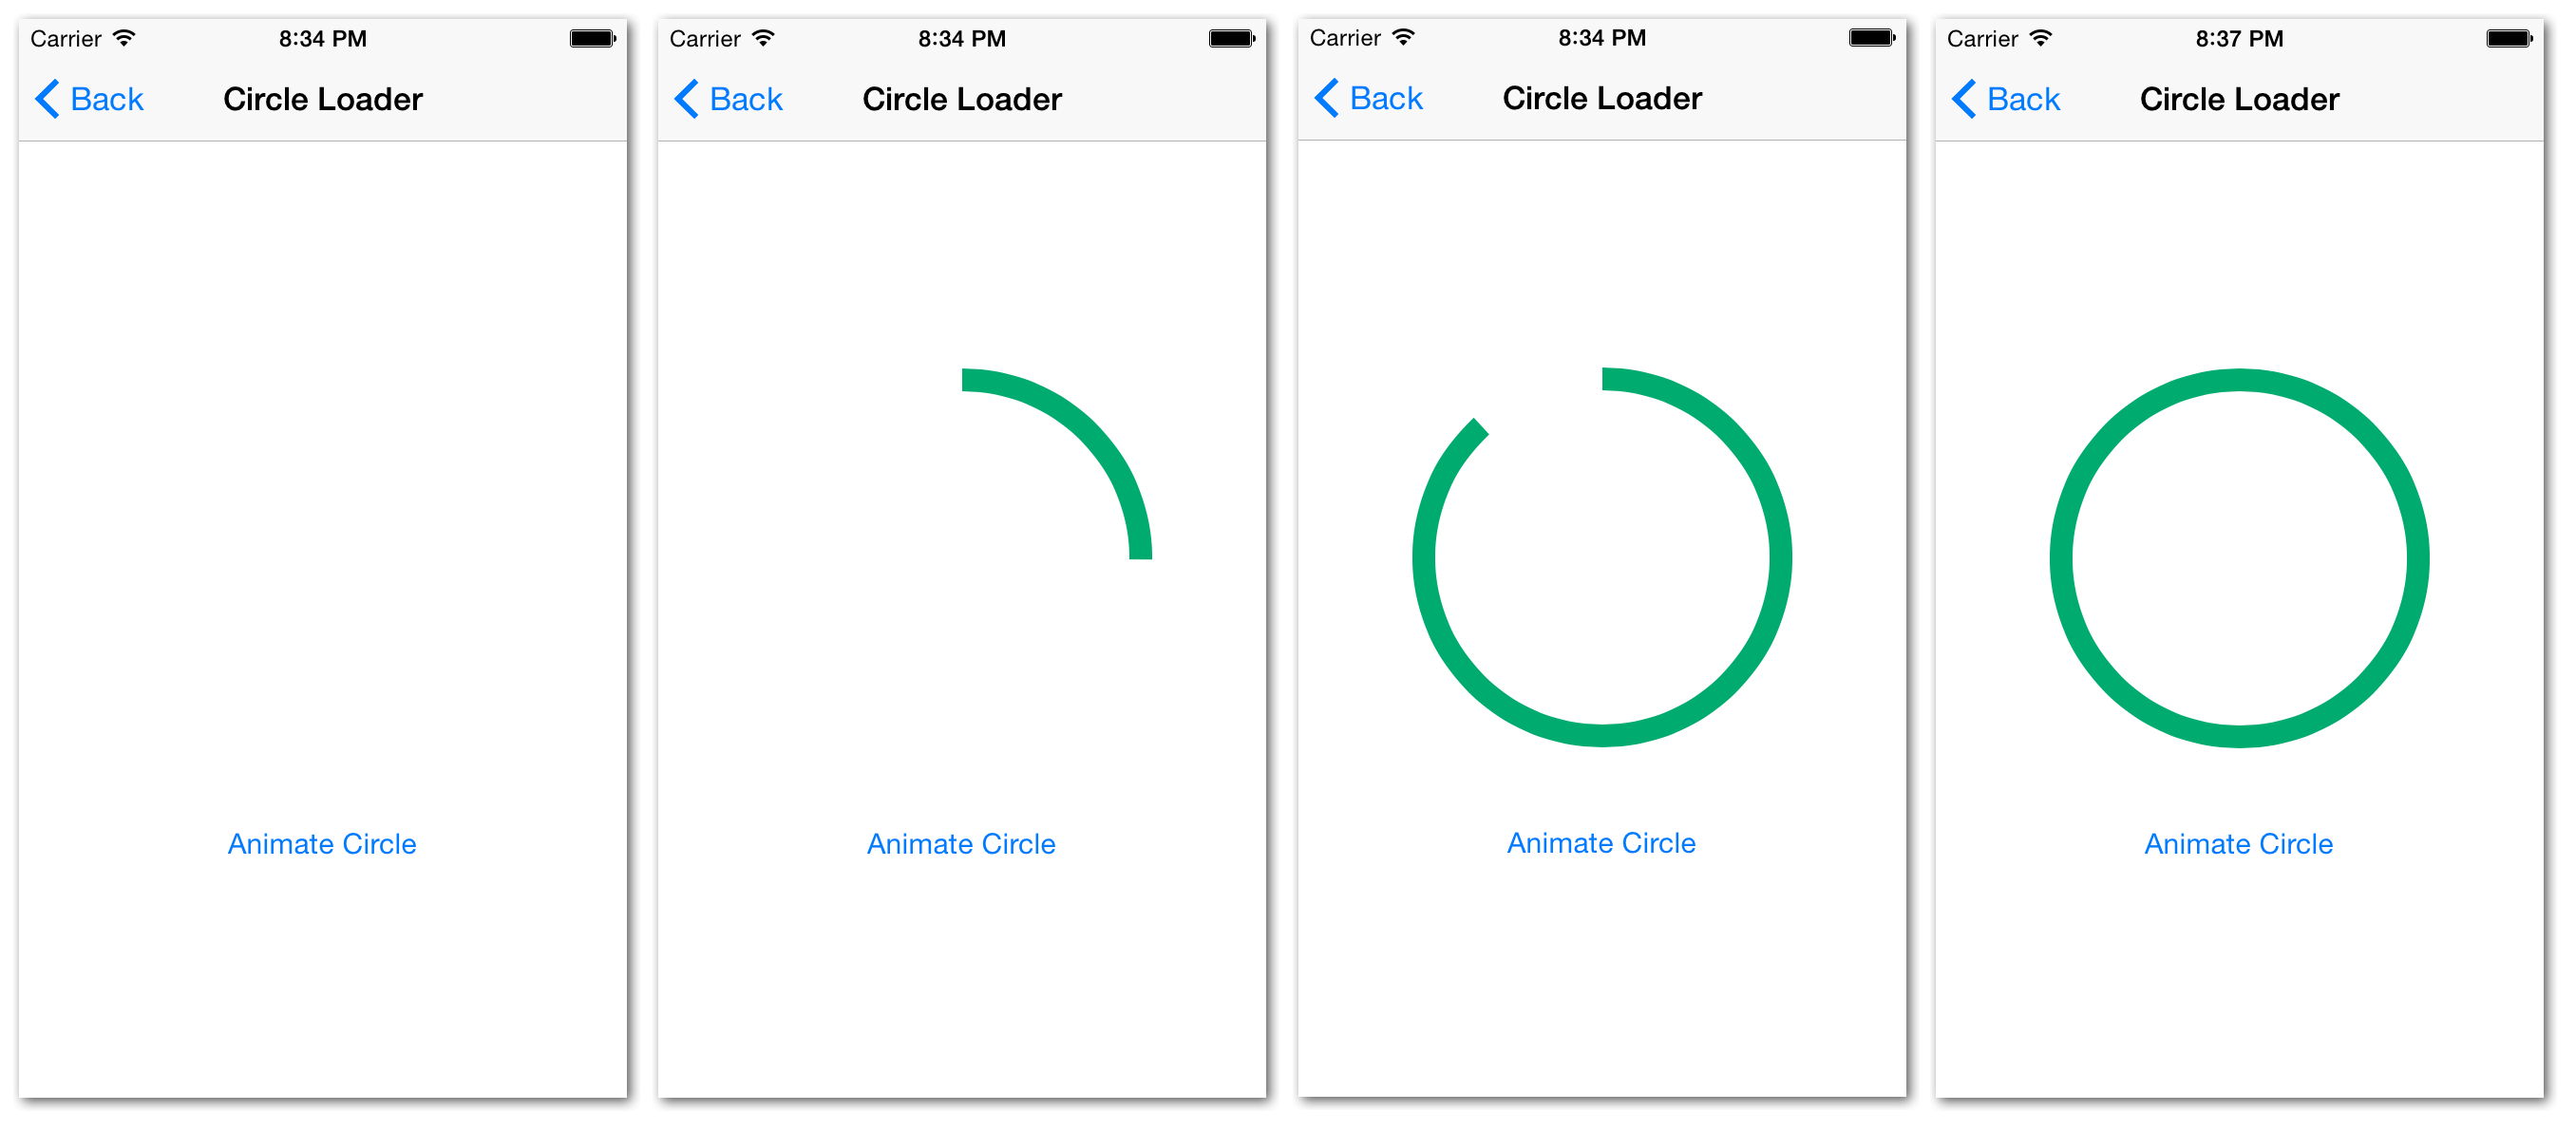
Effect: A circular loading animation. Rather than a traditional progress bar moving left to right, using Pop, you can create a circular progress bar that starts at the top and rotates clockwise. One hundred percent loading complete is symbolized when the circle is completed. Figure 2 depicts the various progression stages of the animation from start to finish from left to right.
Animations used: POPBasicAnimation
Creating this effect is a matter of using a POPBasicAnimation to animate the stroke path of a CAShapeLayer. To get started, let's create a CircleLoaderViewController to contain this animation demonstration. Once that's done, you'll need a few other steps to complete the animation:
- Create a circle sub-view where the circle shape and animation code will live.
- Initialize the circle sub-view in
CircleLoaderViewControllerand add it to the view. - Create a button that will be used to start the animation and add it to the main view.
- Write a function to start the animation when the start button is pressed.
Following the above steps, the first thing you need to do is create the circle UIView that you will later add to the CircleLoaderViewController. This UIView contains the method to animate the circle as well as the shape code to construct the circle itself. Listing 3 shows the content of CircleLoader.m, the circle UIView implementation.
Listing 3: The CircleLoader.m file containign the circle loader animate and shape code
#import "CircleLoader.h"
#import <pop/POP.h>

@interface CircleLoader (){
    CAShapeLayer *circle;
}

@implementation CircleLoader

-(id)initWithFrame:(CGRect)frame{
    self = [super initWithFrame:frame];
    if(self){
        //set the width of the circle
        CGFloat lineWidth = 12.0f

        //the radius of the circle is equal to half the width of
        //the CircleLoader view minus half the circle line width
        CGFloat radius = CGRectGetWidth(self.bounds) / 2 - lineWidth / 2;

        //initialize the circle layer, make the frame fit
        //within the view and set the path accordingly
        circle = [CAShapeLayer layer];
        CGRect rect =
                CGRectMake(lineWidth / 2, lineWidth / 2,
                    radius * 2, radius * 2);
        circle.path =
            [UIBezierPath bezierPathWithRoundedRect:
                rectcornerRadius:radius].CGPath;

        //customize the view of the circle as you see fit
        circle.strokeColor = [UIColor greenColor].CGColor;
        circle.fillColor = [UIColor clearColor].CGColor;
        circle.lineWidth = lineWidth;
        circle.strokeEnd = 0.0;

        //finally add the circle to the view
        [self.layer addSublayer:circle];
    }
    return self;
}

//animates the circle to 100% completion over a set time
-(void)animateCircle{
    //create the basic animation and customize it
    POPBasicAnimation *draw = [POPBasicAnimation
        animationWithPropertyNamed:kPOPShapeLayerStrokeEnd];
    draw.fromValue = @(0.0);
    draw.toValue = @(1.0);
    draw.duration = 2.5; //time to draw circle (s)
    draw.timingFunction = [CAMediaTimingFunction functionWithName:
        kCAMediaTimingFunctionEaseInEaseOut];
    [circle pop_addAnimation:draw forKey:@"draw"];
}

@end
Now you have a completed circle UIView that has a function called animateCircle that, when called, draws a complete circle from start to finish. For the purpose of maintaining simplicity in the demonstration, I've chosen to perform the animation over a fixed time period of two and a half seconds. Now let's shift back to the CircleLoaderViewController and add the newly created CircleLoader as a sub-view.
//initialize the circleLoader
circleLoader = [[CircleLoader alloc] initWithFrame: CGRectMake(0, 0, 200, 200)];

//center the circle with respect to the view
[circleLoader setCenter:CGPointMake(SCREENWIDTH / 2, SCREENHEIGHT / 2)];

//add the circle to the view
[self.view addSubview:circleLoader];
To complete this demonstration, create a UIButton to trigger the animation. Once pressed, the button triggers the animateCircle method of the circleLoader object you just created above.
[circleLoader animateCircle];
Hockey Physics
Traditionally, if you were to think about developing an interactive object that imitated real-world physics and could be manipulated by the user, it could seem like a daunting task. How would you account for object weight, initial velocity, speed at which velocity dissipates, etc.? This next sample demonstrates Pop's ability to simplify this process.
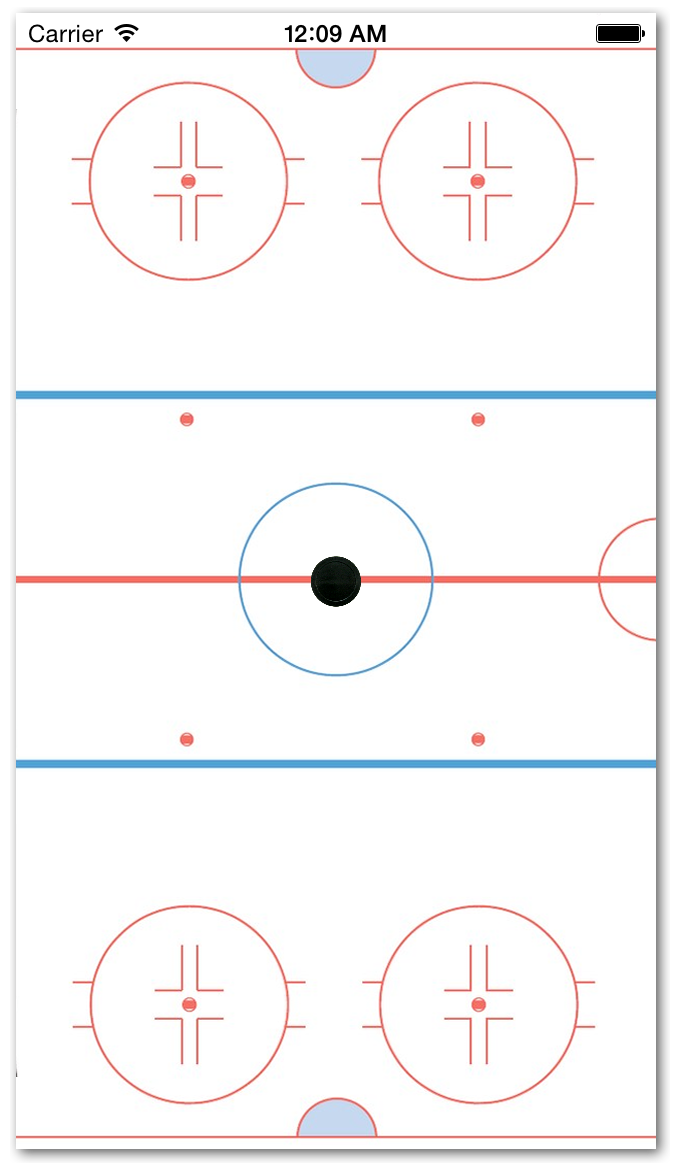
Effect: Create a mock hockey rink where a user can flick a puck around on ice. The rink simulates realistic physics as the puck slides across the ice. The initial velocity that the user gives the puck determines the distance it travels and the rate at which it slows to a stop. Sliding the puck beyond the bounds of the rink causes the puck to spring back to its starting position. Figure 3 shows the end result.
Animations used: POPDecayAnimation and POPSpringAnimation
The last animation sample I'll cover uses a POPDecayAnimation to simulate real world physics. As a hockey player shoots a puck, he gives it some initial force using the hockey stick. Once the puck is in motion, friction with the ice causes the puck to lose speed over time. The stronger the initial force, the longer it takes friction to stop the puck. Let's take a closer look at how you can use the Pop animation engine to recreate these same physics.
First, let's take a look at creating the puck. In this sample, the puck is a UIButton object. A UIButton was chosen because you need the ability to add a target for a touch-down event on the puck. When the user touches down on the puck, you want to cancel any puck animation that's in progress and give back control of movement to the user. Listing 4 demonstrates the puck creation.
Listing 4: Create a puck object with touch and pan recognition
-(void)addPuck{
    //create a gesture recognizer that will enable the puck
    //to be dragged around the screen by the user
    UIPanGestureRecognizer* recognizer = [[UIPanGestureRecognizer
        alloc] initWithTarget:self action:@selector(handlePan:)];

    //initialize the button, center it to the screen, and set
    //the puck image
    puck = [UIButton buttonWithType:UIButtonTypeCustom];
    [puck setFrame:CGRectMake(0, 0, 30, 30)];
    [puck setCenter:CGPointMake(SCREENWIDTH/2, SCREENHEIGHT/2)];
    [puck setBackgroundImage:[UIImage imageNamed:@"puck.png"]
        forState:UIControlStateNormal];

    //add the touch-down event that will cancel in-progress
    //animations and give user back control of the puck
    [puck addTarget:self action:@selector(touchDown:)
        forControlEvents:UIControlEventTouchDown];
    //attach the gesture to the puck
    [puck addGestureRecognizer:recognizer];


    //finally add the puck to the view
    [self.view addSubview:puck];
}
Notice that the puck has two methods of interaction. Pressing down on the puck triggers the touchDown method, and panning on the puck triggers the handlePan function. As mentioned earlier, touchDown simply removes any existing animation causing the sliding puck to stop any current momentum and come to rest underneath your finger, simulating “catching” the puck. The handlePan function has two distinct purposes. First, it's responsible for changing the location of the puck based on the movement of your finger. Second, when your finger releases from the puck, handlePan initiates a POPDecayAnimaton on the puck based on the velocity of the puck when your finger leaves the screen. Listing 5 demonstrates the touchDown and handlePan methods.
Listing 5: TouchDown and handlePan methods for interacting with the puck
-(void)touchDown:(UIControl *)sender{
    //remove all animations when user touches down on puck
    [sender.layer pop_removeAllAnimations];
}

-(void)handlePan:(UIPanGestureRecognizer *)recognizer{
    //move the puck from its current position by the distance
    //indicated by the translation
    CGPoint translation = [recognizer translationInView:self.view];
    recognizer.view.center = CGPointMake(recognizer.view.center.x
        + translation.x, recognizer.view.center.y + translation.y);
    [recognizer setTranslation:CGPointMake(0, 0) inView:self.view];

    //check if the recognizer is in an ended state symbolizing
    //the user lifting their finger from the puck
    if(recognizer.state == UIGestureRecognizerStateEnded){
        //at this point, puck has been released by the user
        //get the velocity the puck was released at
        CGPoint velocity = [recognizer velocityInView:self.view];

        //create a decay animation to allow the puck to continue
        //in motion when the user releases their finger
        POPDecayAnimation *positionAnimation = [POPDecayAnimation
            animationWithPropertyNamed:kPOPLayerPosition];
        //set the delegate to self as you will need access to the
        //animation's delegate method later to control the puck
        //when it goes out of the bounds of the rink
        positionAnimation.delegate = self;
        positionAnimation.velocity = [NSValue valueWithCGPoint:velocity];

        //apply the animation to the puck
        [recognizer.view.layer pop_addAnimation:positionAnimation
            forKey:@"layerPositionAnimation"];
    }

}
The last piece to this puzzle is accounting for the scenario where the puck is sent out of the rink (off-screen). In this scenario, you use a POPSpringAnimation to spring the puck back to the middle of the screen. In order to be able to detect when the puck slides out of view, you can use the pop_animationDidApply delegate method of POPAnimation. This method is called once per frame of the animation. You can use it to check each frame and make sure that the puck is within the rink. Listing 6 demonstrates this function as it relates to the example.
Listing 6: The pop_animationDidApply delegate method used to stop the puck from sliding out of the rink
-(void)pop_animationDidApply:(POPDecayAnimation *)anim{
    //Boolean will indicate if the location of the puck is
    //within the rink/view
    BOOL isDragViewOutsideOfSuperView =
        !CGRectContainsRect(self.view.frame, puck.frame);

    //if the puck is outside the bounds of the view, spring it
    //back into place
    if(isDragViewOutsideOfSuperView){
        //get the current velocity of the puck heading offscreen
        CGPoint currentVelocity = [anim.velocity CGPointValue];
        //reverse the velocity
        CGPoint velocity = CGPointMake(currentVelocity.x, -currentVelocity.y);

        //create a spring animation to send the puck back to center
        POPSpringAnimation *positionAnimation = [POPSpringAnimation
            animationWithPropertyNamed:kPOPLayerPosition];
        positionAnimation.velocity = [NSValue valueWithCGPoint:velocity];
        positionAnimation.toValue = [NSValue valueWithCGPoint:self.view.center];

        //apply the animaton to the puck
        [puck.layer pop_addAnimation:positionAnimation forKey:
            @"layerPositionAnimation"];
    }
}
Wrapping Up
Hopefully, over the course of this introduction, you can start to see the potential power of the Pop animation engine. It's also worth noting that Pop isn't limited to the basic, spring, and decay animations I covered in these samples. Pop has a custom animation type that lets you custom tailor the animations as you see fit. The source code for all the examples shown here, as well as an additional example not covered in this article, has been included on the CODE download page. Additionally, check the sidebar for various links to the Pop framework and additional tutorial material.
