


"I'm on record that Bitcoin, and cryptocurrency broadly, is one of the most important tech breakthroughs of our time." Marc Andreessen (co-author Mosaic, co-founder Netscape)
Maybe you've heard of Bitcoin, but what about Litecoin, Platinumcoin, Unobtanium, Dogecoin, or Feathercoin? These are just a few of the available Cryptocurrencies that are showing up as an alternative to traditional bank-based finance. If you've wondered what they are, how to get them, how they work, what Bitcoin Mining is (and whether it's worth it), and what to do with them once you have them, keep reading!
What is Bitcoin? What is Cryptocurrency?
Bitcoin is a form of cryptocurrency. Cryptocurrencies use cryptography to control digital coin creation and distribution, and to ensure the integrity of each transaction.
Bitcoin
Bitcoin (also known by the currency symbol: BTC) is a spendable currency, like the U.S. dollar, the Euro, or the Japanese yen. It's also nothing like any of these, because it's 100% digital, and it's not issued or regulated by any government. You also don't have to deal with a bank or credit card company to use it to make purchases or accept payments online.
Bitcoin is also an investment instrument, like stocks or precious metals. You can purchase a fixed amount of Bitcoin, and due to its volatile nature, watch the value fluctuate in tune with real-world events.
Altcoin
One of the most well-known altcoins is Litecoin (LTC). Often referred to as the silver to Bitcoin's gold, Litecoin trades at a lower volume and carries a lower value per coin. It has continued to gain in popularity over the last year, but is similarly volatile to Bitcoin, even if on a smaller scale. Unlike Bitcoin, Litecoin uses the Scrypt hashing algorithm, instead of SHA-256.
Other altcoins include Platinumcoin, Unobtainium, Dogecoin, and Feathercoin. These coins offer a variety of payouts, and use different algorithms, although typically Scrypt or SHA-256. A much longer list of alternate cryptocurrencies can be found at http://altcoins.com/.
Despite their lower value, altcoins operate much like Bitcoin, meaning you can buy, sell, and spend them, provided that you can find a buyer or exchange that supports them.
Before I go much further into what you can do with Bitcoin let's take a moment to discuss where they come from, how they work, and how to get some.
Where It Comes From
Bitcoin behaves exactly like cash does in face-to-face transactions, only it does so via the Internet. There are no merchant providers, no chargebacks, no (or very little) transaction fees, no banks, and no regulating institutions.
The coins are generated as part of a reward system for processing a block of transactions. (This is called mining; more on that in a bit.) However, there's a finite number of Bitcoin (21 million) that will ever be released. For more information on why this is, be sure to check out the Bitcoin white paper linked to in the sidebar.
Once all 21 million Bitcoin have been issued, there will be no more block rewards, but the people who choose to continue processing transactions for the network will earn transaction fees, typically added by the sender. (Many cryptocurrency exchanges will cover fees for transactions over a certain amount, but this varies by site.)
Reaching the 21 million coin cap is NOT the same as having 21 million Bitcoin in active circulation. That will never happen due to lost Bitcoin. Lost Bitcoin? Yep, much like cash, any lost Bitcoin is gone forever. There's no way to get it back. Fortunately, you can and should back up your wallet, which I'll cover shortly.
How It Works
Every confirmed Bitcoin transaction, all the way back to the very first one made by Satoshi Nakamoto, is recorded in a giant public ledger called the blockchain. If you wish to take a look at the blockchain - and it's really quite interesting - you can see/search it at http://www.blockchain.info.
Each time you make a transaction with Bitcoin, it's sent across the network to all nodes. Each node simultaneously collects new transactions into a block and then attempts to find an exponentially difficult proof-of-work that can be verified by executing a SHA-256 hash.
Once the proof-of-work is found (this is where the term “mining” comes from) the block is created and sent to all other nodes for verification. If a majority of nodes accepts the new block, meaning all included transactions are valid and not already spent, it becomes part of the blockchain and all nodes begin work on the next block. As a reward for successfully creating a new block, the originating node receives 50 BTC. Of course, if you were mining Litecoin, the reward would be in Litecoin.
As each new block is created, and to compensate for increasing computing power on the network, the difficulty of generating the correct hash goes up to ensure a consistent number of new blocks per hour (around six).
Ok, Sounds Great! How Do You Get Some?
There are a number of ways to acquire Bitcoin. You can buy it via a Bitcoin Exchange, which works similar to a commodities exchange, much like gold or silver, or stocks. You can accept it as payment for goods or services. You can have a friend send you some (and let me know how that works out for you). And you can try mining Bitcoin (which I'll cover in a bit.)
Digital Wallets
Before you can send or receive Bitcoin, or any cryptocurrency, you'll need a digital wallet to store it in. Digital wallets come in a variety of forms, including but not limited to Web-based, mobile apps, and desktop software. You can find a list of “Bitcoin approved” wallets at https://bitcoin.org/en/choose-your-wallet.
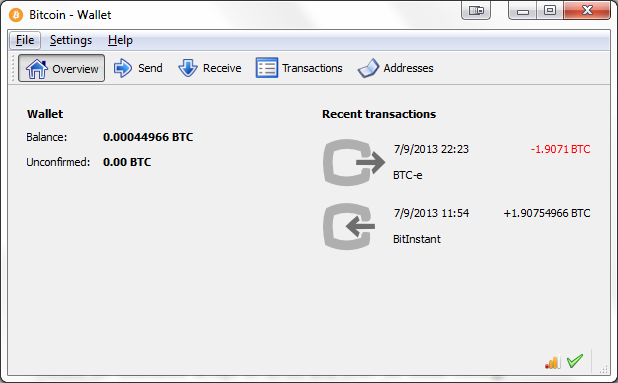
The Bitcoin Core desktop wallet, which I use, is shown in Figure 1. This is a good starter wallet, with high levels of security. However, it lacks some of the features of more advanced wallets.
Mobile wallets offer the convenience of taking your Bitcoin with you wherever you go. You can even use your phone to scan a QR code to pay for items with Bitcoin in a physical store.
Web-based wallets allow access to your Bitcoins from anywhere you can access a browser, but you accept certain risks with this convenience, as they host your coins. If they fold, or fall prey to embezzlement, you could lose anything you stored with them. Mobile wallets store your bitcoin on the phone, so you aren't beholden to any particular website.
Once you have your wallet set up, you need to find a source of Bitcoin. Back in the old days (less than a year ago), buying any cryptocurrency, including Bitcoin, was a painful process. It's a lot better now though. Thanks to services like Coinbase.com, you can now purchase Bitcoin with funds drawn directly from your bank account.
In addition to the three types of digital wallets listed above, there are also (less common) “paper wallets” and “brain wallets” that don't actually store your Bitcoin at all, but give you the ability to set up a private key and address to receive funds for later retrieval.
Wallets like these work because the transaction is stored on the blockchain (which, if you remember, is a giant public ledger) and therefore available for you to “cash in” later when you activate your key. These types of wallets are considered hardware failure-proof and unhackable; as long as you don't lose or forget the key, you're good to go.
Buying Bitcoin
The easiest way to get Bitcoin these days is just to buy some with traditional forms of money. Once you have a digital wallet set up, you just find a cryptocurrency exchange or online wallet service that supports buying and selling and sign up.
I prefer Coinbase.com, which is an online wallet service that gives me the ability to buy, sell, and accept Bitcoin. If you are looking to convert between cryptocurrencies, you'll need to use an exchange like this. There are several good options available, including BTCe (http://www.btc-e.com) and Kraken (http://www.kraken.com).
Signing up for Coinbase is as simple as providing an email address and secure password. Once you confirm your email address, you'll have access to a variety of features, but still won't be able to buy Bitcoin until you add and confirm a bank account.
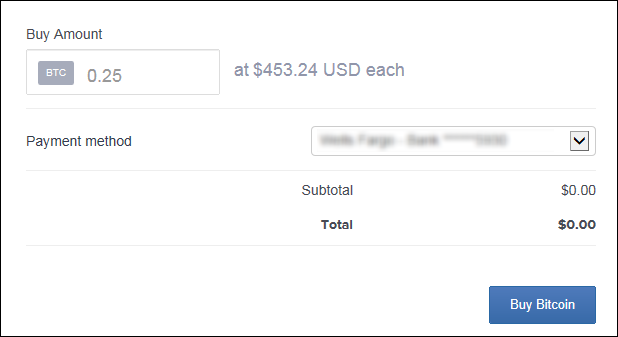
That last step can take a couple of days to complete, but once you have that in place, buying Bitcoin is as easy as filling in an amount and clicking the “Buy Bitcoin” button, as seen in Figure 2.
Mining Bitcoin
Mining Bitcoin, while interesting from a technical perspective, has gained an undeservedly sexy reputation. Mining really isn't terribly practical for individuals anymore, due to the specialized hardware necessary to generate any profit.
Mining Bitcoin, while interesting from a technical perspective, has gained an undeservedly sexy reputation.
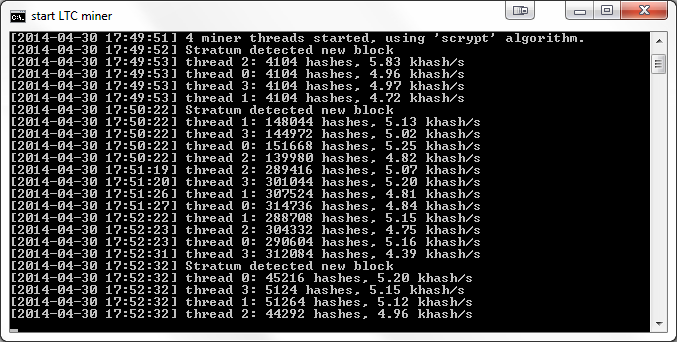
A lot of techies I've spoken to who've heard about mining Bitcoin said they initially pictured it as some type of video game, like World of Warcraft or at least possessing an interesting UI like SETI@HOME or The Matrix.
The reality isn't nearly as visually enticing and looks a lot more like Figure 3 than what you probably imagined (and on hopefully faster hardware than my trusty old laptop).
It's time for a little history lesson. In the early days of Bitcoin, when the degree of difficulty per block was still fairly low, you could run CPU-based mining programs and collect a few coins here and there.
The volume of transactions continued to increase, and more people saw mining as a serious moneymaker, throwing better and better hardware into the mix. The difficulty of the blocks increased rapidly to a point where CPU miners could no longer keep up.
Eventually, it was discovered that GPUs in video cards (specifically ATI cards, not Nvidia) were significantly more efficient than CPUs at generating the thousands of hashes per second necessary to solve or “mine” a block of transactions.
Before long, video card GPU-based mining also became largely obsolete for Bitcoin, for the same reason that CPU mining largely went away: You can still get good results for some altcoins, but serious Bitcoin mining now happens on dedicated hardware that doesn't resemble a traditional computer at all.
In fact, trying to mine Bitcoin on a desktop computer costs more in energy than you would make by mining. Mining on a laptop is even worse and can actually damage your system from the heat generated.
Fortunately, cloud-based mining is a reasonably affordable alternative to abusing your own hardware. You can find more information on cloud mining at http://www.eobot.com/cloud.
If I still haven't scared you away from desktop mining, visit this GitHub repo at https://github.com/poker/cpuminer and pull down the latest release. (Editor's note: link not working.) Cpuminer is usable for mining coins that use the Scrypt algorithm (like Litecoin). The link at the top of their page will take you to instructions for setting it up.
How Do I Use Bitcoin?
By this point, you know a thing or two about how Bitcoin works, where it comes from, and even how to get it. You may even have some. So how do you use it?
This is where the wallets discussed above come into play. Any transaction you make is going to be coming to or from your wallet of choice.
In the next section, I'll build a simple application that illustrates how to buy and sell Bitcoin via the Coinbase API.
Buying and Selling Bitcoin Programmatically
Coinbase offers a simple, easy to use REST API that returns JSON from each call. You can find the full API reference doc at https://coinbase.com/api/doc.
Because the Coinbase team is mostly comprised of Ruby and PHP developers, they aren't exactly what I would call “hip to the Microsoft stack.” Fortunately, there's an open source .NET wrapper (written by yours truly - there's a link in a minute) for the Coinbase API that makes everything really easy.
Before you can use the API, you'll need to get a pair of keys called API_KEY and API_SECRET from Coinbase. You can get these by logging into Coinbase, going to the Account Settings page and clicking on the API tab. Follow the instructions, and you'll have your keys in seconds. Don't share them with anyone, ever.
You can find my GitHub repo for the Coinbase .NET wrapper at https://github.com/chrisgwilliams/Coinbase.NET. Download the latest release (v1.0.2) and open the solution in Visual Studio.
Inside the CoinbaseConnector project, open the Connector.cs file and scroll down until you find a method called JsonRequest(), as shown in Listing 1. This is the method that handles all the tricky bits of communicating securely with the Coinbase API.
Listing 1: The JsonRequest method handles communication with the API
private string JsonRequest(string url, string method)
{
    // take care of any spaces in params
    url = Uri.EscapeUriString(url);

    string returnData = String.Empty;

    var webRequest = HttpWebRequest.Create(url) as HttpWebRequest;
    if (webRequest != null)
    {
        webRequest.Accept = "*/*";
        webRequest.UserAgent = ".NET";
        webRequest.Method = method;
        webRequest.ContentType = "application/json";
        webRequest.Host = "coinbase.com";

        string nonce = Convert.ToInt64(DateTime.Now.Ticks).ToString();
        string message = nonce + url;
        string signature = HashEncode(HashHMAC(StringEncode(API_SECRET),
        StringEncode(message)));

        var whc = new WebHeaderCollection();
        whc.Add("ACCESS_KEY: " + API_KEY);
        whc.Add("ACCESS_SIGNATURE: " + signature);
        whc.Add("ACCESS_NONCE: " + nonce);
        webRequest.Headers = whc;

        using (WebResponse response = webRequest.GetResponse())
        {
            using (Stream stream = response.GetResponseStream())
            {
                StreamReader reader = new StreamReader(stream);
                returnData = reader.ReadToEnd();
            }
        }
    }

    return returnData;
}
The Coinbase API uses a hash-based message authentication code (also known as HMAC authentication.) This requires a positive, incrementing integer known as a nonce, which is hashed with the full URL of the API call (using SHA-256 encryption and your API_SECRET key) and inserted into the request header.
The rest of the Connector class is made up of the wrapped API calls. Take a moment to look those over and you'll see one called GetSpotPriceForBitcoin() that does exactly what you would expect it to.
In the sample application, you'll use that method to look up the current price for Bitcoin. Then you'll add a few more methods to Buy and Sell Bitcoin.
The Sample Application: IBuyBitCoin
The first step in building the test application is to add a new Windows Form project to the Coinbase Connector solution. I called mine IBuyBitcoin, but feel free to name yours whatever you like.
Drag some buttons and textboxes onto the form, so it looks roughly like Figure 4. It doesn't have to be perfect.
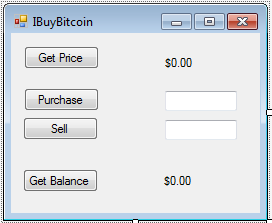
I've listed the less obvious control properties in Table 1. You will need to apply these for the sample code to work properly.
After you have your form put together, it's time to add some code. You'll just work your way down the form and start with the “Get Price” button.
Double-click btnGetPrice to generate a click handler and pull up the code file.
In Solution Explorer, add a reference to the CoinbaseConnector project, and to the NewtonSoft.Json dll, which you can find in the TestApp project or at https://github.com/JamesNK/Newtonsoft.Json. The open source Json.NET project makes using JSON in your applications super easy.
Next, at the class level, add the following variable:
private Connector cbc;
You'll want to instantiate it in your form constructor, like this:
cbc = new Connector();
Finally, add the following to the btnGetPrice click event handler:
Amount amount = JsonConvert.DeserializeObject<Amount>
  (cbc.GetSpotPriceForBitcoin());
lblPrice.Text = amount.amount + " " + amount.currency;
You're almost ready to run for the first time. Find the App.Config file in the IBuyBitCoin project and add your keys in the appSettings section, as shown in the next snippet. Replace the placeholder values with the keys you got from Coinbase.
<appSettings>
    <add key="API_KEY" value="api_key"></add>
    <add key="API_SECRET" value="api_secret_key"></add>
</appSettings>
Make sure to set IBuyBitcoin as your startup project in the Solution Explorer. Once that's done, hit F5 and start the application.
Click the “Get Price” button and you'll get a real-time price quote on the current value of Bitcoin in U.S. Dollars.
Now it's time to add the ability to buy and sell Bitcoin, so go back into the code and add the method from Listing 2.
Listing 2: btnPurchase.click()
private void btnPurchase_Click(object sender, EventArgs e)
{
    var result = MessageBox.Show("You are about to purchase Bitcoin
      using funds from Coinbase, via your linked bank account. Are
      you absolutely sure you wish to do this? Bitcoin transactions
      are not reversable.", "Buying Bitcoin",
    MessageBoxButtons.OKCancel);

    if (result == System.Windows.Forms.DialogResult.OK)
    {
        var result2 = MessageBox.Show("Seriously? This is going
          to cost you real money. Are you absolutely sure?", "Buying
          Bitcoin FOR REAL", MessageBoxButtons.OKCancel);

        if (result2 == System.Windows.Forms.DialogResult.OK)
        {
            MessageBox.Show("Ok. Can't say we didn't warn you.");

            PurchaseBitcoin_Result purchase =
              JsonConvert.DeserializeObject<PurchaseBitcoin_Result>
                (cbc.PurchaseBitcoin(Convert.ToSingle
                (txtPurchaseQty.Text)));

                MessageBox.Show("Your purchase of " + purchase.transfer.btc
                + " Bitcoin was " + purchase.success + ".");
        }
        else
        MessageBox.Show("Purchase cancelled.");
    }
    else
    MessageBox.Show("Purchase cancelled.");
}
I'd like to point something out, before you run this code. At the time of writing this article, one Bitcoin has a value of a little over $450. Bitcoin is a highly volatile digital currency, with valuation ranging from as little as a couple dollars to over $1200 per Bitcoin.
At the time of writing this article, one Bitcoin has a value of a little over $450.
If you have a bank account linked in Coinbase, and you run this code, it will attempt to make a Bitcoin purchase on your behalf.
I strongly encourage you to enter an amount you are comfortable with spending. A value of 0.01 BTC will result in a purchase cost of approximately $4.50 (based on the current rate.) Always check the rate before making a purchase.
Having said all that, you are now ready to purchase some Bitcoin. Launch the app and enter a value of 0.01 in the textbox next to the Purchase button and click “Purchase.”
You're halfway done. All that's left is to implement the “Sell” and “Get Balance” buttons. Let's keep going!
To sell Bitcoin, you have to have enough funds in your account or the transaction will fail. So knowing your balance is important. Fortunately, there's a way to check that.
Add an event handler for the “Get Balance” button and put this code in:
Amount amount = JsonConvert.DeserializeObject<Amount>
  (cbc.GetAccountBalance());
lblPrice.Text = amount.amount + " " + amount.currency;
This will check your current balance and report it back whenever you click the “Get Balance” button.
Give it a test. If you bought any Bitcoin in the last step (or at any other time via Coinbase) you should see a balance returned. Otherwise, it will remain $0.00.
If you're curious, apply a breakpoint on the API call and check out what is being returned.
The last step is the implement the “Sell” button. Listing 3 shows the complete click event handler.
Listing 3: btnSell.click()
private void btnSell_Click(object sender, EventArgs e)
{
    Amount amount = JsonConvert.DeserializeObject<Amount>
      (cbc.GetAccountBalance());
    if (Convert.ToSingle(amount.currency) >= Convert.ToSingle(txtSellQty.Text))
    {
        SellBitcoin_Result sell =
          JsonConvert.DeserializeObject<SellBitcoin_Result>
          (cbc.SellBitcoin(Convert.ToSingle(txtSellQty.Text)));

        MessageBox.Show("Your sale of " + sell.transfer.btc + " Bitcoin
        was " + sell.success + ".");
    }
    else
        MessageBox.Show("You don't have enough Bitcoin available to
          make that sale.");
}
The first thing to do is re-pull your current balance. You want to compare that to the amount you are trying to sell. Assuming you have enough, you can go ahead and call the SellBitcoin() method from the API.
That's it for the sample application. I encourage you to do some additional exploration on your own. There's a lot of cool functionality in the API, including setting up items for sale and accepting Bitcoin as payment, dynamically creating multiple receiving addresses, etc.
Thanks for reading. I look forward to seeing what you come up with.
