


Over the past few years, APIs evolved to become the center of software development. You can take advantage of APIs to enable communication between systems and the data exchange between them. Today's applications thrive on a lot on APIs - most of today's applications are API-based.
API is an acronym for Application Programming Interface and acts as the middle layer between the presentation layer and the database layer.
You must test your APIs before releasing them for the clients or end-users to consume. It would help if you had API testing as part of your testing strategy to test your application's core business rules and help deliver better software faster. There are plenty of API testing tools around. Postman is the de facto industry-standard tool for testing and developing APIs.
Insomnia is yet another popular, fast REST client that's available for Mac, Windows, and Linux. You can use Insomnia for testing RESTful as well as GraphQL APIs. It's a free cross-platform desktop framework that incorporates a user-friendly user interface and sophisticated features, such as security helpers, code creation, and environment variables. You can take advantage of Insomnia to test HTTP-based RESTful APIs or even GraphQL APIs. This article talks about how you can fast-track API development with Insomnia REST Client.
Prerequisites
If you're to work with the code examples discussed in this article, you should have the following installed in your system:
- Visual Studio 2019 (an earlier version will also work but Visual Studio 2019 is preferred)
- .NET 5.0
- ASP.NET 5.0 Runtime
- Insomnia REST Client
You can download Visual Studio 2019 from here: https://visualstudio.microsoft.com/downloads/. You can download .NET 5.0 and ASP.NET 5.0 runtime from here: https://dotnet.microsoft.com/download/dotnet/5.0. You can download and install the Insomnia REST Client from here: https://insomnia.rest.
What's API Testing?
API testing determines whether the application programming interfaces (APIs) meet functionality, consistency, efficiency, usability, performance, and security specifications. In addition, it helps uncover bugs, anomalies, or discrepancies from an API's expected behavior.
Typically, any application has three distinct layers: the presentation layer, the business layer, and the data access layer. API testing is performed at the business layer because it's the most critical of all layers in an application where the heart of the application or the business rules is stored. An API client is used to evaluate APIs for accessibility, usability, stability, reliability, and correctness.
Benefits of API Testing
Some of the benefits of API testing are:
- Early testing: Using API testing, you can validate your business logic even before the application is built in its entirety. API testing can also help you to find more bugs in much less time (API tests are much faster that UI tests).
- GUI-independent: API testing allows testing the core functionality of an application even without the need of a user interface.
- Language-independent: Because data is exchanged in XML or JSON format, you can use any language for test automation.
- Improved test coverage: Most APIs allow creating automated tests (both positive and negative tests) with high test coverage.
- Faster releases: API testing enables you to detect errors early in the software development life cycle, allowing for faster product releases.
Popular API Testing Tools
Some of the popular API testing tools include the following:
- Postman
- Soap UI
- Apigee
- JMeter
What Is Insomnia?
A REST client is a tool used for interacting with a RESTful API that's exposed for communication. An Insomnia REST Client is an open-source, powerful REST API client used to store, organize, and execute REST API requests elegantly. The Insomnia REST Client is an excellent alternative to Postman for sending REST and GraphQL requests with support for cookie management, environment variables, code generation, and authentication. It's available for Windows, Mac, and Linux operating systems. In addition, Insomnia incorporates a user-friendly GUI with sophisticated features such as security helpers, code creation, and environment variables.
The following are some of the features of Insomnia REST Client:
- Cross-platform support
- Ability to execute REST, SOAP, GraphQL, and GRPC requests
- Ability to store, organize, and execute REST API requests
- Ability to organize requests in workspaces and groups
- Support for query string param builder
- Ability to export and share workspaces
- Support for chained requests
Insomnia REST Client vs. Postman
Although both Postman and Insomnia have their unique features, there are certain features that are common to both, such as the following:
- Both have a free version of their software.
- Both are open-source projects.
- Both offer support for multiple workspaces.
- Both include support for GraphQL integration.
- Both have import and export of test data.
- Both use multiple ways to configure authorizations.
What's Unique about Postman
Postman is a more mature tool and the market leader in API testing tools. Some of the striking features of Postman are:
- API documentation: Postman is adept at generating host browser-based API documentation in real-time.
- Monitoring: Postman is capable of running a collection periodically to check for its performance and response.
What's Unique about Insomnia
Insomnia provides certain features that aren't supported by Postman. These features include the following:
- Plug-ins: Insomnia provides support for creating new plug-ins.
- Environment variables: Environment variables are one of the most useful features of Insomnia that can save a lot of time manually typing.
- Code snippet generation: Insomnia enables you to generate code snippets in 12 different languages.
- Response format: You can take advantage of Insomnia to view response beyond JSON and XML, i.e., you can see HTML pages, images, and even PDF documents.
Now, let's put it through its paces so you can see for yourself.
Create an ASP.NET 5 Project in Visual Studio 2019
First off, create a new ASP.NET 5 project in Visual Studio. You can create a project in Visual Studio 2019 in several ways. When you launch Visual Studio 2019, you'll see the Start window. You can choose “Continue without code” to launch the main screen of the Visual Studio 2019 IDE.
To create a new ASP.NET 5 project in Visual Studio:
- Start the Visual Studio 2019 Preview IDE.
- In the “Create a new project” window, select “ASP.NET Core Web API” and click Next to move on.
- Specify the project name and the path where it should be created in the “Configure your new project” window.
- If you want the solution file and project to be created in the same directory, you can optionally check the “Place solution and project in the same directory” checkbox. Click Next to move on.
- In the next screen, specify the target framework and authentication type as well. Ensure that the “Configure for HTTPS,” “Enable Docker Support,” and the “Enable OpenAPI support” checkboxes are unchecked because you won't use any of these in this example.
- Click Create to complete the process.
This creates a new ASP.NET 5 Web application. I'll use this project throughout this article. A default controller named WeatherForecastController will be created as well. Because I won't be using this controller in this example, delete this file and update the profiles section of the launchSettings.json file with the following text:
"profiles": {
    "IIS Express": {
        "commandName": "IISExpress",
        "launchBrowser": true,
        "launchUrl": "api/product",
        "environmentVariables": {
            "ASPNETCORE_ENVIRONMENT": "Development"
        }
    }
}
Note that the launchUrl in the launchSettings.json file points to a controller named ProductController. You've yet to create this controller - you'll create it shortly.
Create a Minimalistic ASP.NET Core Web API
In this section you'll create a minimalistic RESTful API. In this example, you'll be using the following classes and interfaces:
- Product: This is the entity class you'll use in this application for storing Product data.
- IProductRepository: This interface contains the declaration of the methods used to perform simple CRUD operations using the Product entity.
- ProductRepository: The
ProductRepositoryclass extends theIProductRepositoryinterface and implements its members. - ProductController: This is the controller class that contains all the action methods.
Create the Model
Create a file named Product.cs with the following code in there:
public class Product
{
    public int Id { get; set; }
    public string Code { get; set; }
    public string Name { get; set; }
}
Create the Product Repository
Create an interface named IProductRepository in a file named IProductRepository.cs with the following code in there:
public interface IProductRepository
{
    Task<List<Product>> GetProducts();
    Task<Product> GetProduct(int id);
    Task<bool> AddProduct(Product product);
    Task<bool> DeleteProduct(int id);
}
The ProductRepository class pertaining to the ProductRepository.cs file extends the IProductRepository interface and implements its methods as shown in Listing 1.
Listing 1: The ProductRepository Class
public class ProductRepository: IProductRepository
{
    private readonly List<Product> products = new List<Product>();

    public ProductRepository()
    {
        products.Add(new Product
        {
            Id = 1,
            Code = "P0001",
            Name = "DELL Laptop"
        });

        products.Add(new Product
        {
            Id = 2,
            Code = "P0002",
            Name = "Logitech Wireless Mouse"
        });

        products.Add(new Product
        {
            Id = 3,
            Code = "P0003",
            Name = "HP Printer"
        });
    }

    public Task<List<Product>> GetProducts()
    {
        return Task.FromResult(products);
    }

    public Task<Product> GetProduct(int id)
    {
        return Task.FromResult(products.Where(x => x.Id == id).SingleOrDefault());
    }

    public Task<bool> AddProduct(Product product)
    {
        products.Add(product);
        return Task.FromResult(true);
    }

    public Task<bool> DeleteProduct(int id)
    {
        products.Remove(products.Where(x => x.Id == id).SingleOrDefault());
        return Task.FromResult(true);
    }
}
Add the Dependencies
The following code snippet illustrates how an instance of the ProductRepository class is added as a scoped service in the Startup class so it can be used in the controller using dependency injection.
public void ConfigureServices(IServiceCollection services)
{
    services.AddScoped<IProductRepository, ProductRepository>();
    services.AddControllers();
}
You can now leverage dependency injection in your controller class to retrieve an instance of ProductRepository at runtime.
Create the API Controller
Create a new API controller named DefaultController and replace the default autogenerated code using the code shown in Listing 2.
Listing 2: The DefaultController Class for the RESTful API
using Microsoft.AspNetCore.Mvc;
using System.Collections.Generic;
using System.Threading.Tasks;

namespace InsomniaRESTClient.Controllers
{
    [Route("api/[controller]")]
    [ApiController]
    public class DefaultController : ControllerBase
    {
        private readonly IProductRepository _productRepository;

        public DefaultController(IProductRepository productRepository)
        {
            _productRepository = productRepository;
        }

        [HttpGet]
        public async Task<ActionResult<List<Product>>> Get()
        {
            return await _productRepository.GetProducts();
        }

        [HttpGet("{id}")]
        public async Task<ActionResult<Product>> Get(int id)
        {
            return await _productRepository.GetProduct(id);
        }

        [HttpPost]
        public async Task<ActionResult<bool>> Post([FromBody] Product product)
        {
            return await _productRepository.AddProduct(product);
        }

        [HttpDelete("{id}")]
        public async Task<ActionResult<bool>> Delete(int id)
        {
            return await _productRepository.DeleteProduct(id);
        }
    }
}
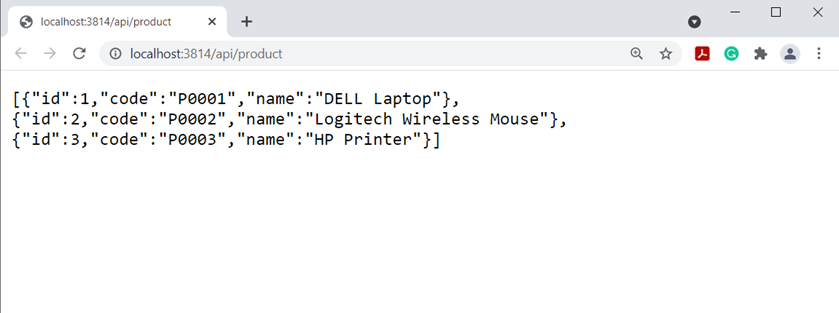
Run the Application
Now run the application by pressing Ctrl + F5 or just F5. The application starts and the Web browser displays the data shown in Figure 1:
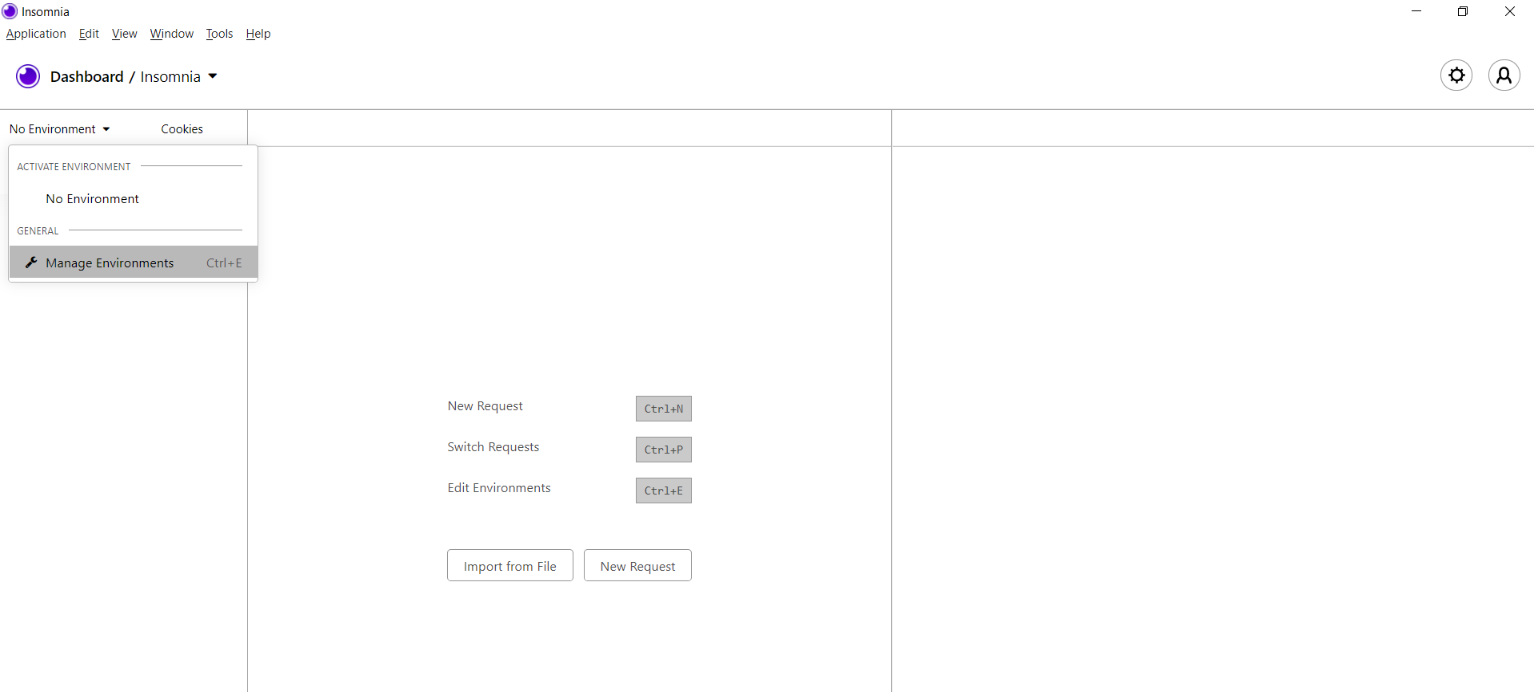
Configuring Environment Variables in Insomnia
While communicating with APIs, you often need to manually type certain data across multiple requests. Here's exactly where environment variables come to the rescue. An environment here refers to a JSON object that contains data represented as key-value pairs. You can take advantage of environment variables to define a variable once and then reference its value wherever it's needed. You can access the environment manager through the drop-down menu at the top of the sidebar, as shown in Figure 2:
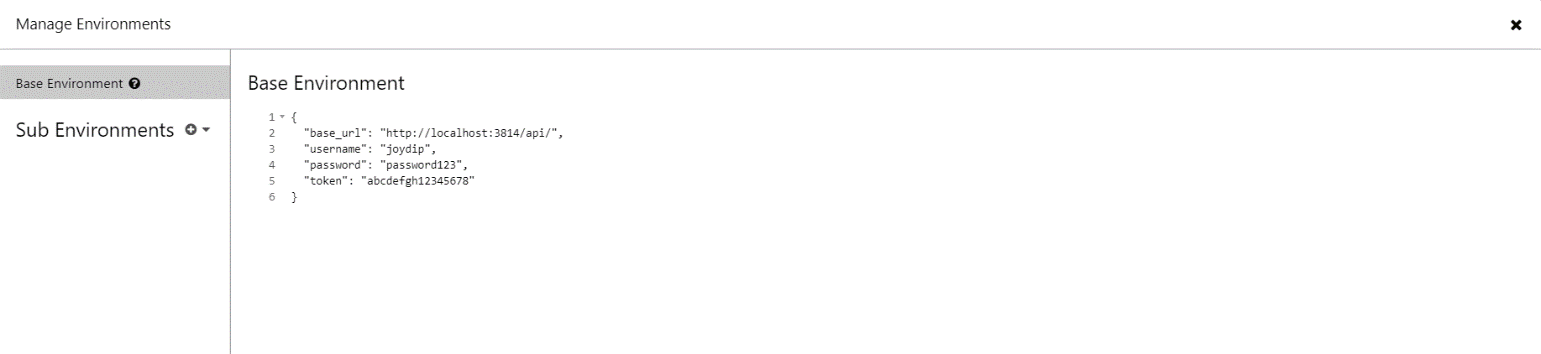
You can take advantage of the environment manager to edit the base environment, create sub environments, etc. You can click on Manage Environments to add or edit an environment. Figure 3 shows how you can edit the Base environment.
Test RESTful API in Insomnia
In this section, I'll examine how you can make GET and POST requests using Insomnia.
Send a GET Request
To create a GET request, follow the steps outlined below:
- Launch the Insomnia application.
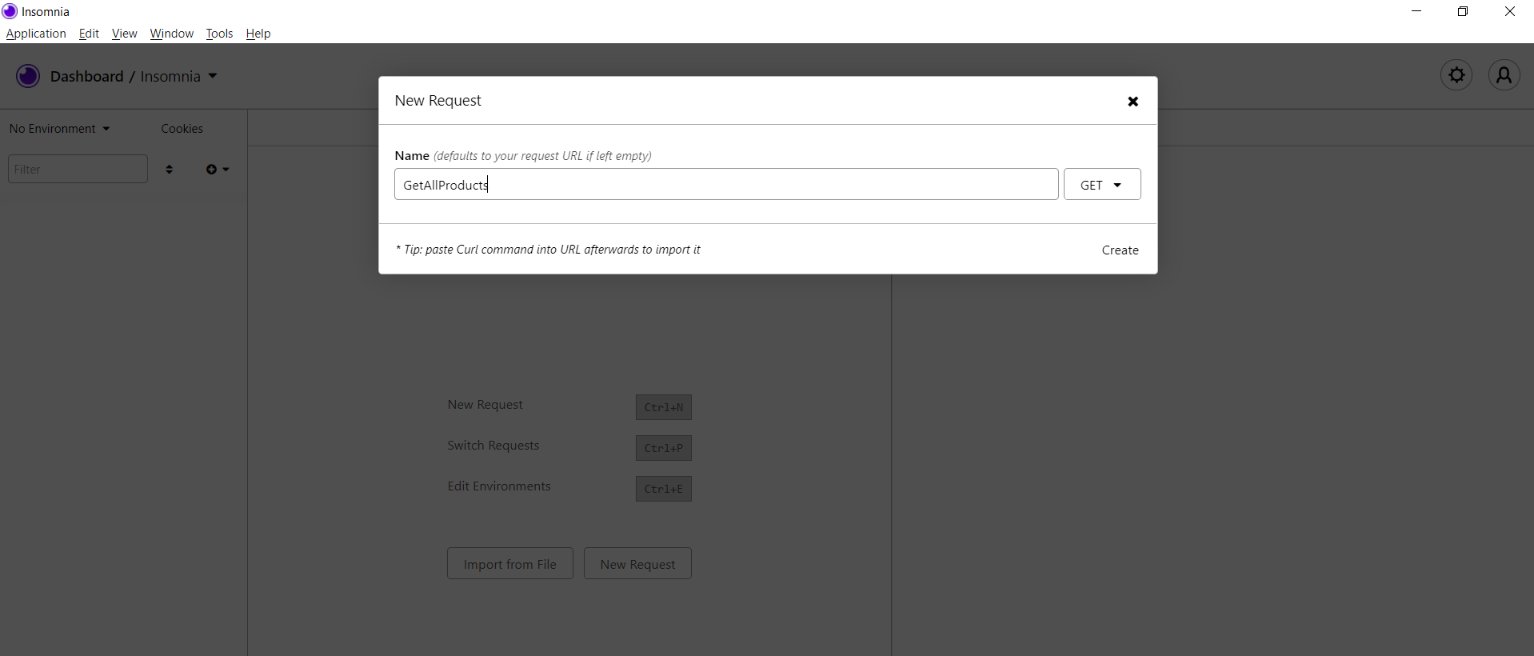
- Click on the “New Request” button.
- In the “New Request” window that pops up, specify the name of the request and select a request method.
- Click Create.
Now follow the steps given below to test the API using Insomnia REST Client:
- Ensure that the Web API application is up and running.
- Launch the Insomnia REST Client.
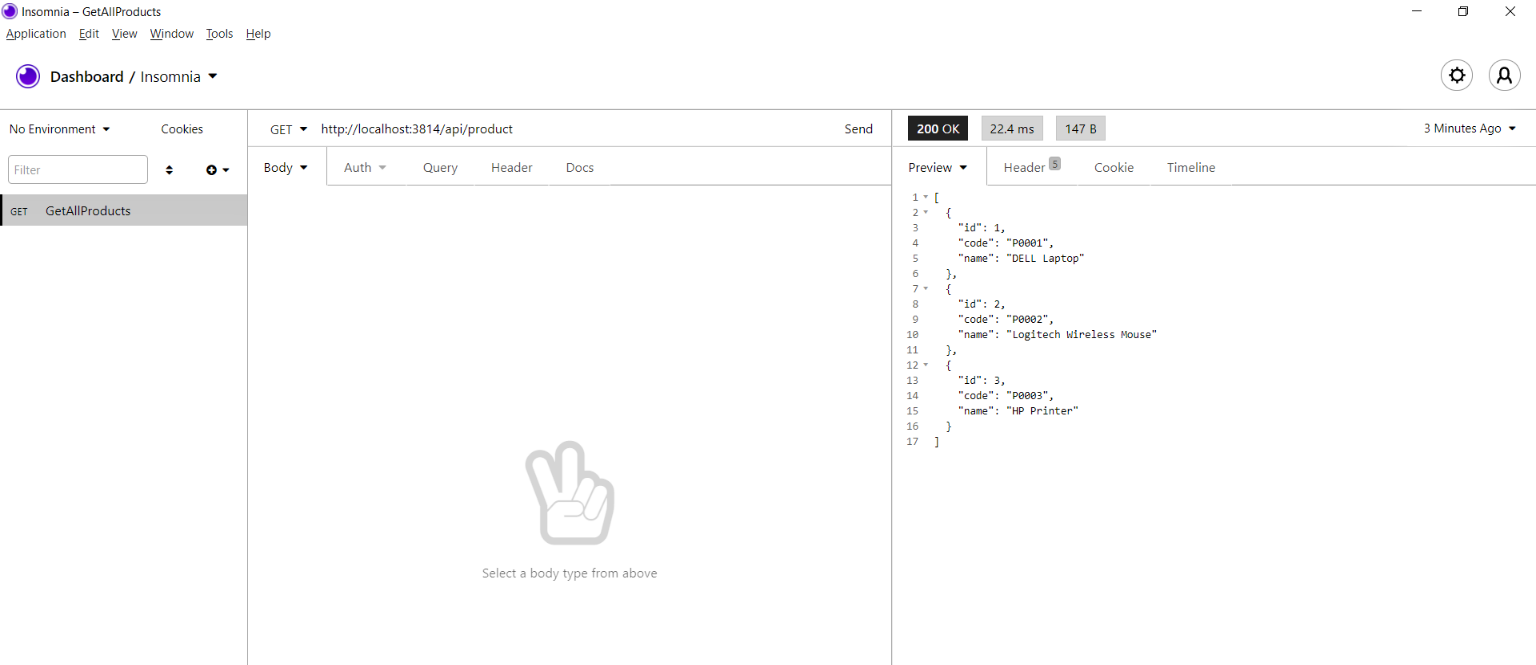
- Ensure that the HTTP method GET is selected (it's the default).
- Specify the URL in the address bar.
- Click Send.
Figure 5 shows the output - the list of the products is displayed in the right-side panel.
Send a POST Request
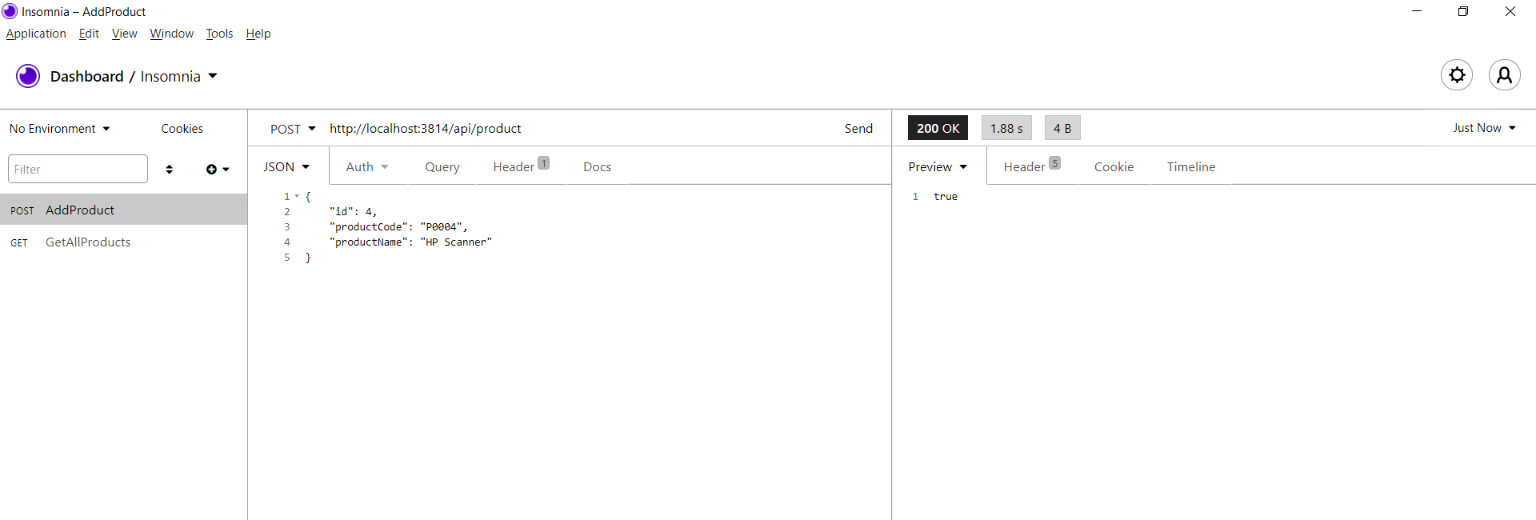
Assuming that Insomnia is up and running, to send a POST request, follow the steps outlined below:
- Specify the URL in the address bar.
- Specify the JSON data in the request body.
- Click Send.
The response returned as true, indicating that the POST request is successful, as shown in Figure 6.
Create a Minimalistic GraphQL API
In this section, I'll examine how you can test a GraphQL API using Insomnia. Follow the steps mentioned earlier in this article to create another ASP.NET Core Web API project. Both of these projects can be part of the same solution. There are certain classes and interfaces you'll reuse from the previous example.
Here's the list of the classes and interfaces you'll reuse from the earlier example:
- Product: This is the entity class.
- IProductRepository: This is the interface for your repository class that contains the declarations of the methods.
- ProductRepository: This is your only repository class that extends the
IProductRepositoryinterface and implements its members.
Schemas and Types
The main building blocks of GraphQL are schemas and types. A schema extends the GraphQL.Types.Schema class and represents the functionality exposed via an endpoint for the clients of the API to consume. Note that there's only one endpoint in GraphQL.
A schema comprises Query, Mutation, and a Subscription. Queries are used to consume data in an efficient manner. Mutations are used to send data to the server for performing CRUD operations. Subscriptions enable data to be sent back to the client.
With this knowledge, you can proceed with creating your minimalistic GraphQL API.
Configure the GraphQL Middleware
Support for GraphQL isn't available in ASP.NET Core by default, i.e., it isn't a built-in feature. Hence, you should install the following NuGet packages to work with GraphQL:
Install-Package GraphQL
Install-Package GraphiQL
Because support for GraphQL in ASP.NET Core is an opt-in feature and isn't enabled by default, write the following code in the Configure method of the Startup class to enable the graphql endpoint:
app.UseGraphiQl("/graphql");
Build the GraphQL Schema
To be able to query data using GraphQL, you should be able to create a type that extends ObjectGraphType<T>, as shown in Listing 3.
Listing 3: The ProductType Class
public class ProductType : ObjectGraphType<Product>
{
    public ProductType()
    {
        Name = "Product";
        Field(_ => _.Id).Description("Product ID.");
        Field(_ => _.Name).Description("Product Name");
        Field(_ => _.Description).Description("Product Description");
    }
}
Create Your Query Type
You also need a class that retrieves data. To do this, create a class named ProductQuery that extends the ObjectGraphType class, as in Listing 4.
Listing 4: The ProductQuery Class
public class ProductQuery : ObjectGraphType
{
    public ProductQuery(ProductRepository productRepository)
    {
        Field<ListGraphType<ProductType>>(
            name:"products",
            resolve: context =>
            {
                return productRepository.GetProducts();
            }
        );
    }
}
Note that when you're working with GraphQL, the client always makes an HTTP POST call and passes the query name, name of the operation, and variables. You need a POCO class to manage schema, variables, and the argument, as shown Listing 5.
Listing 5: The GraphQueryDTO Class
public class GraphQLQueryDTO
{
    public string OperationName { get; set; }
    public string NamedQuery { get; set; }
    public string Query { get; set; }
    public string Variables { get; set; }
}
Add Services to the Container
Write the code shown in Listing 6 in the ConfigureServices method to add services to the built-in IoC container:
Listing 6: The ConfigureServices method
public void ConfigureServices(IServiceCollection services)
{
    services.AddScoped<IDependencyResolver>(_ => new FuncDependencyResolver(_.GetRequiredService));
    services.AddScoped<IDocumentExecuter, DocumentExecuter>();
    services.AddScoped<ISchema, GraphQLDemoSchema>();
    services.AddScoped<IDocumentWriter, DocumentWriter>();

    services.AddScoped<IProductRepository, ProductRepository>();
    services.AddScoped<ProductQuery>();
    services.AddScoped<ProductType>();
    services.AddControllers();
}
Create the Controller Class
So far, so good. You now need to create the GraphQL endpoint. Create a new API controller named DefaultController with the code mentioned in Listing 7 in there:
Listing 7: The DefaultController Class for our GraphQL API
[Route("graphql")]
public class DefaultController : ControllerBase
{
    private readonly ISchema _schema;
    private readonly IDocumentExecuter _executer;
    public DefaultController(ISchema schema, IDocumentExecuter executer)
    {
        _schema = schema;
        _executer = executer;
    }

    [HttpPost]
    public async Task<IActionResult> Post([FromBody] GraphQLQueryDTO query)
    {
        var result = await _executer.ExecuteAsync(_ =>
        {
            _.Schema = _schema;
            _.Query = query.Query;
            _.Inputs = query.Variables?.ToInputs();
        });

        if (result.Errors?.Count > 0)
        {
            return BadRequest();
        }
        return Ok(result.Data);
    }
}
Test GraphQL API in Insomnia
Here's an example GraphQL query:
query {
    products {
        id
        name
        description
    }
}
Now execute the application and browse to the /graphql endpoint. You can also execute this query here using the GraphiQL tool but you'll execute the GraphQL query using Insomnia. You can easily create a GraphQL request in Insomnia either choosing the GraphQL request type while creating the request or by modifying the body type of the request using the body menu.
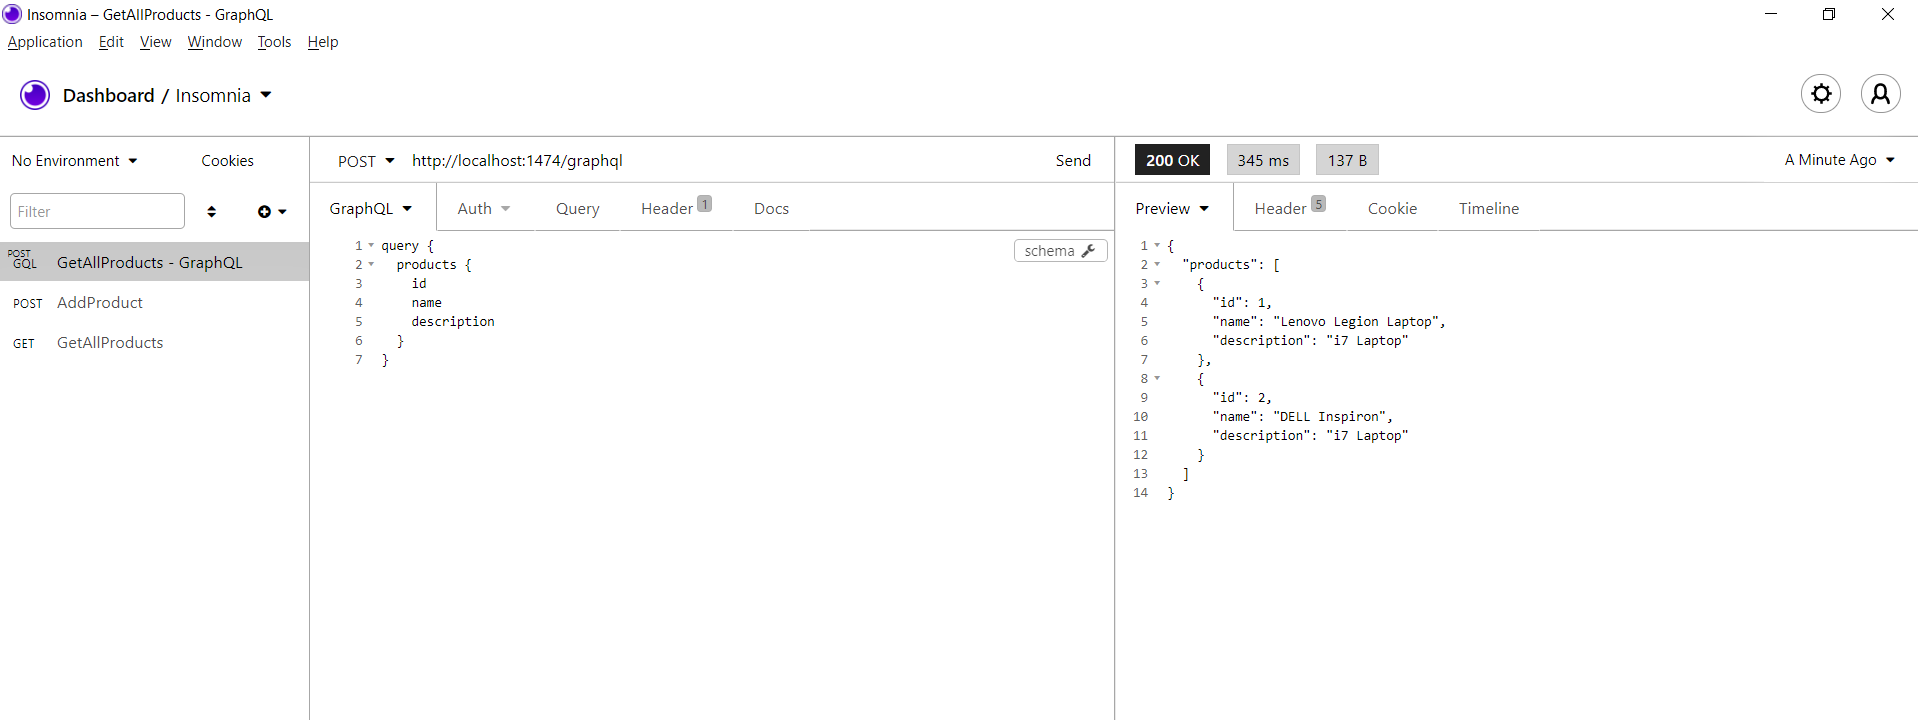
To execute the GraphQL endpoint using Insomnia, follow the steps outlined below:
- Launch Insomnia.
- Create a new request and name it GraphQL (you can provide any name).
- Select HttpPOST as the HTTP method.
- Select GraphQL request type.
- Specify your GraphQL query in there.
- Click Send.
Figure 7 shows how output looks in the Insomnia user interface.
Summary
GraphQL is technology and database agnostic, which means that it can be used with most common technologies, frameworks, or platforms. Insomnia provides support for testing both RESTful as well as GraphQL APIs. You can learn more about Insomnia here: https://support.insomnia.rest/.
