


Imagine you're a cook in a restaurant kitchen. A customer orders a cheeseburger. Simple enough; you've made thousands of cheeseburgers and it's something you're known for. You get to work, craft the best burger you can, and send it out to the table.
A minute later, the waiter brings it back. “They wanted Swiss cheese,” he says. Sighing, you cook another cheeseburger, this time adding the correct cheese. Shortly thereafter, the burger is back on your table. Too much mayonnaise. Again and again, no matter how perfect the burger seems to you, it's never quite right. No onions. Too many onions. Too rare. Too well done. Is that bun gluten free? By the time you get it perfect, you've thrown away seventeen burgers (or let's face it, given them to a very happy kitchen staff), and lots of other orders went out late. You're frustrated, the customers are annoyed, and the restaurant is losing money.
If you're new to Continuous Integration, this scenario may feel familiar.
Continuous Integration (CI) is a process by which code is pulled from a central repository, and changes made are merged back into that repository on a frequent basis. The idea is to make small changes often, as opposed to large changes that won't be complete for weeks or months. The end result, ideally, is that integrating the changes into the main code base can be mostly automatic. Time is spent on development, rather than on integrating large code changes that don't merge well with other large code changes added to the code base by other developers.
I've been hearing about CI for some years and I've experienced it on a small scale. I recently took a position at a company called StarRez, which uses a fairly rigorous CI process. Specifically, we use Jira, BitBucket, and Bamboo from the Atlassian suite. I've managed a fair number of development projects and I was very excited at the power and control promised by these tools, especially considering that the bulk of the development team is on the other side of the planet in Australia. Before new code is merged into the product, multiple experienced developers review it for correctness and adherence to coding standards, while also taking the opportunity to point out the impact the new code might have on other aspects of the product. Aspects that, as the new guy on the team, I quite possibly didn't know anything about. What a great way to ensure code quality! What a great way for junior developers to learn the ropes and for experienced, but newly hired, developers to learn the product!
At least, that's what my brain said.
Unfortunately, developers aren't all brain. We're human, and a process like this doesn't just impact our intellect. It hits us where we live: directly in the ego. Those of us who have been around for a while are used to a lot of autonomy, especially if we've mostly worked alone or on smaller teams. We're proud of our code, and rightly so. Submitting it for approval, and then re-submitting and re-submitting, can be very humbling. It can also take a lot longer than we're used to. Delays can increase if the developers reviewing your code are in a different time zone. A simple change can take a whole day to go through, and each new change means another day. It's easy to tell yourself that if it weren't for all these hoops to jump through, you could release this fix to the customer in twenty minutes. It's just one line of code. Is it worth it? Can't we make an exception in this case?
Shortly after taking this position, I heard about a company that was looking for someone to help sell their developers on the benefits of CI. They were having a hard time understanding why it was necessary, and they were concerned that their productivity would decrease significantly. I could sympathize. I'm hopeful that this article will help developers see CI as an essential tool for code quality, and also see how using CI correctly can improve product quality, speed up big identification, and most importantly, teach us how to be better and more productive developers.
Git Basics
First, I'd like to go through some of the basics. If you've used any source control tool, such as Team Foundation Server or Git, you're familiar with the concept. Code is checked out of a repository, you make your changes, do some testing, and check it back in. This works well, as far as it goes, as long as everyone is careful. No one likes to wake up in the morning and discover a broken build. And no one likes to be the one who broke it.
CI takes us to another level of code sharing. I'll be using Visual Studio and GitHub as my tools, so that's where my screenshots come from. Of course, there are other toolsets and many Git clients. Feel free to use whatever tools you prefer. I won't be going into too much technical detail, so the differences between tools should be fairly minor.
Connect to a Repository
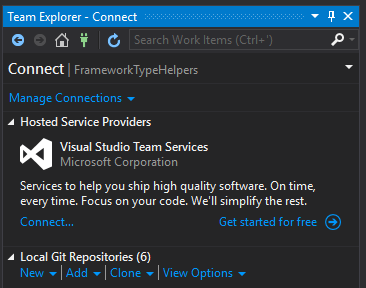
I'll assume here that you're going to be working on an existing project as opposed to starting something new. To connect to a repository, clone it. You'll need the URL for the Git repository. In Visual Studio, open the Team Explorer window and click on the Manage Connections icon. In Figure 1, it looks like a green plug.
Now click Clone. You'll be shown a screen like Figure 2, where you can enter the URL of the Git repository and the local directory where you want your code to live.
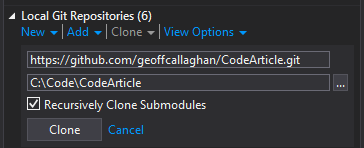
Click the Clone button, and the code is brought down to your computer. The repository in Figure 2 shows the address of the repository for a new killer app. It has the miraculous ability to display a console window that spells out “Hello World”. Pressing Enter makes the window go away. Who wouldn't pay 99 cents for that? Go ahead and clone the repository and open the HelloWorld solution.
Create a Branch
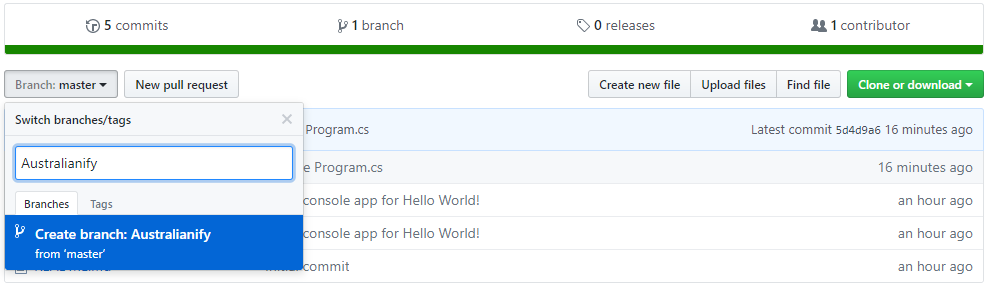
Here's the problem: StarRez, as mentioned above, is an Australian company. “Hello World” is great, but I'd like the wording to be a bit more Australian. To accomplish this, I create a branch in which to make the changes. On GitHub, this is done by going to the repository and clicking on the Branch button. You can either select an existing branch or create a new one by typing in a branch name, as shown in Figure 3.
Open Your Branch
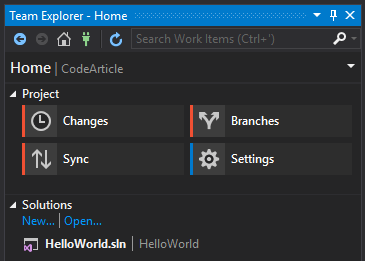
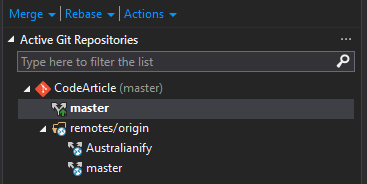
Now that your branch has been created, you need to download it to your computer. Back in Team Explorer, click on the Home button, then click Sync, and then Fetch. Once the Fetch is complete, click on Home again, and then Branches. You should be presented with a screen that looks like Figure 4.
In the Branches window, as shown in Figure 5, you should now see the new Australianify branch. Double click on it to open the branch.
Make Your Changes
This is the familiar part. Just make the changes to your code and test it to make sure it's right.
Stage Your Changes
Staging the changes means that you're pushing your code into the repository, but not yet requesting that the changes become a permanent part of the code base. You can stage as many times as you like, and you can also revert any of those staged changes. If you're working in multiple branches, you'll have to stage before you switch among them.
Switch to the Changes tab (as shown in Figure 6) and click Commit All.
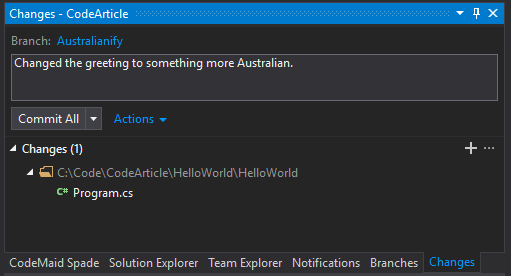
You'll be notified that a commit has been created locally. If you're confident that your changes are complete, you can now Sync them with the Git server.
Push Your Changes
This is a small change, so you're now ready to request that the changes become a permanent part of the application. Return to Team Explorer and click Push.
The Approval Process
Up to this point, you've been working in a vacuum. Now that you believe the code is complete, it's time to involve other members of the team.
Create a Pull Request
A Pull Request is how you submit your code for the approval of other team members. Depending on the tools and the process your organization uses, approval from certain reviewers may be required before you're permitted to merge your code with the main branch.
Wait…
This, emotionally speaking, is the hard part. You move on to a new task, putting this one aside. Tomorrow, or possibly after the weekend, you see that your code has been reviewed, and hopefully, that it passed muster. Now all you have to do is send the task to QA for testing, and if they don't find any issues, you should be ready to merge the code into the main branch. If, on the other hand, your code is found wanting, you'll need to go back to that branch and try again.
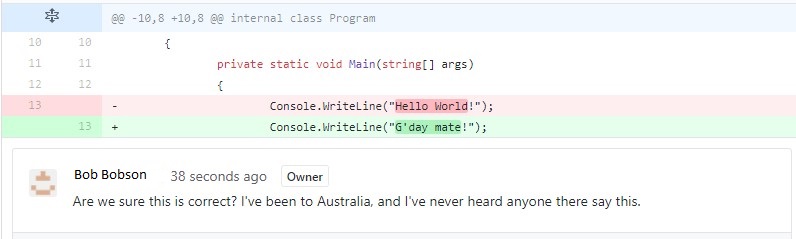
Remember, the first change was to make the greeting a bit more Australia-friendly. Figure 7 shows the code change:

Simple enough, right? This should fly through the approval process. You go home and sleep the sleep of the just. Morning arrives, you sit down with your coffee and pull up GitHub. Yawn. Stretch. Sip. Wait, what?!? Looks like it wasn't that simple (Figure 8).
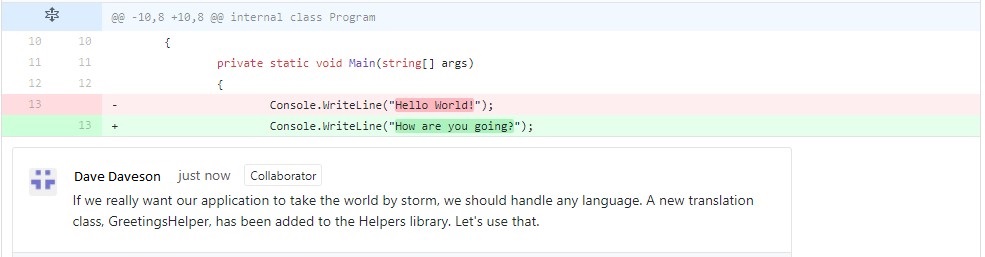
Well, that's what I get for learning about Australia through TV commercials. OK, no big deal. I do a little research, ask a few of the other developers, and decide to change the greeting to “How are you going?” After a quick test, I push the branch to again.
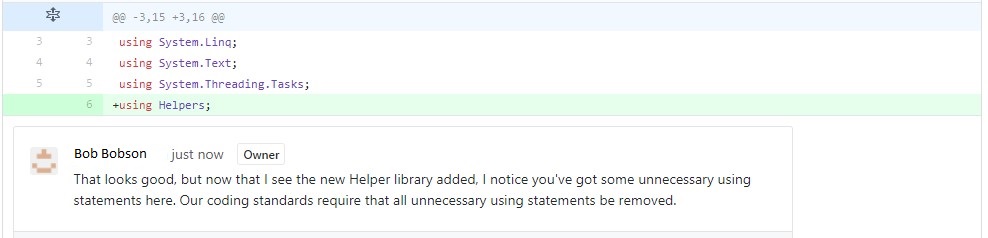
The next day, you're presented with Figure 9.
Hmm. Ok, fair enough. I'll find the new helper class and implement it.
Another day passes. See Figure 10.
On this one, my face is a little red. I was given a copy of the coding standards when I was hired. I got a little sloppy here and forgot to check. This time, I'll check my code against all the standards.
Finally, I get the stamp of approval. (See Figure 11.)
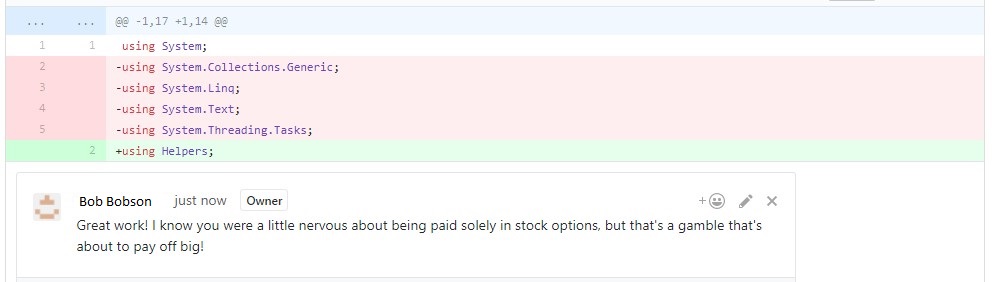
Phew! That task is complete. Now I can focus on the other tasks on my plate. I should probably go ahead and order that Tesla, too.
Automated Builds and Tests
Each branch is required to pass one or more automated builds prior to merging. This ensures that our code doesn't cause unintended consequences and that the merged code compiles properly.
Automated tests have also been added to the build process to further protect us from the possibility of releasing buggy code. In the example above, there may have been a test requiring that the output be “Hello World”. The test would have to change to allow for the new language, and possibly expand to test for all supported languages.
Merge
Merging the code back into the main product is the final step. Code from the branch is integrated into the master branch, and becomes part of the product.
How It Feels
The approval process of CI is the hardest part to deal with. Ideally, you check in your code, assign some kindhearted developers to review it, they click Approve, and there is much rejoicing. In reality, there's a decent chance you forgot something, or didn't know something, or just that your team lead would prefer you handle something differently. If you're sitting next to that person in an office, this isn't a big deal. You can run through the approval process several times on any given day. The code is still fresh in your mind, and if you've moved on to another task, you still shouldn't have too much trouble getting back into this one.
Remote work adds another wrinkle, especially if you're in another time zone. If the code was written on a Friday, it could be three days before you're notified of a problem with the code. You're probably deep into another task. Switching back to this one - again - can be very frustrating. It's bad enough to discover that you misunderstood a key part of the task, or that there's an unintended consequence. It's even worse to find out you've missed a sprint deadline because one of the reviewers pointed out that you used single quotes when you should have used double quotes. More on that later. Hi, Murray.
How to Make It Feel Better
There are a lot of things you can do to make sure your code gets through the approval process as soon as possible. There are also some helpful ways to look at the process to help you see it as a positive experience. Here are a few that work for me:
Coding Standards
Most software companies have a set of coding standards. Verifying that these standards are being adhered to is part of approving a Pull Request. It may seem like the reviewers are nit-picking, but those standards are there for a reason.
For example, StarRez has a standard of using double quotes instead of single quotes in their JavaScript and TypeScript files. I have a bad habit of forgetting to verify that I've used the correct quotes before I check in the code. Each time I forget, it's at least another day added to the task. A simple once-over before checking in the file can ensure that you don't lose time for failing to proofread your code for typos. Also, make sure that you named your variables according to standards, used the appropriate code cleanup tools (such as CodeMaid or ReSharper) and checked your spelling. Even in the comments. I know it doesn't impact the build, but misspelled words drive me crazy and I'm sure I'm not the only one.
A simple once-over before checking in the file can ensure that you don't lose time for failing to proofread your code for typos.
Double Check It Yourself
Once the code is committed, you have an opportunity to give the code a once-over to make sure it all looks good. Your Git client has a Diff tool of some kind, which allows you to compare your new code to the old code. Look at it as if you were the reviewer, not the coder. Keep a list of items you tend to forget, and verify that you haven't forgotten them this time. Until that list shrinks to nothing, use it every time.
Ask for Advice
It's always a good idea to collaborate on a task, especially if it's in an area where you don't have a lot of expertise. Try to find some time to work one-on-one with another developer who has that expertise, preferably a developer who'll be reviewing your code.
It's also a good idea to do some Googling to get tips from other sources. A lot of companies use various CI tools. Other developers run into the same problems you do. Their insight could prove very helpful. Perhaps you could even find a concise, witty, well-written article in a top-notch technical magazine and use it to make your life easier <wink wink>.
Insist on Clear Specs
Whether you've been assigned a task by a supervisor or just grabbed one from the backlog, it's important that you understand it well before you begin coding. Sometimes tasks aren't as simple as they seem at first glance. You should feel free to request more detail. It's always better to get the specifications as clear as possible to avoid re-work and delays. The sooner an issue is discovered, the cheaper it is to fix. Keep in mind that it's your responsibility to make sure you understand the task before you begin coding.
Take Advantage of the Reviewer Role
Keep in mind that as a member of the team, you'll be asked to review code written by other team members. This can be an opportunity to learn new aspects of the application, new techniques, new libraries. The comments from the other reviewers might point out issues you'll run into in your own code. Think of it as a meeting in a conference room. Ask questions, listen carefully, learn as much as you can.
Think of Pull Requests as Conversations
Sometimes when you're stuck on something, it can be very helpful to talk through the problem with other developers. Pull Requests can be used for this purpose. If you run into a roadblock, or can't decide which of multiple options is preferable, create a Pull Request and add reviewers you think might have some insight. Add some comments yourself to highlight the areas you'd like to discuss. Reviewers may even suggest other developers who could help. Once you have all the information you need, you can complete the code and add more reviewers.
Summary
Granted, the example I've used is not very realistic, but it's easy to extrapolate these steps to a task in your not-too-distant past. Take a moment to think about the implications of what can be achieved using CI. There may be some added hoops to jump through and it may take a bit longer to complete tasks. The payoff is that the product is far less likely to contain bugs. The code is guaranteed to be cleaner, because team leads have signed off on it before allowing it to be merged. Multiple developers have at least a passing familiarity with every chunk of code that's been added to the product. Automated builds have run to ensure that the code compiles. There may even be a suite of tests ensuring that no functionality was broken by this change. You've achieved a higher level of quality, reliability, and maintainability.
The thing to remember is that we all have something to teach and we all have something to learn. The review process is not only an opportunity to learn more about the software you've been hired to help build, it's also an opportunity to increase your skills as a developer, and to pass that knowledge on to other developers. Maybe there's a new class in C# you've never used. Maybe the product uses a third-party library you didn't know was there. Maybe it's just a new technique you haven't seen before. These things can be pointed out during the review process, and now that you know them, they become part of your toolbox.
