


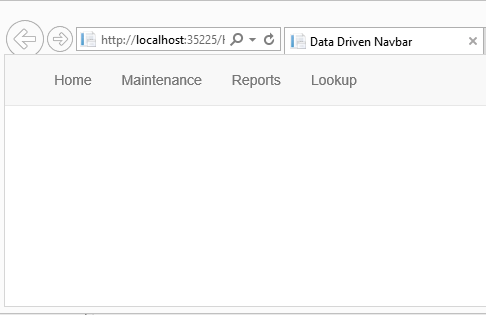
Bootstrap makes it easy to create a nice looking menu system (see Figure 1 and Figure 2). Instead of coding all your menus within your shared layout file, make your menus dynamic by storing them in an XML file or a database table. In this article, you create a simple one-line menu system using two C# classes and a little bit of Razor code in an MVC page. The sample in this article shows you how to build a hierarchical menu structure to be used with drop-down menus. You'll also see how to store and retrieve the menus from an XML file using LINQ to XML and a little bit of recursion.
Menu Classes
For any menu system, you need a minimum of two properties: Title and Action. Title is the text to display to the user and Action is the anchor tag to take the user to the page represented by the menu. As with most everything in .NET, you use a class to represent a menu. In the code snippet below, you'll find a class called BSMenuItem that has these two properties.
public class BSMenuItem
{
    public string Title { get; set; }
    public string Action { get; set; }
}
Create a single instance of the BSMenuItem class for each menu you wish to display on the screen. As shown in Figure 1, you have four menus to display, so you create four instances of this class with the appropriate titles filled in Home, Maintenance, Reports, and Lookup.
A Menu Manager Class
To build this collection of BSMenuItem objects, create a class called BSMenuItemManager (as shown in Listing 1). This class contains a single property called Menus, which is a generic list of BSMenuItem objects. A Load method creates all four of the menus shown in Figure 1. In the constructor, create a new instance of the generic list of BSMenuItem objects. In the Load method, create a new object, fill in the Title and Action properties, and then add that new object to the Menus collection.
Listing 1: A hard-coded approach to a simple menu system.
public class   BSMenuItemManager
{
    public BSMenuItemManager()
    {
        Menus = new List<BSMenuItem>();
    }

    public List<BSMenuItem> Menus { get; set; }

    public void Load()
    {
        BSMenuItem entity = new BSMenuItem();

        entity.Title = "Home";
        entity.Action = "/Home/Home";
        Menus.Add(entity);

        entity = new BSMenuItem();
        entity.Title = "Maintenance";
        entity.Action = "/Maintenance/Maintenance";
        Menus.Add(entity);

        entity = new BSMenuItem();
        entity.Title = "Reports";
        entity.Action = "/Reports/Reports";
        Menus.Add(entity);

        entity = new BSMenuItem();
        entity.Title = "Lookup";
        entity.Action = "/Lookup/Lookup";
        Menus.Add(entity);
    }
}
The Menu Controller
Create a new MVC page called DataDrivenMenu. In the controller for your new page, create a new instance of the BSMenuItemManager class. Call the Load method to build the collection of BSMenuItem objects. Pass the instance of the manager object to the View so you can use the Menus property from the .cshtml page.
public ActionResult DataDrivenMenu()
{
    BSMenuItemManager mgr = new BSMenuItemManager();

    mgr.Load();

    return View(mgr);
}
The .cshtml Page
The first thing you do in your .cshtml page (Listing 2) is set up the model for the page. The model is the instance of the BSMenuItemManager that you created in the controller. The model contains the Menus property, which contains the collection of BSMenuItem objects created in the Load method. Add the appropriate HTML and Bootstrap classes to create the container around the menu items that you need to build. Use a foreach loop to iterate over the collection of menu items. Within the foreach loop, build a <li> tag with an anchor tag inside each. The href attribute is set to the Action property and the text within the anchor is set to the Title property. This is all it takes to build a simple one-line menu system.
Listing 2: A foreach loop creates a bootstrap menu.
@model BSMenuItemManager

@{
    ViewBag.Title = "Data Driven Navbar";
}

<nav class="navbar navbar-default navbar-static-top" role="navigation">
    <div class="container">
        <ul class="nav navbar-nav">
            @foreach (BSMenuItem item in Model.Menus)
            {
                <li>
                    <a href="@item.Action">@item.Title</a>
                </li>
            }
        </ul>
    </div>
</nav>
Hierarchical Menus
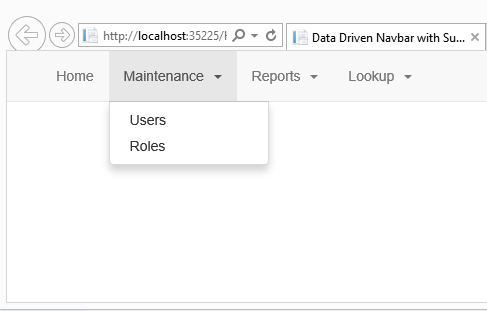
In many websites, you need drop-down menus (Figure 2) instead of single-line menus. Using Bootstrap, you can accomplish this quite easily. In order to use a data-driven approach, you need to modify the BSMenuItem class (Listing 3) so it holds a collection of other BSMenuItem objects. A few other properties need to be added as well. You need a MenuId to be used as a primary key. A ParentId property is set to the MenuId value of another menu to indicate that this menu is a sub-menu. Set the ParentId property to zero to signify that this menu is a top-level menu. The last property is DisplayOrder so you can sort the menus in a specific order before you display them.
Listing 3: A self-referencing object is ideal for drop-down menus.
public class BSMenuItem
{
    public BSMenuItem()
    {
        ParentId = 0;
        Menus = new List<BSMenuItem>();
    }

    public int MenuId { get; set; }
    public int ParentId { get; set; }
    public string Title { get; set; }
    public int DisplayOrder { get; set; }
    public string Action { get; set; }

    public List<BSMenuItem> Menus { get; set; }
}
Store Menus in an XML File
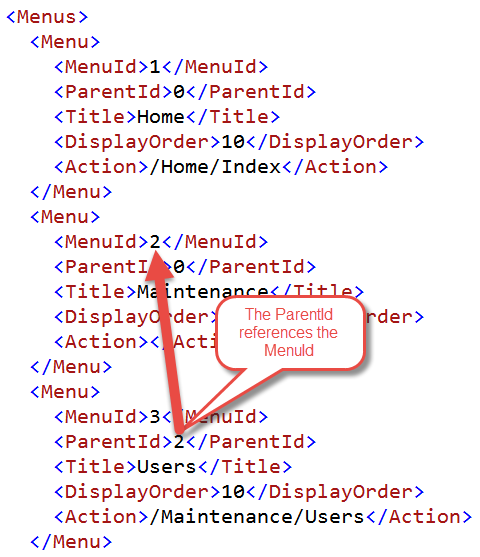
Instead of hard-coding the menus, let's put the menus into an XML file. The XML reflects the new structure defined in the BSMenuItem class. The next code snippet shows a single node of the XML file. The ParentId is set to zero to represent that this menu is one of the top-level menus.
<Menus>
    <Menu>
        <MenuId>1</MenuId>
        <ParentId>0</ParentId>
        <Title>Home</Title>
        <DisplayOrder>10</DisplayOrder>
        <Action>/Home/Index</Action>
    </Menu>
</Menus>
In Figure 3, you see the relationship between a ParentId and a MenuId within the XML file. If the ParentId is not zero and is equal to the same value as a MenuId, then that menu is one that is a drop-down under the menu with that MenuId value.
Load the Self-Referencing Menus
Modify the Load method of the BSMenuItemManager class to use an XElement class to load the XML file (Listing 4). Pass the collection of all menus to a new method called LoadMenus. This recursive method is passed an XElement object and a value of the menus that have a ParentId that match that value. The Load method passes the value zero to only select those nodes from the XElement object passed in where the ParentId is equal to zero. Zero represents all of the top-level menus only.
Listing 4: Using LINQ to XML and recursion to load hierarchical menus.
public class BSMenuItemManager
{
    public List<BSMenuItem> Menus { get; set; }

    public List<BSMenuItem> Load(string location)
    {
        XElement menus = XElement.Load(location);

        Menus = LoadMenus(menus, 0);

        return Menus;
    }

    private List<BSMenuItem> LoadMenus(XElement menus, int ParentId)
    {
        List<BSMenuItem> nodes = new List<BSMenuItem>();

        nodes = (from node in menus.Elements("Menu")
            where node.Element("ParentId").GetAs<int>() == ParentId
            orderby node.Element("DisplayOrder").GetAs<int>()
            select new BSMenuItem
        {
            MenuId = node.Element("MenuId").GetAs<int>(),
            ParentId = node.Element("ParentId").GetAs<int>(),
            Title = node.Element("Title").Value,
            DisplayOrder = node.Element("DisplayOrder").GetAs<int>(),
            Action = node.Element("Action").Value,
            Menus = (ParentId != node.Element("MenuId").GetAs<int>() ?
                     LoadMenus(menus, node.Element("MenuId").GetAs<int>()) :
            new List<BSMenuItem>())
        }).ToList();

        return nodes;
    }
}
In the LoadMenus method, LINQ to XML is used to select those nodes from the XElement object that match the ParentId passed in. Apply a where clause to perform the filtering and use an orderby to sort by the DisplayOrder element. A select new BSMenuItem statement creates a new object and maps the XML elements to each property of the new object. Notice the use of an extension method GetAs. This method is explained in the sidebar XML Extension Methods.
Notice the line of code within the select that sets the Menus property of the BSMenuItem class. A ternary operator is used to determine whether or not to recursively call the LoadMenus method again or to just create an empty list of BSMenuItem objects. If the ParentId is not equal to the MenuId, you need to check to see if there are any sub-menus that match the current MenuId in the XML node that is being processed. Pass that MenuId to the LoadMenus method and any sub-menus are loaded and returned into the Menus property.
Menus =
    (ParentId != node.Element("MenuId").GetAs<int>() ?
    LoadMenus(menus, node.Element("MenuId").GetAs<int>()) : new List<BSMenuItem>())
Modify the Controller
The controller to call this new Load method in the BSMenuItemManager class must now change. You need to pass in the name of the XML file that contains the menus to the Load method. Use Server.MapPath to calculate the complete file path and name within your website. In the next code snippet, I created a file called Menus.xml that was under the folder \Xml.
public ActionResult DataDrivenMenu()
{
    BSMenuItemManager mgr = new BSMenuItemManager();

    mgr.Load(Server.MapPath("/Xml/Menus.xml"));

    return View(mgr);
}
Modify the .cshtml Page
To display a drop-down menu in Bootstrap, add additional attributes to your anchor tag and create a new <ul> tag with the collection of sub-menus. Add an if statement around the code you had before in the .cshtml page. Check the current menu item and see if there are any sub-menus in its Menus property. If not, use the same code to build the anchor tag that you used previously.
@if (item.Menus.Count == 0)
{
    <a href="@item.Action">
    @item.Title
</a>
}
Next, add an else statement (Listing 5) to build submenus if there are submenus to display. Submenus in Bootstrap are built by adding the class of dropdown-toggle to the anchor tag of the top-level menu. Add data-toggle="dropdown" attribute to the anchor tag as well. Display the Title within the anchor tag, and next to the title, add a blank space and a span tag with the class of caret to display an arrow next to the menu.
Listing 5: A nested foreach loop builds the sub-menus
else
{
<a href="@item.Action"
class="dropdown-toggle"
data-toggle="dropdown">
@item.Title
<span class="caret"></span>
</a>
<ul class="dropdown-menu">
@foreach (BSMenuItem subitem in item.Menus)
{
<li>
<a href="@subitem.Action">
@subitem.Title
</a>
</li>
}
</ul>
}
Immediately below the anchor tag add a new <ul> tag and iterate through all submenus building the <li> tags for each menu item just like you did for your normal menus. You can see the complete .cshtml page in Listing 6.
Listing 6: This function strips any non-numeric characters from a string.
@model BSMenuItemManager
@{
ViewBag.Title = "Data Driven Navbar with Submenus";
}
<nav class="navbar navbar-default navbar-static-top" role="navigation">
<div class="container">
<ul class="nav navbar-nav">
@foreach (BSMenuItem item in Model.Menus)
{
<li>
@if (item.Menus.Count == 0)
{
<a href="@item.Action">
@item.Title
</a>
}
else
{
<a href="@item.Action" class="dropdown-toggle"
data-toggle="dropdown">
@item.Title
<span class="caret"></span></a>
<ul class="dropdown-menu">
@foreach (BSMenuItem subitem in item.Menus)
{
<li>
<a href="@subitem.Action">
@subitem.Title
</a>
</li>
}
</ul>
}
</li>
}
</ul>
</div>
</nav>
Summary
In this article, you learned to build a Bootstrap menu system using C# classes and foreach loops. You also saw how to build a hierarchical menu system using LINQ to XML and a recursive method. Keeping menus in an XML file is convenient if you aren't using a database in your application. Using a self-referencing system of a MenuId and corresponding ParentId avoids the need to have multiple XML files.
