


In the introductory overview article elsewhere in this issue, I discussed the what and why of ASP.NET vNext using a high-level editorial perspective. In this article, I want to take you through the how, using a more hands-on approach starting from the bottom up, and describing some of the low-level system features and working up to the high-level showcase features that you've probably seen in demos or presentations.
But first, a disclaimer: The code and tooling I'm showing is based on ASP.NET vNext Beta 1 or the Visual Studio 2015 Beta 1 Preview, which is pre-release software. ASP.NET vNext is still changing, so it's possible that some of the tooling and code I show will change. I've made the samples I'll demonstrate in the article available on GitHub and will continue to update them for more recent versions until the RTM of vNext. You can find the repository at: https://github.com/RickStrahl/AlbumViewerVNext.
Getting Started
The easiest way to get started with ASP.NET vNext is by using Visual Studio 2015. But you should also understand that vNext implements most of its tooling using command-line tools that let you manage and administer this new environment through a command-line interface. It's a good idea to understand these relatively simple tools and that's where I'm going to start. I'll also go into high-level frameworks and Visual Studio later, but before I do, let's go over some core aspects that are vital to understanding vNext.
Command Line First?
I highly recommend that you take a few minutes to familiarize yourself with the underlying K Runtime Environment (KRE) and tools that actually drives the vNext platform. The runtime includes a number of tools that run from the command line and allow you, among other things, to load new and updated versions of the KRE onto your system and configure applications to run using one of these runtimes. These tools are independent of Visual Studio, so you don't need Visual Studio to do anything with vNext. The tools are folder-based and they have very little impact on your system.
The K Runtime can execute multiple versions of the runtime side by side. All you need is a new command shell.
Getting the KRE Runtime installed
The first step is installing the K Runtime on your computer. The KRE hosts and runs your applications. It's a runtime that is bootstrapped by either an executable application host or IIS and provides most of the application services that make up vNext. Depending on which version you run; the Full CLR or Core CLR; the base loader loads the full .NET runtime or the Core .NET runtime respectively. The application host includes the loaders responsible for bootstrapping the runtime and essentially executing the applications you create. The KRE supports running through its own EXE application host (K <command>) and applications hosted on IIS using the lightweight Helios extension that bootstraps the KRE into IIS.
The full installation instructions are at https://github.com/aspnet/home, but here's what you need to do in a nutshell. For Windows, there's a long PowerShell script that you can run from a command window (one line):
@powershell -NoProfile -ExecutionPolicy unrestricted Command "iex
((new-object net.webclient).DownloadString('<a href=
"https://raw.githubusercontent.com/aspnet/Home/master/kvminstall.ps1'">
https://raw.githubusercontent.com/aspnet/Home/master/kvminstall.ps1'</a>))"
This creates a new .KRE folder in your user profile folder (c:\users\<yourusername>\.kre). Inside, there's a \bin folder that contains shell and PowerShell scripts to run kvm - the K Version Manager. The folder is added to your system path so now you can grab the latest version by running:
kvm upgrade
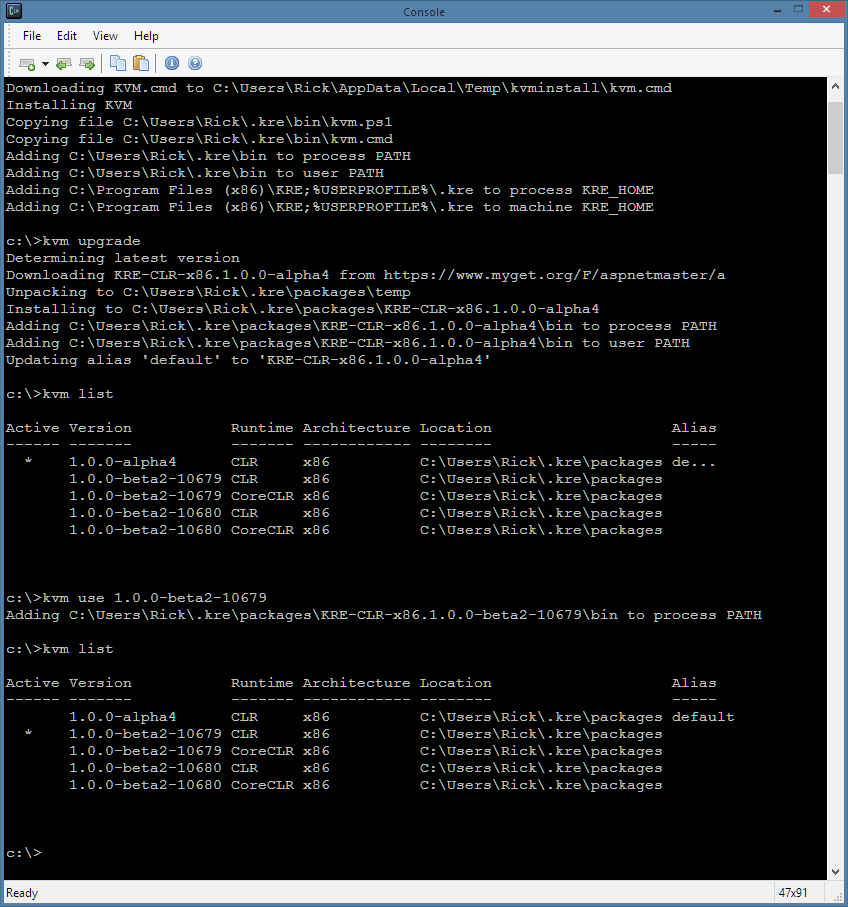
Once you've downloaded, you can look at the installed versions.
When you install new runtimes, a few important things happen: The specific runtime and tools are installed, and paths and environment variables are set so that you can find and run the various utilities like kvm, kpm, k, and others for that version. This is key if you want to play around with newer versions of the runtime, run the package manager, or simply test your server apps as a self-hosted application. All of these steps require some of the command line tools.
You can install multiple version of the KRE side-by-side and you can list them using:
kvm list
Figure 1 shows what this looks like at the command window. Note that I have a few other versions of the KRE installed and I can choose which one I want to be active (the one with the * next to it), like this:
kvm use 1.0.0-beta2-10680
The active version is marked with a * character and that's the one that runs if you launch an application or perform other operations, like packing a project.
This is an important point-the KRE executes in the context of a command shell and you essentially select the version of the KRE that you want to load and run in this shell instance. You can open another command window and select a different version of the KRE and then run your applications under the other versions. This allows for side-by-side execution of different runtime versions for different, or even the same, applications.
By default, there's a production feed that the KRE uses to load runtimes. This feed can be changed by setting an environment variable. To change to the latest Dev feed that contains pre-release versions, you can use:
set KRE_NUGET_API_URL=<a href="https://www.myget.org/F/aspnetvnext/api/v2">
     https://www.myget.org/F/aspnetvnext/api/v2</a>
If you plan to work with the Dev feed, I recommend that you add this environment variable to your user profile. Running the Dev feed has been a requirement for me as I've been struggling with a host of breaking bugs that have been fixed since the Beta 1 release. But using the Dev feed can also introduce bugs, since it's under development. Use with caution and maybe pick and choose the builds that work for you.
Once you've switched to another feed, you can upgrade again and get the latest version from the Dev feed:
kvm upgrade
kvm list
Information on the feed URLs is available on the vNext Home page on GitHub. You can also get a specific version from the feed by using the install command:
kvm install 1.0.0-beta2-10680 -runtime CoreCLR
kvm install 1.0.0-beta2-10680 -runtime CLR
The last version installed becomes the selected version.
The KRE is responsible for loading the runtime and then bootstrapping your vNext applications. ASP.NET vNext applications run either as Console applications (using the K command) or as hosted IIS applications currently (using the Helios components). Think of the KRE like .NET Framework versions (i.e., 4.0, 4.5, 4.51 etc.) that can be easily swapped out and run side-by-side on the same system. The difference is that KRE loads the .NET BCL and FCL libraries in a modular fashion.
There are two versions of the KRE-the full CLR using the full .NET 4.5.x Framework to execute code, and the Core CLR, which uses a smaller cloud-optimized version of the Framework. The full CLR version loads the full .NET Framework and can interact with existing .NET NuGet packages and assemblies. The new Core CLR can only use NuGet packages specifically compiled for that platform. The Core CLR is much more limited in terms of feature set and APIs, so it has much more potential to break existing code and is likely missing features that you expect to have in .NET code.
This is a core concept to understand. ASP.NET vNext applications run on one of these new K Runtimes and changing the environment of the shell affects the KRE running within it. The tooling is driven by command line tools. There's KVM to manage versions, K to run applications, KPM to pack applications and load and manage application NuGet packages. It all works from the command line, which means that you don't have to use Visual Studio for these tasks. Any editor and a command window will do.
You'll see more of the command line tools later in this article, but first I'll start with Visual Studio by creating a new project.
ASP.NET vNext projects don't have Assembly references; instead all dependencies are NuGet Package references.
Creating a New Project in Visual Studio 2015
Let's start Visual Studio and create an empty vNext Web project, as shown in Figure 2. Note that the blue headers indicate vNext project types in the dialog.

This creates a new project, as shown in Figure 3. ASP.NET vNext projects contain a few unfamiliar features, including a new References tree that only shows NuGet packages rather than assemblies. You can view all of the dependencies as a tree hierarchy that you can drill deeply into. This is a big change: There are no assembly references in vNext, only NuGet package references. Note also that there are two nodes there: ASP.NET 5.0 and ASP.NET Core 5.0, which corresponds to the two supported build targets of the Full CLR and Core CLR. The Visual Studio project lets you select a specific version and mode for the KRE to run your application on, which determines which version is packaged with the application when you pack or deploy your project.
Although you can have both Full and Core CLR runtimes in the same project for Web applications, real Web applications are likely going to target one or the other, not both. It's useful when you get started to see what's supported on each of the platforms, but as soon as you use a feature that's not supported by one of the runtimes, your code won't compile. Unless you plan on a lot of #IF/#ENDIF constant code, I advise you to pick a version and forget about running both. It's different library creators, though: Libraries often support both platforms that can both be added into a single Nuget package.
The project also contains a project.json and Startup.cs file. These two files are the core configuration files for a project. Project.json drives the content of the References node by defining the top-level NuGet packages that are referenced by the project, as well as a few build directives that drive the K Package Manager (KPM) that packages an application and gets it ready for deployment. Startup.cs contains configuration code that enables features set configuration options for each of the features and components you're enabling in the application. These two files are the key to configuring vNext applications and you'll need to get familiar with them.
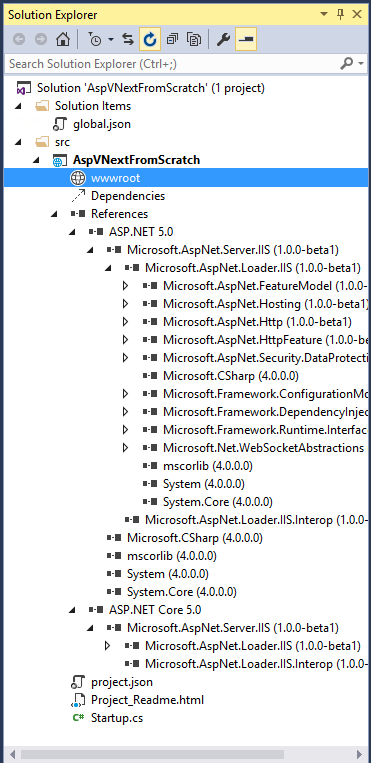
You'll also note that there's a wwwroot folder in the project. ASP.NET vNext introduces the concept of a WebRoot, which is the folder that's rooted to the Web server when you run your Web application, and that should contain only deployable files but no code. When you build your Web project, it's packaged and produces the final output that's used by the Web server into this folder.
If you've used JavaScript build tools like Grunt or Gulp, you're already familiar with the development style of having a source tree and deployment tree using tools to transform the source files by transpiling, minifying, packing, and combining them into the most efficient files for deployment. In vNext, these same JavaScript build tools (Grunt and Gulp, etc.) are also supported and even integrated into Visual Studio, and ASP.NET vNext adds the K Package Manager to package a project for deployment. Wwwroot should contain all your final content files and Web resources.
When you're done with your Web app, KPM builds and compiles all code and Razor Views and into the Packages folder leaving the wwwroot folder with only those HTML artifacts that need a direct disk presence. This is mostly static files and not much more. Views are compiled and included into the packages, as is any code in loose .cs files. KPM also builds a deployment package (a folder structure, really) that's completely portable and can be uploaded (or synched, in the case of Web deploy) to a Web server.
Project.json
The default project.json file generated looks like this:
{
    "webroot": "wwwroot",
    "version": "1.0.0-*",
    "exclude": [
        "wwwroot"
    ],
    "dependencies": {
        "Microsoft.AspNet.Server.IIS": "1.0.0-beta1"
    },
    "frameworks" : {
        "aspnet50" : { },
        "aspnetcore50" : { }
    }
}
The key elements are the dependencies, which are NuGet packages required by the project, and the frameworks to use, which is either the Full CLR (aspnet50) and the Core CLR (aspentcore50): each of these two nodes can have their own specific dependencies. A vNext project can be compiled to a specific version of the KRE runtime, which you choose when you compile or build the project in Visual Studio, or by using kvm use on the command line before you package your project using the kpm pack command.
The dependencies node maps to the Reference tree in the UI and packages are added here. Visual Studio supports IntelliSense for packages from the configured NuGet feeds and provides autocomplete for package names and version numbers. Currently, editing project.json is the only way to add dependencies.
In vNext, NuGet packages for common system services have been broken up into very modular pieces and so if you need a reference to a component, you may need to do some sleuthing to find the right package to add. To help with this, Microsoft has created a simple helper site that you might find useful: http://packagesearch.azurewebsites.net/. Using this tool, you can type in the name of a class or namespace and it returns the packages and namespaces that match.
Startup.cs
Configuration is the other important part of vNext. Unlike previous versions of ASP.NET, the focus is on code-based configuration rather than extensive configuration files. Startup.cs is the entry point for an application and when creating an empty Website, you're greeted with a pretty bare file:
public class Startup
{
    public void Configure(IApplicationBuilder app)
    {    }
}
The Startup class is similar to the Application_Start in the current System.Web stack and so the Configure method is called when the application starts. The startup class above is empty, so if you were to run this application now, you'd literally have a Website that does nothing. If you hit a URL, you get a blank page.
Hello World at a Low Level
Let's create the simplest and lowest-level thing you can do in ASP.NET vNext, which is an App.Run() handler that's fired on any incoming requests.
public class Startup
{
    public void Configure(IApplicationBuilder app)
    {
        app.Run(async ctx =>
        {
            ctx.Response.ContentType = "text/plain";
            await ctx.Response.WriteAsync(
               "Hello vNext World. Time is: " +
               DateTime.Now);
        });
    }
}
This code is roughly equivalent to an HttpHandler in the System.Web stack except that this handler runs on every request. App.Run() is a catchall interface that fires when nothing else in the call chain handles a request. Since there's no other functionality hooked, the App.Run() code runs on every Web request directed to the server.
To check it out, let's add an Index.html page to the Visual Studio project in the wwwroot folder so you have an easy way to launch IIS Express and start the application without the Debugger. Put any HTML text at all inside of the index page, then use View in Default Web Browser from Visual Studio. This should bring up your browser and display the index page. Because IIS Express is a full-featured Web server, the index page shows. But it's IIS Express, not your application that's serving this static HTML resource. ASP.NET vNext hasn't actually fired yet.
To fire the code, navigate to a non-existent extension-less URL like http://localhost:1325/wat and you should now see something like this:
Hello World from vNext. Time is: 1/5/2014 1:10:00am
And voila, there's your first ASP.NET vNext application.
ASP.NET vNext Applications don't need to be compiled. The KRE can compile code at runtime when it starts and it's fast, thanks to Roslyn.
No-CompileCode Changes with IIS Express
Now go back to Visual Studio and change the code in the App.Run() method slightly. Maybe change the text from vNext to ASP.NET vNext. Don't recompile the code, just go back to your browser and reload the page. And you should see the changed code. Nice!
This works because IIS Express is using a Design Time Host that communicates with Visual Studio and coordinates code changes. When a file is saved, the change is detected, the Visual Studio byte code is shuttled over to the Design Time host, which injects it into the newly restarted application. Rather than recompiling the code, the KRE can then just run with the already pre-compiled code, which is much faster than a warm application restart. This is a design time feature.
Saving code and simply hitting F5 to refresh is huge time saver that may seem like it's a small thing, but it's really noticeable if you go back to an environment that doesn't support it. A lot of context switching and time lost is involved in compile/restart operations. Note that the file system watcher and change detection features currently only work with IIS Express in Beta 1 and then only when not running under the debugger. When running under debug, the change detection features are not enabled and any changes require a restart of the application.
But explicit non-compilation goes beyond just design time features in vNext. You don't have to explicitly compile code using your favorite language compiler, but rather the K Package Manager (KPM) compiles app code on-the-fly directly into memory when it starts, without any assemblies copying to disk. Compilation becomes more of an error-checking mechanism than an actual build step. Automatic in-memory compilation also extends to referenced projects in a solution, so making code changes in a dependent project also update without a required compile step.
With vNext, you can see code changes immediately reflected in the browser without recompilation. Just refresh.
Adding Basic Web Server Features
So far, you've only added an endpoint handler that didn't have any dependencies and that works fine. Also because you're hosting on IIS Express right now, you get a lot of Web server functionality for free. For example, when you navigated to index.html, you noticed that the index.html page rendered. Likewise, if you reference an invalid HTML page, an IIS error page displays. This works because IIS Express is a full-featured Web server and has default features for static file serving and error display.
However, with vNext, you can host your website on other servers or platforms. For example, you can self-host your Web application and run it from the command line with its own built-in server using the HttpListener in Http.sys on Windows. When hosting this way, there's no support for static files or a default error display, so the application has to provide these features. To demonstrate, add these features and see if you can run the application using self-hosting from the command line.
First, you need to add some NuGet packages that provide for hosting, static file handling, and error page support in project.json:
"dependencies": {
    "Microsoft.AspNet.Server.IIS": "1.0.0-beta1",
    "Microsoft.AspNet.Diagnostics": "1.0.0-beta1",
    "Microsoft.AspNet.StaticFiles": "1.0.0-beta1",
},
You can then hook up these features in the Configure() method of the Startup class:
public void Configure(IApplicationBuilder app)
{
    if (env.EnvironmentName == "Development")
      app.UseErrorPage(ErrorPageOptions.ShowAll);
    app.UseStaticFiles();
    app.Run(async ctx => {...});
}
Flip back over to your browser, make sure that IIS Express is still running, and hit both the index.html and /wat link that should fire the App.Run() handler again to ensure that running IIS Express still works. It does.
Then go and change the App.Run() code and introduce an error. A null reference error is easy to create like this:
app.Run(async ctx =>
{
    string bonk = null;
    bonk = bonk.ToLower();

}
If you now refresh in the browser, you should see a very rich error page that looks something like Figure 4. The error page shows detailed error information, the line of code where it bonked, as well as typical trace information for the request.
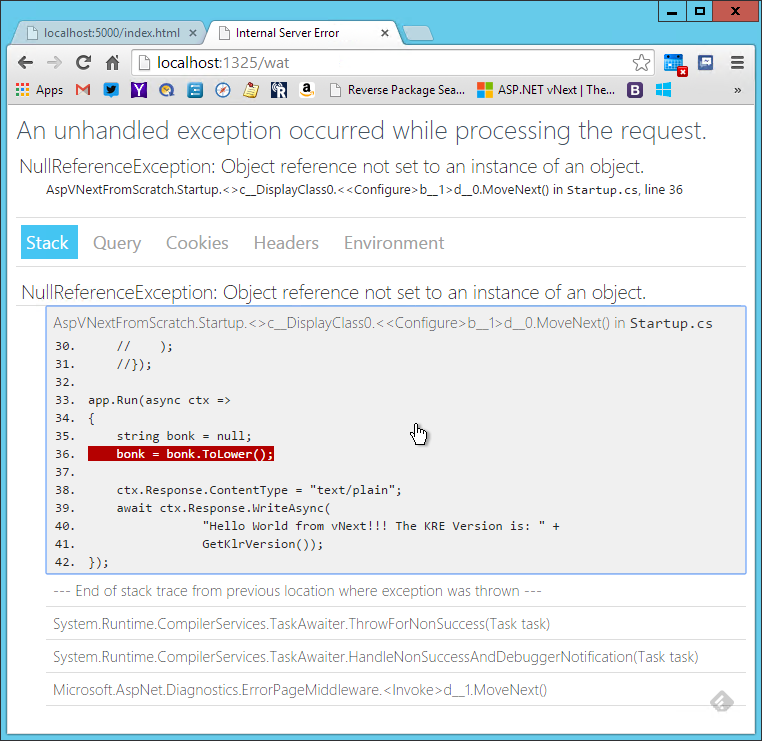
This error page behavior is implemented as middleware and app.UseErrorPage() is how it's hooked up and added to the middleware chain. Go ahead and comment out the error-causing code so that the application runs again without an error.
More Low Level Stuff: Middleware Basics
If App.Run() is similar to an HttpHandler, app.Use() is similar conceptually to an HttpModule. The app.Use() interface is a generic interface used to implement middleware components to hook into the request chain. Think of middleware as components that add behavior to requests, just like modules did in the existing ASP.NET stack.
Unlike App.Run(), which is an endpoint handler, App.Use() can have multiple implementations that can be chained together. App.Use() components can execute both on the inbound and outbound request processing. Let's create a simple inline middleware hook that logs request information to the console and which also gives you the opportunity to demonstrate running an ASP.NET vNext app from the command line.
Add the following code above the App.Run() code in the Configure() method:
app.Use(next => async ctx =>
{
    var time = DateTime.UtcNow;
    Console.WriteLine("Started: " +
                            ctx.Request.Path);
    ctx.Response.Headers.Add("Custom-Header",
new string[1] { "ID" });
    await next(ctx);
    var ms =
               DateTime.UtcNow
               .Subtract(t).TotalMilliseconds;
    Console.WriteLine(
        string.Format("Complete: {0} ({1}ms)",
            tx.Request.Path, ms.ToString("n2"));
    );
});
This code hooks into the middleware chain and logs a start and end time to the Console and adds an HTTP header to the request. If you run this code from IIS Express running from Visual Studio, you're not going to see the output, but if you run it using self-hosting or even running IIS Express from the command line, you'll see the output generated.
IIS isn't required to run ASP.NET vNext applications and self-hosting is built-in.
Self Hosting from the Command Line
To see the middleware work, let's run the simple site from the command line. To do this, you'll need to add some more NuGet dependencies and add a new command in project.json.
"dependencies": {
   "Microsoft.AspNet.Server.IIS": "1.0.0-beta1",
   "Microsoft.AspNet.Diagnostics": "1.0.0-beta1",
   "Microsoft.AspNet.StaticFiles": "1.0.0-beta1",
   "Microsoft.AspNet.Hosting": "1.0.0-beta1",
   "Microsoft.AspNet.Server.WebListener":
                                   "1.0.0-beta1",
},
"commands": {
    "web": "Microsoft.AspNet.Hosting
          --server Microsoft.AspNet.Server.WebListener
                --server.urls http://localhost:5000"
},
I added the hosting library dependencies that are used to launch a self-hosted Web server using the Windows HttpListener. In order to be able to actually launch the self-hosted server application, I can specify a command that brings up the server from the command line. The web command specifies which Web server to use and on which endpoint to listen for incoming HTTP requests. You can run any commands defined here using the k command line utility.
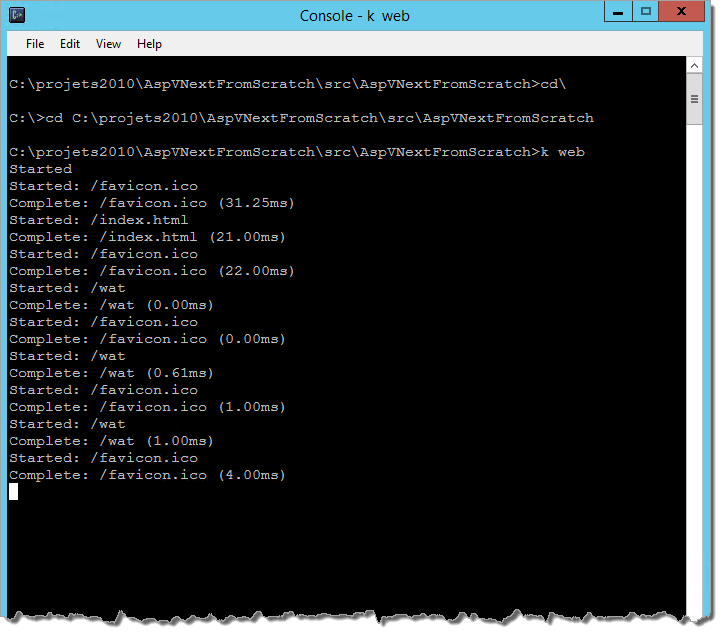
To check out this self-hosted application, bring up an admin command window and change your path to the folder where project.json lives. Then run:
k web
If all goes well, you should see a Started prompt indicating that the server is listening. Now bring up your browser and navigate to http://localhost:5000/index.html. You should see the index page (served by the app.UseStaticFiles() middleware). Then navigate to a dummy path like http://localhost:5000/wat and you should see the Hello World and version number. On the command line, you should see the log information for each request, as shown in Figure 5.
You can now easily self-host your application from the command line without requiring IIS or IIS Express to run. Keep in mind that while you're only doing mind-numbingly simple stuff here, self-hosting still works once you hook up a full API or HTML-based application up to it using ASP.NET MVC, as I'll show shortly.
The important point of this simple demonstration was to show the low-level hooks that vNext uses to build upon. Most features in vNext extend functionality via middleware or the app.Use() command that is customized. MVC, SignalR, and many of the support components all plug into the pipeline as middleware and you can do the same with your own extensions or frameworks. There's a common theme to middleware: Most components have a configuration piece that allows you tweak settings and a hook up piece (UseXXXX extension methods) that are used to enable and set top-level configuration options.
In ASP.NET vNext, MVC and Web API have been combined into a single framework.
Adding MVC and APIs
Most of you are probably going to interact with ASP.NET vNext on a much higher level using a high level framework such as MVC or SignalR. So let's see how to hook up the new MVC version that combines both MVC and WebAPI functionality in a new combined framework.
First, you need to add NuGet references. Add the following two references to your project.json file:
"Microsoft.AspNet.Mvc": "6.0.0-*",
"Microsoft.Framework.CodeGenerators.Mvc": "1.0.0-*",
Next, MVC needs set up and route configuration. Most vNext middleware configuration is a two-step process: Configure the associated services for Dependency Injection and configuration and then hook up the actual middleware. For MVC, this is what the relevant code looks like in the Startup.Configure() method:
app.UseServices(services =>
{
    services.AddMvc();
});
app.UseMvc(routes =>
{
    routes.MapRoute( name: "default",
        template: "{controller}/{action}/{id?}",
        defaults: new { controller = "Home",
                        action = "Index" });
});
With the configuration and a default route in place, you can create a new controller class. In MVC vNext, MVC supports both HTML generation using the familiar Views() using a Razor Template approach, but MVC also supports most of the features of Web API, including Content Negotiation for non-ActionResult responses, HTTP Verb Routing, and an improved arsenal of HTTP response types. In vNext, there's only a single combined Controller framework that uses the same configuration, routing, and filters. Controllers also don't have to inherit from the Controller base class anymore; you can simply create a class and use dependency injection to inject only those features you need as properties.
To demonstrate, let's create a simple controller and the following two simple methods to demonstrate both HTML View and API results. I created a simple Person class to set up a basic model that outputs both as an API response and MVC view.
public class PersonsController : Controller
{
  public Person HelloWorldApi(string name)
  {
        name = name ?? "Mr. Anonymous";
        var person = new Person() {Name = name};
        person.Address.City = "Paia";
        return person;
  }
  public IActionResult HelloWorldMvc(string name)
  {
        name = name ?? "Mr. Anonymous";
        var person = new Person() {Name = name};
        person.Address.City = "Paia";
        return View(person);
  }
}
Once created, the API controller should just work without any further fanfare. As with the low-level code, you don't need to recompile, just switch over to IIS Express if it's still running, and go to http://localhost:1325/persons/helloworldApi?name=Rick. You should get an XML response from the server on this request. XML, you ask? Even though JSON is the default data format for API responses that get returned from a non-ActionResult response, most browsers include an Accept header that includes XML mime types. Here's the one that Chrome sends when I access the URL:
Accept: text/html, ,application/xml;q=0.9
It includes XML and the automatic content negotiation kicks in on the API request and returns XML. This is Content negotiation - first seen in Web API - and now available in the merged MVC framework. If you want a JSON result, just set an explicit Accept header when you create the HTTP request:
Accept: application/json
You can try this by using tools like Postman, Fiddler, or West Wind Web Surge to create REST requests and test the server requests. JSON is the default, so if no Accept header is sent by the client, JSON is returned for most non-action results. You can also override the output behavior explicitly by returning a response using JsonResult() for example.
The HelloWorldMvc() method is a typical MVC-style HTML View method. In order to get it work, you have to create a matching View page called HelloworldMvc.cshtml in the \Views folder of the \src project. The following is a silly simple view that displays a couple of properties from the Person model passed to it.
@model AspVNextFromScratch.Person
@{  Layout = null;    }
<html><head></head>
<body>
    <h1>Hello World from MVC</h1>
    What's up, @Model.Name? How's life in
    @Model.Address.City?
</body></html>
Now, if you navigate to http://localhost:1321/persons/HelloworldMvc?Name=Scott you should see the page with the name and city displaying in the page. MVC's base features and concepts are mostly unchanged in vNext. All the existing concepts, like passing models, using Razor syntax, helpers, and model binding, are all here and work pretty much the same way as they did before. Just be aware that there is no System.Web-based HttpContext object; there's only a much smaller and more lightweight HttpContext that only provides a small subset of the information that was available in the System.Web HttpContext.
Back to the Command Line
Remember when you ran the simple first Web request from the command line? It still works now that you've added MVC to the application. You can go back to the command line, change to the project folder, and again type:
K web
Then browse to http://localhost:5000/persons/HelloworldMvc?Name=Scott and you should still get the MVC-generated HTML page. Likewise, you can access the API endpoint and get a response. If you were to add SignalR, that too would just work. It's nice to see that it's really easy to take a Web application and get it to run on IIS and in a self-hosted environment from the command without any sort of special configuration! That's pretty awesome, especially when you consider how difficult it was to do previously to get this configured correctly. With vNext, it just works out of the box.
Even better, you can also easily package up the entire site you created and deploy it via the command line by using the (K Package Manager) utility. This tool creates a fully deployable version of your site that contains all dependencies including your source code, all NuGet packages, and the K Runtime and pushes it into a path you specify.
Use KPM to package an application for deployment. Packages are xcopy-deployable.
To package the application, go back to the command prompt in the project root and run the following:
Kpm pack -o "c:\temp\aspvnextFromScratch"
    --runtime KRE-CLR-x86.1.0.0-beta2-10687
You specify an output folder and optionally a -runtime switch. This switch adds the K runtime into the packages folder so it can be installed on the target computer.
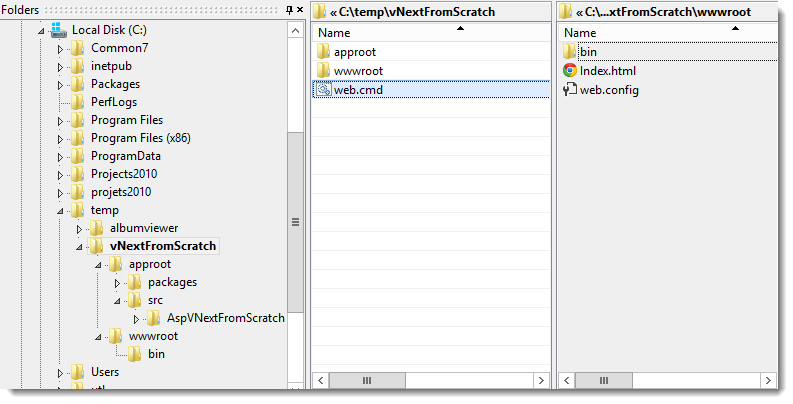
The command creates a runnable copy of the project with all of its package dependencies, including the full KRE runtime package. Figure 6 shows what the output of this folder looks like for this simple project. The copied folder is a fully self-contained version of your site and you can just launch it from the new location, or you can copy it to a USB stick and walk over to another computer and simply start up the application from the USB. The output folder contains the wwwroot folder, which contains only the final Web files of the project. All the code folders and even the Views folder have been stripped out. All compilable code and dependency packages are stored in the approot folder, including the MVC Views folder.
All of your Web project source code and also the code of all dependent source projects is uploaded into approot, compiled by Roslyn and loaded into memory at runtime on the fly. MVC Views are treated as code, since Views are, in fact templates that compile down into source code that executes so they are not stored in the wwwroot folder.
For the simple project, there's only a single content file, index.html, in the wwwroot folder. Everything else lives in appcode and gets compiled at runtime. In a real-world project, you're likely to have much more static content, like HTML files and CSS, images, and JavaScript files, etc. and those, too, live in wwwroot. If you manually configure IIS, you make the wwwroot folder your IIS site or virtual directory home path. Web Deploy to Azure or an IIS Web site automatically configures the path to wwwroot for you.
There's also a \bin folder in wwwroot and it contains AspNet.Loader.dll, which contains the Helios bootstrapping code for IIS. Helios is the small stub that routes IIS and brings up the KRE inside of IIS/IIS Express. It makes it so that IIS requests directly access the KRE without running through the rest of the full IIS .NET pipeline. There's also a web.config file that's also used only for running under IIS. You can still configure IIS with web.config, but in vNext, there's no explicit ASP.NET configuration stored in web.config. Both of these are used only when you run your application under IIS or IIS Express. If you self host or run a custom Web server these files are ignored even though they are still created during publishing.
The web.config file also contains configuration entries that point at the K runtime folders and packages folder so that Helios can find and start up the runtime and load the application-related packages. When running self-hosted, neither web.config nor aspnet.loader.dll are used and the K runtime is bootstrapped directly from the command line environment via the KLR.
When KPM packs the project, it also creates a batch file for each of the commands contained in project.json. If you recall, you have a Web command that launches the self-hosted server that you can run from the command line, and KPM pack creates a web.cmd file to launch the self-hosted WebListener-based server out of the new folder without any further configuration. That's pretty cool-there's no configuration: it just runs! Move it to a new folder and it just runs. This is true xcopy deployment.
Self-Hosting versus IIS
Although vNext makes it very easy to self-host or use a custom Web server, IIS is still the recommended platform for hosting Web applications on Windows. IIS is a very high performance and hardened Web server that includes many features that are missing from a self-hosted application. Although self-hosting can add these features via middleware, IIS's native pipeline has been optimized for many years and provides this functionality out of the box. Self-hosting is useful for many development and administration portal scenarios, but for building high-end server applications, I would still recommend that you stick with IIS whenever performance, security, and administration matters. A ton of infrastructure (like Web Deploy, Application Initialization, ApplicationPool crash recovery, Load Balancing, etc.) is built into the IIS platform and you'd just be pushing those tasks into your application when you forego running on IIS. So for production sites, consider carefully whether self-hosting makes sense for you.
Where self-hosting shines is for small applications that need to integrate HTTP services into their own operational context or environments where IIS is not available. When running on non-Windows platforms, your only option may be to run in self-hosted mode.
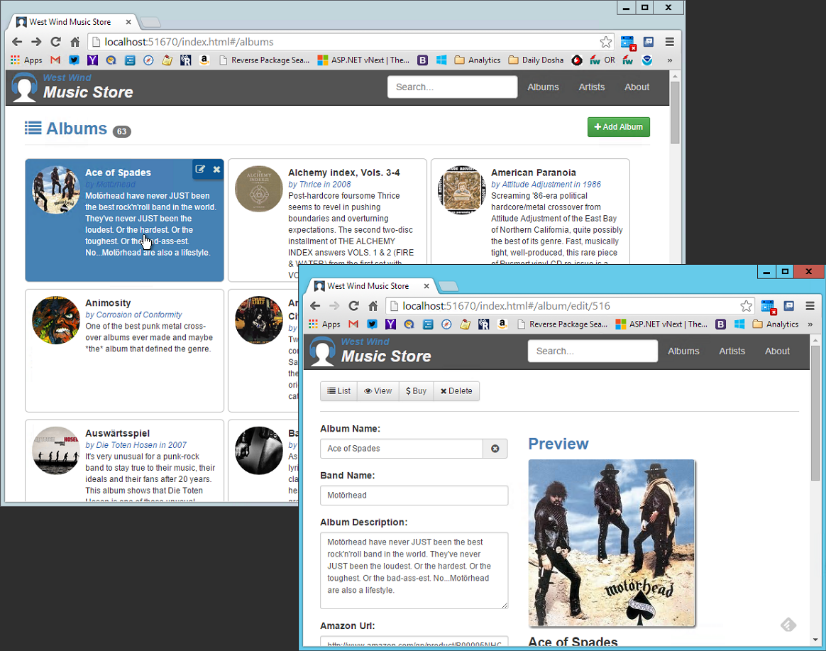
A More Involved Sample
In order to play with ASP.NET vNext, I built a small Angular-based SPA example application called AlbumViewerVNext and placed it on Github at: https://github.com/RickStrahl/AlbumViewerVNext. Figure 7 shows what the app looks like when it's running. The app is a music album viewer and editor that lets you browse, edit, and add albums, artists, and tracks interactively. It's a relatively simple app that uses a SQL Server backend with just a few related tables. It's small enough of a sample to be easily grasped but has enough scope to deal with basic data access with a few small related tables to give you an idea how the pieces go together in vNext.
Dependencies and Configuration
Let's walk through and see how this application is set up. First, you'll need the dependencies pulled in from NuGet:
"dependencies": {
  "EntityFramework": "7.0.0-*",
  "EntityFramework.SqlServer": "7.0.0-*",
  "Microsoft.Framework.ConfigurationModel.Json": "1.0.0-*",
   ...
},
There are a couple of new items here. There are the Entity Framework references that support EF and SQL Server. There's also a dependency pulled in for ConfigurationModel, which is the new configuration provider in vNext. In vNext, there's no .config file-based configuration. Instead there is a new non-hierarchical configuration provider that can load configuration settings from various different sources, including JSON, INI files, and the system Environment. The AlbumViewer application uses configuration for holding a connection string in config.json file.
One of the trickiest parts of vNext currently is setting up the configuration and services that your application needs. Dependency injection and extension methods make it difficult to discover what features are available to you at the moment, so I think it's useful to show the configuration setup for the Album viewer in Listing 1.
Listing 1: A typical Web Application Configuration setup
public void Configure(IApplicationBuilder app,
                     ILoggerFactory logFactory)
{
    // Setup configuration sources
    var configuration = new Configuration();
    configuration.AddJsonFile("config.json");

    // dump log output to the console
    logFactory.AddConsole();

    // Set up application services and DI
    app.UseServices(services =>
    {
        // Add EF services to the services container
        services.AddEntityFramework()
            .AddSqlServer()
            .AddDbContext<MusicStoreContext>(options =>
            {
                var val = configuration.Get(                    "Data:MusicStoreConnection:ConnectionString");
                options.UseSqlServer(val);
            });

        // Inject DbContext as per Request context
        services.AddScoped<MusicStoreContext>();

        // Enable DI for MVC
        services.AddMvc();
    });

    if (env.EnvironmentName == "Development")
        app.UseErrorPage(ErrorPageOptions.ShowAll);

    app.UseStaticFiles();

    // Add MVC to the request pipeline
    app.UseMvc(routes =>
    {
        routes.MapRoute(
            name: "api",
            template: "api/{action}/{id?}",
            defaults: new { controller = "MusicStoreApi",
                            action = "Index" });
        routes.MapRoute(
            name: "default",
            template: "{controller}/{action}/{id?}",
            defaults: new { controller = "Home", action = "Index" });
This application uses a config.json that holds a single connection string for the database:
{
    "Data": {
        "MusicStoreConnection": {
          "ConnectionString": "Data Source=.;database=musicstore;integrated"
        }
    }
}
You can reference this configuration value from code via the Configuration, which is added via:
configuration.AddJsonFile("config.json");
It can then be referenced dynamically via hierarchical syntax like this:
var val = configuration.Get(
  "Data:MusicStoreConnection:ConnectionString");
This is a cool way to read the hierarchical structure of a configuration file and retrieve a string value. Other providers allow you to do the same with .INI files and environment variables and the order determines which provider takes precedence (the last one defined wins).
The app.UseServices() block is used to enable and configure application services. This typically means turning on features explicitly and enabling dependency injection services, such as enabling injection of the MusicStoreContext as a request scoped object in Listing 1.
You've already seen the code to add basic Web services like static files and error pages. The detailed error page is displayed only when in debug mode; otherwise the default error page that vNext provides is used (which also changes depending on Dev or Release mode).
Finally, ASP.NET MVC is configured with routes using the UseMvc() command. This works the same as in old versions, except for the wrapper syntax inside of the app.UseMvc() blocks.
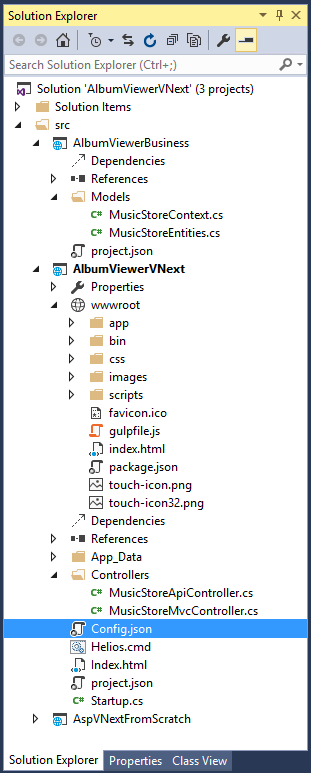
Setting up a Data Model
Although it's overkill, I wanted to separate out my data model into its own project and so I created an AlbumViewerBusiness vNext class library project. In reality, my data model in this app is nothing more than a few Entity definitions and the dbContext implementation that I then use in the Web project's controllers. Normally, I would front this with a business object or Repository that hides the EF code, but because this app is so simple, that's overkill. However, I wanted to see how a second class library project behaves in the vNext compilation. Figure 8 shows the layout of the two projects in the AlbumViewer solution.
Entity Framework 7
This project uses Entity Framework 7 and it currently feels like the least usable piece of the vNext stack. There's lots of stuff that doesn't work and isn't documented yet. For example, as of the Beta 1 Preview, table name, lazy loading, pluralization, and attribute configuration aren't working yet, and all relationships and rules need to be mapped using the fluent API using a new syntax that hasn't been documented (except for samples that were out of date). I also had a number of problems getting my EF relationships to work and had to manually load and save some related resources. It's very clear that EF 7 is a work-in-progress, but things are changing very rapidly. Running the latest Dev builds, issues are getting fixed rapidly so it's possible that even by the time you see this article, these issues will have been addressed.
Listing 2 shows my dbContext definition and the model initialization code to give you an idea of what the fluent syntax looks like currently (note that there are likely to be changes-check the source code on GitHub for updates).
Listing 2: Entity Framework 7 configuration requires using the Fluent API
public class MusicStoreContext : DbContext
{
    public MusicStoreContext(IServiceProvider serviceProvider)
        : base(serviceProvider)
    {   }

    public DbSet<Album> Albums { get; set; }
    public DbSet<Artist> Artists { get; set; }
    public DbSet<Track> Tracks { get; set; }

    protected override void OnModelCreating(
                                ModelBuilder modelBuilder)
    {
        base.OnModelCreating(modelBuilder);

        modelBuilder.Entity<Album>(e =>
        {
            e.Key(a => a.Id);
            e.ForRelational().Table("Albums");
            e.ForeignKey<Artist>(a => a.ArtistId);
        });
        modelBuilder.Entity<Artist>(e =>
        {
            e.Key(a => a.Id);
            e.ForRelational().Table("Artists");
        });
        modelBuilder.Entity<Track>(e =>
        {
            e.Key(t => t.Id);
            e.ForRelational().Table("Tracks");
            e.ForeignKey<Album>(a => a.AlbumId);
        });

        var model = modelBuilder.Model;
        var album = model.GetEntityType(typeof(Album));
        var artist = model.GetEntityType(typeof(Artist));
        var track = model.GetEntityType(typeof(Track));

        album.AddNavigation("Artist",
        album.ForeignKeys.Single(k => k.ReferencedEntityType == artist),
            pointsToPrincipal: true);
        album.AddNavigation("Tracks", track.ForeignKeys.Single(
            k => k.ReferencedEntityType == album), pointsToPrincipal: false);
    }
}
In vNext, EF7 relies on Dependency Injection and the base service provider is injected to provide components like the configuration object. This allows EF to pick up the connection string configured during Startup. Using DI, you can inject MusicStoreContext into business objects or Controller and automatically pick up the configuration information configured in Startup.
API Controllers
Next, it's time to create the controllers that are responsible for serving the API data to the Angular frontend application. I'm not going to talk about the Angular frontend, but you can check out the code on GitHub sample. The API controller contains a few methods that return JSON results to the browser client. These JSON endpoints are called from the Angular application via $http.$get() and $http.$post() operations from an albumservice.js file. Listing 3 shows a few of the API methods.
Listing 3: the MusicStore API controller serves JSON responses to the client
public class MusicStoreApiController : Controller
{
    MusicStoreContext context;

    public MusicStoreApiController(MusicStoreContext ctx)
    {
        context = ctx;
    }

    [HttpGet]
    public async Task<IEnumerable<Album>> Albums()
    {
        return await context.Albums
            .Include(ctx=> ctx.Artist)
            .Include(ctx=> ctx.Tracks)
            .OrderBy(alb => alb.Title)
            .ToListAsync();
    }

    [HttpGet]
    public async Task<Album> Album(int id)
    {
        return context.Albums
                    .Include(alb=> alb.Artist)
                    .Include(alb=> alb.Tracks)
                    .FirstOrDefaultAsync(alb => alb.Id == id);
    }

    [HttpPost]
    public async Task<Album> Album([FromBody] Album postedAlbum)
    {
        int id = postedAlbum.Id;

        Album album = null;
        if (id < 1)
            album = context.Albums.Add(new Album());
        else
            album = await context.Albums.Include(alb=> alb.Artist)
                    .Include(alb=> alb.Tracks).FirstOrDefaultAsync(alb => alb.Id == id);

        // TODO: ModelBinding doesn't work right at the moment
        if (!await TryUpdateModelAsync(album,null))
            throw new ApiException("Model binding failed.",500);
        int result =  await context.SaveChangesAsync();

        return album;
    }

    [HttpGet]
    public async Task<IEnumerable<Artist>> Artists()
    {
        return  context.Artists.OrderBy(art => art.ArtistName)
                               .ToListAsync();
    }
}
You can see that the DbContext is injected into the controller using the startup configuration that you set up in the Startup.cs file mentioned earlier. In the Startup, you set up the MusicStoreContext to be configured using services.AddScoped
Note that all Controller methods are marked as async and all data access calls use async methods to retrieve or update data. This is totally optional and synchronous controllers are still supported, but it's a good idea to use async whenever possible. Database calls are relatively slow, IO-heavy operations, so they are ideal candidates for offloading to async processing. Because vNext is async through the entire pipeline and can offload processing to IO completion ports, using async operations can produce potentially great improvements in scalability for your applications.
The code used for queries is pretty straight forward: You simply use LINQ queries and then use the Async method to materialize your resultsets. For updates, use SaveChangesAsync() or UpdateAsync() for the same effect.
MVC Controller
The sample application I built is a client-centric Angular application that has no explicit need for server-generated HTML content. However, in order to see MVC work, I decided to also implement the Album page as an HTML view using Razor. In vNext, MVC and APIs use the same framework and coexist even in the same Controller. So you can return JSON API results and View() results in the same controller.
However, in most cases, it's better to separate out your HTML frontend logic from any backend services you run. Nevertheless the syntax for MVC and API controllers is identical. In fact, the MVC controller set up looks EXACTLY identical to the API controller I declared in Listing 3, except the methods return View(result) instead of the result objects itself. Here's what the Albums MVC method looks like on the MVC controller:
public async Task<ActionResult> Albums()
{
    var  result = await context.Albums
        .Include(ctx=> ctx.Artist)
        .Include(ctx=> ctx.Tracks)
        .OrderBy(alb=> alb.Title)
        .ToListAsync();
    return View(result);
}
The controller is responsible for setting up the Model, which is then passed to the View to get rendered. The View is a Razor Engine view, that's pretty much as you would expect it to be from previous versions of ASP.NET. Listing 4 shows part of the View that displays an identical layout of the repeating list of Albums in Figure 7, except here, it's using server-generated Razor HTML instead of the Angular-generated displayed in the figure.
Listing 4: MVC Razor Views in vNext work the same as in current ASP.NET
@model IEnumerable<MusicStoreBusiness.Album>
. . .
@foreach (var album in Model.ToList())
{
    <div class="album">
        <div ng-click="view.albumClick(album)">
            <img src="@album.ImageUrl" class="album-image" />
            <div style="padding-left: 80px;">
                <div class="album-title">@album.Title</div>
                <div class="album-artist">
                @if (album.Artist != null)
                { <text>by @album.Artist.ArtistName</text> }
                @if (album.Year > 0)
                { <text>in @album.Year</text>}</div>
                <div class="album-descript">@album.Description</div>
            </div>
        </div>
    </div>
}
If you've used MVC before, this should all look very familiar. You still have models, code blocks, expressions, helpers, partials, ModelBinding, and all of the other features that you know and love in ASP.NET MVC. Very little has changed in terms of syntax.
One nice addition that Razor for vNext sports is TagHelpers. TagHelpers aim to do away with @ControlFor() syntax in favor markup syntax that looks and feels much more like HTML.
Currently, you can do databinding in Razor using:
@Html.TextBoxFor( m=> m.Title,
                 new { @class = "inputfield" })
With TagHelpers, you'll be able to use HTML tags like this instead:
<input type="text" for="Title"
       class="inputfield" />
The key is the for attribute that binds to the model property and acts as the marker for a TagHelper that Razor can turn into embedded HTML. Like HtmlHelpers, TagHelpers are string insertion points in a Razor template that allow component developers to create custom tags that can be processed by the Razor engine and then embedded into the page. MVC will ship with TagHelpers of the core HTML controls that currently support the @Html.ControlFor syntax.
TagHelpers fills a hole for component building that has been sorely missing in MVC and might drive a new renaissance in components that has been mostly absent in MVC. TagHelpers are still in an experimental branch of MVC and not part of the NuGet feeds yet as of the Beta 1 Preview, but they should show up very soon in the Dev releases.
Development Impressions
So now you've seen a few of the different pieces of ASP.NET vNext and have an idea what to expect to see when ASP.NET vNext arrives.
Different, but Familiar
As you can see, there's a lot of stuff that works differently, but at the same time there's also a lot that continues to work in familiar ways. The skills you have learned using today's ASP.NET mostly transfer to vNext, although some of the finer details, and especially the lower-level aspects of the framework have changed, and are going to require some adjustment.
Overall, the process of building the AlbumViewer application didn't feel very different from building it using today's ASP.NET. The server code of this application essentially runs an API service that provides the data that's used in the frontend Angular application and this code doesn't look drastically different than code I might have written with ASP.NET Web API previously. MVC controller and Razor View code also doesn't look drastically different, although there are some changes if you access lower-level pieces like HTTP headers and or other HttpContext items directly. The old System.Web HttpContext is gone, replaced by a much smaller and less feature-rich context.
If anything, the code is a bit simpler in that the MVC/Web API integration makes it easier to get raw results returned. And I particularly like that MVC and Web API can easily co-exist, including in the same Controller, for providing-via some extensions-both Razor Views as well as API results in JSON.
Pre-Release Pains
Keep in mind that everything I've shown here is based on the first beta of vNext. Both the framework and the tooling still feel very rough and there's not a lot of documentation yet. Most of the help you're going to get comes from samples in the various vNext repositories on GitHub (see the “Sample Code” sidebar).
The biggest problems I ran into had to do with finding my way around the new NuGet packages and namespaces. Finding the right components to include in a project feels daunting because there's so little to go on to find anything (see the “Finding Packages and Namespaces” sidebar). A lot of functionality in vNext uses Extension Methods and Dependency Injection to provide functionality, and neither of these technologies is well-suited to discovery or digging down into details, because they are tacked on or dynamically resolved and provided at runtime. It's more difficult to follow program flow without actually running an application.
Another pain point in this project was Entity Framework 7, which has a number of missing features at the moment. I was initially unable to get my original model to handle the relationships properly, which caused a number of problems returning data and more problems saving data. However, things are changing rapidly with Entity Framework and everything else, and fixes pour in daily for issues I ran into. By the time I was done writing this article, a number of the issues I encountered were already fixed. This is the main reason that I'm using post-Beta 1 Preview packages, which at the moment seem to be the best way to play with the Framework. Changes and fixes arrive almost daily, so for now, I think running these changing Dev builds is almost necessary if you want to get anything done.
Although the current release is labeled a Beta it all still feels very, very rough and changing. When pinging product teams on Github or on Jabbr.net, you often hear that certain core principles are still under discussion and subject to change. Sometimes these issues can be major. But at the same time, it's refreshing to see all of this discussed and addressed in public and more importantly, seeing the results of those discussions resulting in changes that you can get your hands on, often in a matter of days.
I'm Excited; Are You?
We're at the beginning of a brand new chapter for ASP.NET and the .NET platform as a whole and we can see it taking shape right in front of our eyes, thanks to the open source and community-driven development of the platform. ASP.NET vNext is being reinvented to be more open, more cross-platform, and provides the flexibility to grow in a rapidly changing Web development world.
It won't be a totally smooth path from the old to the new, but I think the changes that have been made are worth the break with the past and, more importantly, they're necessary for ASP.NET and .NET to stay relevant. To me, it's an exciting time to be a .NET developer and I'm looking forward to where it will take us in the future.
