


There are many examples of using the Windows Presentation Foundataion (WPF) TreeView that you can find on the Web, however, most of them only show you how to go to two levels. What if you have more than two levels? This is where it's vital to understand exactly how the HierarchicalDataTemplates work. In this article, I'm going to break down how these templates work, so you can really understand what's going on underneath the hood.
A Hard-Coded WPF TreeView
To start, let's look at the typical two-level WPF TreeView that has been hard-coded with the values shown in the following code snippet.
<TreeView>
    <TreeViewItem Header="Managers">
        <TextBlock Text="Michael" />
        <TextBlock Text="Paul" />
    </TreeViewItem>
    <TreeViewItem Header="Project Managers">
        <TextBlock Text="John" />
        <TextBlock Text="Tim" />
        <TextBlock Text="David" />
    </TreeViewItem>
</TreeView>
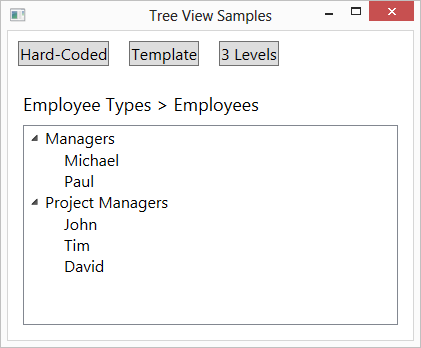
Figure 1 shows you how this TreeView looks when you run the WPF application.
Create Hierarchical Classes to Mimic Your TreeView
You don't want to use hard-coded XAML in your WPF application. You want to retrieve data from a database table or an XML file and build the TreeView dynamically. How and from where you retrieve the data is not important for this article. What's important is how you structure the classes into which your data will be placed. Just as a TreeView is a hierarchical structure, create a set of classes that is also a hierarchy.
Figure 2 shows the three classes that will be necessary for expressing a hierarchy of EmployeeType objects of which each EmployeeType object can hold one or more Employee objects.

The first class you build is the Employee class. This class has a single property called Name. A constructor is created to accept a name argument that you can use to set the Name property when you create an Employee object.
public class Employee
{
    public Employee(string name)
    {
        Name = name;
    }

    public string Name { get; set; }
}
The EmployeeType class contains two properties. First is a string property, called Description, which holds the name of the EmployeeType, such as “Supervisor” or “Project Manager.” The second property, Employees, is a generic collection property to hold a list of Employee objects that are associated with this particular EmployeeType.
public class EmployeeType
{
    public EmployeeType(string desc)
    {
        Description = desc;
        Employees = new List<Employee>();
    }

    public string Description { get; set; }
    public List<Employee> Employees { get; set; }
}
The last class you create is a collection class called EmployeeTypes created using the generic List class. This is a collection of EmployeeType objects. In the constructor of the EmployeeTypes collection class, you build the collection of EmployeeType objects and fill each one with Employee objects, as shown in Listing 1. For purposes of this article, I'm using hard-coded data. Feel free to load this collection with the data of your choice.
Listing 1: A collection class is a great place to initialize default data for that collection.
public class EmployeeTypes : List<EmployeeType>
{
    public EmployeeTypes()
    {
        EmployeeType type;

        type = new EmployeeType("Manager");
        type.Employees.Add(new Employee("Michael"));
        type.Employees.Add(new Employee("Paul"));
        this.Add(type);

        type = new EmployeeType("Project Managers");
        type.Employees.Add(new Employee("Tim"));
        type.Employees.Add(new Employee("John"));
        type.Employees.Add(new Employee("David"));
        this.Add(type);
    }
}
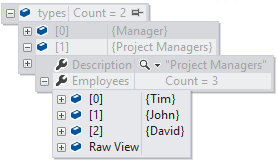
If you create an instance of the EmployeeTypes class as shown in the following code snippet, you will create the hierarchy of EmployeeTypes and Employees shown in Figure 3.
EmployeeTypes types = new EmployeeTypes();
If you compare Figure 1 and Figure 3, you can see that the two structures are very similar. At the top, you have the EmployeeTypes (Manager and Project Managers), and the next level under each EmployeeType is a collection of Employee objects (Tim, John, David). Matching your class hierarchy to the TreeView display is your first step in ensuring that you can display your data in a TreeView format.
Create Your Data and Data Templates Using XAML
When using XAML, you don't need to create an instance of the EmployeeTypes class in C# or Visual Basic code. Instead, you use XAML to create the instance of the EmployeeTypes class as shown in line 12 of Figure 4. Provide your instance of EmployeeTypes with a name using the x:Key attribute, in this example, theData. Notice in line 28 of Figure 4 that the ItemsSource of the TreeView control is using the static resource with the key of theData as the source of data for the TreeView.

With the ItemsSource property of the TreeView control set to the collection of EmployeeType objects, you are now ready to start building the hierarchy of XAML DataTemplate objects. What's important here is that the last level displayed in your TreeView is expressed in a <DataTemplate> listed first in your Resources section, as shown in lines 14-16 of Figure 4. Notice that the TextBlock control within the <DataTemplate> is bound to the Name property of your Employee class. The employee name is indeed what shows up in the last level of the TreeView shown in Figure 1.
As this is just a two-level TreeView, you only need a single <HierarchicalDataTemplate> resource listed after the <DataTemplate> resource. Set the ItemTemplate property in your HierarchicalDataTemplate to the key name of the Data Template. Set the ItemsSource property to the collection of objects that contain the path of the data expressed in the Data Template. In this case, the ItemsSource uses the Employees property as the collection of Employee objects. Each Employee object has a Name property that's used in the Data Template to display the name of the employee in the TreeView.
In the <HierarchicalDataTemplate> resource, you use a TextBlock to display the appropriate EmployeeType property in the first level of the TreeView. The TextBlock control in line 20 of Figure 4 uses the Description property of the EmployeeType class.
The TreeView control has its ItemTemplate property set to the key of the last <HierarchicalDataTemplate> resource in your Resources section. The order of the XAML you create for a TreeView is important. The lowest level you wish to display within your TreeView control needs to be listed first in your Resources section. The reason for this should be fairly obvious: Each resource as you work down through the Resources section needs to reference an x:Key of another XAML element. XAML can only reference keys that have been previously defined.
Three Levels in a TreeView
Now let's expand upon the two-level TreeView and use three levels in the TreeView. The TreeView shown in Figure 5 again uses the EmployeeTypes at the top of the tree, followed by a small set of employees that themselves manage employees. To make this TreeView display, modify the Employee class to contain a collection of Employee objects (named ManagedEmployees) as shown in the following code snippet.
public class Employee
{
    public Employee(string name)
    {
        Name = name;
        ManagedEmployees = new List<Employee>();
    }

    public string Name { get; set; }
    public List<Employee> ManagedEmployees { get; set; }
}

Next, you need to modify the constructor of the EmployeeTypes class to create a list of managed employees within each Employee object. Listing 2 shows the new code where, after creating an Employee object, you add another employee to the ManagedEmployees property.
Listing 2: Modify the EmployeeTypes constructor to add managed employees for each employee.
public class EmployeeTypes : List<EmployeeType>
{
    public EmployeeTypes()
    {
        EmployeeType type;
        Employee emp;
        Employee managed;

        type = new EmployeeType("Manager");
        emp = new Employee("Michael");
        managed = new Employee("John");
        emp.ManagedEmployees.Add(managed);
        managed = new Employee("Tim");
        emp.ManagedEmployees.Add(managed);
        type.Employees.Add(emp);

        emp = new Employee("Paul");
        managed = new Employee("Michael");
        emp.ManagedEmployees.Add(managed);
        managed = new Employee("Cindy");
        emp.ManagedEmployees.Add(managed);
        type.Employees.Add(emp);
        this.Add(type);

        type = new EmployeeType("Project Managers");
        type.Employees.Add(new Employee("Tim"));
        type.Employees.Add(new Employee("John"));
        type.Employees.Add(new Employee("David"));
        this.Add(type);
    }
}
Now that you have your three-level structure built into your classes, you are ready to hook up this three-level structure to your TreeView. As you might expect, you are going to add another <HierachicalDataTemplate> in between the old <HierachicalDataTemplate> and the <DataTemplate> shown in Figure 4. Of course, one of the x:Key attributes will have to change in order to accommodate this new template.
Figure 6 shows the complete XAML needed to hook up your three-level TreeView. You can see in the XAML that there are now two HierarchicalDataTemplates and one DataTemplate. Again, you list the DataTemplate first, because that's the lowest level in your TreeView. The next HierarchicalDataTemplate listed is the next level up from the lowest level, and finally you have a HierarchicalDataTemplate for the first level in your tree. As mentioned before, you always work your way from the bottom up when creating your TreeView hierarchy. XAML is processed from the top down, so any attempt to reference an XAML x:Key that's below where you're referencing it from results in a runtime error.
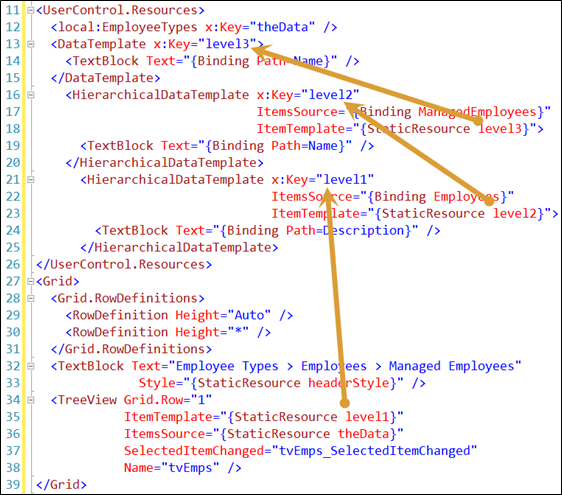
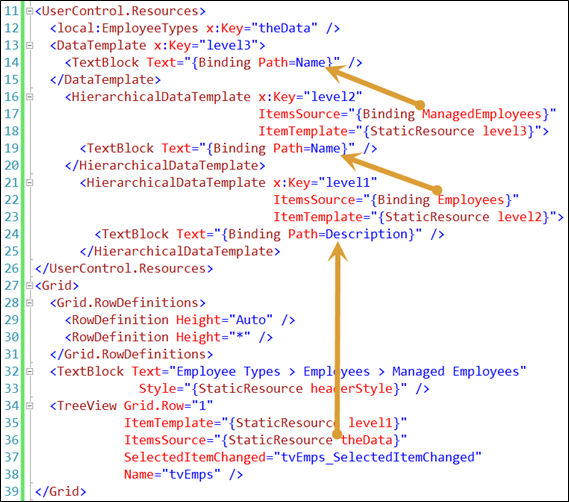
Each HierarchicalDataTemplate uses the x:Key name of the previous template as its ItemTemplate. The ItemsSource of each HierarchicalDataTemplate is used to feed the data to the previous template. This is probably the most confusing part about working with the TreeView control. You expect the content of the current HierarchicalDataTemplate to use the properties set in the ItemsSource property of that template. But you need to look to the template lower down in the XAML to see the source of the data, as shown in Figure 7.
Summary
Understanding how to put together your hierarchy in a TreeView is simple once you understand that you need to work from the bottom up. Start with the bottom node in your TreeView and determine what that will look like and where the data will come from. Then build the next HierarchicalDataTemplate to feed the data to the previous template you created. You keep doing this for each level in your TreeView until you get to the last level. The data for that last HierarchicalDataTemplate comes from the ItemsSource in the TreeView itself. Structure your data classes to mimic the hierarchical structure of your TreeView, and displaying a TreeView becomes quite simple.
NOTE: You can download the sample code for this article by visiting my website at https://www.pdsa.com/downloads. Select PDSA Articles, then select Code Magazine: WPF TreeView with Multiple Levels from the drop-down list.
