


Struggling to grasp the concepts of Model-View-View-Model? Keep it simple!
Have you found that you can understand the basics of data binding in WPF and Silverlight, but when you start to read about Model-View-View-Model (MVVM) you find that you have been dropped off a cliff? Have you looked at some of the XAML frameworks like PRISM only to find that it is just way too complicated for what you need? If this sounds familiar, then don’t worry, you are not alone. Many great programmers struggle with this every day. In my humble opinion, I say don’t try to implement a pure MVVM model. Just keep it simple! Many times the simplest approach is the best.
Many times the simplest approach is best.
In this article, I will present MVVM step-by-step but not drop you off a cliff. I won’t take the purist approach to MVVM, but I will use the familiar event model in code-behind that you are used to. Yes, you will be using MVVM, but you will do it using a programming model that you are very familiar with.
Why MVVM?
The whole point behind MVVM is to separate UI logic from your business and data logic. You want to be able to test your business and data logic without having to run your user interface. You can use MVVM to do this and still code your user interface layer just like you are used to.
Before diving into MVVM, it will be helpful to understand data binding in XAML so that you have the foundation you need to apply a MVVM architecture to your WPF or Silverlight applications. Let me start this discussion by showing you a sample WPF window that I’ll use to illustrate the various concepts in this article.
The Sample
Figure 1 shows a sample screen used to display product data and also allow the user to add and modify that product data. This is a WPF application but the basic data-binding concepts apply equally to Silverlight applications. I’ll use this screen throughout this article to illustrate the various concepts of data binding and ultimately an MVVM model.
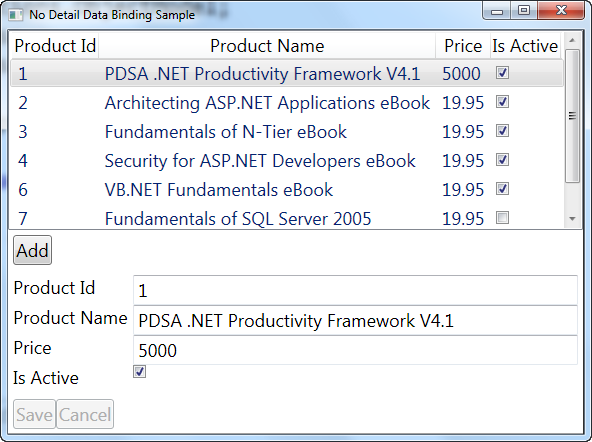
The sample application uses an XML file for the product data, but could just as easily go against a database. This sample uses a class called ProductManager for all data access routines, and it uses a Product entity class that contains one property for each data field in your data store.
The Product Class
The Product entity class implements the INotifyPropertyChanged interface so each property can raise the PropertyChanged event. The data binding in XAML relies on this interface to stay informed of changes to properties in your code. Listing 1 shows the Product entity class.
The ProductManager Class
The ProductManager class has methods that work with the Product entity class. For example, there is a GetProducts method that returns an ObservableCollection of Product objects. There are also stubs for Insert, Update and Delete. I did not write any code in these methods as I was trying to just illustrate MVVM and not data access.
The Brute Force Approach
To start this discussion of data binding, let me show how you can use the brute force approach to populating the ListView and the various text boxes on this screen. First off, you create a ListView with XAML shown in Listing 2.
You will use the Loaded event procedure of the WPF window to populate the list view using the code shown in Listing 3. When you set the DataContext property with the ObservableCollection of Product objects, the {Binding} in each GridViewColumn shown in Listing 2 grabs the data from the Product object’s property to display in the appropriate column in the ListView.
When you click on a row in the ListView control, the SelectionChanged event fires. In this event you will retrieve the Product object from the selected row and use that to populate the text boxes and other controls with the data from that Product object as shown in Listing 4.
The code in Listing 4 should be fairly standard code that you are accustomed to writing if you have ever coded Windows Forms or ASP.NET. You also know that you need to write code to take the data from the forms and move it back into the Product object prior to passing this object to the Insert or Update methods on your data class. You end up with a lot of code just to move data back and forth between your UI and your entity class. Use XAML data binding to eliminate all that code you used to write just to move data in and out of controls. Let’s take a look at how to do that.
Use XAML data binding to eliminate all that code you used to write just to move data in and out of controls.
Data Binding Basics in XAML
Just as you use the Binding syntax in the ListView you may also use this same approach for your text boxes, check boxes and other controls. Each GridViewColumn control has as its parent the ListView itself. The concept of a container or parent control is very important in XAML and you use this to your advantage in WPF and Silverlight. Consider the following XAML:
<Grid Name="grdDetail">
  <TextBox Text="{Binding
                  Path=ProductName}" />
</Grid>
In the above XAML, the Grid named grdDetail contains one text box that has a {Binding} in its Text property. If you set the DataContext of the Grid control to an instance of a Product object, then the Text property of the TextBox will display the ProductName property within that Product object as shown in the following code:
C#
Product entity = new Product();
entity.ProductName = "A New Product";

grdDetail.DataContext = entity;

VB
Dim entity As New Product()
entity.ProductName = "A New Product"

grdDetail.DataContext = entity
You can take advantage of this technique to eliminate the code shown in Listing 4 that moves the code from the Product object into the various controls. Replace the code in the SelectionChanged event with the code shown in Listing 5.
Take advantage of control to control data binding in XAML to eliminate code.
Eliminate More Code
While you eliminated a lot of code in the last example, you still had to write code in the SelectionChanged event. You can eliminate even more code by taking advantage of the control-to-control data binding features in XAML. Consider the following XAML:
<Grid DataContext="{Binding
      ElementName=lstData, Path=SelectedItem}">
  <TextBox Text="{Binding Path=ProductId}" />
  <TextBox Text="{Binding Path=ProductName}" />
  <TextBox Text="{Binding Path=Price}" />
  <CheckBox IsChecked="{Binding Path=IsActive}" />
</Grid>
You set the DataContext property of the Grid to a Binding that uses the ElementName attribute set to the name of the ListView. You set the Path property to SelectedItem as that property of the ListView contains the currently selected Product object. This syntax is all that is needed to automatically bind the ListView control to the Grid where all your text box controls are located. You can now remove the SelectionChanged event procedure completely!
Binding Other Properties
All of the data binding you have done so far relates to data you retrieve from your database. However, you can bind almost any property on any control to any property on any class. To illustrate this concept consider the Add, Save and Cancel buttons on the form shown in Figure 1. Notice how the Add button is enabled, but the Save and Cancel buttons are disabled. The IsEnabled property on these buttons can be controlled from properties on a class.
Let’s assume you have a XAML window named winMoreDataBinding. You can add the appropriate properties to this window class and bind the IsEnabled properties of your buttons to these properties. To do this, you need to implement the INotifyPropertyChanged interface on your window. Listing 6 shows the code that you would add to your Window class to implement properties that you bind to the respective IsEnabled properties of your buttons.
To bind each of these properties to your buttons’ IsEnabled properties, you write the XAML shown in below:
<Button Content="Add"
    IsEnabled="{Binding Path=IsAddEnabled}" />
<Button Content="Save"
    IsEnabled="{Binding Path=IsSaveEnabled}" />
<Button Content="Cancel"
    IsEnabled="{Binding Path=IsCancelEnabled}" />
Now in the code-behind for your window if you set the IsAddEnabled property to False, then the Add button will become disabled automatically. It is important that you set the property IsAddEnabled, not the private variable that this property uses as its backing data store. The Set procedure for the IsAddEnabled will raise the property changed event which is how XAML is informed of the change in value and then knows to refresh its control’s UI state.
A Simple View Model Class
Now that you are familiar with data binding both in terms of data objects and UI objects, you can now expand on your knowledge to create a simple ViewModel and eliminate even more code-behind from your windows. If you download and look at each of the samples illustrated in this article, you will find that each window has about 200 lines of code-behind. When you start using a ViewModel you will cut this amount by more than half!
Remember that a view model is just a class with code, there is no magic. In the sample application that goes along with this article, there is a class called ProductViewModel. You will create an instance of this class by creating it as a resource in your XAML. First you will create an XML namespace and give that namespace a name. Consider the following XAML:
<Window x:Class="winSimpleMVVM"
   xmlns="http://schemas.microsoft.com/winfx
         /2006/xaml/presentation"
   xmlns:x="http://schemas.microsoft.com/winfx
            /2006/xaml"
   xmlns:local="clr-namespace:MVVMSample"
   Title="Simple View Model Sample">
  <Window.Resources>
    <local:ProductViewModel x:Key="viewModel" />
  </Window.Resources>
  ...
</Window>
The fourth line down creates a namespace called local and assigns that namespace to the name of the assembly where the ProductViewModel class is located. Next, in the <Window.Resources> section of the XAML is where you create an instance of the ProductViewModel and assign it a key called viewModel.
DataCollection and DetailData Properties
In the ProductViewModel class there are two properties that you will use for data binding to your window (see Listing 7). The DataCollection property is an ObservableCollection of Product objects and DetailData is a single instance of a Product object. The DataCollection property will be filled in with the data in the constructor of the ProductViewModel class. The DetailData property will be filled in when you click on a row in the ListView.
You use these two properties as the source of data for the ListView control.
<ListView x:Name="lstData"
    ItemsSource="{Binding
    Path=DataCollection}">
    ...
</ListView>
You also use the properties as the source of data for the Grid that contains all of the detail text boxes and the check box.
<Grid DataContext="{Binding Path=DetailData}">
...
</Grid>
Populating the Data in the View Model Class
The method InitializeComponent is called in the constructor of every WPF Window to create all controls of the window. This includes the ProductViewModel class you declared in the XAML. The constructor in your ProductViewModel will be called when the InitializeComponent method is called. In Listing 8 you see the constructor code in the ProductViewModel class. Notice that it calls the GetProducts method in the ProductManager class, which as you remember, returns a collection of Product objects.
Since you are doing data access in the constructor, it is very critical that you have excellent exception handling in place when retrieving your data. The GetProducts method contains all of the exception handling in this example.
Notice that the ProductViewModel class implements the INotifyPropertyChanged interface. In the prior example, this interface was added to the Window class because that is where the UI properties such as IsAddEnabled were created. Now all those UI properties are in the view model class.
Hooking Into the View Model Class in the Code-Behind
Remember that you created an instance of the view model class in the XAML. You will need to interact with this view model class in the code-behind of your window. In the constructor of your Window class (Listing 9) you can grab the instance of the view model class that was created by using the FindResource method on the Window class. You pass in the key that you assigned to the view model class in the XAML, in this case viewModel, you cast it to a ProductViewModel and assign it into a private field variable in the Window class. You can now use this private variable to call any method or get/set any properties in the view model.
Event Procedures in the Window Class
In the product screen, there are still event procedures left in the Window class. These event procedures are for when you click on the Add, Save and/or Cancel buttons. There is very little code in each event procedure as all that is needed is to make calls to the view model class, or maybe perform a little bit of UI logic. Listing 10 shows all the code that is left in the code-behind of this window. Notice that you use the private view model variable to call methods in the view model.
If you want, you can get rid of some of these events using the Commanding model available in WPF. However, you end up writing a lot more code to support the command model, and to me there is very little benefit. You have accomplished the goal of moving all logic into the view model class so that you can unit test the view model. There is no UI code at all in the view model class and thus can be tested very easily using automated tools. Another problem with the command model is that not all events can be hooked up to commands. So at some point, you then have to write some very complicated code to hook to all these events. I find the simpler approach that I have laid out in this article is a good compromise between having everything in the code-behind and a “pure” view model approach. I have accomplished the goals of MVVM but I have kept my programming model simple and easy to understand.
Summary
Once you understand the basics of data binding in XAML, you can eliminate a lot code that is otherwise needed to move data into controls and out of controls back into an object. This forms the basis of a MVVM approach. You are used to writing classes; you just need to get used to the idea of using properties on classes to affect UI properties. In this article, you saw a very simple and easy-to-use pattern for MVVM. While the purists would disagree with this approach, those folks that like things simple and easy to understand should be satisfied.
