


This article will present a crash-course in the basics of Windows Communication Foundation (WCF).
WCF is one of the exciting new capabilities in the .NET 3.0 Framework. It provides a unified and uniform programming model for building distributed applications. Those who previously built multiple code bases to deal with Web services and .NET remoting will surely come to appreciate the power standardization that WCF offers. WCF, like any other new technology, requires research and experimentation to become productive. This article will assume no prior experience with WCF, and will walk you through some basic exercises and steps to show WCF’s capabilities.
What’s on the Baker’s Dozen Menu this Time?
In this article I will present a step-by-step guide to building distributed applications with WCF. I’ll minimize the amount of “reading between the lines” that sometimes happens with reference material that makes assumptions about the reader’s knowledge. If you’ve already built even a simple WCF application, you probably won’t find this article to be much more than a refresher-I’m focusing on what someone new to WCF will need for a “crash course”. I’ll walk you through these thirteen steps:
See the Recommended Reading section at the end of this article where I list several links to articles that you’ll hopefully feel more comfortable reading after this article.
“There Are No Bad Questions…”
If you’re new to WCF and distributed computing you may wonder how WCF fits in.
Some .NET developers think that you can only use WCF in a Vista environment. In fact, you also can use it with Windows XP Professional. I built and ran all of the sample code using Windows XP Professional.
Distributed computing is an architecture where the various components of an application reside on different computer systems (often called domains). For example, suppose you load SQL Query Analyzer (or SQL Management Studio) from your desktop, and you open a database on your company’s database server. You type a query or run a stored procedure and you get the results. This is a very basic example of distributed computing. You typed the query from your desktop, but the server performed the work on the server, and fed the results back to you. So each component of the application performed a portion of the overall task.
Now think about this from an enterprise standpoint-you want the work and processing to execute on the servers (or domains) that make the most sense. A typical distributed application might feature a client module, a Web server, an application server, and a database server. You may want certain processes to execute on certain domains-perhaps to take advantage of specific hardware, to follow certain development guidelines, or because of restrictions or policies, or maybe other reasons. This article won’t cover how to architect a distributed application. I make the assumption that you’ve already decided where you want processing to occur.
Developers often use XML Web services or .NET remoting protocols (or both) so that components of distributed applications can communicate and interact. Prior to WCF, developers usually needed to write and maintain different code bases to deal with each protocol. WCF allows developers to work with these protocols using a unified programming model-eliminating the need for separate code bases. This article will walk through the steps of creating simple WCF applications that use both Web services and remoting. By the end of the article, you’ll see how you can use the WCF programming model to write a single code base to deal with all of the protocol differences.
I’m Not Using Windows Vista (Yet)
Some .NET developers think that you can only use WCF in a Vista environment. In fact, you also can use it with Windows XP Professional. I built and ran all of the sample code using Windows XP Professional.
“I’ve Seen All Good People…”
I want to thank Sam Gentile, Ted Neward, Rick Strahl, and Thom Robbins for helping me with WCF questions that I had while researching this article. In many ways, the steps in this article reflect the learning curve I recently experienced.
Step 1: Let’s Go Shopping for WCF-What You’ll Need to Download
First, you can find the main Microsoft WCF site at http://wcf.netfx3.com. I’ll also list some great online references for WCF at the end of this article.
If you used .NET interfaces and/or .NET Generics prior to WCF, you’re already off to a good start. If you didn’t, now is the time!
Second, you’ll need to download all the necessary WCF components prior to using the examples in this article. Because the download page links are so long, I’ll instead include them with the sample code that goes with this article.
Step 2: Defining the Requirements for the Demo Application
The demo will contain two simple classes: a customer class and a customer order status. The customer class will return the information for a specific customer, and the customer order status class will return basic order information for a specific customer.
You’ll want to access these two classes using each of the following protocols:
- TCP from a .NET Windows Forms application (similar to .NET remoting).
- HTTP from both a .NET Windows Forms and Web Forms application (and be able to switch back and forth using configuration files).
- HTTP and SOAP from a non-.NET application.
Step 3: An Overview of WCF Architecture
As much as I’d love to jump in with some code right away, I want to describe some concepts that you first need to understand. At the highest level, you can use WCF for the following:
- Web services
- .NET to .NET communication (via HTTP, TCP)
- Distributed transactions
- WS-* specifications
- Queued messaging
Essentially, this means you can use the WCF model for a variety of different areas that previously required different code bases.
WCF contains four key components which I’ll define in the next few paragraphs:
- Contracts
- Bindings
- Endpoint definitions
- Hosting environment
You are probably thinking, “Oh great, contracts…another new term to use!!!” Well, not exactly. As a teacher of mine used to say (corny joke alert), “It’s one of our old friends, dressed in a Halloween costume.” In this case, the old friend is the .NET interface, which by definition defines a contract that a class implementing the interface must adhere to. Therefore, a WCF contract defines the operations that a service can perform. Step 4 will cover the specifics of building an interface and establishing WCF contracts.
So if you used .NET interfaces and/or .NET Generics prior to WCF, you’re already off to a good start. If you didn’t, now is the time!
Bindings are the communication channels between a WCF service and a client (such as TCP, HTTP, etc.). Table 1 lists the WCF bindings, which I’ll use throughout the code samples in this article.
Endpoint definitions refer to the URI (Uniform Resource Identifier) addresses for connecting to a WCF service. An endpoint definition consists of the base address, along with the binding and contract information. The configuration files in Step 5 and Step 6 will contain examples of endpoint definitions. WCF allows you to define as many endpoints as necessary-such as a specific endpoint for a .NET client, and another endpoint for a non-.NET client.
Hosting environments refers to the architecture for hosting WCF services. You can host a WCF service in a .NET application or a Windows service. Additionally, you can host your WCF services using IIS, which I’ll cover in Step 9 through Step 11. (Note: At least one of the endpoint definitions must be HTTP.) Finally, you can host a WCF service using the new Windows Activation Service in IIS 7.0.
OK, now you’re ready to start writing some code! Let me summarize the next few steps.
- In Step 4 through Step 6 you’ll learn to build a self-hosted and simple WCF application using configuration files.
- Step 7 will demonstrate how to build the same application without using configuration files. The step will present a little more code to show the WCF object model.
- Step 8 will create an IIS-hosted WCF service, and then show how to add a WCF service reference to a .NET client that will consume the service (in the same way that you would have added a Web service reference prior to WCF).
- Step 9 through Step 11 create another IIS-hosted WCF service, this time for consumption by a non-.NET client.
Step 4: Your First Demo, Building the Interface (Part 1 of 3)
Code time! Your first step is to build the interface for the two methods I described back in Step 2 (GetCustomer and GetOrderHistory). Both will receive a customerID integer as a parameter, and both will return an XML string for the results. You’ll construct an interface that establishes the WCF contracts for any clients that consume the service.
TCP remoting in WCF means three words: No more MarshalByRefObject!!!
So do the following:
The code for the public interface (Listing 1 and Listing 2) contains two new keyword attributes: ServiceContract and OperationContract.
[ServiceContract]
public interface ICustomer
{
    [OperationContract]
    string GetCustomer(int CustomerID);
    [OperationContract]
    string GetOrderHistory(int CustomerID);
}
The ServiceContact attribute defines the operations that a service can perform, and the OperationContract attribute identifies the exact methods. The .NET CLR will translate these interfaces to SOAP types.
You’ll use this interface on both the server that hosts the WCF service as well as the client that uses it. The interface is your contract (pun intended) between the client and the server.
Step 5: Your First Demo, Building the Business Object and the Server (Part 2 of 3)
Now that you’ve established the interface, the next step is to build the business object that the client side will access, and then write a small server-side process to host the service.
Learn the fundamental WCF terms and security options. Study the entire object model in System.ServiceModel. These will be your vocabulary.
To create the business object, do the following:
The only noteworthy aspect of the customer business object (aside from the fact that the methods are merely test methods that return dummy test data) is that the class implements the ICustomer interface from the previous step.
public class CustomerBz : ICustomer
One of the requirements of this demo application is the ability to access the back-end business object through different communication protocols (e.g., TCP, HTTP). Prior to WCF, developers who used .NET remoting would often derive from System.MarshalByRefObject in conjunction with interfaces. This allowed them to set up the necessary messaging between the client proxy and the remote object.
TCP remoting in WCF means three words: No more MarshalByRefObject!!! WCF handles that in the endpoint binding definition and the interface; therefore, you no longer need System.MarshalByRefObject, and the back-end class looks like any other class implementing an interface. In other words, this allows you to separate the interface from the implementation.
Next, you can build a small server application to host the service. To do this:
The server-side hosting is very simple. The code includes the App.Config reference to the service, which starts with the name of the business class:
<system.serviceModel>
  <services>
    <service name="DemoCustomerBz.CustomerBz">
App.Config also contains the endpoint address, binding, and contract name. This first example will use basic TCP binding to the localhost port 8228. Note that the contract specifics the interface. (Later in the article you’ll add more endpoint addresses to demonstrate that multiple clients can access different addresses and bindings.)
<endpoint
     address="net.tcp://localhost:8228/CustomerBz"
            binding="netTcpBinding"
            contract="DemoInterfaces.ICustomer" />
      </service>
    </services>
  </system.serviceModel>
Finally, the code in the application can open the service by using the ServiceHost class:
ServiceHost oHost =
             new ServiceHost(typeof(CustomerBz));
oHost.Open();

// TO CLOSE

oHost.Close();
At this point you’ve created a listener program, a self-hosting application that allows a client application to connect using the specific TCP address, and to use the back-end class CustomerBz using the ICustomer interface contract. The next step creates the client application.
Step 6: Your First Demo, Building the Client Piece (Part 3 of 3)
Now you’ll construct a simple .NET application that accesses and uses the service. To do this:
Notice that the client-side configuration settings for App.Config are almost identical to those on the server-side in the previous tip.
<client>
   <endpoint
       address=
          "net.tcp://localhost:5555/CustomerBz"
       binding="netTcpBinding"
       contract="DemoInterfaces.ICustomer"
       name="Customer" />
</client>
We also specify (with the name tag) a variable that we’ll use in the application that relates to this connection information. You could use this if you needed to present multiple communication options to a user.
The code to activate the service on the client side uses the ChannelFactory class, a cornerstone of the client piece. The ChannelFactory is a factory class that creates a communication channel of a specific type for the client to send a message to an endpoint that you specified in your configuration.
ChannelFactory<ICustomer> customersFactory =
        new ChannelFactory<ICustomer>("Customer");
If that sounds like a mouthful, think of it this way: you’re creating a factory class called customersFactory. It is of type ICustomer (the interface), and inherits all of the endpoint information that matches the “Customer” tag.
Note that you haven’t (yet) accessed the WCF service-you’ve created a class from the ChannelFactory that allows you to instantiate a strongly-typed proxy that you will use to communicate with the service. The next line creates a strongly-typed proxy (customersProxy) of type ICustomer, using the base ChannelFactory method CreateChannel.
 ICustomer customersProxy =
        customersFactory.CreateChannel();
You can then use the proxy customersProxy to access the two methods, GetCustomer and GetOrderHistory.
string CustomerString =
      customersProxy.GetCustomer(1);
string CustomerHistory =
        customersProxy.GetOrderHistory(1);
Finally, if you wanted to change the communication binding to use HTTP, or use a different TCP port, you’d only need to modify and distribute the app.config files.
 <endpoint
   address="http://localhost:8080/CustomerBz"
     binding="basicHttpBinding"
     contract="DemoInterfaces.ICustomer" />
Step 7: Writing Code Instead of Config Files
Step 4 through Step 6 used configuration files to minimize the amount of code you’d need to write. Perhaps more importantly, you can distribute changes via configuration files without having to recompile and redistribute new software modules. However, there may be times when you’ll want to access the WCF object model more directly.
Make sure to add a .NET reference to System.ServiceModel any time you write code using the WCF object model.
Listing 6 and 7 opened a ServiceHost object using configuration settings in app.config. If you wanted to write out the code “long-hand” you’d do the following:
First, you’d determine the current host address:
// C# code
IPHostEntry ips =
    Dns.GetHostEntry(Dns.GetHostName());

IPAddress _ipAddress = ips.AddressList[0];

string urlService = "net.tcp://" +
          _ipAddress.ToString() +
          ":8228/MyService";
' VB.NET
Dim ips As IPHostEntry =
       Dns.GetHostEntry(Dns.GetHostName())

Dim _ipAddress As IPAddress = ips.AddressList(0)

Dim urlService As String = "net.tcp://" +
    _ipAddress.ToString() + ":8228/MyService"
Next, you’d create a new instance of a NetTcpBinding object (or WsHttpBinding, or whatever communication binding object you need), and set any required properties:
// C# code
NetTcpBinding tcpBinding =
    new NetTcpBinding();

tcpBinding.Security.Transport.ProtectionLevel =
      System.Net.Security.
             ProtectionLevel.EncryptAndSign;

tcpBinding.Security.Mode = SecurityMode.None;
'  VB.NET code

Dim tcpBinding As New NetTcpBinding()

tcpBinding.Security.Transport.ProtectionLevel =
      System.Net.Security.
             ProtectionLevel.EncryptAndSign;

tcpBinding.Security.Mode = SecurityMode.None;
Finally, create an instance of the ServiceHost object, and use the method AddServicePoint to define the type reference to the service contract (the interface), the binding object, and the address.
// C# code
ServiceHost host =
            new ServiceHost(typeof(ICustomers));
host.AddServiceEndpoint(
     typeof(ICustomers), tcpBinding, urlService);
host.Open();
'  VB.NET code
Dim host As New ServiceHost(GetType(ICustomers))
host.AddServiceEndpoint(GetType(ICustomers),
   tcpBinding, urlService)
host.Open();
Step 8: The Baker’s Dozen Spotlight: Building and Hosting a WCF Service Inside IIS (Part 1 of 2)
If you have built ASMX-style Web services in the past, you may be wondering how to accomplish the same thing in WCF: namely, to build a WCF service that uses the interface and business class, and host it in IIS. The steps are at least similar enough that you’ll see some general commonality. In this step, you’ll build the WCF Web service, and in the next step you’ll build a client piece to access it.
Prior to WCF, developers usually needed to write and maintain different code bases to deal with each protocol. WCF allows developers to work with these protocols using a unified programming model-eliminating the need for separate code bases.
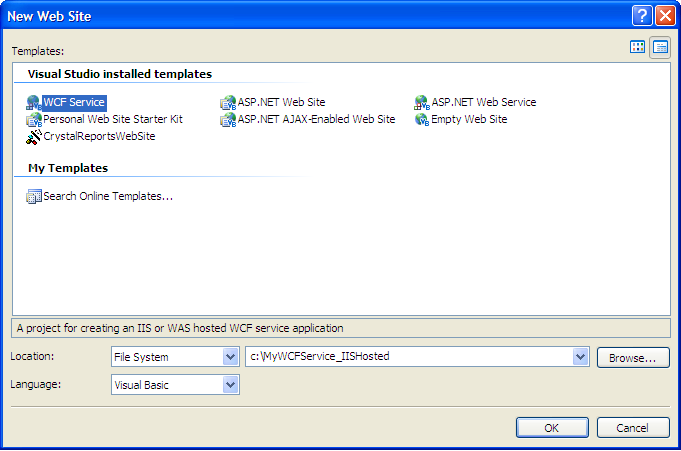
First, create a new Web site project, using the WCF Service template (Figure 1). Call the project WCFService_IISHosted.
Second, right-click in Solution Explorer and add .NET references to the two DLLs for the interface and business class libraries that you created in Step 4 and Step 5 (DemoInterfaces.DLL and DemoCustomerBz.DLL). Once you do that, Solution Explorer will look like Figure 2.
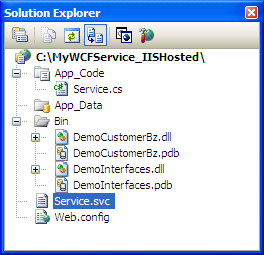
Note that Figure 2 contains a service file called Service.svc. This is similar to the ASMX file you would have used prior to WCF. The contents are as follows:
<% @ServiceHost Language=C# Debug="true"
Service="MyService"
CodeBehind="~/App_Code/Service.cs" %>
You’ll need to change two things in the service file: the service reference is the CustomerBz DLL file, and there is no code-behind. (Many online demos feature a simple codebehind file that contains both an interface and the class code, but this example shows how to specify an external DLL).
<% @ServiceHost Language=C# Debug="true"
Service="DemoCustomerBz.CustomerBz"
Your next step is to test out the service in a browser. If you run the Web project from within Visual Studio 2005 (or make the folder shareable and run it outside of Visual Studio 2005), you’re likely to see a browser screen (Figure 3) stating that Metadata publishing is currently disabled. You can enable Metadata publishing by adding the following line to web.config, in the serviceBehavior area:
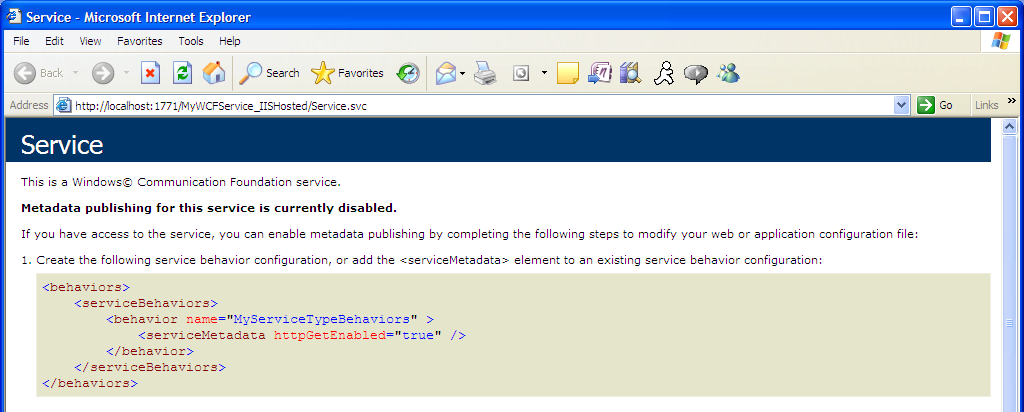
<serviceMetadata httpGetEnabled="true"/>
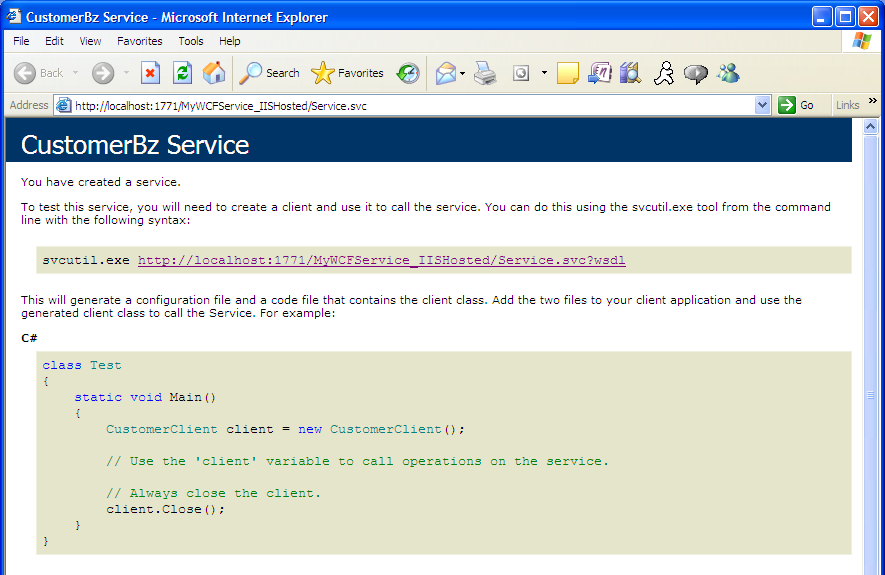
Now if you try to run the service in the browser, you’ll see it correctly (Figure 4). Note that you cannot actually “run” the service and view test results in the browser, which was never a recommended way to test a service in the first place. The next step will create a simple .NET client to consume this IIS-hosted service.
Step 9: Building a .NET Client to Access an IIS-hosted WCF Service (Part 2 of 2)
Now that you’ve created the IIS-hosted WCF service, the next step is to build a .NET client to consume the service. In the .NET client, you’ll add a service reference to the WCF service, similar to the way you might have added a Web reference prior to WCF.
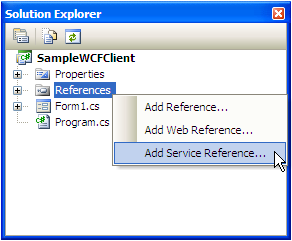
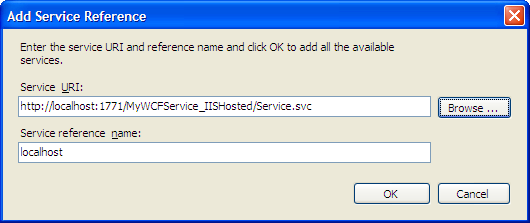
So create a Windows Forms application, and in Solution Explorer, right-click on the References list to add a Service Reference (Figure 5). Visual Studio 2005 will prompt you for the address of the WCF service (Figure 6), along with the default name of the local reference to the service. (You can change it if you want, but for this demo, just keep it as localhost.)
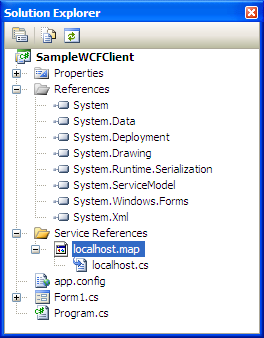
Once you add the service reference, Visual Studio 2005 will do three things:
- Automatically add a reference to System.ServiceModel.
- Add the binding information into the local app.config file, based on the information from the service.
- Add an interface proxy to the WCF service, which you’ll programatically access (in the same way you’d access a Web reference proxy).
Figure 7 shows Solution Explorer with these additions.
Finally, you can use the proxy object to consume the WCF service and call the back-end classes. Once again, if you previously consumed ASMX services, this should appear familiar:
// C# code
localhost.CustomerClient oClient =
        new   localhost.CustomerClient();
string cResults = oClient.GetOrderHistory(1);
'VB.NET code
Dim oClient As New localhost. CustomerClient()
Dim cResults As String =
oClient.GetOrderHistory(1)
One final note: this approach essentially “pulled” the WCF service reference from IIS. In some instances, you may wish to “push” service references out. The Microsoft Windows SDK contains a utility called SVCUTIL.EXE (short for ServiceModel MetaData Utility): this utility generates service model code from the service metadata.
Figure 8 shows a command prompt for using SVCUTIL.EXE. You specify the full URL for the service and the utility generates two files: the service proxy and an output.config file that you can incorporate into your client application.

Step 10: WCF Services Under IIS for non-.NET Clients, (Part 1 of 3)-Creating the Service and the Configuration
Listing 11 provides a complete listing for a modified web.config file for an IIS-hosted service over multiple bindings.
One of the many great things about WCF is that you can define as many endpoints as necessary-such as a specific endpoint for a .NET client, and another endpoint for a non-.NET client.
One of the many great things about WCF is that you can define as many endpoints as necessary-such as a specific endpoint for a .NET client, and another endpoint for a non-.NET client.
Step 11: WCF Services for non-.NET Clients, (Part 2 of 3)-Registering the Service
Before you consume the service with a non-.NET client, you need to register the service with IIS and ASP.NET 2.0. The .NET 3.0 Framework contains a utility called ServiceModelReg that you can use, as follows:
-- Location for ServiceModelReg.EXE
-- "\Windows\Microsoft.NET\Framework\v3.0\
               Windows Communication Foundation"

-- Syntax:
ServiceModelReg.EXE -s:W3SVC/1/ROOT/TestWCFService
ServiceModelReg registers the service and creates the necessary script maps.
Step 12: WCF Services for non-.NET Clients, (Part 3 of 3) (VFP)
Finally, you can access the WCF XML Web service using a non-.NET client. Since I was a Visual FoxPro developer in a past life, I’ll use VFP to consume the service. Listing 12 shows a brief code sample-if you ever consumed ASMX services in VFP, you’ll notice that the code is basically the same!
Step 13: WCF Security Options
With WCF, you are sending SOAP messages over all the supported protocols (TCP, HTTP, etc.) Therefore, you need to implement security (for authentication, encryption etc.). WCF security is a complete topic in itself (see the Recommended Reading section for more on this topic), which is beyond the scope of this article.
Table 3 lists the main security modes for all of the WCF communication bindings. You can specify security settings in the configuration files that you built in previous steps. For example, the following requires that messages must be passed with user credentials:
<wsHttpBinding>
   <binding name="wsHttp">
        <security mode="Message">
            <message
                 clientCredentialType=
                       "UserName" />
        </security>
    </binding>
</wsHttpBinding>
Recommended Reading
Learn the fundamental WCF terms and security options. Study the entire object model in System.ServiceModel. These will be your vocabulary. Finally, here are some excellent resources for WCF:
- Thom Robbins (currently the Director of .NET Platform Product Management) has posted several informative blog entries on WCF. You can find his blog at http://blogs.msdn.com/trobbins/.
- Rick Strahl’s has covered WCF in several places: his eColumn article in CoDe Magazine, “A New Foundation: Taking a Look at WCF” (http://www.code-magazine.com/Article.aspx?quickid=060123), his CoDe Focus article, “Visual FoxPro Web Services Revisited” (http://www.code-magazine.com/Article.aspx?quickid=0703062), and his blog (http://west-wind.com/WebLog/).
- Juval Lowy wrote an excellent article in CoDe Magazine, “WCF Essentials-A Developer’s Primer” (http://www.code-magazine.com/Article.aspx?quickid=0605051), and also has written the book, Programming WCF Services.
- Michele Leroux Bustamante has written two terrific articles in CoDe Magazine, “Hosting WCF Services” (http://www.code-magazine.com/Article.aspx?quickid=0701041), and “Fundamentals of WCF Security” (http://www.code-magazine.com/Article.aspx?quickid=0611051).
Closing Thoughts
Have you ever submitted something (an article, a paper, some code, etc.) and thought of some good ideas after the fact? Well, I’m the king of thinking of things afterwards. Fortunately, that’s the type of thing that makes blogs valuable. Check my blog (www.TheBakersDozen.net) for follow-up tips and notes on Baker’s Dozen articles…and maybe a few additional treats!
Listing 1: The interface and contracts (C#)
// Make sure to add System.ServiceModel as a .NET reference!
using System;
using System.Collections.Generic;
using System.Text;
using System.ServiceModel;

namespace DemoInterfaces
{
    [ServiceContract]
    public interface ICustomer
    {
        [OperationContract]
        string GetCustomer(int CustomerID);
        [OperationContract]
        string GetOrderHistory(int CustomerID);
    }
}
Listing 2: The interface and contracts (VB.NET)
' Make sure to add System.ServiceModel as a .NET reference!
Imports System
Imports System.Collections.Generic
Imports System.Text
Imports System.ServiceModel

Namespace DemoInterfaces
<ServiceContract()> _
Public Interface ICustomer
   <OperationContract()> _
Function GetCustomer(ByVal CustomerID As Integer) As String

<OperationContract()> _
Function GetOrderHistory(ByVal CustomerID As Integer)
                         As String
End Interface
End Namespace
Listing 3: CustomerBz.cs (C#)
using System;
using System.Collections.Generic;
using System.Text;
using System.Data;
using DemoInterfaces;

namespace DemoCustomerBz
{
    public class CustomerBz : ICustomer
    {
        public string GetCustomer(int CustomerID)
        {
            DataSet dsCust = new DataSet();
            DataTable dt = new DataTable();
            dt.Columns.Add("CustomerID", typeof(Int32));
            dt.Columns.Add("CustomerName", typeof(String));
            dt.Columns.Add("CustomerNumber", typeof(String));

            dt.Rows.Add(CustomerID,    "Customer " +
            CustomerID.ToString(),
                       "ID" + CustomerID.ToString());
            dsCust.Tables.Add(dt);

            return dsCust.GetXml();
        }

        public string GetOrderHistory(int CustomerID)
        {
            DataSet dsCustOrder = new DataSet();
            DataTable dt = new DataTable();
            dt.Columns.Add("CustomerID", typeof(Int32));
            dt.Columns.Add("OrderID", typeof(String));
            dt.Columns.Add("OrderDate", typeof(DateTime));
            dt.Columns.Add("OrderAmount", typeof(Decimal));
            dt.Columns.Add("OrderStatus", typeof(String));

            dt.Rows.Add(CustomerID, 1001,
                  new DateTime(2006, 11, 21), 1100, "Completed");
            dt.Rows.Add(CustomerID, 1523,
                  new DateTime(2007, 1, 3), 1100, "Pending");

            dsCustOrder.Tables.Add(dt);

            return dsCustOrder.GetXml();
        }

    }
}
Listing 4: CustomerBz.cs (VB.NET)
Imports System
Imports System.Collections.Generic
Imports System.Text
Imports System.Data
Imports DemoInterfaces

Namespace DemoCustomerBz
   Public Class CustomerBz
      Implements ICustomer

      Public Function GetCustomer(ByVal CustomerID As Integer)
                                                As String
         Dim dsCust As New DataSet()
         Dim dt As New DataTable()
   dt.Columns.Add("CustomerID", GetType(Int32))
   dt.Columns.Add("CustomerName", GetType([String]))
   dt.Columns.Add("CustomerNumber", GetType([String]))

   dt.Rows.Add(CustomerID, "Customer " +
             CustomerID.ToString(), "ID" + CustomerID.ToString())

   dsCust.Tables.Add(dt)
   Return dsCust.GetXml()

End Function

Public Function GetOrderHistory(ByVal CustomerID As Integer)
                                         As String
   Dim dsCustOrder As New DataSet()
   Dim dt As New DataTable()
   dt.Columns.Add("CustomerID", GetType(Int32))
   dt.Columns.Add("OrderID", GetType([String]))
   dt.Columns.Add("OrderDate", GetType(DateTime))
   dt.Columns.Add("OrderAmount", GetType([Decimal]))
   dt.Columns.Add("OrderStatus", GetType([String]))

   dt.Rows.Add(CustomerID, 1001, New DateTime(2006, 11, 21),
                    1100, "Completed")
   dt.Rows.Add(CustomerID, 1523, New DateTime(2007, 1, 3),
                    1100, "Pending")

   dsCustOrder.Tables.Add(dt)
   Return dsCustOrder.GetXml()

End Function
   End Class
End Namespace
Listing 5: The app.config file on the server side
<?xml version="1.0" encoding="utf-8" ?>
<configuration>
  <system.serviceModel>
    <services>
      <service name="DemoCustomerBz.CustomerBz">
        <endpoint address="net.tcp://localhost:8228/CustomerBz"
            binding="netTcpBinding"
            contract="DemoInterfaces.ICustomer" />
      </service>
    </services>
  </system.serviceModel>
</configuration>
Listing 6: Actvating the service on a demo server (C#)
using System;
using System.Collections.Generic;
using System.ComponentModel;
using System.Data;
using System.Drawing;
using System.Text;
using System.Windows.Forms;
using System.ServiceModel;
using DemoInterfaces;
using DemoCustomerBz;

namespace DemoServer
{
    public partial class Form1 : Form
    {
        ServiceHost oHost;
        public Form1()
        {
            InitializeComponent();
        }

        private void UpdateStatus(string cLabel)
        {
            this.lblStatus.Text = cLabel;
            this.lblStatus.Visible = true;
            this.lblStatus.Update();
        }

        private void btnStart_Click(object sender, EventArgs e)
        {
            using (oHost = new ServiceHost(typeof(CustomerBz)))
            {
                this.UpdateStatus( "Attempting to start Service");
                oHost.Open();
                this.UpdateStatus("Service Started");
            }

        }

        private void btnStop_Click(object sender, EventArgs e)
        {
            this.UpdateStatus("Service Stopped");
            oHost.Close();
        }
    }
}
Listing 7: Activating the service on a demo server (VB.NET)
' Remember to add
Imports System
Imports System.Collections.Generic
Imports System.ComponentModel
Imports System.Data
Imports System.Drawing
Imports System.Text
Imports System.Windows.Forms
Imports System.ServiceModel
Imports DemoInterfaces
Imports DemoCustomerBz

Namespace DemoServer
End Namespace

Class Form1
Inherits Form

Private oHost As ServiceHost

Public Sub New()
InitializeComponent()
End Sub         'New


Private Sub UpdateStatus(ByVal cLabel As String)
Me.lblStatus.Text = cLabel
Me.lblStatus.Visible = True
Me.lblStatus.Update()
End Sub         'UpdateStatus


Private Sub btnStart_Click(ByVal sender As Object,
                          ByVal e As EventArgs)
Dim oHost = New ServiceHost(GetType(CustomerBz))
Me.UpdateStatus("Attempting to start Service")
oHost.Open()
Me.UpdateStatus("Service Started")
End Sub


Private Sub btnStop_Click(ByVal sender As Object,
                          ByVal e As EventArgs)
Me.UpdateStatus("Service Stopped")
oHost.Close()
End Sub         'btnStop_Click
Listing 8: The app.config on the client side
<?xml version="1.0" encoding="utf-8" ?>
<configuration>
  <system.serviceModel>
    <client>
      <endpoint address="net.tcp://localhost:8228/CustomerBz"
                          binding="netTcpBinding"
                          contract="DemoInterfaces.ICustomer"
                          name="Customer" />
    </client>
  </system.serviceModel>
</configuration>
Listing 9: Client-side code to activate a WCF service via interfaces (C#)
using System;
using System.Collections.Generic;
using System.ComponentModel;
using System.Data;
using System.Drawing;
using System.Text;
using System.Windows.Forms;
using DemoInterfaces;
using System.ServiceModel;
using System.IO;

namespace DemoClient
{
    public partial class Form1 : Form
    {
        public Form1()
        {
            InitializeComponent();
        }


        private void btnRetrieve_Click(object sender, EventArgs e)
        {
            using (ChannelFactory<ICustomer> customersFactory =
                 new ChannelFactory<ICustomer>("Customer"))
            {
                ICustomer customersProxy =
                   customersFactory.CreateChannel();
                string CustomerString =
                       customersProxy.GetCustomer(1);

                string CustomerHistory =
                    customersProxy.GetOrderHistory(1);

                this.dataGridView1.DataSource =
            this.XMLToDs(CustomerString);
                this.dataGridView1.DataSource =
            this.XMLToDs(CustomerHistory);

            }
        }

        private DataSet XMLToDs(string XMLData)
        {
            DataSet dsReturn = new DataSet();
            StringReader sr = new StringReader(XMLData);
            dsReturn.ReadXml(sr, XmlReadMode.InferSchema);

            dsReturn.AcceptChanges();

            return dsReturn;
        }
    }
}
Listing 10: Client-side code to activate a WCF service via interfaces (VB.NET)
Imports System
Imports System.Collections.Generic
Imports System.ComponentModel
Imports System.Data
Imports System.Drawing
Imports System.Text
Imports System.Windows.Forms
Imports DemoInterfaces
Imports System.ServiceModel
Imports System.IO

Namespace DemoClient
End Namespace

Class Form1
Inherits Form

Public Sub New()
InitializeComponent()
End Sub         'New

Private Sub btnRetrieve_Click(ByVal sender As Object,
                    ByVal e As EventArgs)

Dim customersFactory As ChannelFactory(Of ICustomer) =
       New ChannelFactory(Of ICustomer)("Customer")

Dim customersProxy As ICustomer =
   customersFactory.CreateChannel()

Dim CustomerString As String = customersProxy.GetCustomer(1)
Dim CustomerHistory As String =
      customersProxy.GetOrderHistory(1)

Me.dataGridView1.DataSource = Me.XMLToDs(CustomerString)
Me.dataGridView1.DataSource = Me.XMLToDs(CustomerHistory)

End Sub         'btnRetrieve_Click


Private Function XMLToDs(ByVal XMLData As String) As DataSet

Dim dsReturn As New DataSet()
Dim sr As New StringReader(XMLData)
dsReturn.ReadXml(sr, XmlReadMode.InferSchema)
dsReturn.AcceptChanges()
Return dsReturn

End Function
End Class
Listing 11: The web.config file to host a WCF service for non-.NET clients
<configuration>
  <system.serviceModel>
    <services>
      <service name="MyService"
            behaviorConfiguration="FoxWcfServiceBehaviors">

        <endpoint contract="IMyService"
                  binding="basicHttpBinding"/>

        <endpoint contract="IMyService"
                   binding="wsHttpBinding"
                   address="ws" />

        <endpoint address="mex"
                  binding="mexHttpBinding"
                  contract="IMetadataExchange" />
      </service>
    </services>
    <behaviors>
      <serviceBehaviors>
        <behavior name="FoxWcfServiceBehaviors" >
          <serviceDebug
           includeExceptionDetailInFaults="true" />
          <serviceMetadata  httpGetEnabled="true"/>
        </behavior>
      </serviceBehaviors>
    </behaviors>
  </system.serviceModel>
  <system.web>
    <compilation debug="true"/>
    <authentication mode="Windows"/>
    <identity impersonate="true"/>
  </system.web>
</configuration>
Listing 12: Visual FoxPro code to consume a WCF server
-- VFP code to consume a WCF service, in the same way
-- that an ASMX would be handled

LOCAL loBasicHttpBinding_IMyService AS "XML Web Service"
LOCAL loException, lcErrorMsg, loWSHandler

loWSHand = NEWOBJECT("WSHandler",HOME()+"FFC\_ws3client.vcx")

loBasicHttpBinding =
loWSHand.SetupClient("http://localhost/WCFDemo/Service.svc?wsdl",
                    "DemoService", "BasicHttpBinding_IMyService")
| Kevin S. Goff, a Microsoft MVP award recipient for 2007, is the founder and principal consultant of Common Ground Solutions, a consulting group that provides custom Web and desktop software solutions in .NET, VFP, SQL Server, and Crystal Reports. Kevin is the author of Pro VS 2005 Reporting using SQL Server and Crystal Reports, published by Apress. Kevin has been building software applications since 1988. He has received several awards from the U.S. Department of Agriculture for systems automation. He has also received special citations from Fortune 500 Companies for solutions that yielded six-figure returns on investment. He has worked in such industries as insurance, accounting, public health, real estate, publishing, advertising, manufacturing, finance, consumer packaged goods, and trade promotion. In addition, Kevin provides many forms of custom training. Contact Kevin at kgoff@commongroundsolutions.net |
| Contract |
|---|
| Data contracts |
| Service contracts |
| Fault contracts |
| Message contracts |
| Binding |
|---|
| BasicHttpBinding |
| WSHttpBinding |
| WSDualHttpBinding |
| WSFederationHttpBinding |
| MsmqIntegrationBinding |
| NetMsmqBinding |
| NetNamedPipeBinding |
| NetPeerTcpBinding |
| NetTcpBinding |
| Contract |
|---|
| None |
| Transport |
| Message |
| Both |
| TransportWithMessageCredential |
| TransportCredentialOnly |
