


One of the hottest technologies of late is blockchain. A blockchain is a digital transaction of records that's arranged in chunks of data called blocks. These blocks link with one another through a cryptographic validation known as a hashing function. Linked together, these blocks form an unbroken chain - a blockchain. A blockchain is programmed to record not only financial transactions but virtually everything of value. Another name for blockchain is distributed ledger.
In this article, I explain the basic ideas behind a blockchain and how it works. Once the fundamentals of blockchain are out of the way, I dive into one of the key features behind the Ethereum blockchain: smart contracts. Smart contracts allow developers to deploy decentralized applications that take advantage of the various characteristics of blockchain. Hold on tight, as I'm going to discuss a lot of concepts in this article. But if you follow along closely, you'll understand the concepts of blockchain and be on your way to creating some really creative applications using it!
Centralization vs. Decentralization
In the traditional client-server architecture, you store transactions records in a database in a centralized location. Figure 1 shows the interactions between clients and servers.
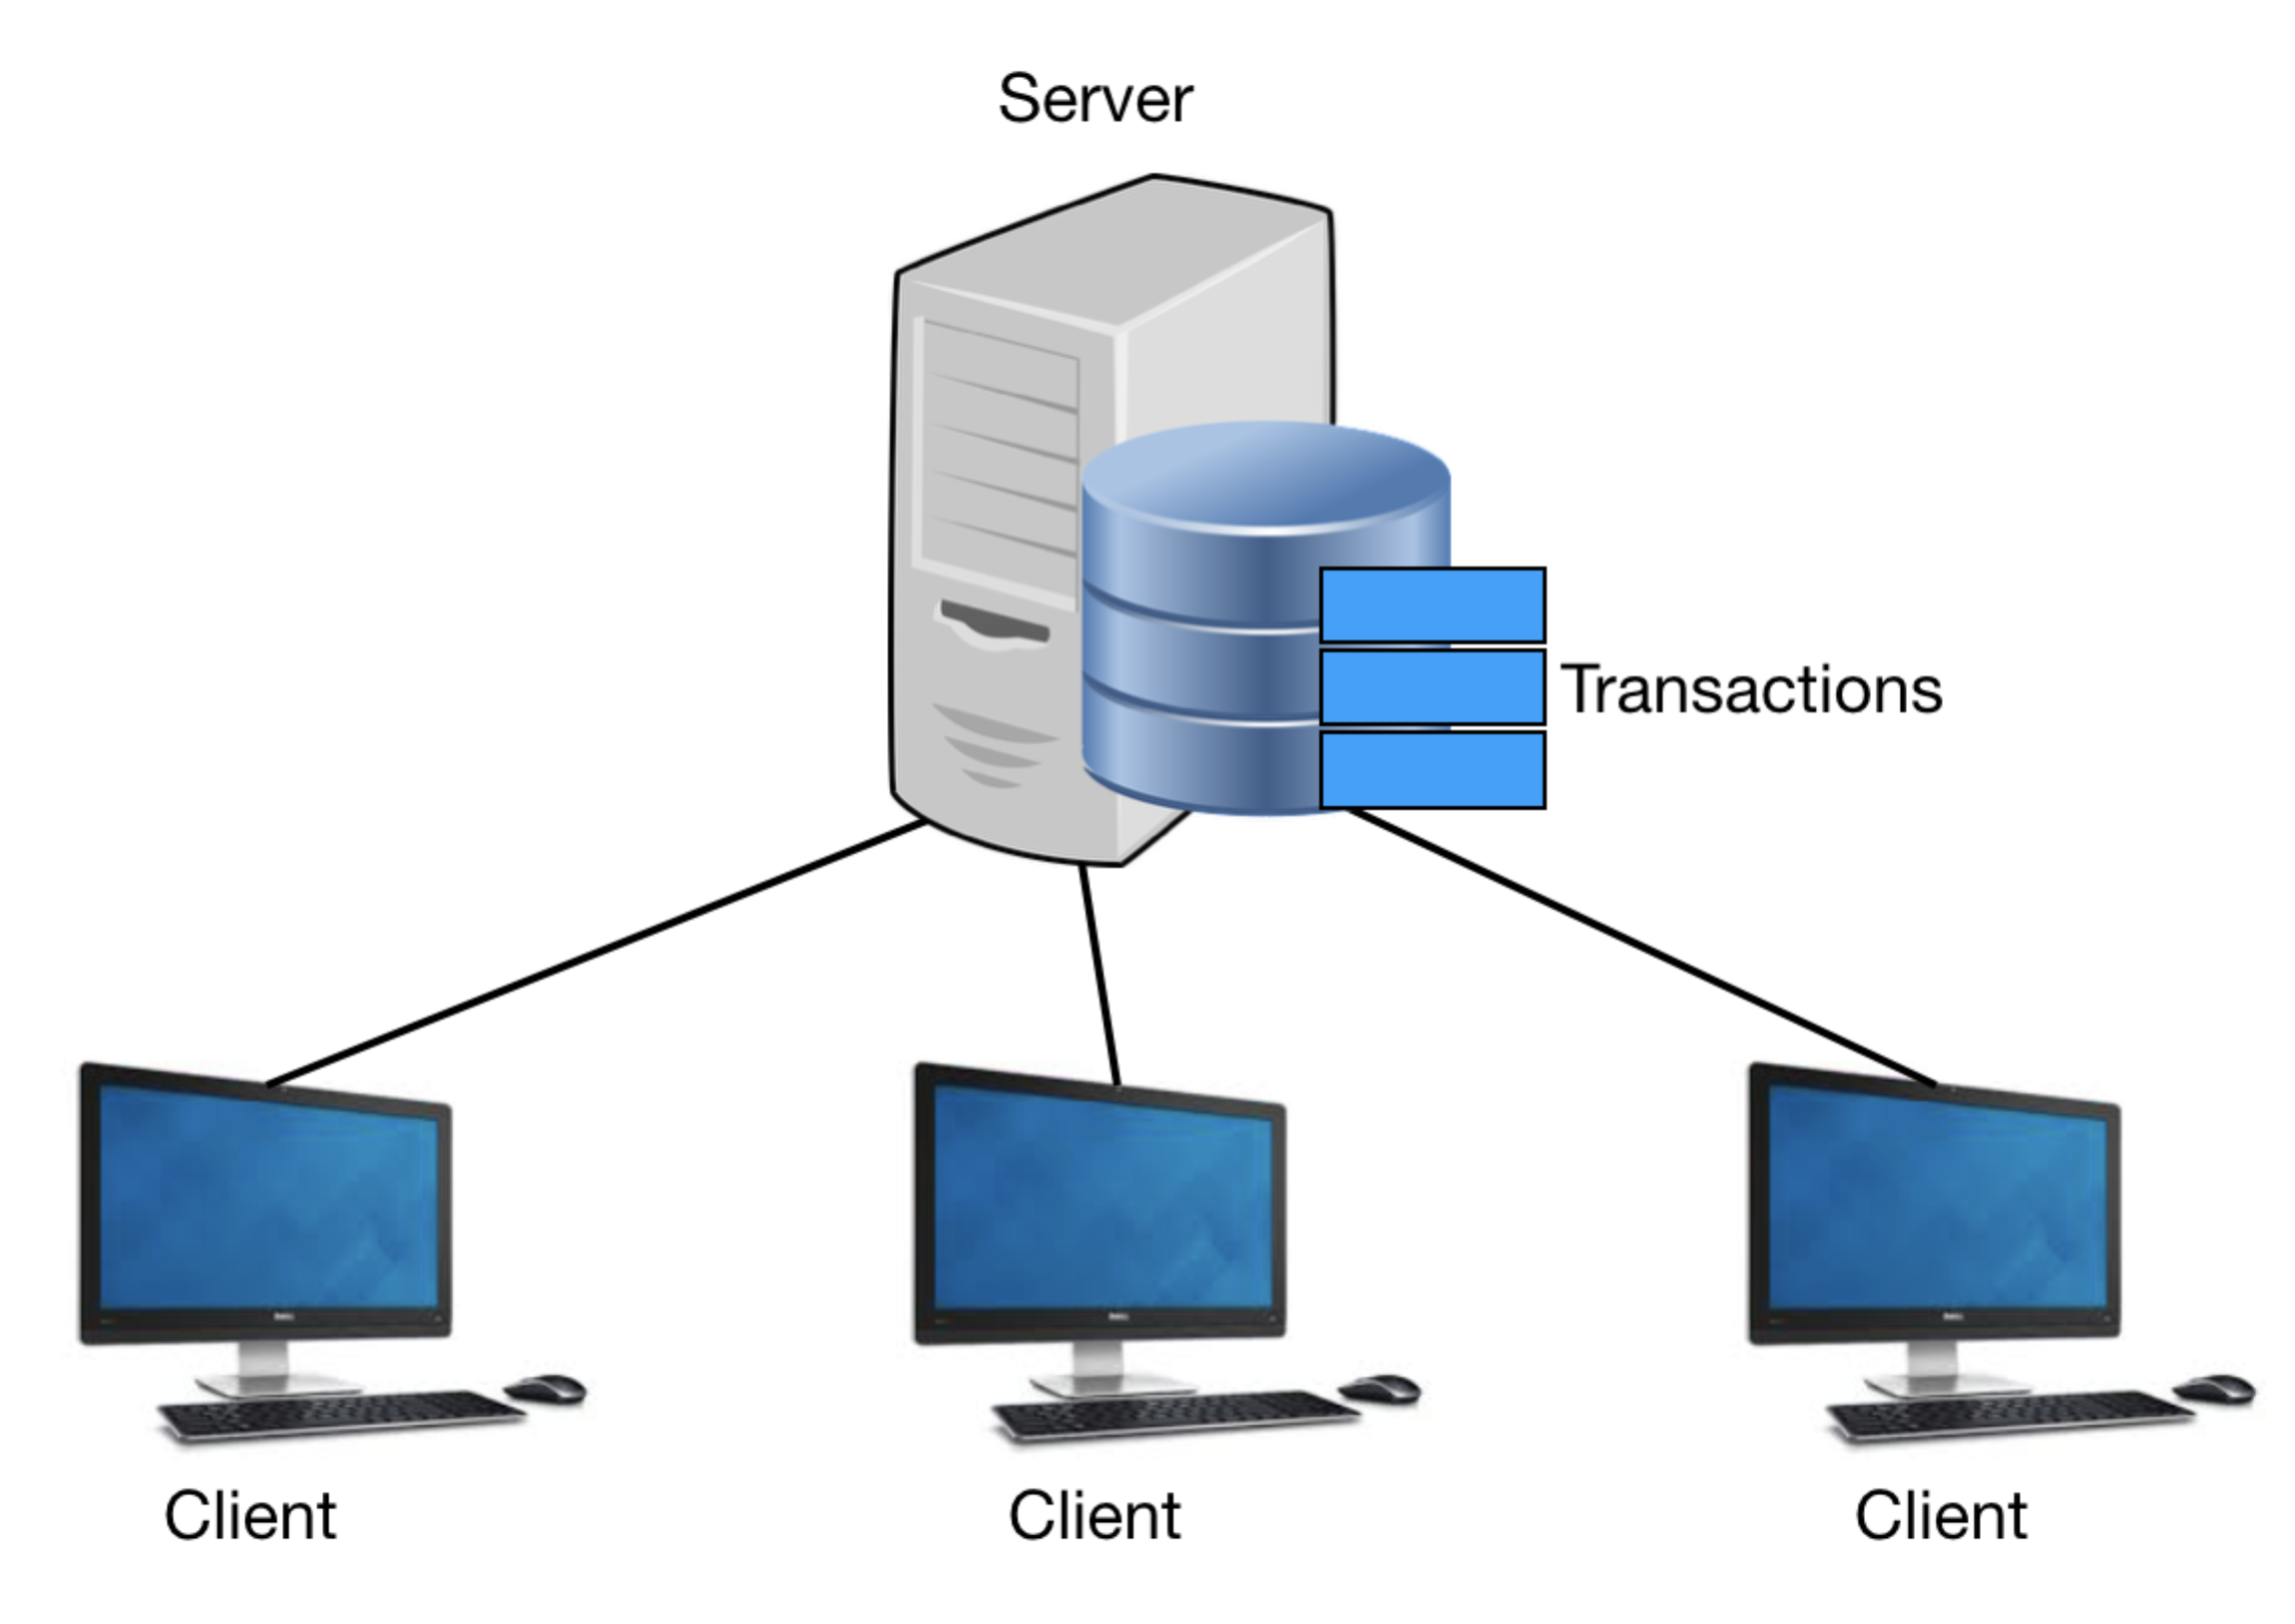
Storing your data in a central location has the following risks:
- The potential for data loss
- The potential for illegal data alteration
The first point is easy to mitigate and can be solved by replicating the data in multiple locations (backups). The second point is more challenging. How do you ensure the integrity of the data stored on the server? A good example is banks. How can you be sure that the balance in your bank account reflects the correct amount of money you possess? In most countries, people trust their banks and governments to maintain the correct records of their personal possessions. But in some countries, governments are corrupt and people have very little trust in them. As you can see, a centralized approach to data storage isn't always ideal.
Thus, blockchain was born, focusing on the decentralization of data storage, commonly known as a distributed ledger. Using decentralization, Figure 1 now looks like Figure 2.
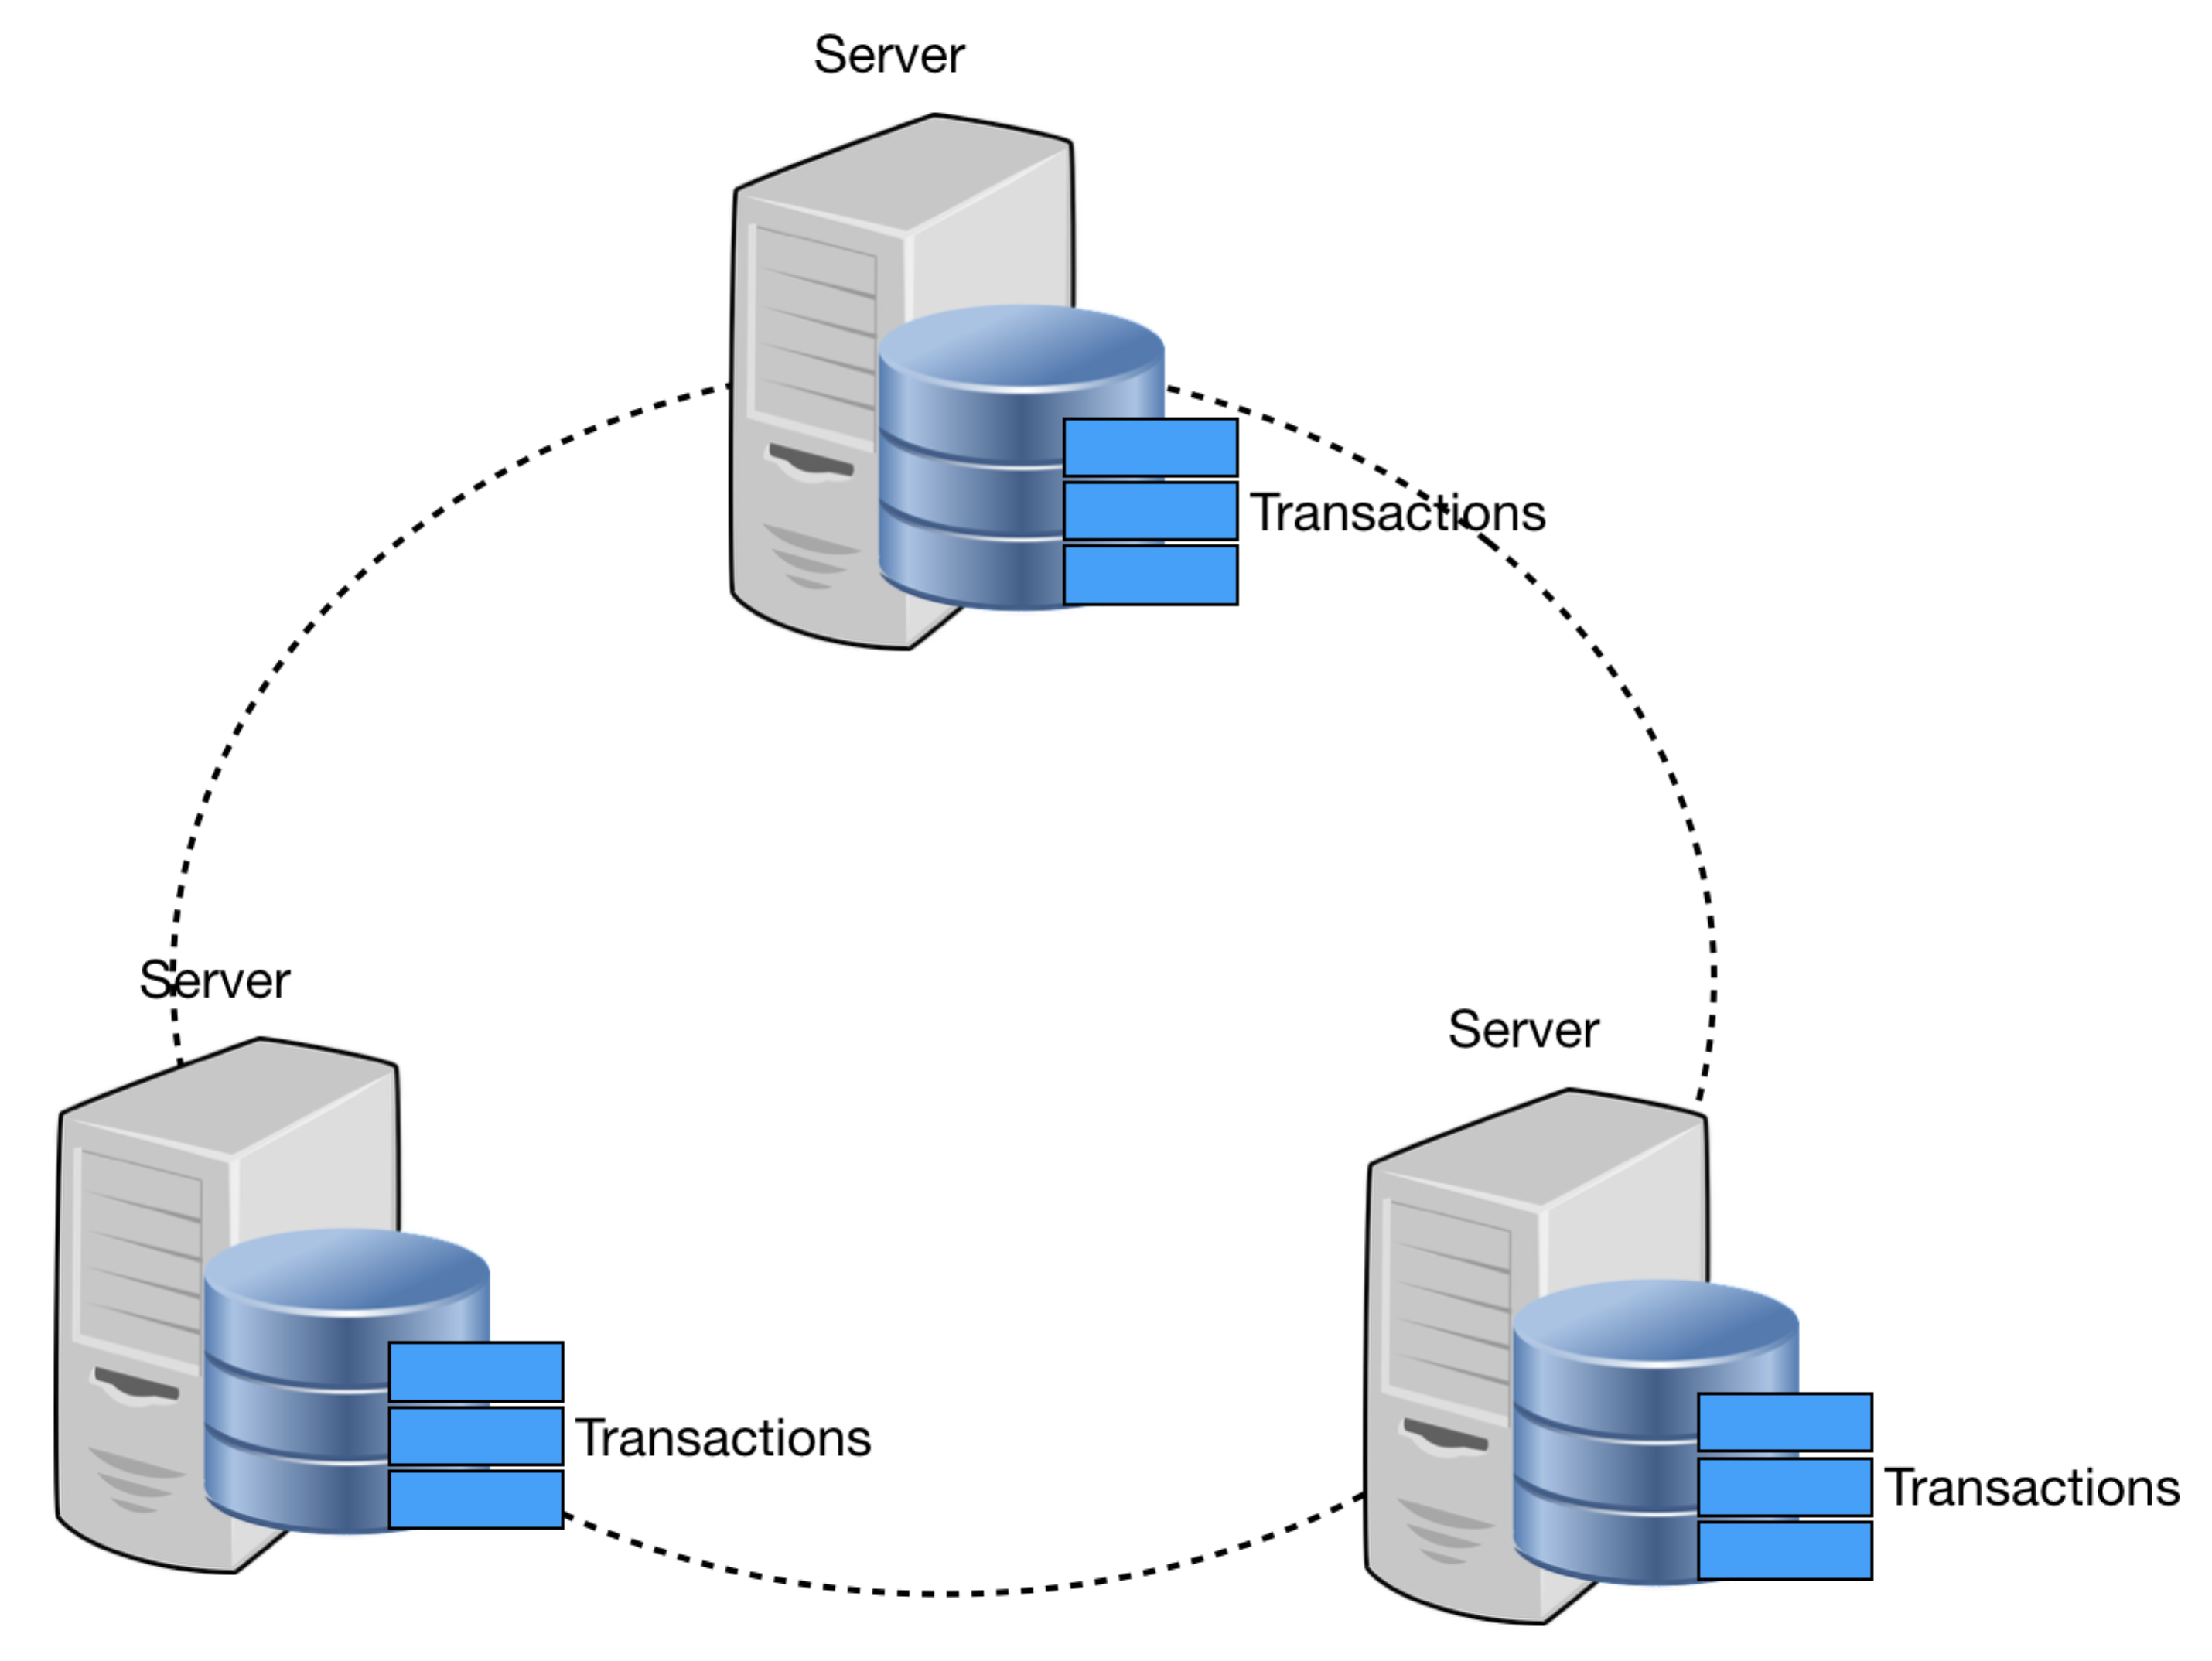
Storing the transactions on multiple computers ensures that no single computer can singlehandedly alter the data on its own, because the transactions are replicated on multiple computers. If a malicious actor wishes to alter the transactions, he must modify the transaction not only on a single computer, but also on all the computers holding the transactions. The more computers participating in the network, the more computers he needs to modify. In this case, decentralization shifts the trust from a central authority to one that is trustless: You don't need to trust a central authority because now everyone holds the records.
The Blocks in Blockchain
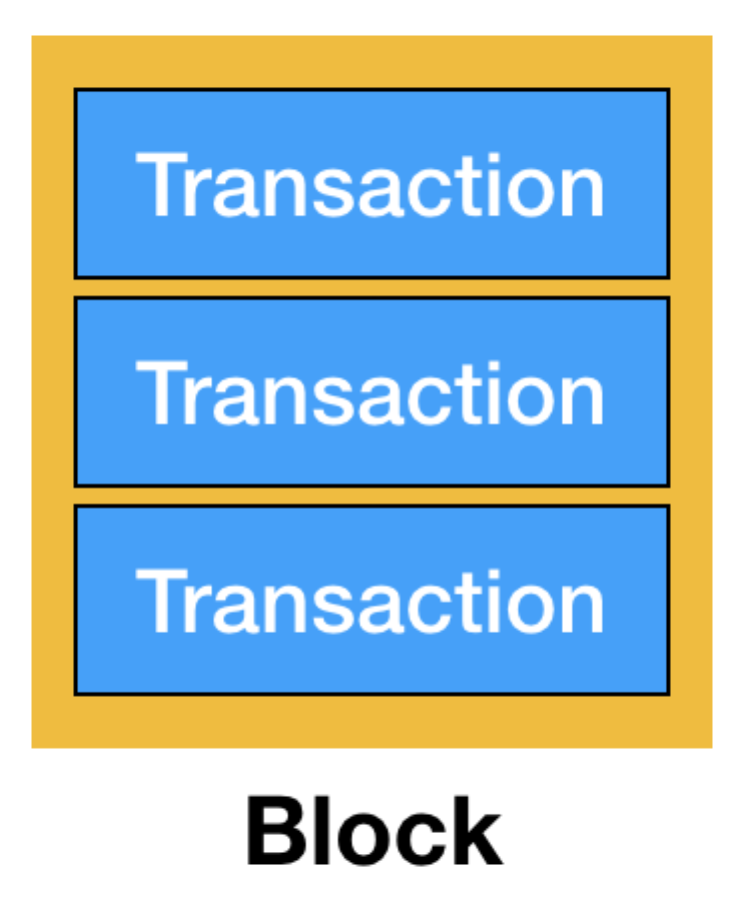
In Figure 1 and Figure 2, you saw that the database contains transactions. Typical transactions may look like this:
- A sends 5 BTC (bitcoins) to B
- B sends 2 BTC to C
- A sends 1 BTC to D
It's important to note that blockchains are used not only for cryptocurrencies like bitcoins and ethers, but can be used for anything of value. Transactions are then grouped into blocks (see Figure 3).
Transactions are grouped into blocks so that they can be efficiently verified and then synchronized with other computers on the network. Once a block is verified, they are added to the previous block, as shown in Figure 4.
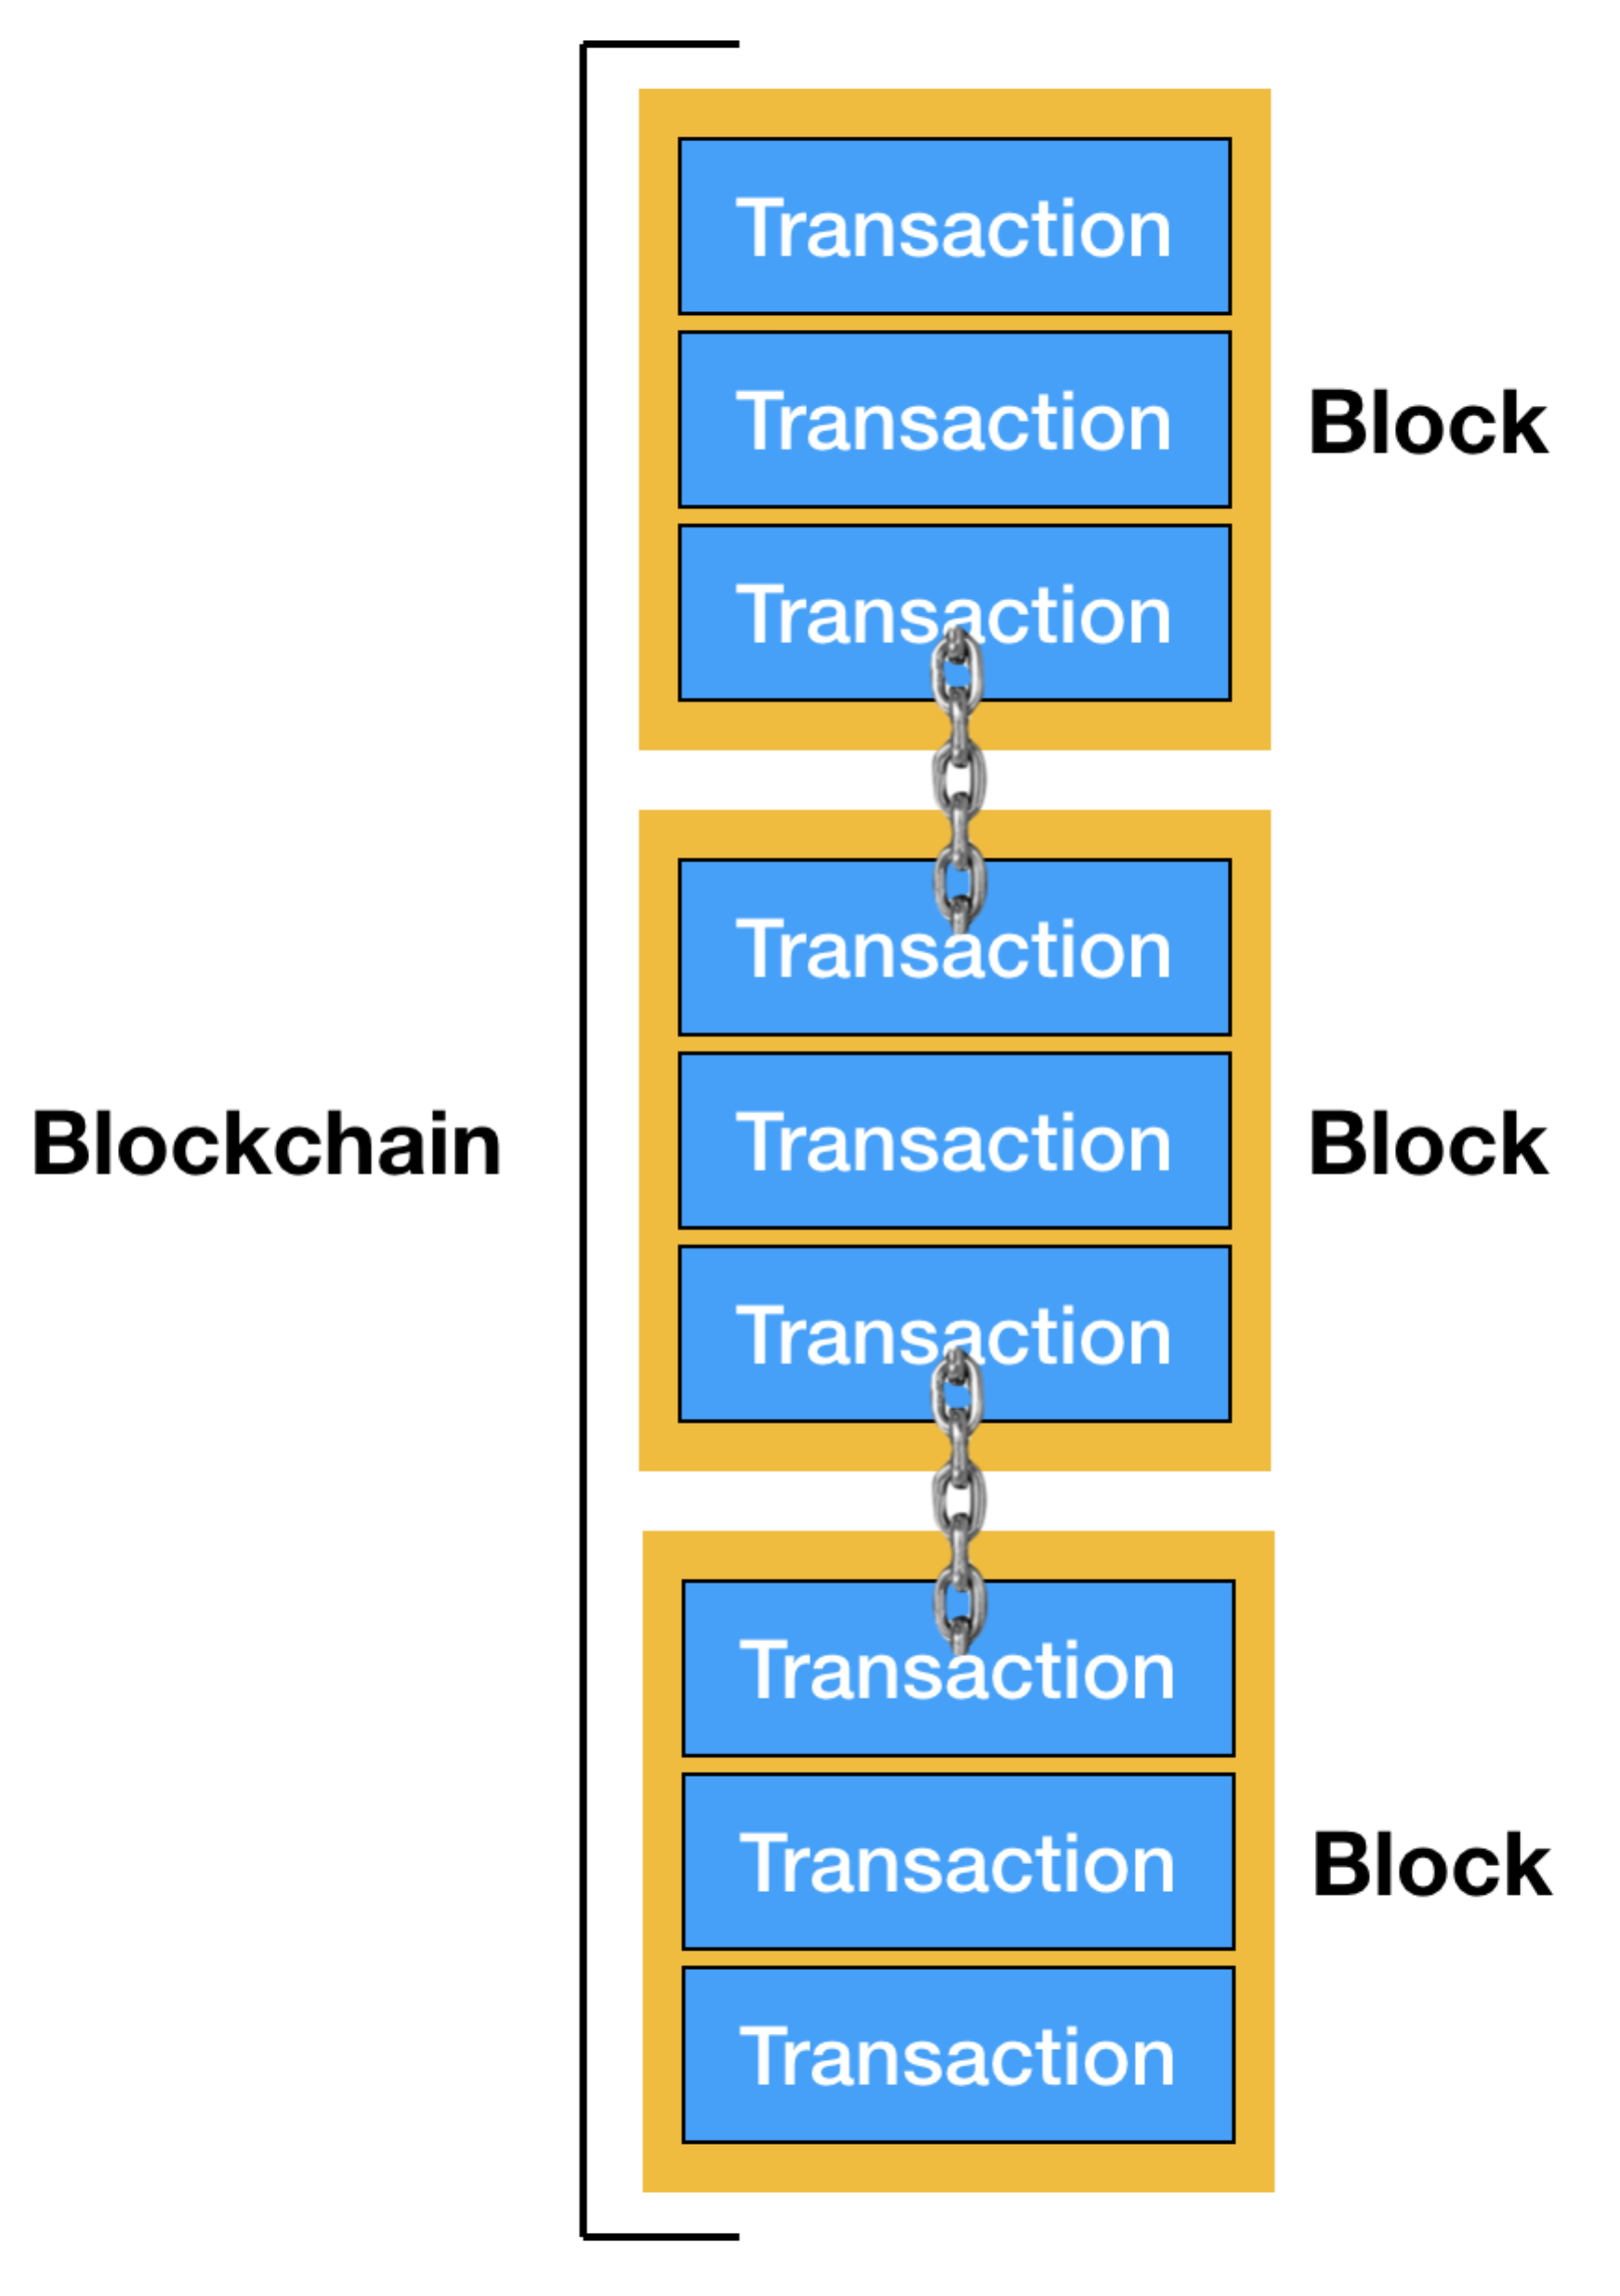
Blockchain gets its name from the fact that blocks of data are chained to each other cryptographically. In order to ensure the correct order of transactions in the blockchain, each block contains the hash (a hash is the result of mapping a block of data into data of fixed size using a cryptographic function) of the previous block, as shown in Figure 5.
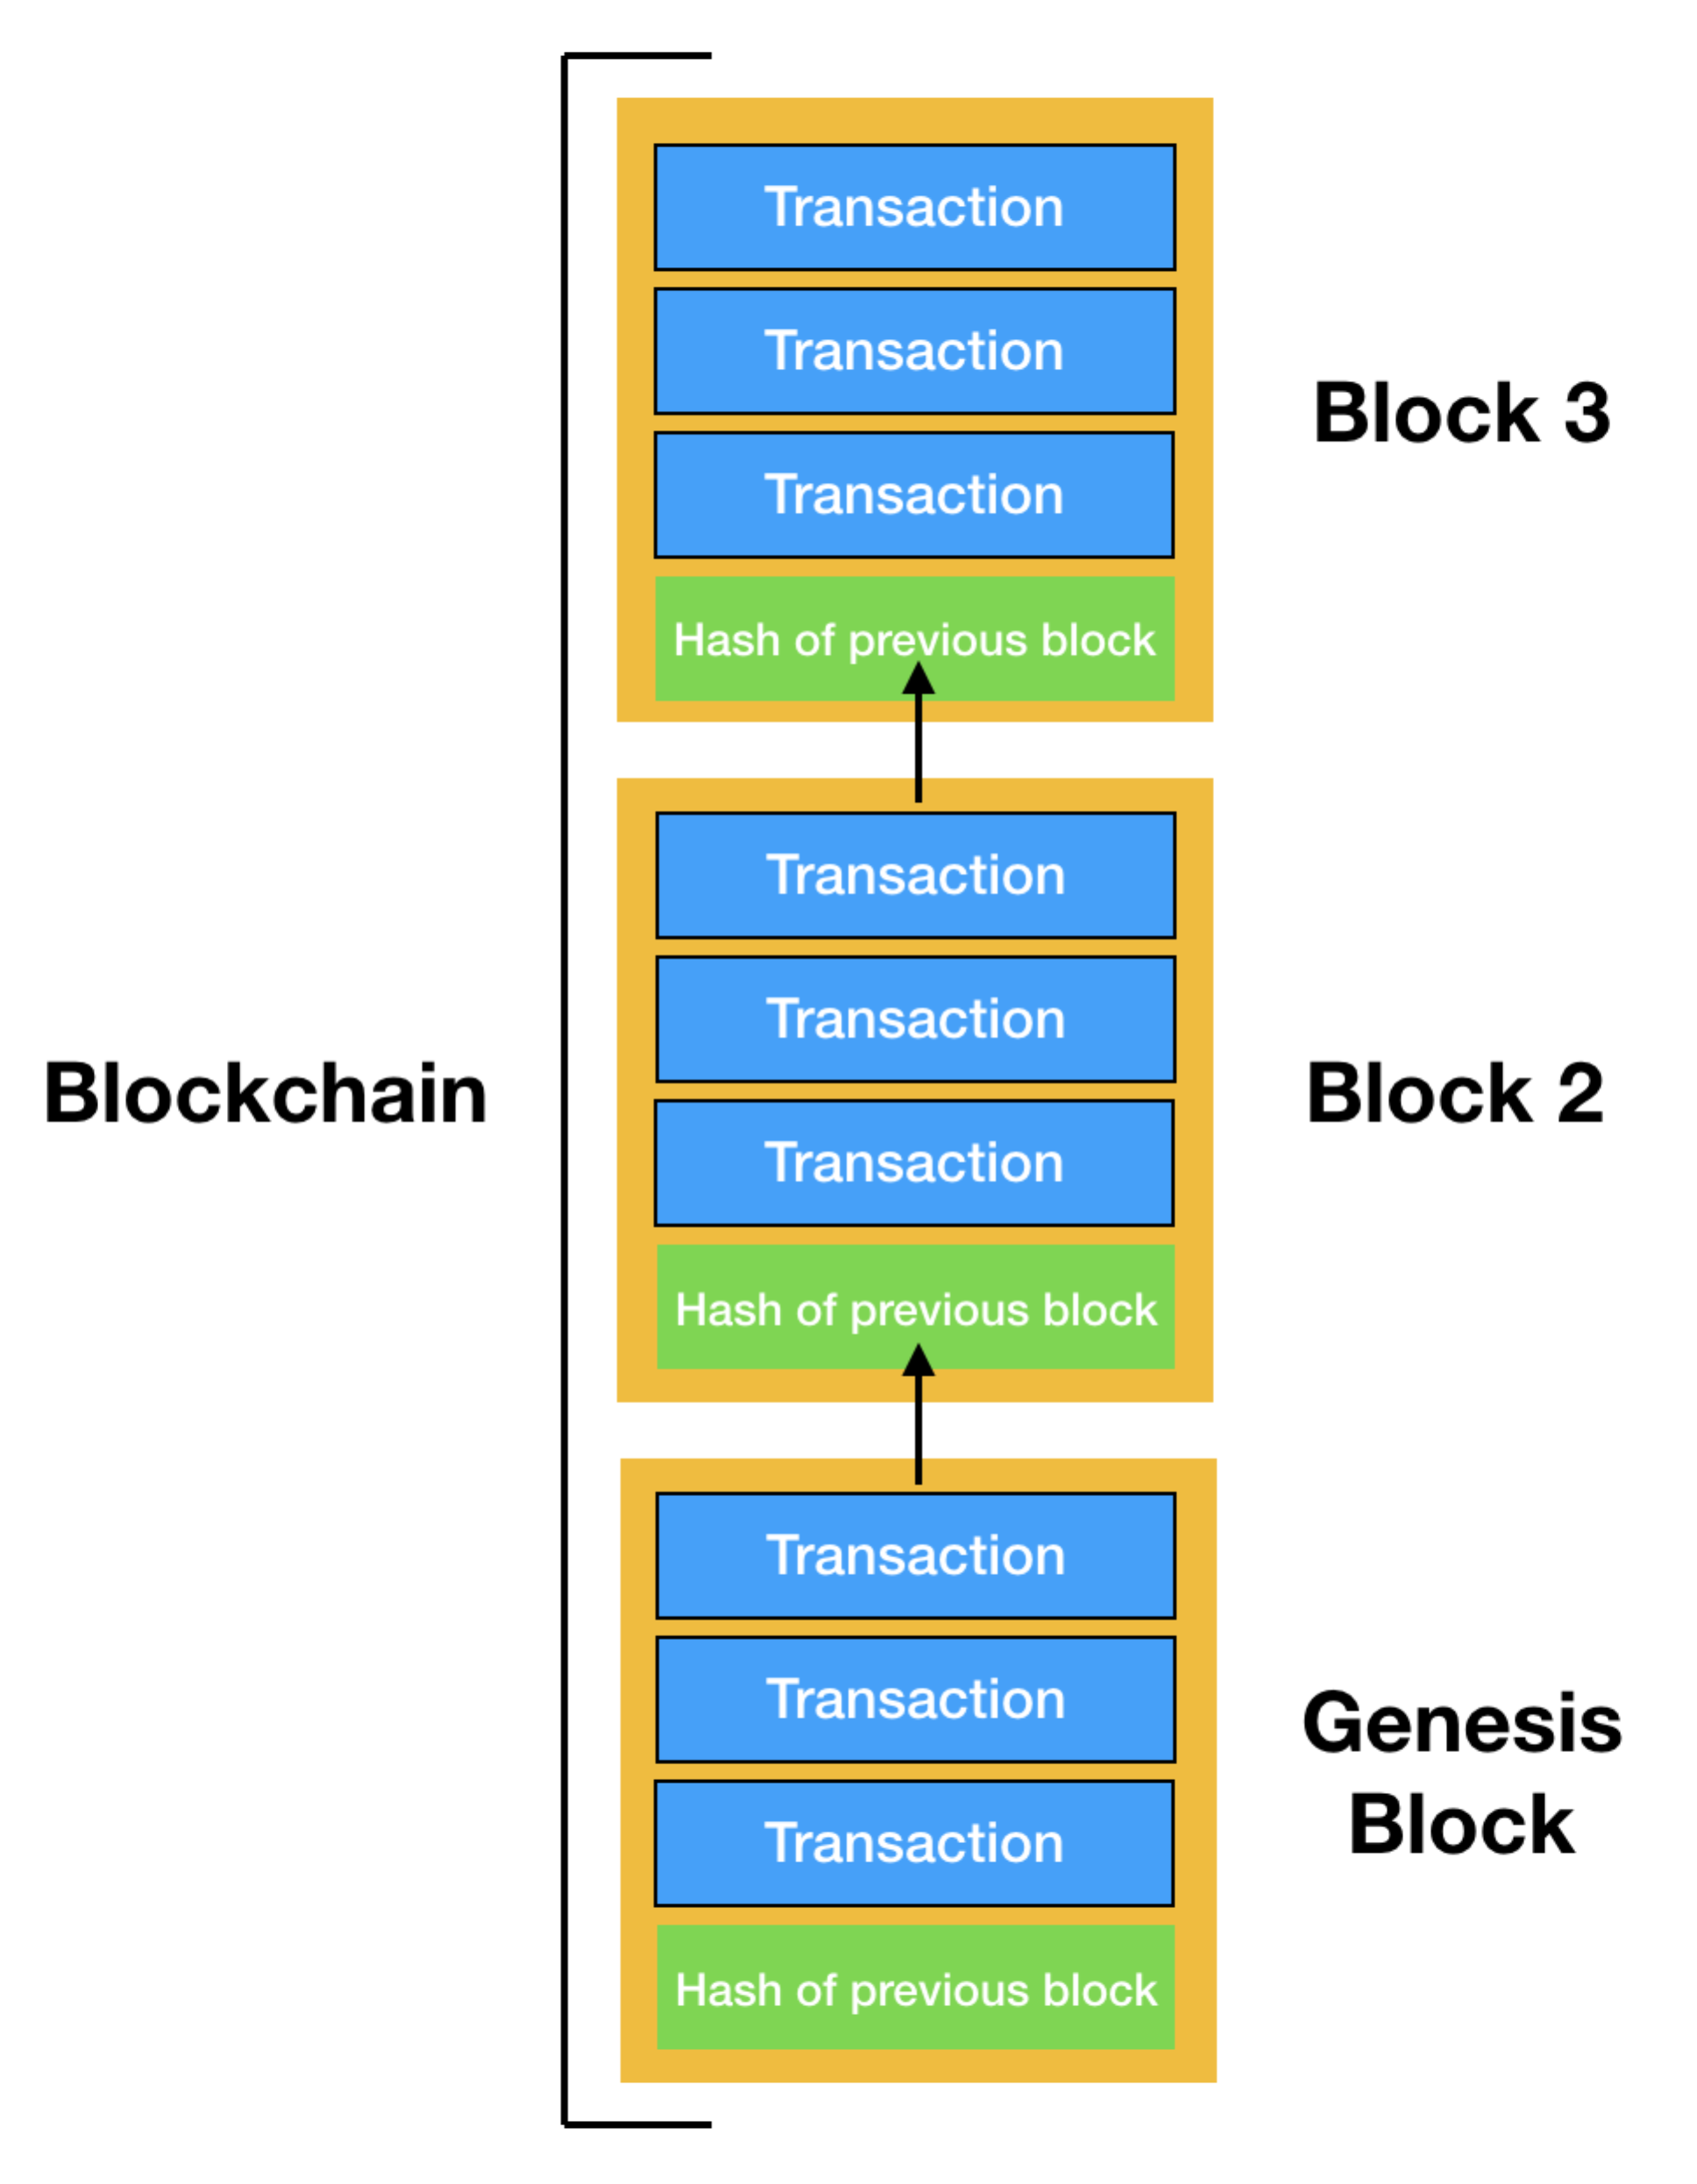
Storing the hash of the previous block in the current block assures the integrity of the transactions in the previous block. Any modifications to the transaction(s) within a block causes the hash in the next block to be invalidated, and it also affects the subsequent blocks in the blockchain. If a hacker wants to modify a transaction, not only must he modify the transaction in a block, but all other subsequent blocks in the blockchain. In addition, he needs to synchronize the changes to all other computers on the network, which is a computationally expensive task to do. Data stored in the blockchain is immutable, for it's hard to change once the block they are in is added to the blockchain.
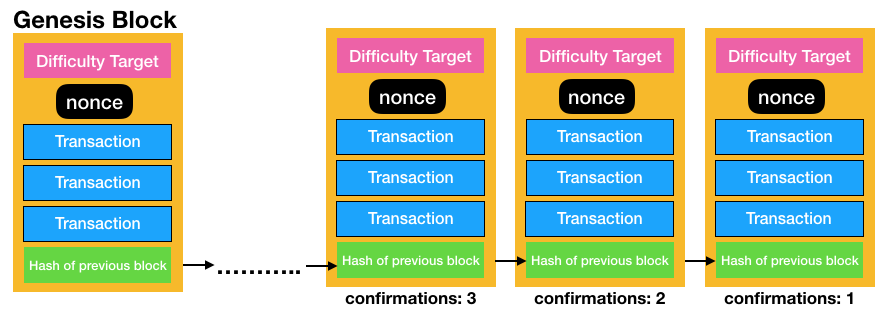
The first block in a blockchain is known as the genesis block. Every blockchain has its own genesis block; the Bitcoin network has its own genesis block, and Ethereum has its own genesis block.
Nodes in a Blockchain Network
I have earlier mentioned that in a decentralized network, there are many computers holding onto the transactions. I can now replace the transactions with the blockchain, as shown in Figure 6.
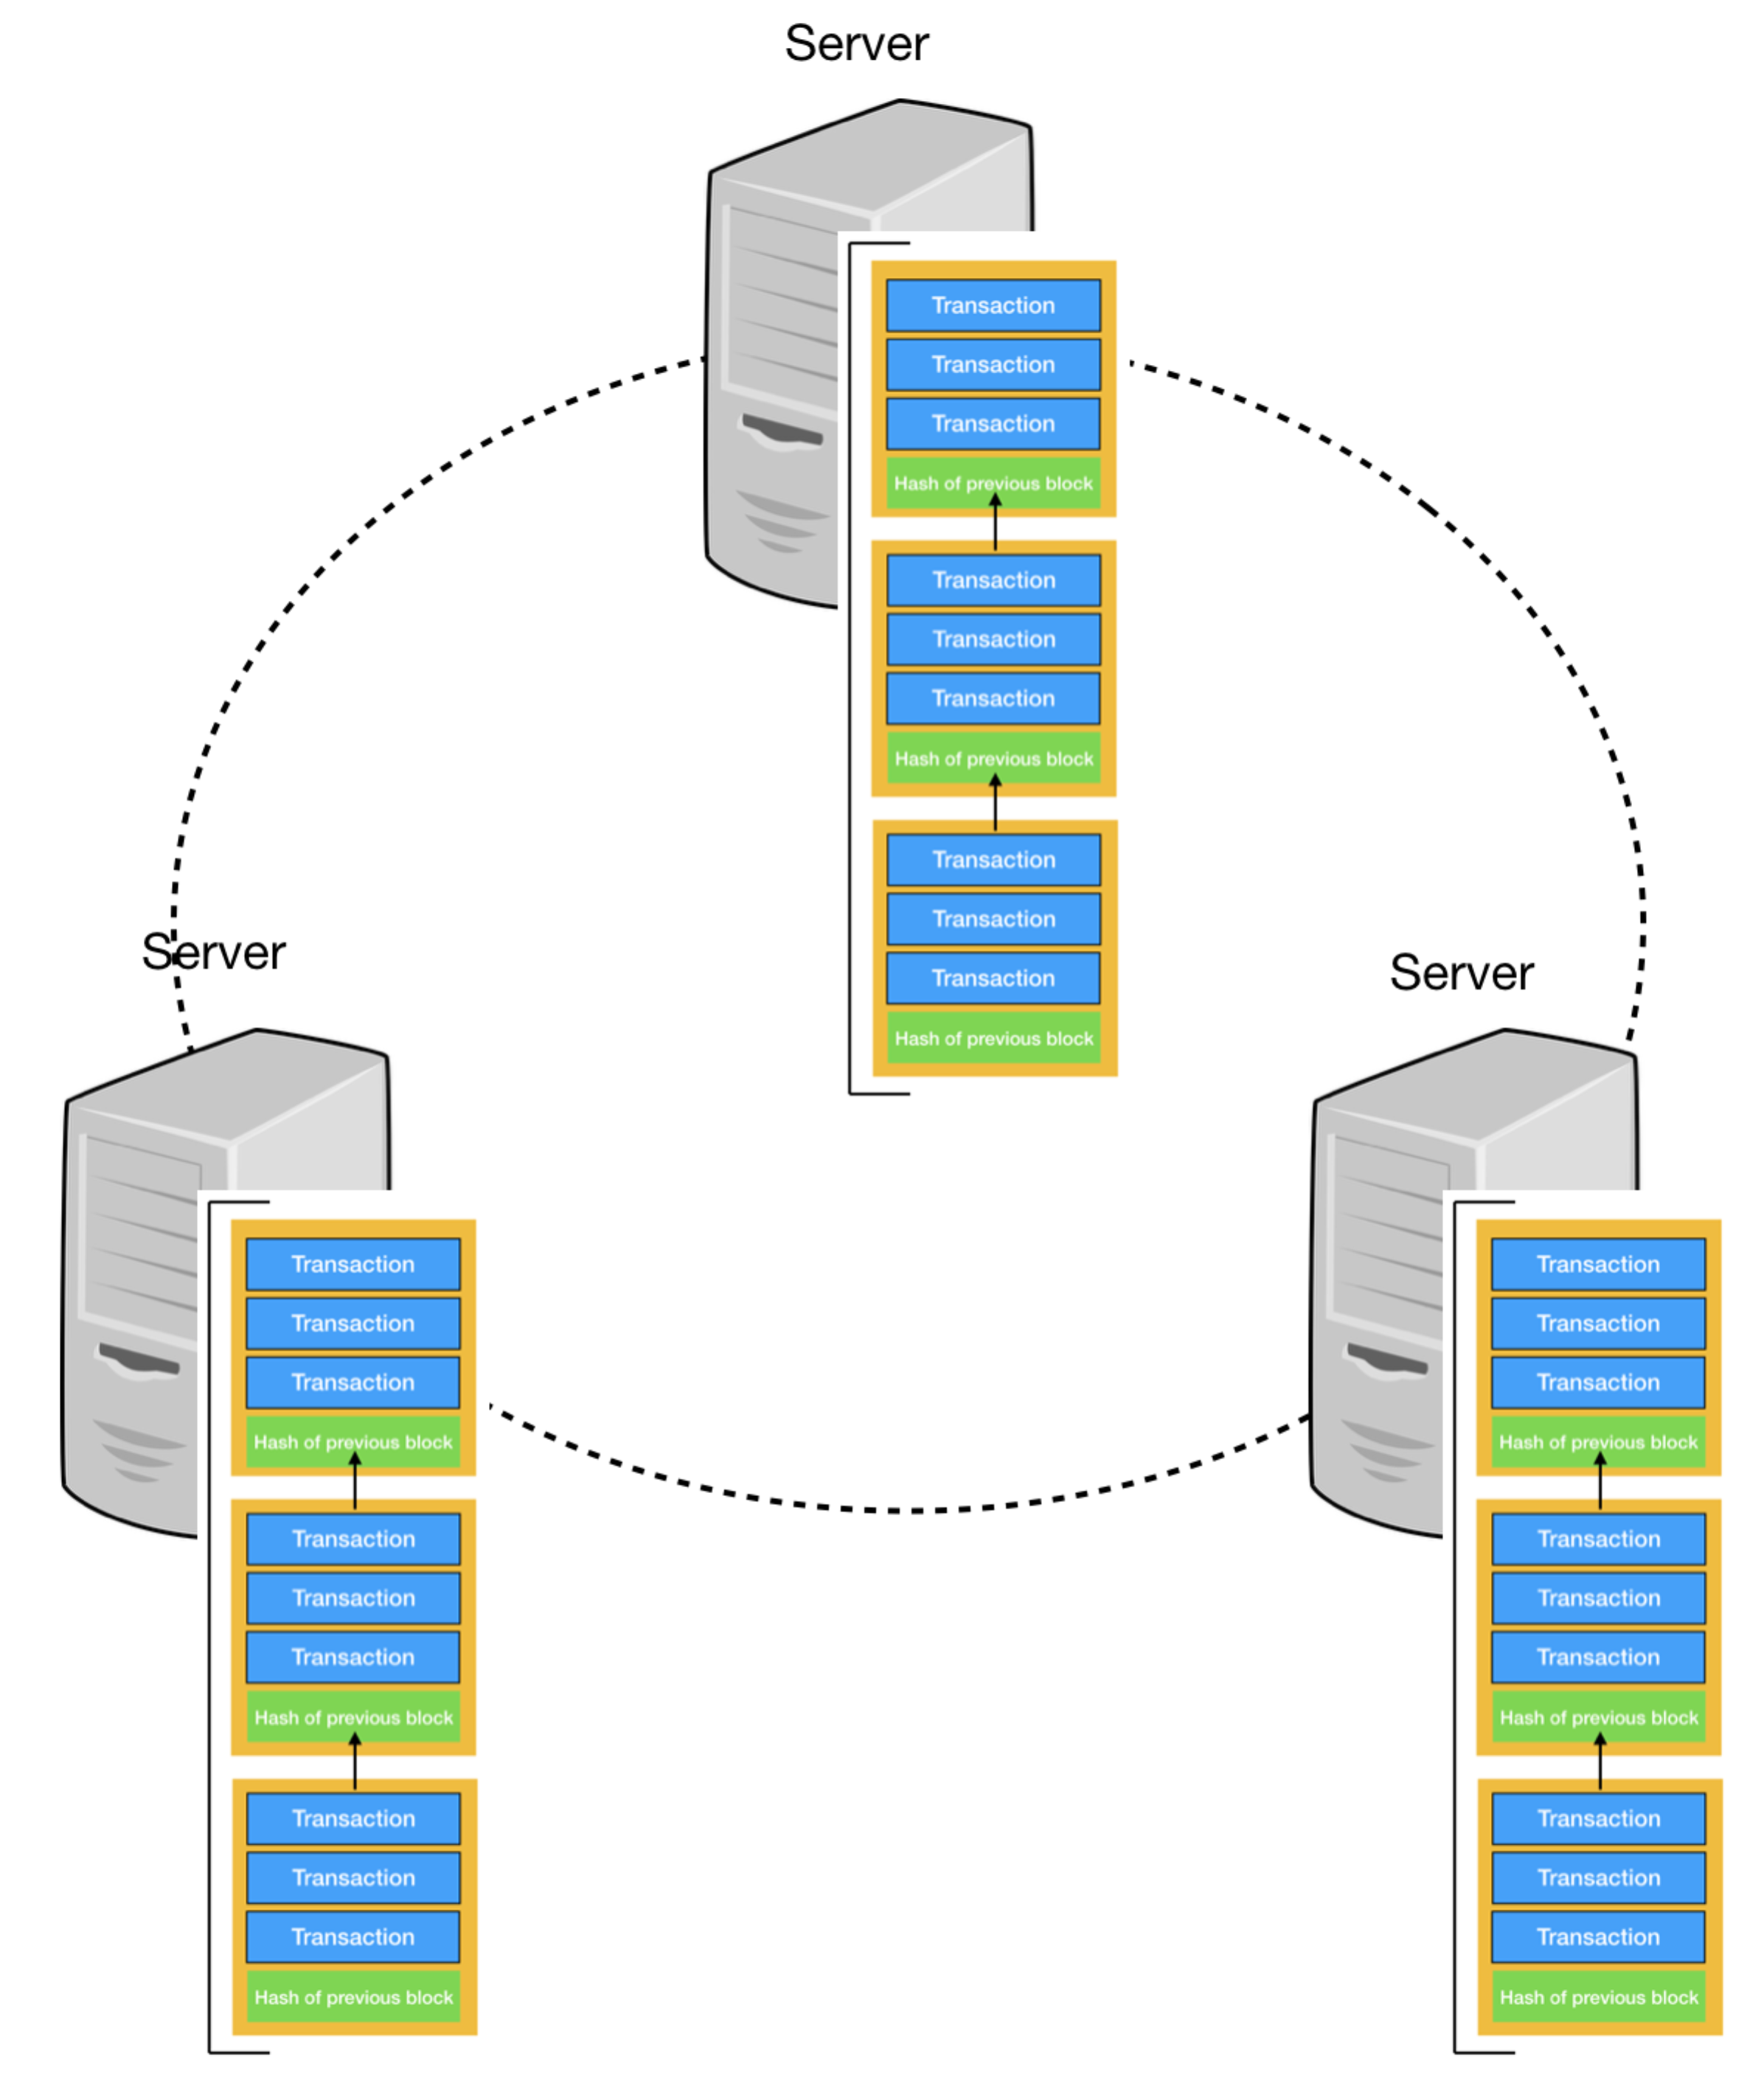
Computers storing the entire blockchain are known as full nodes. They help to verify and relay transactions and blocks to other nodes. They also make the network robust, as there are now multiple nodes in the network with little risk of a single point of failure. Besides full nodes, there are also nodes known as light nodes, which I'll discuss later in this article.
Miners
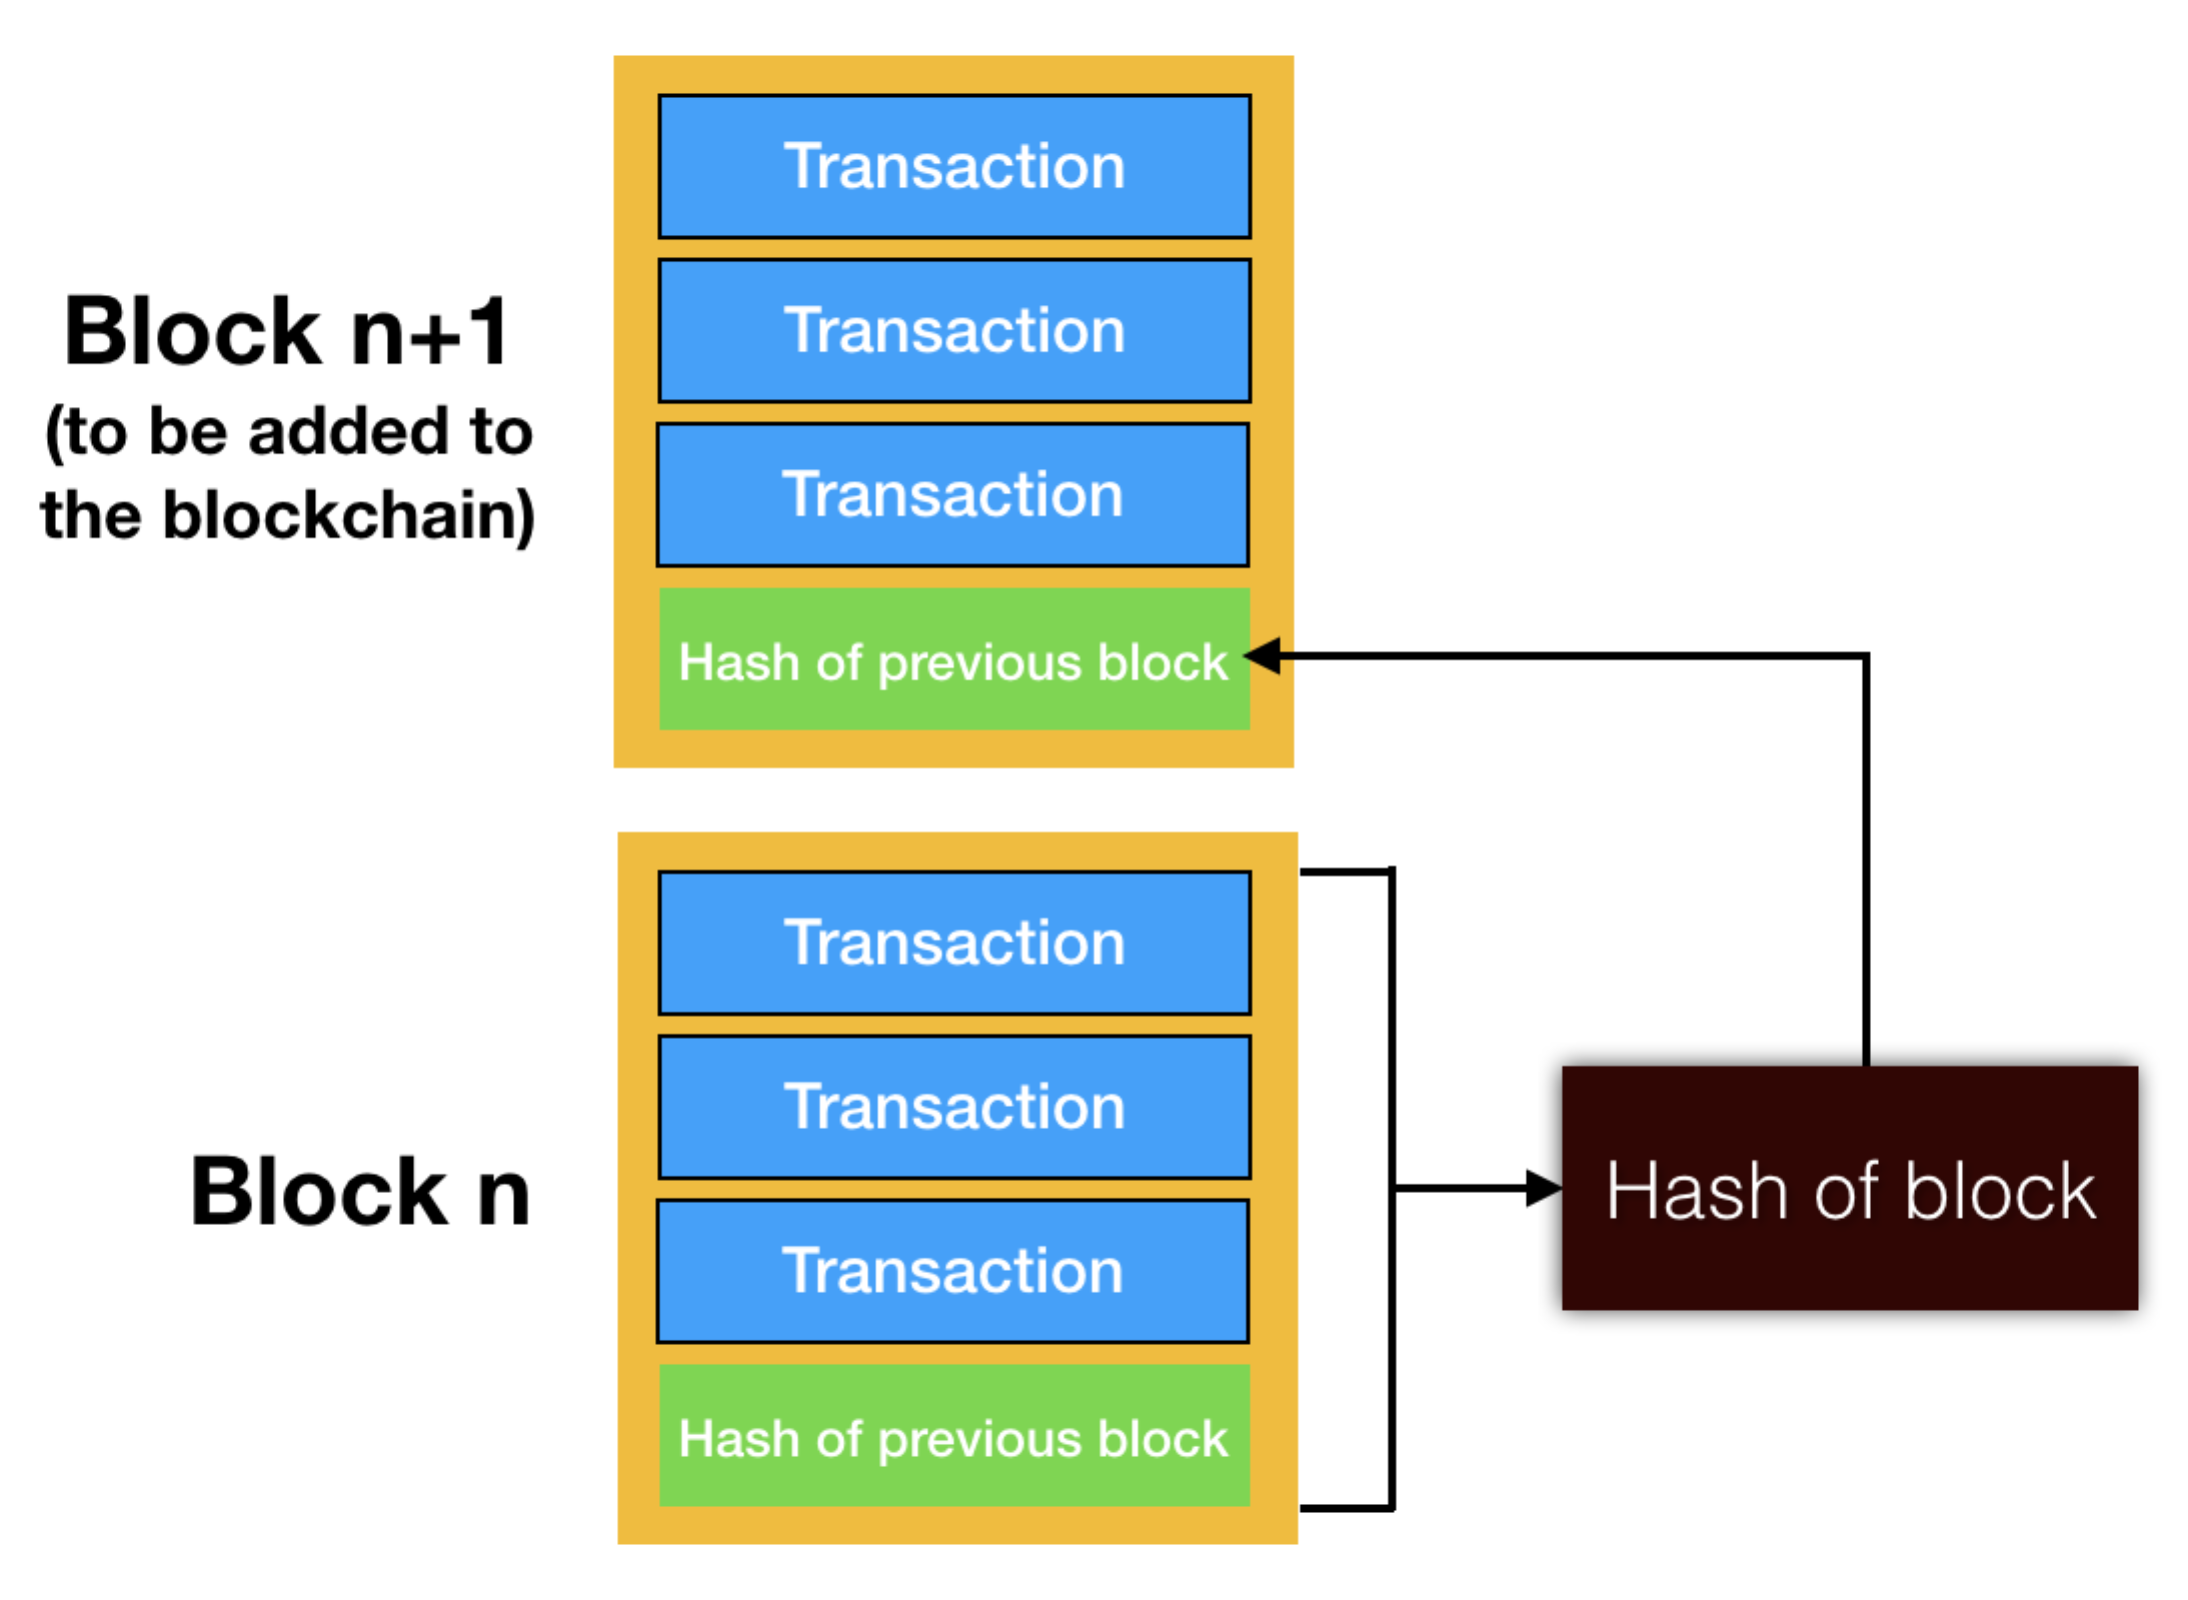
Among all the full nodes in a blockchain network, some are known as mining nodes (also known as miners). Miners add blocks to the blockchain. In order to add a block to the blockchain, a miner needs to do the following:
- Take the transactions in the previous block and combine it with the hash of the previous block to derive its hash.
- Store the derived hash into the current block
Figure 7 outlines the process:
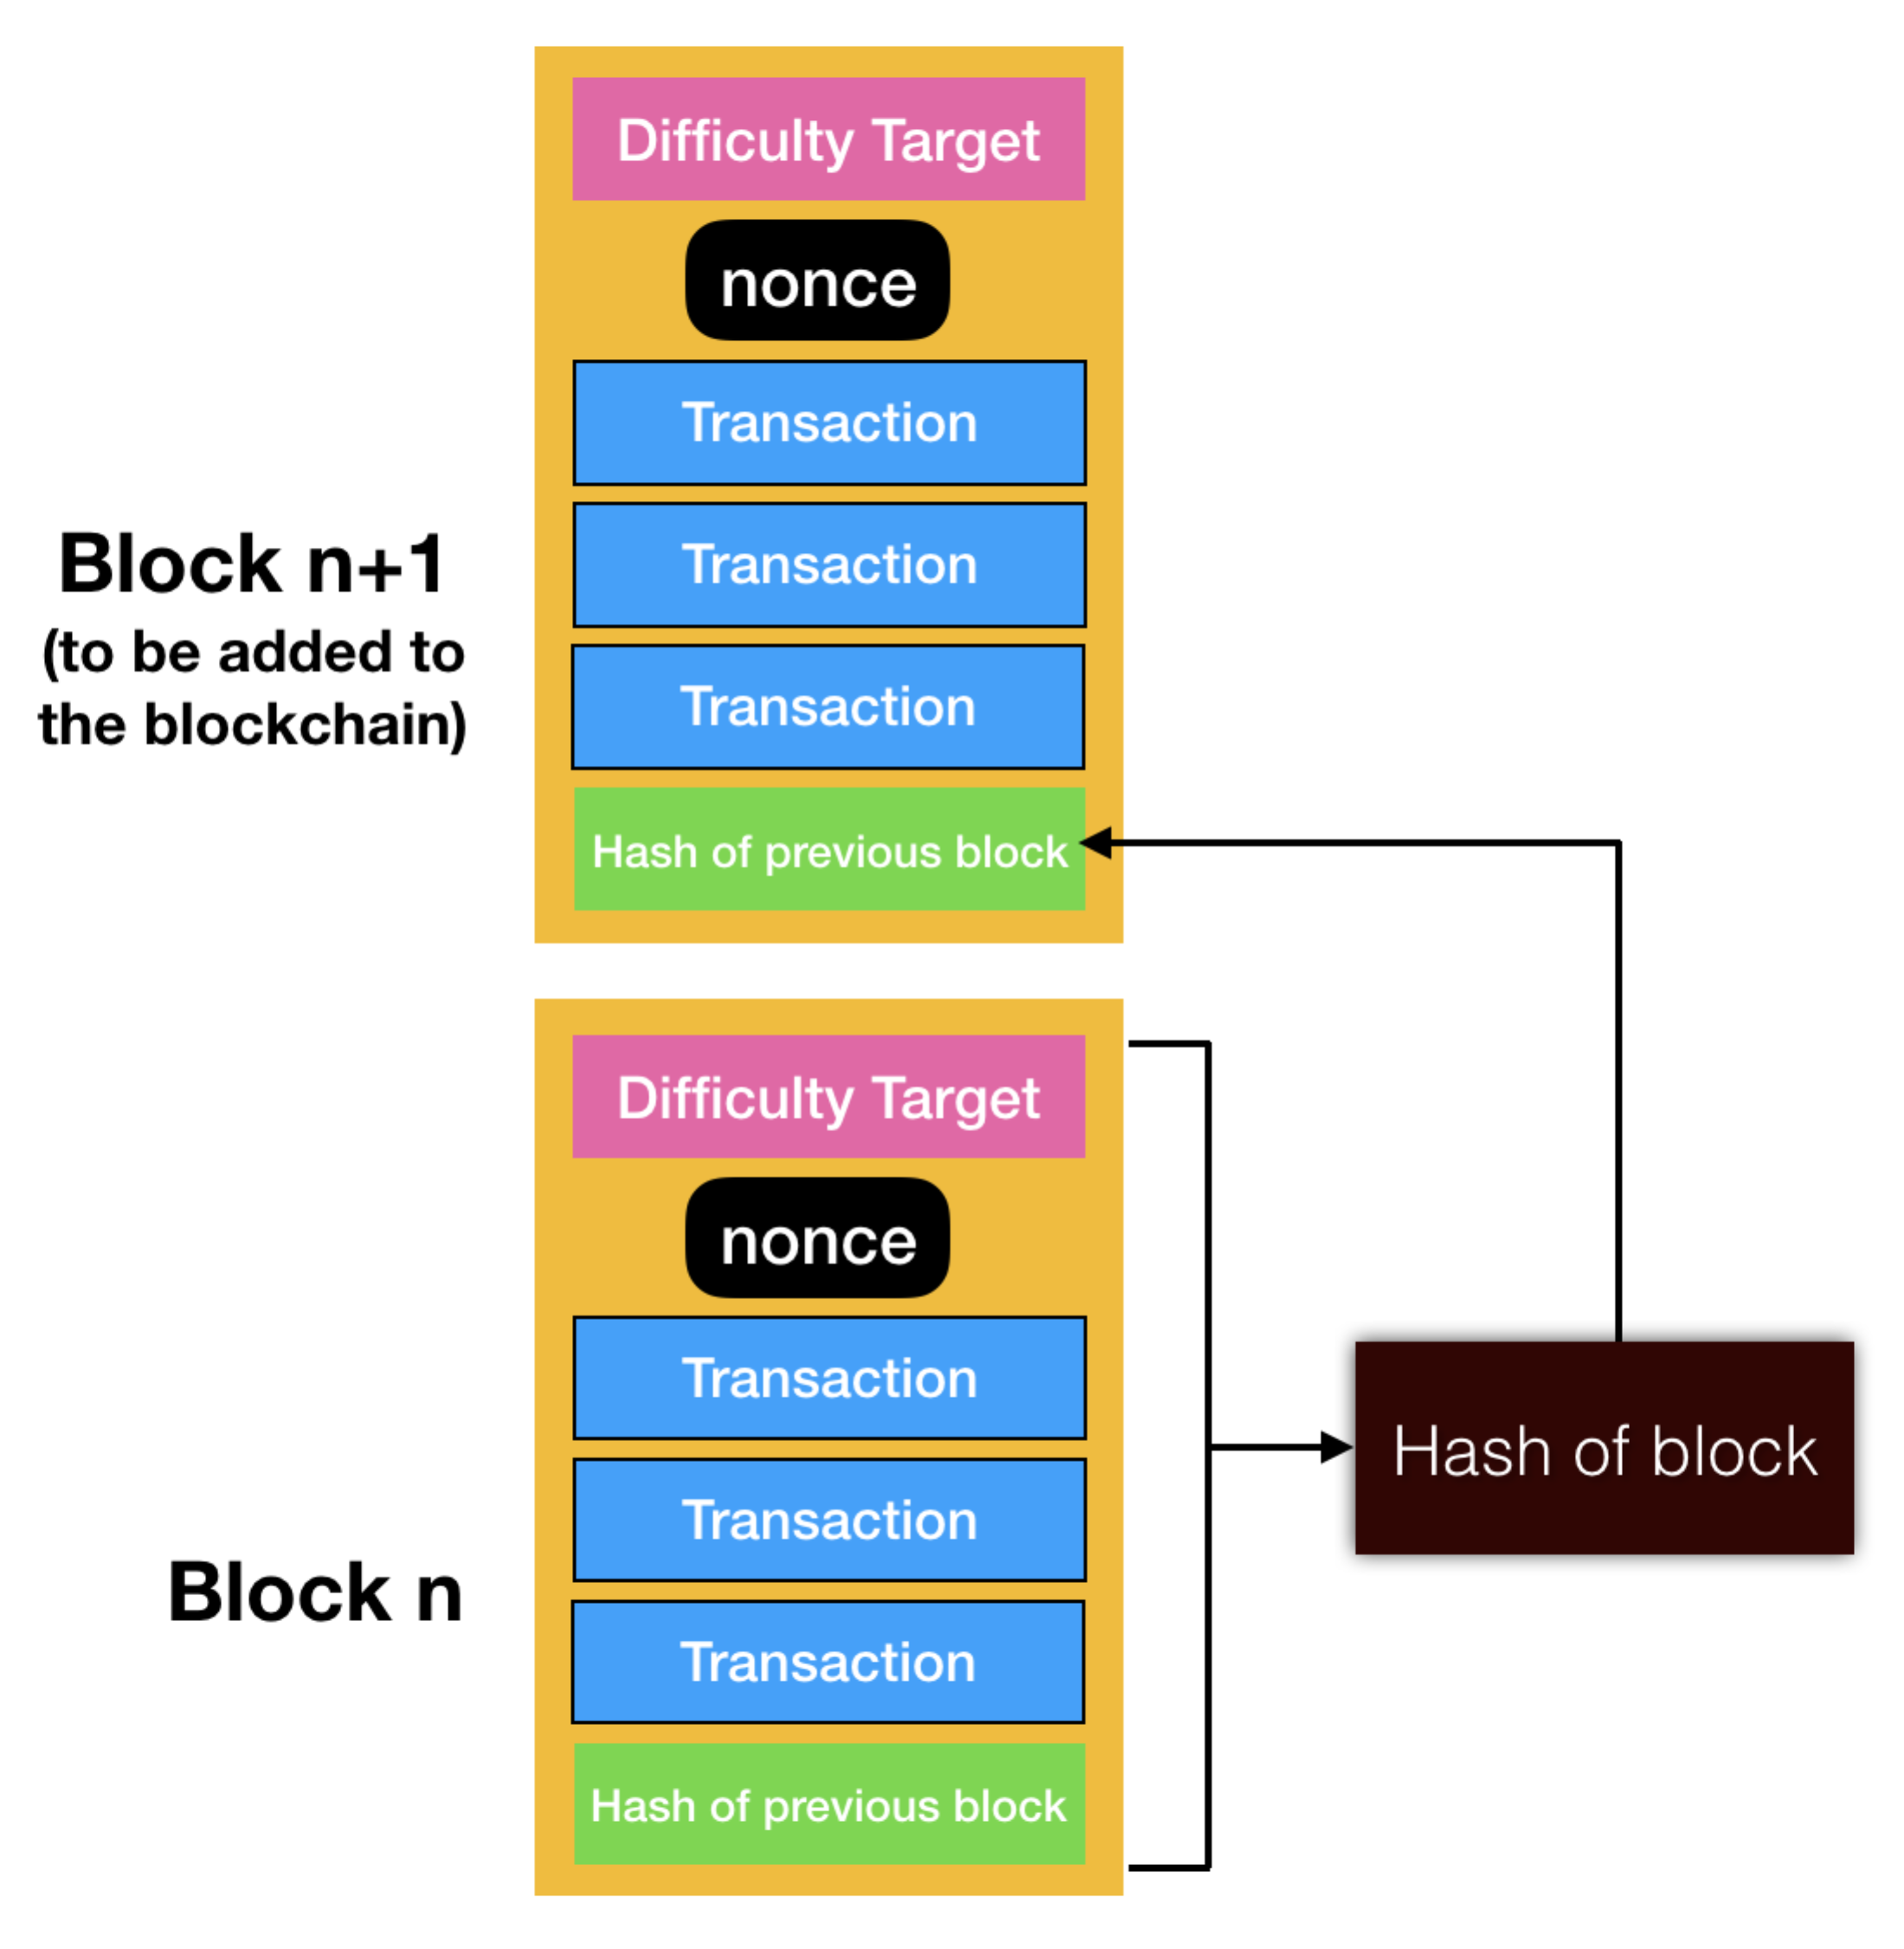
The process of performing hashing is straightforward and a computer can perform that in a matter of milliseconds. So how do you ensure that all the miners have equal chances to mine a block? It turns out that to solve this problem, the blockchain network (such as Bitcoin or Ethereum) inserts a network difficulty target into every block, so that in order to mine a block, the result of the hash must meet the criteria set by the difficulty target. For example, a difficulty target may dictate that the resultant hash starts with five zeros; if not the block can't be accepted. As more miners join the network, the network automatically adjusts the difficulty target so that blocks can be mined at a constant rate.
In order to meet the difficulty target, miners need to inject a number called nonce (number used once) into the block. So instead of deriving a hash from the transactions and the hash of the previous block, they now add the nonce to the hashing operation. The miners need to compete with each other to guess the value of the nonce that gives a resultant hash matching the difficulty target. And that's basically all that miners do! Their job is to find the value of this nonce.
The updated blockchain now looks like Figure 8.
The process of finding the nonce is called Proof-of-Work (PoW). Once the nonce is found, the entire block and the nonce is broadcasted to other nodes, informing them that the block has been mined and is ready to be added to the blockchain. The other blocks can now verify that the nonce does indeed satisfy the difficulty target and stop their current mining process and move on to mine the next block. The key principle behind PoW is that it's difficult to find the nonce but easy for others to verify once you've found it. A good analogy is a digital lock; it's difficult to find the correct key combination to unlock it but very easy to verify it once you've found the correct key combination.
When a miner has successfully mined a block, he earns mining fees as well as transaction fees. That's what keeps miners motivated to invest in mining rigs and keep them running 24/7, thereby incurring substantial electricity bills.
Immutability of Blockchains
In a blockchain, each block is chained to its previous block through the use of a cryptographic hash. A block's identity changes if the parent's identity changes. This, in turn, causes the current block's children to change, which affects the grandchildren, and so on. A change to a block forces a recalculation of all subsequent blocks, which requires enormous computation power. This makes the blockchain immutable, a key feature of cryptocurrencies like Bitcoin and Ethereum.
As a new block is added to the blockchain, the block of transactions is said to be confirmed by the blockchain. When a block is newly added, it's deemed to have one confirmation. As another block is added to it, its number of confirmations increases. Figure 9 shows the number of confirmations that the blocks in a blockchain has. The more confirmations a block has, the more difficult it is to remove it from the blockchain.
In general, once a block has six or more confirmations, it's deemed infeasible for it to be reversed. Therefore, the data stored in the blockchain is immutable.
Blockchain in More Detail
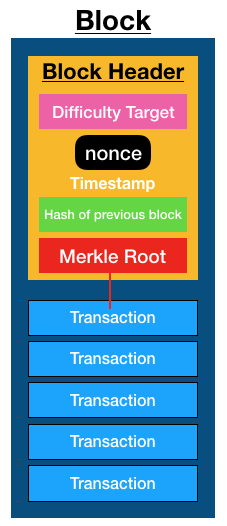
I mentioned that a block contains a list of transactions, the hash of the previous block, and the nonce. That was an over-simplification. In actual fact, a block also contains (see also Figure 10):
- A block header that includes the nonce, hash of the previous blocks, as well as the Merkle Root of the transactions (discussed in the next section)
- The list of transactions
Merkle Tree and Merkle Root
The list of transactions is stored as a Merkle tree. A Merkle tree is a tree data structure in which every leaf node is the hash of a transaction and every non-leaf node is the cryptographic hash of the child nodes. Figure 11 shows how the Merkle Root is derived from the transactions.
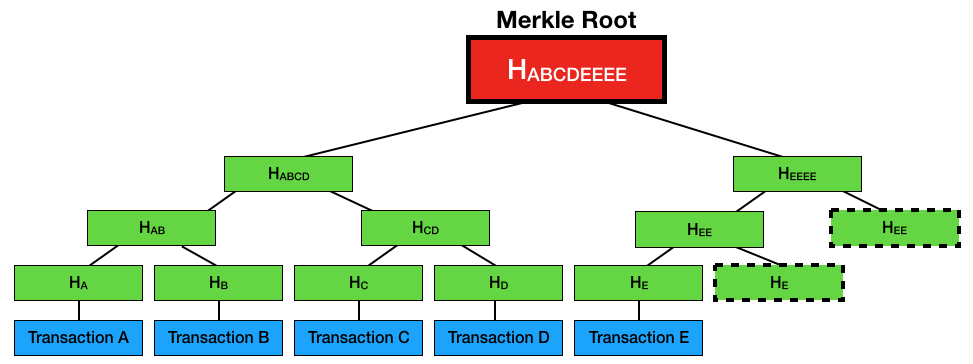
As you can see from the figure, each transaction is hashed. The hash of each transaction is hashed together with the hash of another node. For example, the hash of transaction A (HA) is combined with the hash of transaction B (HB) and hashed to derive HAB. This process is repeated until there's only one resultant hash. This final hash is known as the Merkle Root. In the above example, because HE doesn't have another node to pair with, it's hashed with itself. The same applies to HEE.
The Merkle Root is stored in the Block Header and the rest of the transactions are stored in the block as a Merkle tree. In the earlier discussion, I mentioned about full nodes. Full nodes download the entire blockchain, and there's another type of node (known as light nodes) that downloads only the blockchain headers. Because light nodes don't download the entire blockchain, they're easier to maintain and run. Using a method called Simplified Payment Verifications (SPV), a light node can query a full node to verify a transaction. Examples of light nodes are cryptographic wallets.
Uses of Merkle Trees and the Merkle Root
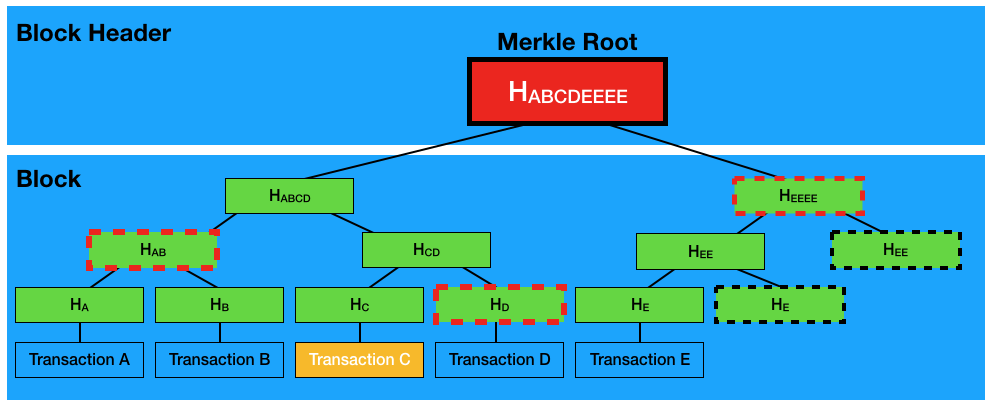
By storing the Merkle Root in the Block Header and the transactions as a Merkle Tree in the block, a light node can easily verify if a transaction belongs to a particular block. This is how it works. Suppose a light node wants to verify that transaction C exists in a particular block:
- The light node queries a full node for the following hashes: HD, HAB, and HEEEE (see Figure 12).
- Because the light node can compute HC, it can then compute HCD with HD supplied.
- With HAB supplied, it can now compute HABCD.
- With HEEEE supplied, it can now compute HABCDEEEE (which is the Merkle Root).
- Because the light node has the Merkle Root of the block, it can now check to see if the two Merkle Roots matches. If they match, the transaction is verified.
As you can see from this simple example, to verify a single transaction out of five transactions, only three hashes need to be retrieved from the full node. Mathematically, for n transactions in a block, it takes log2n hashes to verify that a transaction is in a block. For example, if there are 1024 transactions in a block, a light node only needs to request 10 hashes to verify the existence of a transaction in the block.
Smart Contracts
Although the initial use of blockchain was for cryptocurrency such as Bitcoin, blockchain offers much more than just a record of transactions. In addition to trading cryptocurrencies, some implementations of blockchains offer the idea of smart contracts. In particular, the Ethereum is one such example. Like Bitcoin, Ethereum offers a cryptocurrency known as Ether, but it also turned all the nodes in the network into “Turing complete” computers. What this means is that you can write programs (known as smart contracts) and execute them on all the nodes on the network.
Ethereum implements an execution environment on the blockchain called the Ethereum Virtual Machine (EVM). Every node participating in the network runs the EVM as part of the block verification protocol. They go through the transactions listed in the block they're verifying and run the code as triggered by the transaction within the EVM. Each and every full node in the network does the same calculations and stores the same values.
To understand how a smart contract is useful, let's imagine the following scenario. You're a musician and you want to protect your intellectual property, in this case, your music creations. You want to make sure that the lyrics of your songs are protected and that no one else can plagiarize them (especially before they are released). Because data stored on the blockchain is immutable and time-stamped, it's a good platform to store the lyrics of your songs as the proof that you're the original creator of the song. However, blockchain data are inherently public, so storing the lyrics of your creation on the blockchain isn't practical. A good workaround for this case is to store the hash of the song's lyrics. That way, you maintain confidentiality of your creation, and at the same time you can prove that the lyrics are written by you if you are able to provide the original lyrics to generate the original hash.
Based on this scenario, let's now create a smart contract that solves the problem. In Ethereum, smart contracts are written using the Solidity language, a language inspired by the JavaScript programming language.
The smart contract is shown in Listing 1.
Listing 1: A Smart Contract to copyright a song's lyrics
pragma solidity ^0.4.17;

contract SongsCopyright {
    //---mapping is an associative array, similar to key/value pairs
    // key is bytes32 and value is boolean---
    mapping (bytes32 => bool) private proofs;

    //---stores the hash of the lyrics in the mapping---
    function storeProof(bytes32 proof) private {
    proofs[proof] = true;
    }

    //---calculate and store the hash (proof) for a song's lyrics---
    function copyrightLyrics(string lyrics) public {
        bytes32 proof = lyricsHash(lyrics);
        storeProof(proof);
    }

    //---helper function to get a lyrics's sha256---
    function lyricsHash(string lyrics) private
    pure returns (bytes32) {
        return sha256(lyrics);
    }

    //---check if a lyrics has previously been saved---
    function checkLyrics(string lyrics) public
    view returns (bool) {
        bytes32 proof = lyricsHash(lyrics);
        return hasProof(proof);
    }

    //---returns true if proof is found---
    function hasProof(bytes32 proof) private view
    returns(bool) {
        return proofs[proof];
    }
}
Let's examine the contract in more detail. The first statement specifies the pragma directive:
pragma solidity ^0.4.17;
The above means that the contract compiles with a compiler version beginning with 0.4.17; but it won't work with version 0.5.0 or higher.
Next, to define a contract, you use the contract keyword:
contract SongsCopyright {
}
This is very much like declaring a class in languages like C# or JavaScript. Next, you declare a state variable named proofs:
mapping (bytes32 => bool) private proofs;
Think of state variables like class members in a typical programming language. In this example, the state variable is of type mapping, which is really like an associative array (commonly known as a dictionary). In this example, it contains key/value pairs, of which the key is of type bytes32 (32 bytes of raw data) and its associated value of type bool (Boolean). For this example, you'll hash the lyrics of a song using SHA256 (which returns a 32-byte hash) and then store the hash in proofs. State variables values are permanently stored in contract storage.
Because State variables store values permanently on the blockchain, it's expensive to use and consumes gas whenever you need to change their values. This is because of the way the state variables store their values in the blockchain. (An explanation of this is beyond the scope of this article.)
Next, define a function called storeProof(), which takes in a single argument of type bytes32. It's declared with the private visibility modifier to indicate that it will be used internally within the contract and not visible outside this contract.
//---stores the hash of the lyrics in the mapping---
function storeProof(bytes32 proof) private {
    proofs[proof] = true;
}
The next function is called copyrightLyrics() and it calls the lyricsHash() function to hash the given song's lyrics. Once the hash is derived, it calls the storeProof() function to store the hash in the proofs mapping. Note that this function is declared with the public keyword to indicate that this function is callable outside the contract.
//---calculate and store the hash (proof) for a song's lyrics---
function copyrightLyrics(string lyrics)
public {
    bytes32 proof = lyricsHash(lyrics);
    storeProof(proof);
}
The lyricsHash() function performs a hash on the song's lyrics using the sha256() function. Note that it's declared with the pure keyword. The pure keyword indicates that this function won't access nor change the value of state variables.
//---helper function to get a lyrics's
// sha256---
function lyricsHash(string lyrics) private
pure returns (bytes32) {
    return sha256(lyrics);
}
The next function is checkLyrics(), which is declared with the view keyword. The view keyword indicates that this function accesses the value of state variables, but it never modifies them. This function takes in a song's lyrics and hashes it. It then calls the hasProof() function to see if the hash exists in the proofs mapping.
//---check if a lyrics has previously been saved---
function checkLyrics(string lyrics) public
view returns (bool) {
    bytes32 proof = lyricsHash(lyrics);
    return hasProof(proof);
}

//---returns true if proof is found---
function hasProof(bytes32 proof) private view
returns(bool) {
    return proofs[proof];
}
Compiling the Smart Contract
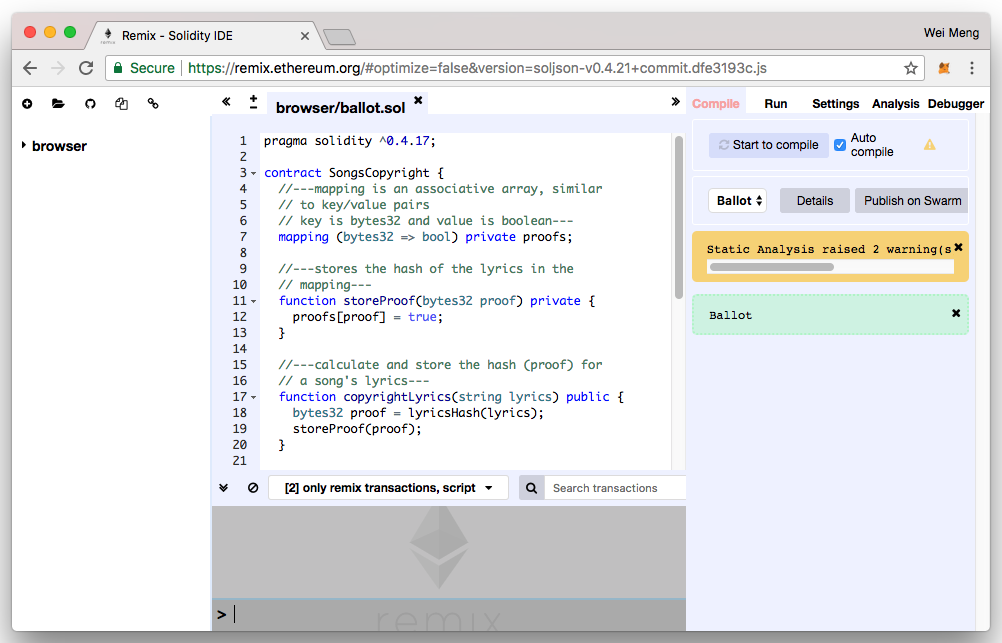
To compile a Smart Contract, you can use the solc compiler. The easiest is the online Solidity compiler (Remix IDE) available at https://remix.ethereum.org. When you first load the Remix IDE, you'll see a default contract called ballot.sol. Simply overwrite it with the SongsCopyright contract, as shown in Figure 13.
On the right side of the window, you'll see a tab named Compile. Be sure to check the Auto compile option. This allows your contract to be compiled as you type and you can fix any errors on the fly. Quite often, there may be warning messages, but most of the time the warnings are more informational than critical. On the same tab, you'll find the Details button. If you click the Details button, you'll see a pop-up, as shown in Figure 14.
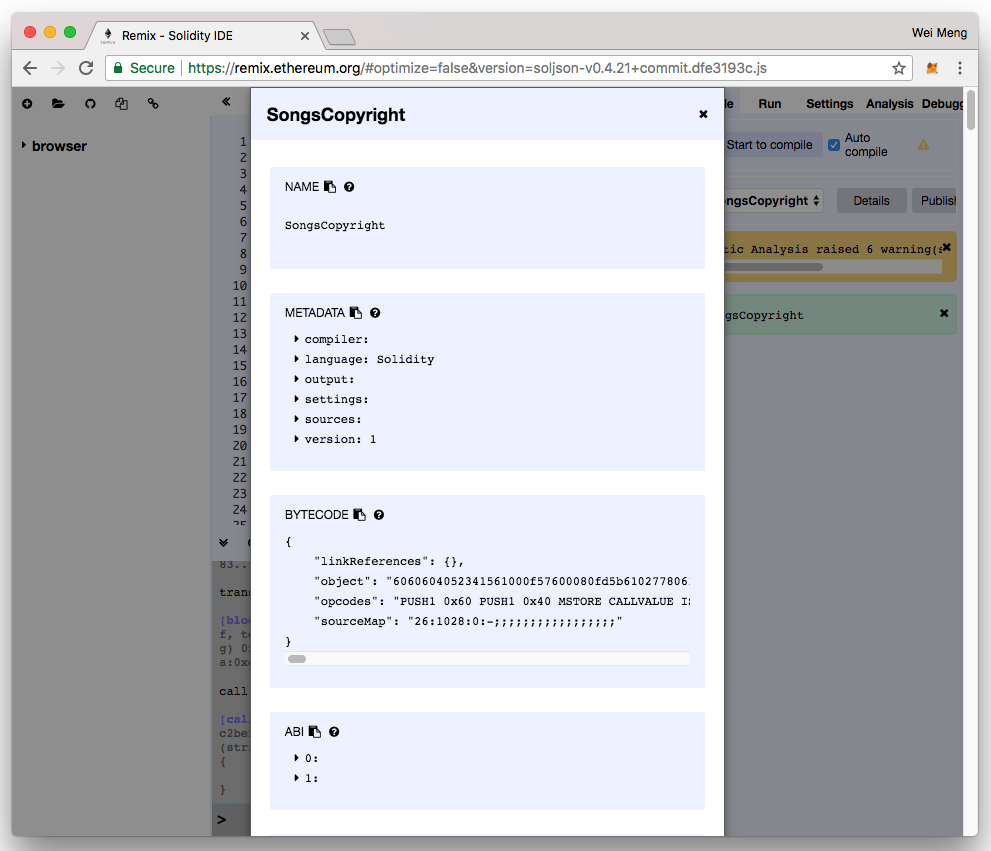
For a contract to be callable by client applications, a client application needs the following two pieces of information:
- The ABI (Application Binary Interface) of the contract
- The address of the deployed contract
For the first one, you can find the ABI of your contract by clicking on the icon displayed next to the ABI section, as shown in Figure 14. This copies the ABI of the contract into the clipboard. Paste the ABI into a text editor because you'll need it later in this article when you build a client application to interact with the contract.
For the address of the contract, you'll get it once it has been mined and added to the blockchain. You'll see this later in this article.
Testing the Contract Using the JavaScript VM
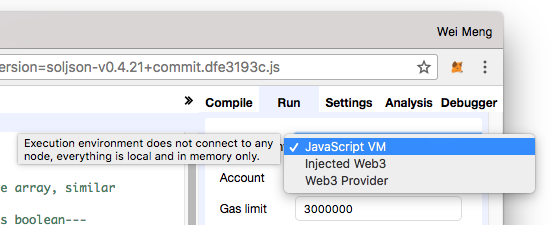
Once the smart contract is compiled without any errors, it's time to test it. The Remix IDE offers three modes of testing your smart contract:
- JavaScript VM simulates running your smart contract without actually deploying it onto the blockchain.
- Injected Web3 uses a plug-in such as MetaMask in your Web browser to inject a
web3object (see the next section for more information) so that your smart contract can be associated with an account. - Web3 Provider connects directly to an Ethereum node so that your smart contract can be associated with an account. Requires you to run an Ethereum node such as geth.
For this section, let's select the JavaScript VM (see Figure 15) located under the Run tab.
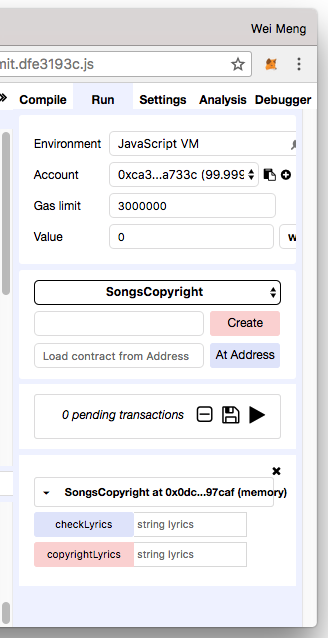
You can now click the Create button to simulate deploying the contract onto the blockchain. Immediately, you see the contract with two buttons (see Figure 16). Observe that the checkLyrics button is blue and the copyrightLyrics button is red. Blue-colored buttons represent functions that do not consume gas when called, and those in red require gas. Because the contract is simulated in this example, you won't see the difference between the two buttons, for now.
Gas is the internal pricing for running a transaction or contract in Ethereum.
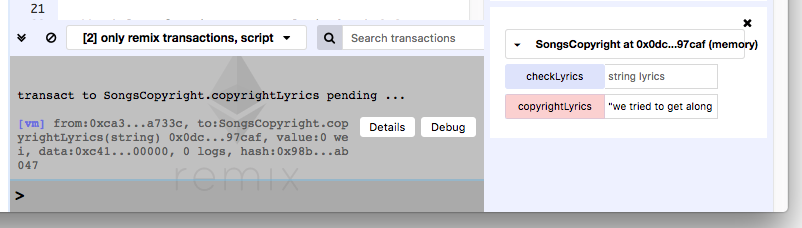
Let's now try to copyright the lyrics of a song and type in the following lyrics (together with the quotation marks) into the box displayed next to the copyrightLyrics button (see Figure 17):
“We tried to get along, we tried to just get through but something here is wrong, don't tell me this is true. There's no reason why, I never saw the sign, you didn't say good-bye. I hoped you were mine, waited up all night long, waited up all night long, waited up all night long, waited up all night long, the night went on and on. The sun was rising slow somewhere in the dawn, the saddest feelings grow, the power of that pretty face, my heart could end for you causing such an empty space. Don't tell me this is true, waited up all night long, waited up all night long, waited up all night long, waited up all night long.”
Click the copyrightLyrics button and the lyrics are now passed to the contract and the hash saved.
To verify whether the same lyrics have previously been saved into the contract, type in the same lyrics and click the checkLyrics button (see Figure 18). You should see the result as true.
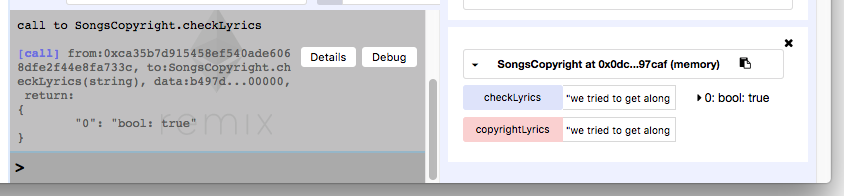
If you now enter some other song's lyrics, you will get a false for the result.
Testing the Contract Using the Injected Web3
Now that your contract is tested to run without problems, let's deploy it onto a real blockchain. To do so, you need a way to get connected to the Ethereum blockchain. You do this via an Ethereum node. The easiest way to get connected to the Ethereum network is to use MetaMask (https://metamask.io/).
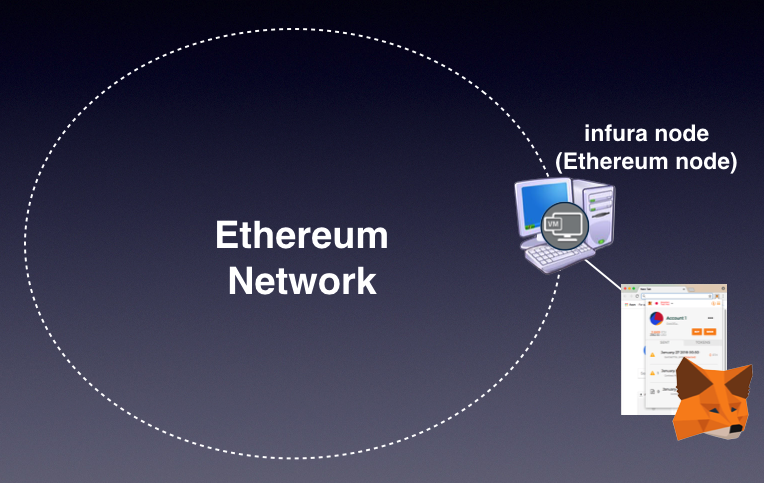
Behind the scenes, MetaMask connects to some Ethereum nodes hosted at infura.io. Your accounts are saved in MetaMask itself, but all your transactions are relayed through the Ethereum nodes at infura.io. Figure 19 shows how MetaMask connects to the Ethereum network.
MetaMask exists as a Chrome extension. Just launch the Chrome Web browser and navigate to https://metamask.io/. Once the installation is done, you can see the MetaMask extension installed on your Chrome browser (see Figure 20).
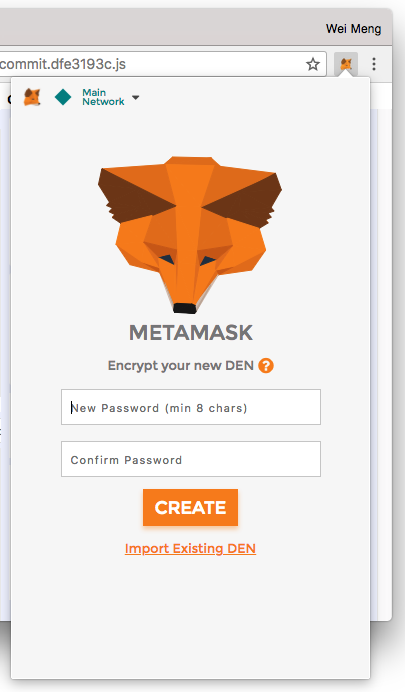
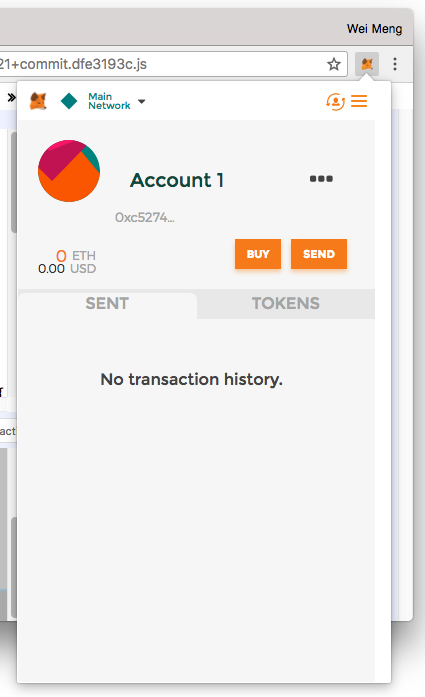
Enter a password to secure your account. Once the password is entered, you will see a 12-word phrase. These 12 words allow you to restore your account(s) in the event that you have forgotten your password, or that you need to restore the accounts on another computer. Once this is done, you should see a default account created for you (see Figure 21). Observe your account address (in this example it's the one that says "0xc5274…").
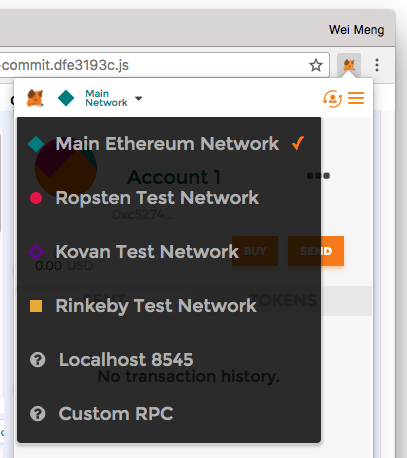
You can also click on the drop-down item labeled Main Network (see Figure 22) to see the different Ethereum networks you can connect to. By default, MetaMask connects to the Main Ethereum Network. For development use, you should connect to one of the test networks available. Doing so spares you the need to use real Ethers for testing your smart contract. For this example, let's connect to the Ropsten Test Network.
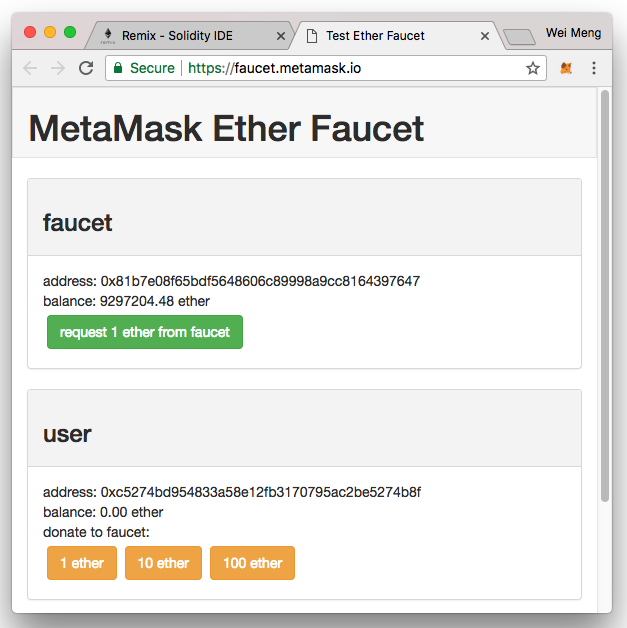
In order to test smart contracts on the test networks, you need Ethers. At this moment, you have none, so you need to get some. Click on the BUY button and then another screen will appear. Click the ROPSTEN TEST FAUCET button and you will be redirected to the https://faucet.metamask.io/ page (see Figure 23). (Editor's note: In testing on April 26, 2021, this page was not working.) Click the request 1 ether from faucet button a few times to request for some free Ethers.
After a while (an Ethereum block typically takes about 14 seconds to be mined), you should see some Ethers (see Figure 24).
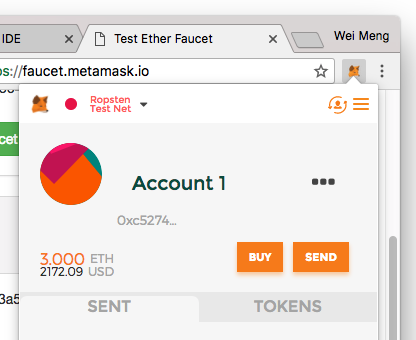
The Ethers that you obtained from the test faucet have no real monetary value, so don't be too excited if you see a monetary value assigned in MetaMask.
You are now ready to deploy the contract to the test network. Back in the Remix IDE, select the Injected Web3 environment. Make sure that the Account now displays the account you observed in MetaMask (see Figure 25). If you don't see the account, refreshing the page will usually fix the problem.
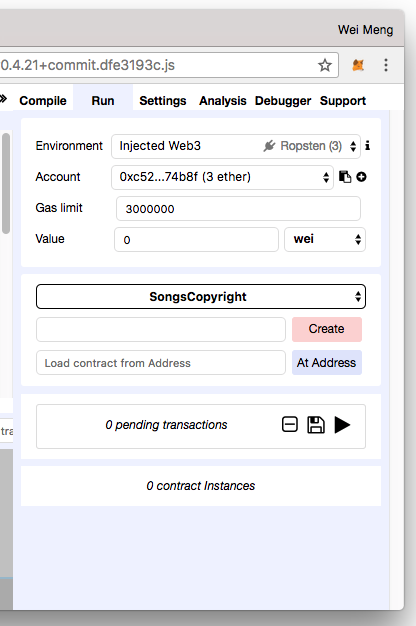
Click the Create button to deploy the contract. This time around, notice that MetaMask pops up a window asking you to confirm the transaction (see Figure 26), with the Gas information specified.
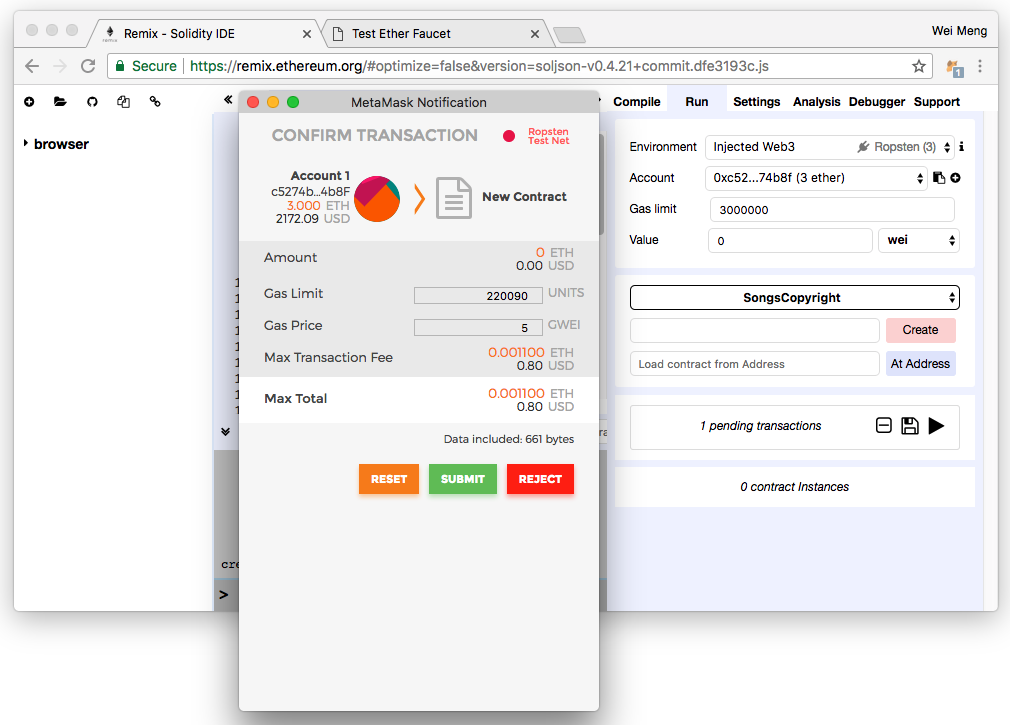
Gas and Ether are decoupled deliberately; units of gas are aligned with computation units, and the price of Ether fluctuates as a result of market forces. The price of gas is decided by the miners, who can refuse to process a transaction with a lower gas price than their minimum limit. To get gas, you simply need to have Ether in your account. Ethereum clients automatically use your Ether to purchase Gas. Ether is deducted from the Ethereum account sending the transaction. The amount of gas needed for a transaction is determined by the complexity of the contract. You specify the gas limit (min. 21,000 gas) to indicate the maximum amount of gas you are willing to spend on a contract. This prevents you from spending an unlimited amount of gas on a contract that runs indefinitely (due to a bug). All unused gas is refunded back to you. As shown in Figure 26, a maximum of 220090 gas is needed and a unit of gas is priced at 5 GWEI (1 Ether is equal to 1000000000 GWEI), giving it a total of (220090 * 5)/1000000000 = 0.0011 Ether. Based on the time of this writing, this is worth about $0.80.
Click the SUBMIT button to confirm the transaction. When the transaction is mined, you'll see the contract deployed together with the contract address (see Figure 27).
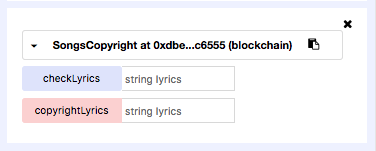
You can now enter the song lyrics and then click the copyrightLyrics button. I mentioned earlier that buttons that are red require payments. In this case, clicking on the copyrightLyrics button brings up the confirmation window again, as shown in Figure 28.
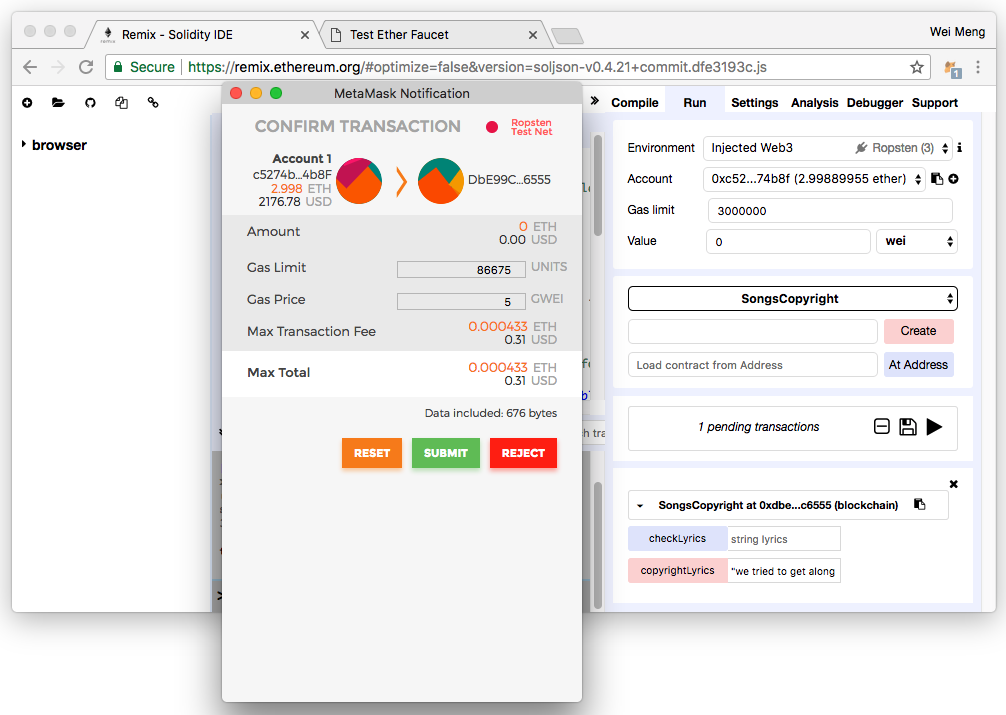
Click the SUBMIT button and the transaction will be added to a block and mined. After a while, you'll be able to enter the same lyrics in the textbox next to the checkLyrics button to verify the lyrics. Observe that for this transaction, no gas is required, as the request isn't modifying the state variables in the smart contract. Once the transaction is mined and the block containing it is added to the blockchain, the hash of your song's lyrics is forever available in the blockchain and remains immutable.
Writing a Web Application to Invoke the Smart Contract
In the previous sections, you tested the smart contract and deployed it onto the Ropsten test network. You even had the chance to test it in the Remix IDE. However, in real life usage, it isn't practical to ask your user to use Remix IDE. A better way should exist to interact with your smart contract, ideally through a Web application.
To interact with a smart contract from within a Web application, you can use the web3.js APIs. The web3.js is a collection of libraries that allow you to interact with a local or remote Ethereum node, using a HTTP or IPC connection.
To see how it's used, let's now create a Web application to interact with the Smart Contract that you've just deployed to the Ethereum Ropsten test network.
Type the following commands in the Terminal (you need to install Node.js in order for the npm command to work):
$ cd ~
$ mkdir UseContract
$ cd UseContract/
$ npm init
[Press Enter a few times]
The above commands create a directory named UseContract in the home directory of your account. You then use npm to initialize a new project. Once that's done, type the following command:
$ npm install --save ethereum/web3.js
This downloads the web3.js module and its dependencies. Remember when you used MetaMask in the earlier section of this article? MetaMask injects the web3.js JavaScript library to allow you to carry out transactions via a regular Web page in Chrome. This means that when your Web application interacts with a Smart Contract, it automatically links to your account in MetaMask so that it can use the account to pay for gas, as well as send Ether to another user or account.
In order for web3.js to work correctly (due to security concerns), your HTML pages must be served from http://, and not file:///. If you have a Web server, you can store the Web pages in the Web publishing directory of your computer. For development purposes, there is a Node.js module that allows you to serve a HTML page from wherever it's saved. Type the following command to install the serve module:
$ npm install -g serve
Let's now create the HTML page to interact with the Smart Contract. Create a file named SongsCopyright.html and save it in the UseContract folder. Populate it as shown in Listing 2. Note that to invoke a contract, a client needs the ABI of the contract as well as its address.
Listing 2: The content of SongsCopyright.html
<html lang="en">
    <head>
        <link rel="stylesheet" type="text/css" href="main.css">
        <script src="./node_modules/web3/dist/web3.min.js">
        </script>
    </head>
    <body>
    <div class="container">
    <h1>Song's Copyright Smart Contract</h1>
    <center>
        <label> Song Lyrics to Copyright</label>
        <input id="songlyricstocopyright" type="text">
        <button id="btnCopyright">Copyright</button>

        <label>Song Lyrics to Verify</label>
        <input id="songlyricstoverify" type="text">
        <button id="btnVerify">Verify</button>
    </center>
    </div>
<script src="https://code.jquery.com/jquery-3.2.1.slim.min.js"></script>
    <script>
    if (typeof web3 !== 'undefined') {
        // when using Metamask, web3 would be injected
        web3 = new Web3(web3.currentProvider);
    } else {
        // set the provider you want from Web3.providers
        // this block will be executed if you are not using Metamask
        web3 = new Web3(new Web3.providers.HttpProvider("http://localhost:8545"));
    }

    //---the ABI of the contract---
    var contractABI = web3.eth.contract(
        [{ "constant": true,   "inputs":
            [{ "name": "lyrics", "type": "string" }],
            "name": "checkLyrics", "outputs": [{ "name": "", "type": "bool"} ],
            "payable": false, "stateMutability": "view",   "type": "function" },  {
                "constant": false, "inputs": [{ "name": "lyrics", "type": "string" }],
                "name": "copyrightLyrics", "outputs": [],
                "payable": false, "stateMutability":"nonpayable", "type": "function" }
        ]);

    //---replace the contract address with your own---
    var contract = contractABI.at('0xdbe99ce4ffd917796d85e134814c5fae625c6555');

    $("#btnCopyright").click(function() {
        var songlyrics = $("#songlyricstocopyright").val();
        console.log(songlyrics);
        contract.copyrightLyrics(songlyrics,(err, result) => {});
    });

    $("#btnVerify").click(function() {
        var songlyrics = $("#songlyricstoverify").val();
        contract.checkLyrics(songlyrics, (err, result) => {
        $("#result").html(result);
        alert(result)
        });
    });
    </script>
    </body>
    </html>
Create another file named main.css and save it in the UseContract folder. Populate it as shown in Listing 3.
Listing 3: The content of main.css
body {
    background-color:#F0F0F0;
    padding: 2em;
    font-family: 'Arial';
}
label {
    display:block;
    margin-bottom:10px;
}
input {
    padding:10px;
    width:100%;
    margin-bottom: 1em;
}
button {
    margin: 2em 0;
    padding: 1em 4em;
    width: 50%;
    display:block;
}
To start the Web server, type the following commands in Terminal:
$ cd ~/UseContract
$ serve
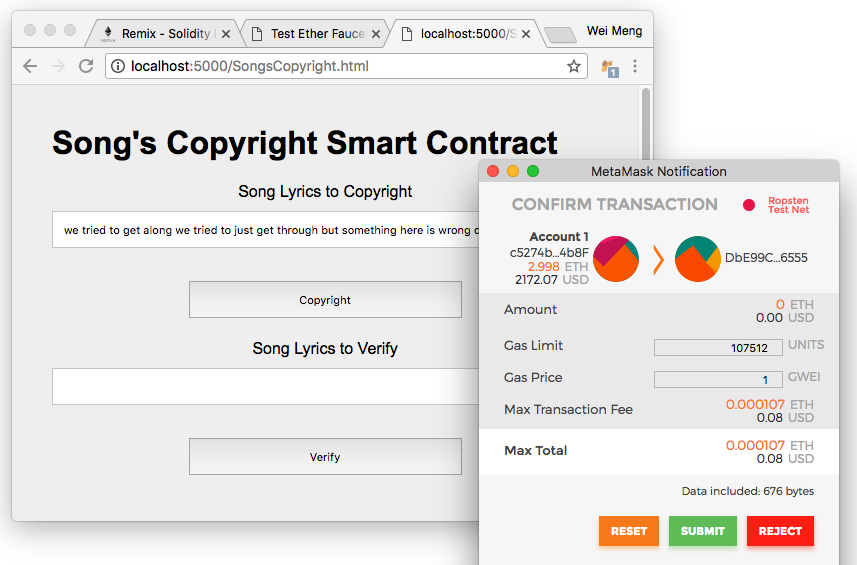
Using the Chrome browser (with the MetaMask extension installed), load the HTML page using http://localhost:5000/SongsCopyright.html/. You can now enter the song lyrics and then click on the Copyright button. The MetaMask window now automatically pops up asking you to submit or reject the transaction (see Figure 29).
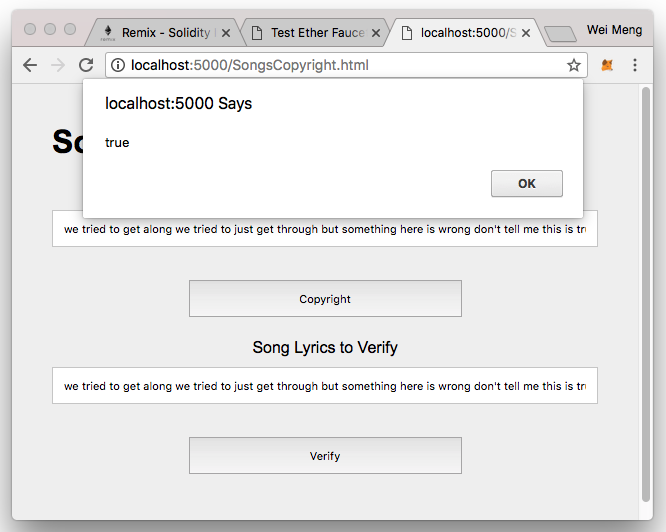
Once the transaction has been confirmed and the block mined, you can now verify the song lyrics. Clicking on the Verify button displays the result as an alert (see Figure 30).
Summary
I hope that I‘ve provided an easy way for you to understand Blockchain and see how it works. Although there are many details that I haven't discussed in this article due to the constraint of space, it should help you get started with Blockchain, in particular with Smart Contracts, and to see how it can be used for a lot of real-world applications. We are still in the early days of this technology, so prepare to see many more creative uses of Blockchain and smart contracts coming your way in the near future!
