


The Amazon Echo devices are incredibly useful products that come with a sparkling personality (Alexa) and a huge library of skills, with more being added every day. But there's a lot more to them than just playing songs and telling jokes.
In this article, you'll learn how Alexa works, and how to develop, deploy, and test your own Alexa Skill in C#, and how to deploy it to Amazon for everyone to use.
Introducing Alexa
You may see the terms Alexa and Echo tossed around interchangeably online, so to avoid any confusion, it's important to get some basic terminology in common (see Table 1) before I begin.
Using Alexa
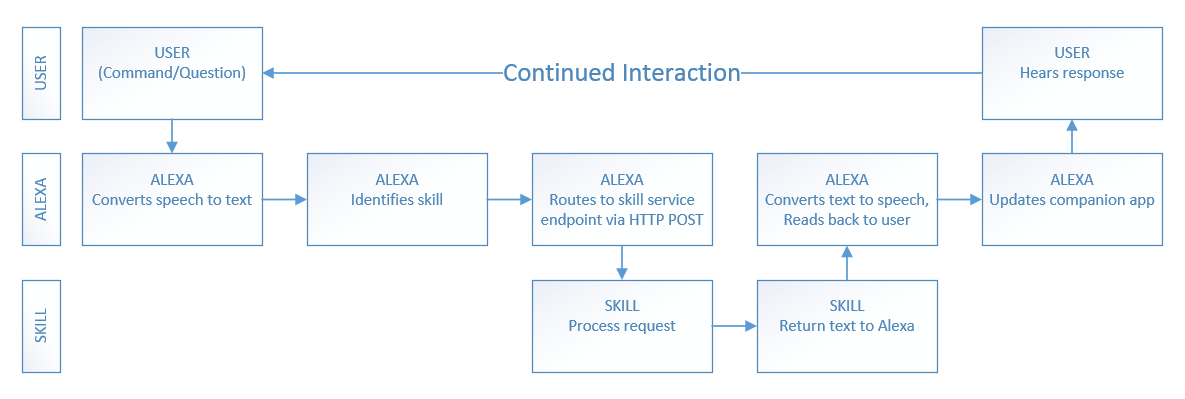
It all starts with you, the user, asking/telling Alexa to do something (via the Amazon Echo device). From there, Alexa takes your request and converts it to text. The text command is parsed to identify the skill being requested, and then routed to the proper skill service endpoint for processing. Then, the response is sent back from the service to Alexa, converted back into speech, and finally played for the user to hear.
If you've never used Alexa before, Figure 1 illustrates the User Interaction Flow.
In practice, the command is structured like this: Wake Word + Phrase + Invocation Name + Intent (+ optional limit)
Examples:
- Alexa {verb} {SkillName} to {Do Something}
- Alexa ASK WheresMyBeer for the three nearest breweries.
- Alexa TELL WheresMyBeer to get me a list of breweries near me.
- Alexa PLAY the newest Norah Jones album.
- Alexa TURN OFF the living room lights.
- Alexa SET AN ALARM for 10 minutes from now.
Other supported commands include: Begin, Launch, Load, Open, Resume, Run, Start, Talk to, and Use.
Example: Alexa RUN SurfReport AND GET ME the high tide.
You can use the following prepositions: About, For, If, To, Whether, and “blank” (to return a response prompting for more information.)
Example: Alexa TELL SurfReport TO GET ME the high tide FOR TOMORROW.
Alexa is great for returning lists of information, but you can also be more restrictive in your requests by using Limits with your Intents. You're provided with a list of built-in Amazon intent types (see the list: http://amzn.to/2awO7gw), which include: AMAZON.DATE, AMAZON.DURATION, AMAZON.FOUR_DIGIT_NUMBER, AMAZON.TIME, AMAZON.NUMBER, and AMAZON.LITERAL. You can also create custom intent limit types, just like in .NET.
Be sure to read the article “Understanding How Users Invoke Custom Skills,” located at http://amzn.to/1UmXGjz for a much more in-depth discussion of command structures and built-in types.
Starting Your First Alexa Skill
When developing Alexa Skills for the Amazon Echo, you'll be spending a lot of time at the Alexa Developer Portal (http://developer.amazon.com/alexa), so you should take a moment to familiarize yourself with it now.
In addition to some rotating featured content, you'll find some “getting started” links and some “Why Alexa?” information. Near the top, you'll also find links to the following three sections:
- Alexa Voice Service
- Alexa Skills Kit
- Alexa Fund
I'll go over all three sections in this article, starting with the Alexa Voice Service.
Alexa Voice Service
The Alexa Voice Service (AVS) is the cloud-based speech-recognition and natural language processing service for the Amazon Echo/Alexa. Because everything is cloud-based, Amazon can roll out enhancements and updates as needed, and Alexa continues to grow smarter and smarter.
In addition to supporting the Amazon Echo devices, the Alexa Voice Service also allows you to voice-enable any connected product that has a microphone and a speaker, like a smart watch, TV, refrigerator, or even your car.
If you're looking to create commercial-grade physical products that use Amazon Alexa, you can also purchase hardware development kits relatively inexpensively to prototype with.
Alexa Skills Kit
The Alexa Skills Kit, also referred to as the ASK, is Amazon's free Alexa SDK. The ASK comes with a lot of great samples and documentation. To get started, pull down some of the sample code and take a look at how things are set up before jumping into building your own skill in C#.
Amazon likes to move pages around occasionally, so rather than just giving you a link that might break later on, I'm going to guide you down the yellow brick road, so to speak, in order to find the information you seek:
- Starting at the Amazon Alexa Skills Kit page, click the “Get Started With Our Step By Step Checklist” link (http://amzn.to/2cb5a9o).
- Click the “Getting Started Guide” link (http://amzn.to/1UczDnl).
- Click the “Using the Alexa Skills Kit Samples” link (http://amzn.to/2hFt50M).
On the samples page, you'll see a section called “Getting the Source Code for the Samples and the Java Library,” which contains links to the JavaScript (https://github.com/amzn/alexa-skills-kit-js) and Java (https://github.com/amzn/alexa-skills-kit-java) samples, along with some additional info about each.
Remember, there are no C# samples yet. We're brave explorers forging a path through uncharted territory! Don't worry though, we're on this adventure together. (Editor's Note: There is now support for VS Code here: https://github.com/alexa/ask-toolkit-for-vscode)
There is now support for VS Code here: https://github.com/alexa/ask-toolkit-for-vscode
If you haven't already, click the link above and grab the JavaScript sample. Once you're at the GitHub page for the Node.js Alexa Skills Kit Samples, look for the green button on the right that says Clone or Download.
If you're familiar with GitHub, and have Git set up locally already, feel free to clone the repo, otherwise you can just download the alexa-skills-kit-js-master.zip file to your local computer and extract it. It's not very large, weighing in at roughly 8.5 MB.
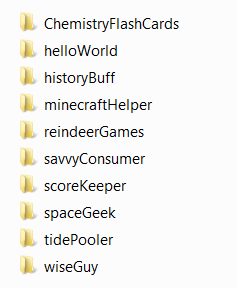
There are a lot of great samples to choose from (see Figure 2), and I'll be focusing on two of them right now (although I encourage you to look at all of them. Pick them apart, deploy them, and play with them.
Every Alexa Skill sample project contains a speechAssets folder, which, in turn, contains (at least) two files: IntentSchema.json and SampleUtterances.txt. These two files are the heart of defining a good voice interface, which is the key to a robust user experience.
The HelloWorld sample is definitely the simplest, so I'll take a look at it, and the MinecraftHelper sample (which is relatively complex by comparison) before jumping in to building your own.
The intentSchema.json file is where you define the features (called Intents) of your Amazon Alexa Skill. Unfortunately, the IntentSchema.json for the HelloWorld sample isn't particularly interesting.
Inside the Intents array, there's a HelloWorldIntent and one of the built-in intents (more on that in a minute): AMAZON.HelpIntent.
{
    "intents":
    [
        {
            "intent":"HelloWorldIntent"
        },
        {
            "intent":"AMAZON.HelpIntent"
        }
    ]
}
The IntentSchema.json for the MinecraftHelper sample is a little more varied, because it accepts an argument (item) and has more of the built-in AMAZON intents included.
{
    "intents":
    [
        {
            "intent": "RecipeIntent",
            "slots":
            [
                {
                    "name":"Item",
                    "type":"LIST_OF_ITEMS"
                }
            ]
        },
        {
            "intent":"AMAZON.HelpIntent"
        },
        {
            "intent":"AMAZON.StopIntent"
        },
        {
            "intent":"AMAZON.CancelIntent"
        }
    ]
}
Slots (Amazon lingo for parameters) are how you define the data and type your intent accepts. You can only use them on your own intents though, because the built-in intents don't allow it. In the MinecraftHelper schema, there is one slot, named Item, which you'll see again in your SampleUtterances file in just a bit.
The built-in intents are super useful, because you don't have to write any special code to implement them. I'll dig into them in more detail later, but here's a quick rundown of a few of the most commonly used ones:
- AMAZON.CancelIntent (stay in the skill, cancel a transaction or task)
- AMAZON.StopIntent (stop and exit the skill)
- AMAZON.HelpIntent (provide the user with information on how to use the skill)
You get all of these for free. You don't even have to add them to your schema unless you intend to extend them to customize the utterances that trigger them.
They didn't do it in the MinecraftHelper sample, but if you have several intents listed in your schema, it's a best practice to always put the AMAZON.HelpIntent last! This is because Alexa defaults to the last intent in the schema if it can't otherwise find a match. You can use this to provide the user with some helpful suggestions on how to properly use your skill.
Also, Intent and Slot names are case-insensitive and you can't give them the same name (even with different case). Doing so gives you an error when you try to publish the skill.
Always put the HelpIntent last because Alexa defaults to the last intent in the schema if it can't otherwise find a match.
If the IntentSchema.json file is where you define what capabilities your Alexa Skill has, then the SampleUtterances.txt file is where you define how the user can invoke them. Take a look at the SampleUtterances.txt file from the Hello World project sample:
HelloWorldIntent say hello
HelloWorldIntent say hello world
HelloWorldIntent hello
HelloWorldIntent say hi
HelloWorldIntent say hi world
HelloWorldIntent hi
HelloWorldIntent how are you
As you can see, there are a number of ways to invoke the HelloWorldIntent, ranging from brief (“hi”) to slightly less brief (“say hello world”). The AMAZON.HELPIntent isn't included in the HelloWorld SampleUtterances.txt file, because it's a default behavior (it responds to the phrase “HELP”), but if you wanted to extend it, you could add some lines like this:
AMAZON.HelpIntent help me
AMAZON.HelpIntent rut row
AMAZON.HelpIntent oh no
This is a plain text file containing a dictionary of phrases, organized as key/value pairs that map the intents in your IntentSchema.json file to the sample spoken phrases.
There are a couple of things to keep in mind with this file:
- The KEY (on the left) must match a name in the Intents Schema document.
- The VALUE is the spoken phrase, and may include slots, such as “Limit” (if you defined the intent to accept them.)
The HelloWorld sample still responds to “help,” in addition to the other phrases you just added.
By comparison, the SampleUtterances.txt file in the MinecraftHelper sample project is significantly longer (so long, in fact, that I'm not even going to show you all 120+ lines of it here).
RecipeIntent how can I build a {Item}
RecipeIntent how can I build an {Item}
RecipeIntent how can I build {Item}
RecipeIntent how can I craft a {Item}
RecipeIntent how can I craft an {Item}
RecipeIntent how can I craft {Item}
RecipeIntent how can I get a {Item}
RecipeIntent how can I get an {Item}
RecipeIntent how can I get {Item}
RecipeIntent how can I make a {Item}
RecipeIntent how can I make an {Item}
RecipeIntent how can I make {Item}
RecipeIntent how can you build a {Item}
RecipeIntent how can you build an {Item}
Even if you have multiple intents defined in your IntentSchema, they all go in the same SampleUtterances file. Whitespace is ignored, so feel free to break them up or group them however you like.
One thing to make note of, especially in the last sample, is the use of the “a” and “an” articles, as well as their omission. The more detailed you make this file, the better, because you don't know how the user pronounces these expressions. One of the other samples in the zip file you downloaded includes options like “I don't know” and “dunno” in the list of acceptable utterances.
The Alexa Voice Service (which I'll get to in a bit) is quite good. Depending on your enunciation, it's definitely good enough to tell the difference between “a” and “an” before a word. Trying to account for every possible way your users will interact with Alexa, combined with local dialects, slang, and accents, can be quite a challenge, but you'll want to at least get the basics.
The next two files you'll want to familiarize yourself with are the index.js and AlexaSkill.js files, which are located in the src folders of each of the sample projects.
The index.js file from the HelloWorld sample is pretty straightforward and contains a few pieces that you'll need for the C# implementation later, so let's take a look at that one first.
At the beginning of the file, you'll find the APP_ID and the AlexaSkill library references, which you'll need to make use of once you have the skill defined with Amazon.
var APP_ID = undefined;
//replace with "amzn1.echo-sdk-ams.app.[your-unique-value-here]";
var AlexaSkill = require('./AlexaSkill');
The onLaunch event greets users of your skill, and optionally provides them a brief synopsis of how they can expect to interact with it. Make note of the speechOutput and repromptText variables.
HelloWorld.prototype.eventHandlers.onLaunch = function (
    launchRequest, session, response)
    {
        console.log("HelloWorld onLaunch requestId: "
            + launchRequest.requestId + ", sessionId: "
            + session.sessionId);
        var speechOutput = "Welcome to the Alexa Skills
            Kit, you can say hello";
        var repromptText = "You can say hello";
        response.ask(speechOutput, repromptText);
};
Next up are some session-related event handlers that should look familiar to anybody who's done some Web development in the past. Most Alexa sessions last for a single interaction, but it's possible, depending on the skill, for a session to last for four or five interactions.
The onSessionStarted event gives you an opportunity to do any necessary initialization prior to launching your skill.
HelloWorld.prototype.eventHandlers.onSessionStarted
    = function (sessionStartedRequest, session)
{
    console.log("HelloWorld onSessionStarted requestId:
        " + sessionStartedRequest.requestId
        + ", sessionId: " + session.sessionId);
        // any initialization logic goes here
};
The onSessionEnded event allows you an opportunity to add code for any necessary cleanup when the skill is finished executing.
HelloWorld.prototype.eventHandlers.onSessionEnded
    = function (sessionEndedRequest, session) {
        console.log("HelloWorld onSessionEnded requestId: "
            + sessionEndedRequest.requestId
            + ", sessionId: " + session.sessionId);
           // any cleanup logic goes here
};
Lastly, the intentHandlers method registers the intents that are defined in the IntentSchema.json file, and tell Alexa how to respond to them. Make note of the tellWithCard() method, which allows Alexa to respond with additional information, or even graphical content, via the Amazon Alexa app on your smart phone.
HelloWorld.prototype.intentHandlers = {
    // register custom intent handlers
    "HelloWorldIntent": function (intent, session, response) {
        response.tellWithCard("Hello World!",
        "Hello World", "Hello World!");
    },
    "AMAZON.HelpIntent": function (intent, session, response) {
        response.ask("You can say hello to me!",
            "You can say hello to me!");
    }
};
Most of the index.js file for the MinecraftHelper is very similar to this one, so I won't include it all here (see Listing 1), but the intenthandler section is a bit more involved, and is worth taking a look at, especially the section where it shows the simultaneous use of speech output and piping the same information to a card in the Alexa app.
Listing 1: intentHandler for MinecraftHelper sample
HowTo.prototype.intentHandlers = {
    "RecipeIntent": function (intent, session, response) {
        var itemSlot = intent.slots.Item, itemName;

        if (itemSlot && itemSlot.value) {
            itemName = itemSlot.value.toLowerCase();
        }

        var cardTitle = "Recipe for " + itemName,
            recipe = recipes[itemName],
            speechOutput,
            repromptOutput;

        if (recipe) {
            speechOutput = {
                speech: recipe,
                    type: AlexaSkill.speechOutputType.PLAIN_TEXT
            };

            response.tellWithCard(speechOutput, cardTitle, recipe);
            } else {
                var speech;

                if (itemName) {
                    speech = "I'm sorry, I currently do not know the
                         recipe for " + itemName + ". What else can I help
                         with?";
                } else {
                    speech = "I'm sorry, I currently do not know that
                    recipe. What else can I help with?";
                }

                speechOutput = {
                    speech: speech,
                        type: AlexaSkill.speechOutputType.PLAIN_TEXT
                };

                repromptOutput = {
                    speech: "What else can I help with?",
                    type: AlexaSkill.speechOutputType.PLAIN_TEXT
                };

                response.ask(speechOutput, repromptOutput);
            }
        },

        "AMAZON.StopIntent": function (intent, session, response) {
            var speechOutput = "Goodbye";
            response.tell(speechOutput);
        },

        "AMAZON.CancelIntent": function (intent, session, response) {
            var speechOutput = "Goodbye";
            response.tell(speechOutput);
        },

        "AMAZON.HelpIntent": function (intent, session, response) {
            var speechText = "You can ask questions such as, what's the
                recipe, or, you can say exit... Now, what can I help you
                with?";

            var repromptText = "You can say things like, what's the
                recipe, or you can say exit... Now, what can I help you
                with?";

            var speechOutput = {
                speech: speechText,
                type: AlexaSkill.speechOutputType.PLAIN_TEXT
            };

            var repromptOutput = {
                speech: repromptText,
                type: AlexaSkill.speechOutputType.PLAIN_TEXT
            };

            response.ask(speechOutput, repromptOutput);
        }
    };
The next file to take a look at is AlexaSkill.js, also located in the src directory of each sample project. This class serves as the base class for the index.js file, and contains the plumbing for the request, event, and intent handlers. There's nothing specific to your skill here, and each instance of this file is the same from one project to the next, so I won't spend any further time on that one right now.
There's also a recipes.js file, which is specific to the MinecraftHelper project. I won't include the whole thing here, because it isn't really relevant to what we're doing (and it's a huge file), but I will add a small snippet, just so you can see how external data can be referenced in the typical key/value or dictionary style:
module.exports = {
    "snow golem": "A snow golem can be created by
      placing a pumpkin on top of two snow blocks
      on the ground.",
    "glass": "Glass can be obtained by smelting
      sand in a furnace.",
    "boat": "A boat can be obtained by making a U
      shape with five wooden planks.",
    "hay bale": "A hay bale can be crafted by
      placing wheat in a 3 by 3 grid in a crafting
      table.",
    "clay": "Clay is obtained by breaking clay
      blocks with a non silk touch tool.",
    "bowl": "A bowl can be crafted by placing
      three wooden planks in a v shape in a crafting
      table."
};
The last file to look at in each of the sample projects is the README.md markdown file, which provides step-by-step instructions on how to deploy the project to AWS Lambda and setup the skill. This file is essential if you plan to do a test deployment of any of the sample projects.
At this point, you've looked at everything relevant that goes into the sample projects, so it's time to get started making your own Alexa Skill in C# and Visual Studio.
Time to Write Some Code
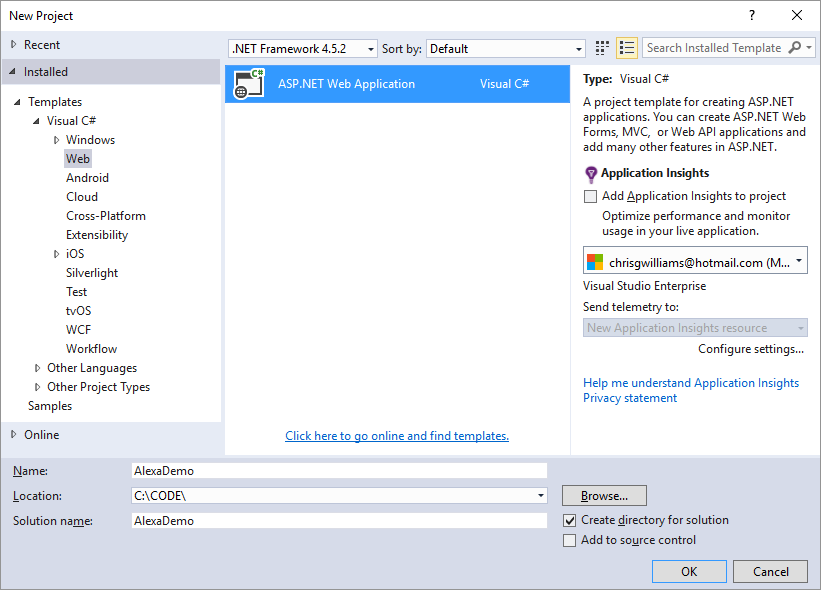
Start by creating a new ASP.NET Web Application in Visual Studio 2015 (see Figure 3). I'm using Visual Studio Community 2015 because it's free, but if you have the Professional or Enterprise editions, that's cool too. Name your project whatever you like (I'm naming mine AlexaDemo) and uncheck the box for Application Insights.
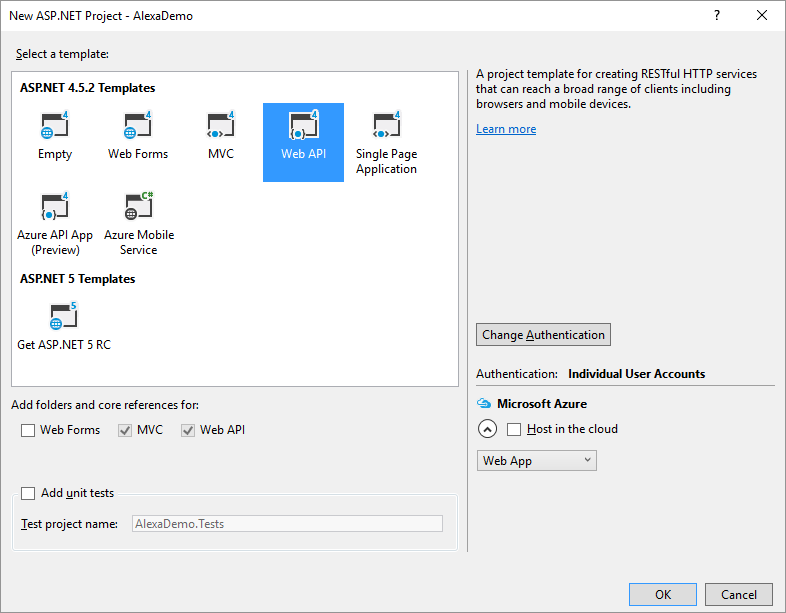
In the next dialog box, select the Web API template (see Figure 4) and unselect the “Host in the cloud” checkbox.
I'm using the Web API template because it provides nearly everything I need right out of the box, with a minimum of additional work required. This makes it really easy to get up and running quickly.
Hit OK and wait a couple moments. If all goes well, you'll have the Project_Readme file onscreen, congratulating you for successfully creating a new project. Take a moment to bask in all that glory, then close the window, and push up your sleeves. It's time to do some work.
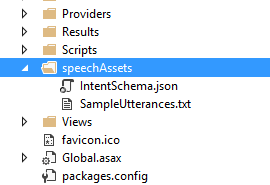
In your Solution Explorer under the AlexaDemo project, create a new folder and call it SpeechAssets. This is where you'll put the IntentSchema.js and SampleUtterances.txt files.
- Add a new
JSfile to the folder and call itIntentSchema.json. - Add a new
Textfile (if you can't find the file type, look under General) to the folder and name itSampleUtterances.txt.
Once you've done that, it should look like Figure 5.
Next, open up File Explorer and dive into the helloWorld\speechAssets folder. Open up the IntentSchema.json and SampleUtterances.txt files and copy/paste their contents into the empty files of the same name you created a moment ago. Make sure to save them.
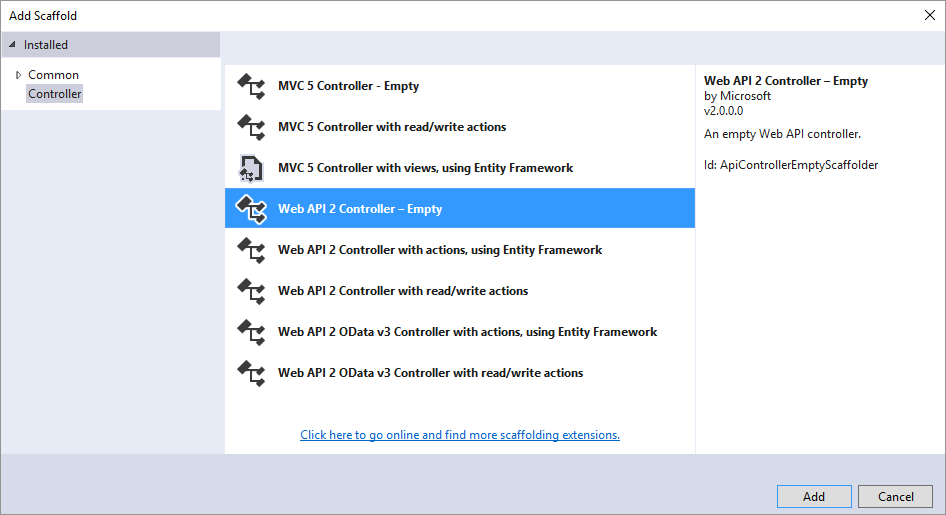
Give it a name (AlexaDemoController.cs sounds good) and hit the Add button. After a few seconds, you'll be staring at an empty controller class.
Before you start writing the controller, take a look at Listing 2, which is a slightly modified version of the Sample Response found in the ASK Interface Reference docs (it's here: https://developer.amazon.com/public/solutions/alexa/alexa-skills-kit/docs/alexa-skills-kit-interface-reference). This represents the Response object that your service returns to the Alexa Voice Service.
Listing 2: Modified Sample Response from ASK Reference Docs
{
    "version": "1.0",
    "sessionAttributes": {},
    "response":
    {
        "outputSpeech":
        {
            "type": "PlainText",
            "text": "Hello World, from the Alexa Demo"
        },
        "card":
        {
            "type": "Simple",
            "title": "Alexa Demo",
            "content": "This is the Alexa demo."
        },
        "reprompt":
        {
            "outputSpeech":
            {
                "type": "PlainText",
                "text": "Can I help you with anything else?"
            }
        },
        "shouldEndSession": false
    }
}
I'm not using any session attributes in this sample, but the sessionAttribute collection is where you map any key-value pairs that need to be persisted within an Alexa session.
You'll notice that within the “response” section, there are three entries: outputSpeech, card and reprompt. The text in the outputSpeech block is what the AVS converts back into speech for Alexa to read to you, and the card block content is what gets sent to the Alexa Companion App on your phone or tablet. The reprompt block contains what Alexa says to you if you don't respond to the initial response after activating your skill.
Be aware of the following size limitations when crafting your response:
- The
outputSpeechresponse can't exceed 8000 characters. - All of the text included in a
cardcan't exceed 8000 characters. This includes the title, content, text, and image URLs. - An image URL (
smallImageUrlorlargeImageUrl) can't exceed 2000 characters. - The token included in an
audioItem.streamfor theAudioPlayer.Playdirective can't exceed 1024 characters. - The URL included in an
audioItem.streamfor theAudioPlayer.Playdirective can't exceed 8000 characters. - The total size of your response can't exceed 24 kilobytes.
- If your response exceeds these limits, the Alexa service returns an error at deployment time.
Now that you have an idea of what a proper response should look like, it's time to jump back in to Visual Studio and add some code to the controller. Add this dynamic method signature inside the AlexaDemoController class:
[HttpPost, Route("api/alexa/demo")]
public dynamic AlexaDemo(dynamic request) {
}
The Alexa Voice Service requires the message to be sent as a POST (not a GET) request and the Route attribute is how the request will get to the right API call in the service. Of course, you could create a C# class to strongly type the return object, but this dynamic approach works just as well.
In the message, in addition to the response, you'll need to include a version number and session attributes (even if empty).
I'm not using any session attribute in this example, but if you were to add some, they would be in key/value pairs, and would be defined like this:
sessionAttributes = new {
    "string": object,
    "string": object
}
The same rules that apply to sessions in Web pages are relevant here as well; don't assume they'll always be there because the session could expire at any time, and don't put anything sensitive in them.
Inside the AlexaDemo() method, add the following code:
return new {
    version = "1.0",
    sessionAttributes = new { },
    response = new {
        outputSpeech = new {
            type = "PlainText",
            text = "Welcome to the Alexa Demo"
        },
        card = new {
            type = "Simple",
            title = "Alexa Demo",
            content = "Welcome to the Alexa Demo"
        },
        shouldEndSession = true
    }
};
The shouldEndSession property of the response object is something I haven't talked about yet. In a skill that requires multiple interactions with Alexa, you set this to false, to preserve any session attributes until the end of the interaction, but in this example there's no need to do this, so I've set it to true.
If you're writing a single Web service to support additional speech enabled devices beyond Alexa, you can include any additional SSML tags that the other devices support in the response and Alexa ignores anything she doesn't recognize.
Within the outputSpeech block, you have a type of PlainText, which is exactly what it sounds like. Whatever you put here is exactly what Alexa will read back to you.
The Alexa Voice Service also supports another type, called Speech Synthesis Markup Language (SSML). SSML is used when you need to control how Alexa generates the speech, such as specific inflection via phonemes, adding a longer pause between phrases, or even injecting an MP3 clip in the response.
Amazon didn't create the SSML standard, but they do support a subset of it. You can find the entire list of Alexa-supported SSML tags here: http://amzn.to/1OaLmAZ.
If you're writing a single Web service to support additional speech enabled devices beyond Alexa, you can include any additional SSML tags that the other devices support in the response and Alexa ignores anything she doesn't recognize.
The following snippet shows what your outputSpeech block looks like with SSML instead of plain text and with an embedded sound clip:
"outputSpeech" = new {
    type = "SSML",
    ssml = "<speak>This output speech uses SSML.
        <audio src=http://www.mp3.com/file.mp3 />
    </speak>"
}
If you're using SSML instead of plain text, there are some limits you should be aware of when crafting your service's response to Alexa:
- The entire
outputSpeechresponse may not be greater than 8000 characters. Cardtext may not exceed 8000 characters, including image URLs.ImageURLs may not exceed 2000 characters.- The total size of your response message may not exceed 24K.
- These are the limitations most relevant to what I'm doing here, but there are more than this, so be sure to look at all of them (here: http://amzn.to/1UcAgxa) if you plan to work with SSML.
Congratulations! You're done with coding the controller. In the next section, I cover deploying and testing your Alexa skill.
Deploying and Testing Your Service
In order to deploy and test your Alexa Skill, you'll have to publish it somewhere. I've published mine as an Azure API app, but you're free to put yours anywhere that's publicly accessible on the Web or the cloud. There are benefits (and drawbacks) no matter which you choose, so I'm leaving that up to you.
If you visit the previous link, you'll see something that looks like Figure 7, and if you aren't familiar with Swagger, you're in for a real treat.
Swagger is a great set of free open source tools that help you build and test your RESTful APIs. You may have heard of Postman, which is another great tool. In this article, I'm using Swagger (mostly because you get it automatically when publishing to Azure API apps, which is even better).
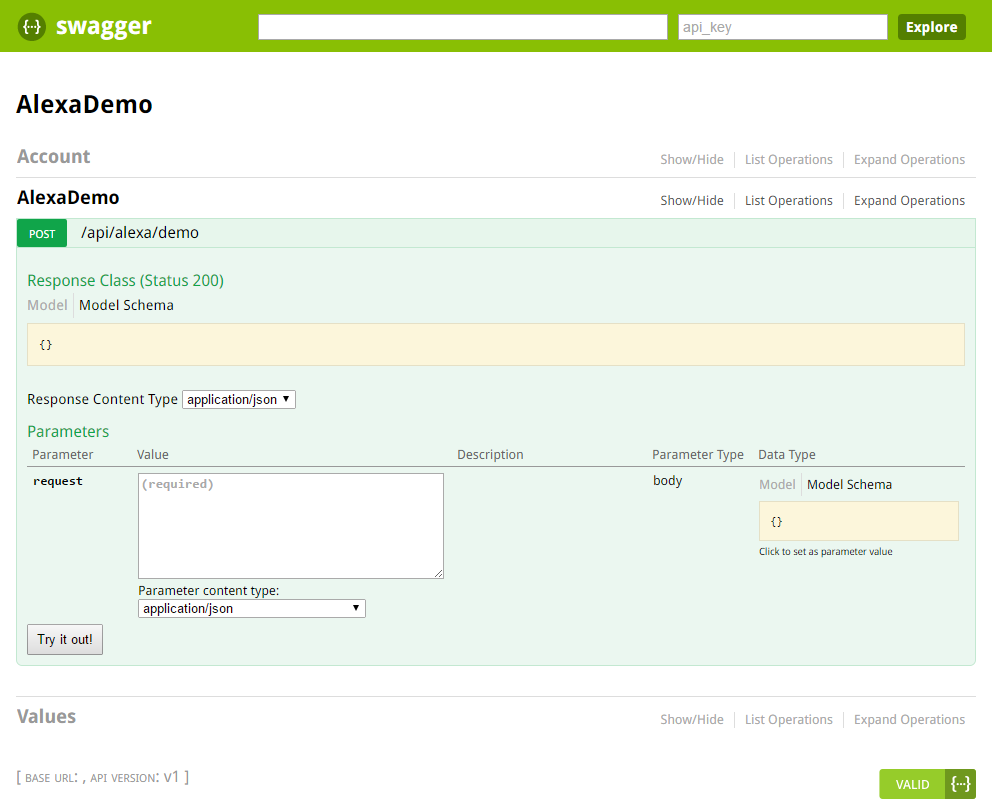
To test the service, type anything (i.e., “hi” or “hello” or whatever) in the request box and click the “Try it out!” button. You'll see the Response Body, which matches the response object you defined earlier, along with a Response Code of 200, and the Response Headers, which you can see below:
{
  "pragma": "no-cache",
  "date": "Sun, 18 Dec 2016 19:27:47 GMT",
  "content-encoding": "gzip",
  "server": "Microsoft-IIS/8.0",
  "x-aspnet-version": "4.0.30319",
  "x-powered-by": "ASP.NET",
  "vary": "Accept-Encoding",
  "content-type": "application/json; charset=utf-8",
  "cache-control": "no-cache",
  "x-ms-proxy-outgoing-newurl": "https://microsoft-
    apiapp82820479ea5048298e6d4a3969eb78f7
    .azurewebsites.net/api/alexa/demo",
  "content-length": "269",
  "expires": "-1"
}
Now that you've tested the service, it's time to visit the Amazon Developer Portal and add your new skill.
Setting Up an Alexa Skill
In your browser of choice, visit
https://developer.amazon.com/en-US/alexa and sign in (or sign up) to get to the Developer Console.
If you're signing up for the first time, be aware that whatever account you use going forward should be the one that's paired up to your Amazon Echo device and Marketplace Account (if you have one).
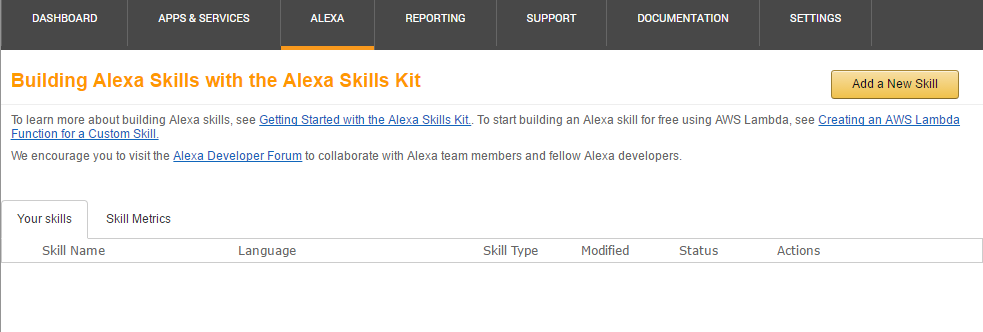
Once you're in, click on ALEXA in the top menu. You should see (at least) two options available. Click the Get Started button under the Alexa Skills Kit and you'll be taken to the Skills page (shown in Figure 8), which is where you will add, edit, and track the various skills you've submitted.
Click the Add a New Skill button, and you are presented with some fields to fill out in order to create your Alexa Skill.
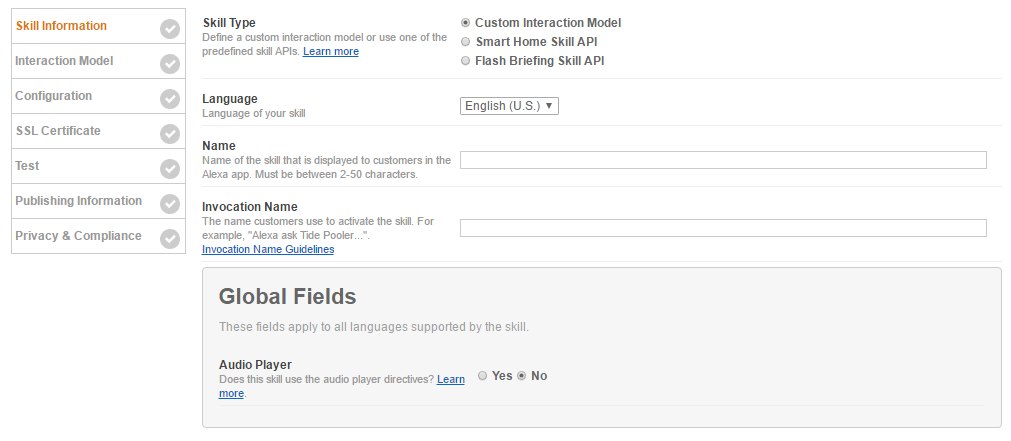
To create the skill for the Alexa Demo, start by filling in the Skill Information screen (as shown in Figure 9.) Do the following:
- Select the Custom Interaction Model radio button.
- Select the Language of your skill (default is English U.S.)
- Type in the Name of the skill (i.e., Alexa Demo)
- Type in the Invocation Name (what you say to activate the skill)
- Click the Next button.
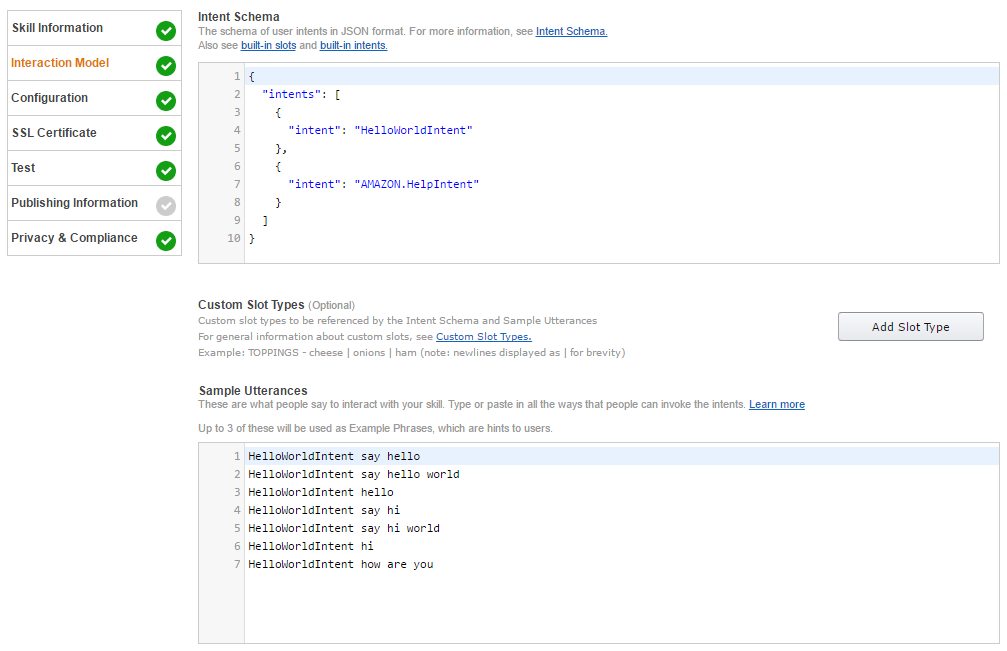
On the next screen (Figure 10), define the interaction model.
- Switch back over to Visual Studio, copy the JSON contents of your
intentSchema.jsfile, and then paste it into the text box labeled Intent Schema. - You haven't defined any Custom Slot Types in this skill, so you can skip that section.
- Do the same thing for the
SampleUtterances.txtfile, pasting it into the Sample Utterances text box. - Click the Next button.
In the Configuration section (see Figure 11), provide information about your service endpoint.
- Select the HTTPS radio button.
- Select the geographical region closest to you (North America or Europe).
- Enter the URL of your service endpoint (this is wherever you hosted it, including the “api/alexa/demo”).
- Click the Next button.

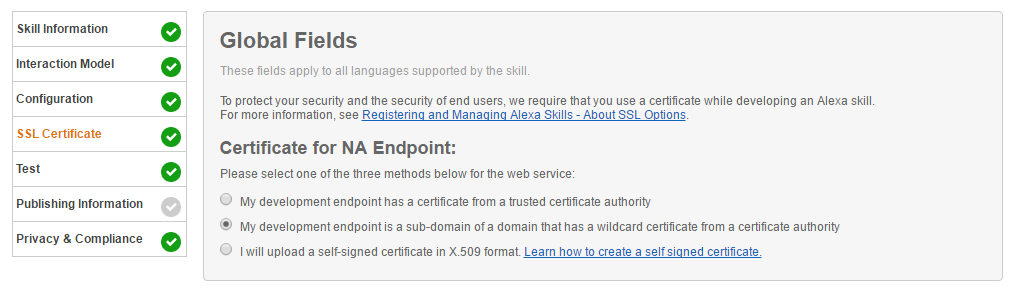
In the SLL Certificate section (Figure 12), provide the required certificate information.
- If you're hosting your service on your own website and it has a certificate, select “My development endpoint has a certificate from a trusted certificate authority.”
- If you're hosting your service in Azure (like me), you have a built in certificate already, so select “My development endpoint is a sub-domain of a domain that has a wildcard certificate from a certificate authority.”
- If neither of those apply, you have the option of selecting “I will upload a self-signed certificate in X.509 format.” If you don’t know how to create your own cert, Amazon provides you with a link next to this option to walk you through the process.
- Click the Next button.
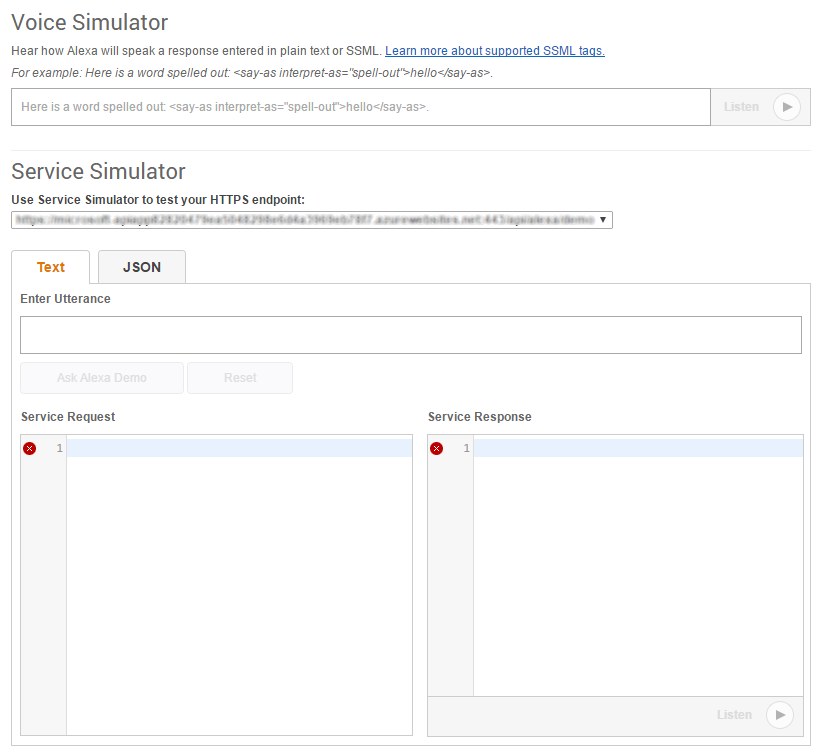
Next up is the Test section (Figure 13). There are no step-by-step instructions here, just some handy tools to play with:
- You can set your skill to Enabled or Disabled. It's set to Enabled by default.
- In the Voice Simulator text box, you can type anything you want, just to get an idea of what your skill sounds like coming from Alexa. This is super handy if you don't actually HAVE an Amazon Echo to test with. Also, this is a great place to practice some of those SSML tags I mentioned earlier. (SSML Reference: http://amzn.to/1UcAgxa)
- In the Service Simulator box, you can enter an utterance to test your endpoint. Let's do that now, by typing Hi in the “Enter Utterance” box and clicking the Ask Alexa Demo button.
- Once you click the button, the Service Simulator displays the
Service RequestandService Responsein JSON. If you don't get anything back, check the URL of your HTTPS endpoint, as Alexa may be having a problem reaching your service. - You've seen the
responseobject a few times by now, so I won't include it here again, but you should definitely take a minute to look at theService Request(either in the simulator or in Listing 3.) There's a lot of good information in there, especially if you need to debug your endpoint. Among other things, it shows what Intent is being called, along with any parameters (slots) being passed along with it. - Also, under the
Service Responsesection, you can click the Listen button to hear Alexa read the relevant portion of the service response out loud. - When you're finished in this section, go ahead and click the Next button (again).
Listing 3: Service Simulator Service Request
{
    "session": {
        "sessionId": "SessionId.6b864bd4-2f30-4873-a2c3-a34b23827903",
        "application": {
            "applicationId": "amzn1.ask.skill.f980f2fd-6573-4c33-a4cc-c8a8aa5e6fc4"
        },
        "attributes": {},
        "user": {
            "userId": "amzn1.ask.account.xxxxxxxxxxxxxxxxxxxxxxxxxxxxxx"
        },
        "new": true
    },
    "request": {
        "type": "IntentRequest",
        "requestId": "EdwRequestId.b8c8bfc8-f03a-4b1f-91d1-
0649514dd796",
        "locale": "en-US",
        "timestamp": "2016-12-18T21:48:59Z",
        "intent": {
            "name": "HelloWorldIntent",
            "slots": {}
        }
    },
    "version": "1.0"
}
At this point, your skill isn't published yet, but it is available for you to test locally on your Amazon Echo device. Just open the Alexa Companion App on your phone, tap the menu icon in the top left, tap Skills, and then tap the “Your Skills” link on the top right.
You're presented with an alphabetically sorted list of all the skills you've enabled on your Amazon Echo device, and because you named the skill “Alexa Demo,” it should be at the top (or really close.) Go ahead and tap the skill and take a look at the detail page for the skill. It should already be enabled, but if not, just tap the big green Enable Skill button.
You'll notice that there's no icon and no description because you haven't added those yet. Also, nobody but you can see this skill, because it isn't published, but it'll work on your device, so go ahead and give it a try!
If you have an Amazon Echo device, make sure that you're in the correct profile and say this: “Alexa Tell AlexaDemo Hello” and Alexa responds with “Welcome to the Alexa demo.”
Let's go back to the Developer Console and pick up where you left off, in the Publishing Information section.
If you have an Amazon Echo device, say this: “Alexa Tell AlexaDemo Hello” and Alexa responds with “Welcome to the Alexa demo.”
I honestly don't recommend submitting this skill for certification. It will probably get rejected by Amazon because it doesn't really do much, and it doesn't fit any of the readymade categories (it's not a game, or lifestyle skill, for example), but you can at least fill in the Short and Full Skill Description fields, along with the example phrases. If you've got an icon or logo handy, add those as well.
Once you hit the Save button, go look in your companion app again and you'll see that everything has been updated accordingly. Go ahead and click the Next button one more time.
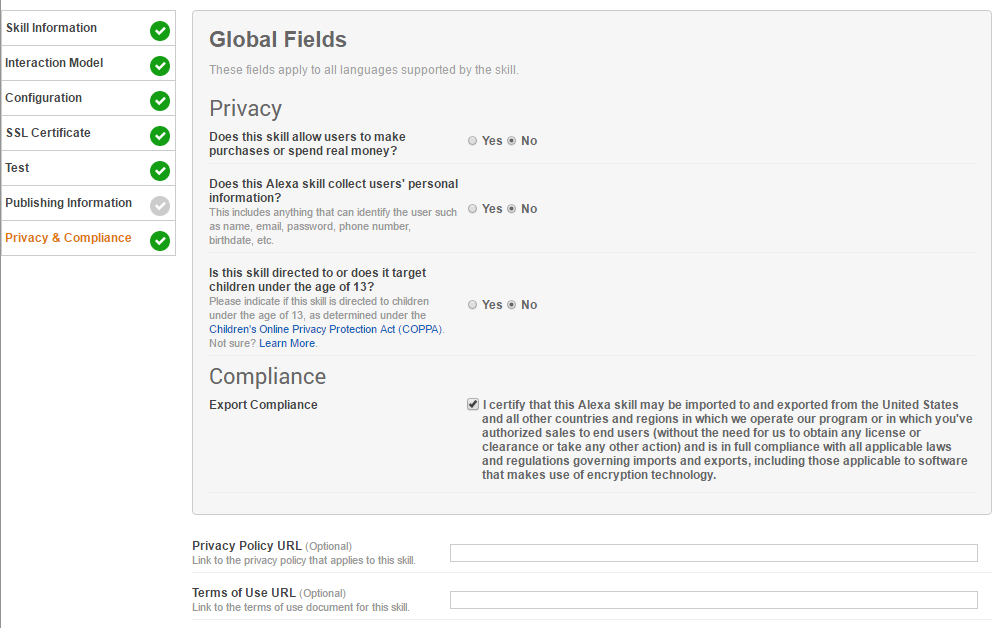
The Privacy & Compliance section (Figure 14) asks you a few basic questions about your app, in terms of who it's targeted for, if it allows users to spend money, and if it collects any information about your users.
And with that, you're done. Go forth and make many awesome Alexa Skills.
For Further Thought
As I mentioned earlier, one of the really great things about the Amazon Voice Service is that you aren't limited to developing for the Amazon Echo. It's not a big leap from this device to connected home and car applications, or even pocket-sized devices, using a Raspberry Pi Zero and a Cellular piHat.
Imagine having Alexa in your home, connected to a smart device hub that controls your lights, appliances, and home security, combined with a connected device in your car that responds to voice commands. Being able to say “Alexa Turn Off The Coffee Pot” while inside your house is pretty neat. Realizing that you left it on when you're 10 miles down the road and being able to say it in your car - and have Alexa turn off the pot - is a whole new level of awesome.
Realizing that you left the coffee pot on when you're 10 miles down the road and telling Alexa to turn it off for you is a whole new level of awesome.
Additional Skills
In addition to the Custom Alexa Skill you just created, there are other APIs supported by Alexa that are worth investigating:
- Smart Home Skill API: This API allows you to add skills to Alexa that include controlling any cloud connected device, such as the lighting, thermostat, appliances, smart plugs, and security features of your home. You can read more about this API at https://developer.amazon.com/en-US/docs/alexa/smarthome/understand-the-smart-home-skill-api.html.
- Flash Briefing Skill API: This API lets you add your own audio content feed to the Alexa Flash Briefing options via RSS. (If you have an Alexa-supported device and you haven't listened to a Flash Briefing yet, just say “Alexa give me my Flash Briefing” to get an idea of why this is useful.) Additional information about this API is available at https://developer.amazon.com/en-US/docs/alexa/flashbriefing/understand-the-flash-briefing-skill-api.html.
- List Skill API: This is a new addition to the ASK and allows you to teach Alexa how to interface directly with your list applications, such as the Shopping List or To-Do List, so you don't have to build out a separate voice interaction model. You can learn all about this API at https://developer.amazon.com/en-US/docs/alexa/list-skills/list-skills-overview.html.
The Alexa Fund
The Alexa Fund provides up to $100 million in venture capital funding to fuel voice technology innovation. Amazon and a lot of other investors are betting big that human voice interaction will drive technology adoption in ways we have yet to even imagine.
In addition to funding, they also offer services such as product incubation, providing advice and resources to deliver your product to market.
If you're creating things that push the boundaries of voice technologies, whether it's software or hardware, you should take a look at The Alexa Fund (at https://developer.amazon.com/en-US/alexa/alexa-startups/alexa-fund).
Table 1: Alexa Terms and Definitions
| Term | Definition |
| Amazon Echo | This is the hardware product. Currently available in two formats:
|
| Alexa | This is the personality of the Amazon Echo device and also the "wake word" you use to get Alexa's attention. (You can also set the wake word to use "Amazon" or "Echo.") |
| Wake Word | A word that Alexa listens for, to be followed by a command. Other (optionally configurable) wake words include "Amazon" and "Echo."If you have an Android phone or tablet, you're probably familiar with the "OK Google" wake word, and of course, Windows 10 and Windows 10 Phone users have Cortana, who listens for "Hey Cortana." |
| Alexa Voice Service | This is the cloud-based brain behind the voice, and is also responsible for translating voice to text and back again. Handles all natural language processing and interpretation. |
| Alexa Skill | This is a function that Alexa knows how to perform. Common Alexa Skills include playing music, playing games, telling jokes, checking your calendar, controlling devices via a smart hub, and a lot more. |
| Companion App | In order to configure the Amazon Echo, and Alexa, as well as any external hardware and smart home devices, you need to run the companion app (currently available for Android and iPhone). For an enhanced Alexa Skill experience, you can push additional information and graphics to the companion app, in addition to the usual voice response via Alexa. |
