


MonoGame is an open source implementation of the XNA 4.X API. It fully supports 2D and 3D graphics, audio, networking, and multiple inputs including touch, mouse, gamepad, and keyboard. There are ports for iOS, Android, Mac OSX, Linux, Windows 8, Windows Phone 8, PlayStation Mobile, PlayStation 4, Raspberry Pi, and Ouya, with more being created all the time. This is accomplished by use of the Mono framework, which is a free and open-source .NET Framework-compatible project created and maintained by Xamarin.
Evolution from XNA to MonoGame
Prior to the mid-2000s, you had two language choices for serious game development, C/C++ or C/C++ combined with Assembly Language. Anyone could develop for Windows and distribute their game however they liked, but if you wanted to develop for the Xbox 360, you needed to be part of a game studio and have a publishing deal with Microsoft. Indie Games didn't exist on any next-gen consoles yet. (Ever notice how every generation of console refers to itself as "next gen?")
Everything changed in 2006, with the release of the Microsoft XNA Framework and XNA Game Studio Express, more commonly referred to as just XNA. The first version of XNA allowed you to make games (with an unheard of low-cost Creators Club membership) using C#, and was widely credited with not only making the game development process substantially easier, but also opening the floodgates for Indie Game developers around the world.
The first version of XNA also introduced an extensible Content Pipeline that compiled a variety of image and audio formats, as well as 3D models and even XML data, to a native .XNB format at build time. The .XNB format was (and still is, in MonoGame) ready to be used by XNA projects with no additional conversion required.
Because the XNA Content Pipeline is extensible, support for converting new content types can easily be added. Unfortunately, at this time, MonoGame doesn't have its own content pipeline (it's in development), but there are multiple workarounds available. These workarounds are addressed in the first sample project later in this article.
Version 2.0 of XNA was released in 2007 and included enhancements for networking via Xbox Live, and better device support on Windows and Xbox 360.
With the 3.0 release in late 2008, XNA added support for trial mode, and cross-platform gaming on Windows, Xbox 360, and the ill-fated Zune media player. A point-release shipped a few months later that included API changes to add support for video playback, a better audio API, and more Xbox Live feature support, including Avatars.
Although XNA was at its peak during this time, the lack of support for non-Microsoft platforms led to the creation of the precursor to MonoGame, called XNA Touch, in 2009. This initial release targeted the iPhone, but eventually support was added for Android, Mac, Linux, and OpenGL on Windows. This project was renamed MonoGame with the 2.0 release.
The final major release of XNA, version 4, came out in 2010 and offered support for the newly released Windows Phone 7. A refresh was issued the next year, which added support for Windows Phone 7.5 and the ability for Visual Basic .NET developers to develop and publish XNA games.
By the release of Windows 8, XNA was no longer being actively developed and the product team had been dissolved. Shortly after, Microsoft announced that there would be no new versions of XNA after 4.5. XNA is not supported on Windows 8, Windows Phone 8, or Xbox One.
In 2013, MonoGame 3.0 was released, with support for Windows 8, Windows Phone 8, OUYA, and PlayStation Mobile/Vita.
The most recent release of MonoGame, version 3.2, came out in April of 2014 and included a significant list of changes and enhancements.
XNA allowed developers to use a shared codebase across multiple Microsoft platforms. MonoDevelop carries that same goal of a shared codebase, but extends the reach into much larger assortment of platforms, including the latest generation of Microsoft operating systems, as seen in Table 1.
In the next section, you will learn exactly what you need to download to get started developing multi-platform games for MonoGame.
Getting Started With MonoGame
In this section, you'll learn what you need to download to set up your development environment for using MonoGame on the supported platforms.
Setting Up Your Environment
If you are developing for Windows, you only need three things:
- Visual Studio 2013: Any SKU will do, including the Express edition, which you can find here if you need it: www.visualstudio.com/en-us/products/visual-studio-express-vs.aspx. The version you need to download and install depends on your operating system. If you're running Windows 8, get Express 2013 for Windows and if you're running an earlier operating system, like Windows 7, get Express 2013 for Windows Desktop.
- MonoGame: Grab the latest release (currently 3.2) from www.monogame.net/downloads/.
- XNA Content Compiler: You'll need this to compile things like SpriteFonts, audio files, and certain image formats. You can find this at
www.xnacontentcompiler.codeplex.com/. Editor's note: Codeplex (and its archive) has been shut down as of July 21, 2021. Search GitHub instead. You'll learn more about how to use this tool in the first project.
Developing for a Mac requires a few more steps:
- XCode developer toolset: This is how you develop for Mac, iPhone, and iPad. The best place to get it is at www.developer.apple.com/downloads/index.action.
- MonoDevelop: Grab the latest MacOSX release (currently 4.0.8) from https://www.monodevelop.com/.
- Mono for MacOSX: You'll need to grab this from the same page as the bullet above for MonoDevelop to work. The current version is Mono 2.10.11 + GTK#.
- Once you have these, install them in the following order: MonoFramework, MonoDevelop, and MonoMac plug in (from within MonoDevelop).
- MonoGame: Finally, download and install MonoGame, found here: https://github.com/MonoGame/MonoGame
As mentioned before, there are a number of other platforms you can target when developing a game with MonoGame:
- Linux: If you wish to use MonoGame to develop games for Linux, you can find instructions here: www.github.com/mono/MonoGame/wiki/Tutorials:-Getting-Started-on-Linux. By default, MonoGame also installs a project template for MonoGame Linux Project.
- Android: Follow the steps for Windows, above. MonoGame installs a project template for MonoGame Android Project into Visual Studio.
- OUYA: The same as Android, except you will use the MonoGame OUYA Project instead.
- Windows Phone 8: Developing for WP8 requires a Windows 8 x64 Pro based system. Follow the steps at this link to get your environment setup with the Windows Phone 8 SDK and Visual Studio 2012 Express: http://developer.nokia.com/community/wiki/XNA_Games_On_Windows_Phone_8_with_Monogame (Editor's note: link no longer valid.) If you already have a copy of Visual Studio 2013, make sure to install it BEFORE installing the SDK.
Once you have everything installed and configured, you're ready to create your first MonoGame project. This rest of this article focuses on the MonoGame Windows Project template, but the great thing about MonoGame and the Mono Framework is that virtually all of the same concepts will be applicable, regardless of platform.
Creating Your First Project
It's time to fire up Visual Studio and create a new MonoGame Windows Project, as shown in Figure 1. Give it a name like DemoGame and click the OK button.

Once your project has been created, take a look in the Solution Explorer window (Figure 2) and find the following items:
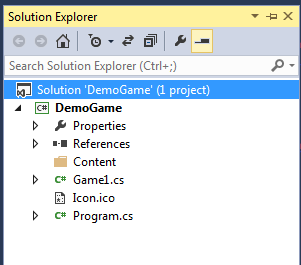
- Content Folder: This is where you store all of your game content, such as sounds, 2D and 3D graphics, and spritefonts.
- Program.cs: In most projects, this file won't be modified. It serves as a loader for your Game class.
- Game1.cs: This is the heart, or rather brain, of your game. All of your game logic goes here.
Running Your First Project
You've created your first MonoGame project, so go ahead and give it a run by pressing the F5 key. Within a couple of seconds, you should be staring at a lovely cornflower blue screen. It's not much to look at right now, but it's a good sign that all the bits and pieces are properly installed.
If you hit the Escape key, the program will terminate and bring you back to Visual Studio. If you happen to have an Xbox 360 (or Xbox One) controller plugged into your development computer, you can also hit the Back button to exit the game.
You might also get an error. Depending on what else you have installed, there's a small chance that you may run into an error the first time you try to run your code. If you get a “xinput1_3.dll not found” error, it means that you're missing a key file from DirectX. People who have worked with XNA before should already have this file, as well as people who play a lot of games, but it was (accidentally) left out of the 3.2 release of MonoGame.
If you find yourself in this situation, don't panic, just download and run DXWebSetup.exe from this link: www.microsoft.com/en-us/download/details.aspx?id=35. This will make sure that all of the DirectX files and drivers are up to date, and will add any missing files. Don't just download xinput1_3.dll from a driver website, though, as this can be extremely detrimental to your system (viruses!), and won't necessarily install it in the right place.
Dissecting Your First Project
Once you have the game project running, it's time to take a look at the various parts that are in play. Open the Game1.cs file and take a look at the code.
Starting at the top of the file, the first thing you'll notice if you expand the “Using Statements” region is a handful of references to what appear to be XNA namespaces, such as Microsoft.Xna.Framework or Microsoft.Xna.Framework.Graphics. These namespaces are actually a total rewrite of the original XNA libraries and are named the same for consistency purposes.
This way, an XNA code sample or even a full game you have created previously in XNA can be recompiled under MonoGame with little or no modification. You don't actually need to install XNA in order to use these namespaces in your MonoGame project.
Within the Game class, you'll see a couple of objects that have already been defined for you:
- GraphicsDeviceManager: Located in the Microsoft.Xna.Framework namespace, this is an abstraction of the graphics hardware that your game is running on top of, allowing you to focus on your game logic instead of spending time writing low-level drivers for specific hardware features. The GraphicsDeviceManager class handles initializing the hardware and gives you access to things like Display Orientation, Full Screen Mode, BackBuffer Size and more.
- SpriteBatch: Located in the
Microsoft.Xna.Framework.Graphicsnamespace, theSpriteBatchclass is used to bundle together multiple draw calls into a single unit of work to be sent to the GPU (Graphics Processing Unit) of the device. This is much more efficient than sending draw commands individually, resulting in a higher (and therefore smoother) frame rate.
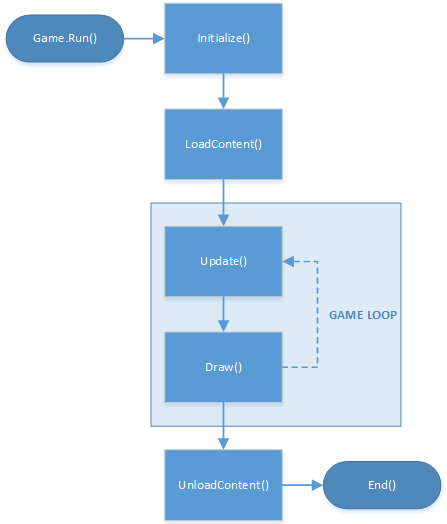
After the Game class constructor, you'll see a collection of methods that serve as your entry points into the game loop. Before digging into those, a brief explanation of the game loop is in order. When playing or watching a graphically intensive game, you might have heard the term “frame rate” or “frames per second” (FPS) being mentioned.
A frame is a single pass through the game loop (Figure 3), consisting of one call each to the Update() and Draw() methods (more on these shortly). This means that the Update() and Draw() methods of your game loop are being called around 30-60 times per second, depending on platform.
Of course, it's also possible for your game to run slower if you have a lot of intense calculations in your Update() method, or you're trying to put too many things on the screen at once in your Draw() method. Unfortunately, there really isn't a way to increase the frame rate beyond the target within MonoGame.
It's a known fact that the more stuff you have on-screen in your game, the slower it will get. So how do you get around this?
One way to improve your frame rate, if your game requires a large number of things to be drawn on-screen at once, is to divide them up into two groups and draw each group every other frame.
For example: drawing items A, C, E, G on the even frames and B, D, F, H on the odd frames greatly reduces the load per frame, and at 60 frames per second, your players won't be able to tell.
One way to improve your frame rate, if your game requires a large number of things to be drawn on-screen at once, is to divide them up into two groups and draw each group every other frame.
The following methods make up the remainder of the Game class:
- Initialize(): This method is used for things like querying for external services, checking for the presence of devices and sensors, loading non-graphical content such as tile-map data, etc. If you have any (Drawable) Game Components that require initialization, the
base.Initialize()call at the bottom of this method enumerates through all of those as well.
protected override void Initialize()
{
   // TODO: Add your initialization logic here
   base.Initialize();
}
- If you aren't familiar with Game Components or Drawable Game Components, keep reading and all will be made clear.
- LoadContent(): This method, which is called directly by the
Initialize()method just before the game loop starts, is where you load things like game art, spritefonts, music, 3D models, XML data, and anything else that has been processed by the Content Pipeline. Graphics are loaded into your graphics device memory, and so this method is also called anytime game content needs to be reloaded, such as when the graphics device is reset.
protected override void LoadContent()
{
   // Create a new SpriteBatch, which can be used to
   // draw textures.
   spriteBatch = new SpriteBatch(GraphicsDevice);
   // TODO: use this.Content to load your game content
   // here
}
- As you can see, this is where the
SpriteBatchobject gets initialized (or re-initialized, in the event of a graphics device reset.) You'll load the rest of your content after the//TODO:line. - Update(): This is where your game does most of its thinking. Everything from updating object coordinates, rotation, physics, game timing, animation loops, pathfinding, or other forms of artificial intelligence (AI), checking for player input, reading GPS or other sensor data, and anything else that manipulates the game state goes into this method.
- Inside the
Update()method, you can see an example of how to listen for player input. In this case, you're checking to see if a player has pressed the Back button on a controller/gamepad, or the ESC key on their keyboard. If either input is detected, theExit()method is called and the game ends.
protected override void Update(GameTime gameTime)
{
    if (GamePad.GetState(PlayerIndex.One).Buttons.Back
    == ButtonState.Pressed
    || Keyboard.GetState().IsKeyDown(Keys.Escape))
        Exit();
    // TODO: Add your update logic here
    base.Update(gameTime);
}
- At the bottom of the method,
base.Update()calls theUpdate()method of any registered Game Components or Drawable Game Components. - Draw(): The
Draw()method is where you place calls to draw on-screen. Just as theUpdate()method above is responsible for managing and manipulating the state of your game objects, theDraw()method then uses that information to know where and how to draw the object on-screen. - Inside the
Draw()method, there are three lines to pay attention to. The first line clears the screen and sets it to a cornflower blue. You can change this to any supported color by using theColorenumeration. The second line tells you where to add your drawing code, and the third line makes a call to thebase.Draw()method, which in turn calls theDraw()method of any Drawable Game Components you have registered.
protected override void Draw(GameTime gameTime)
{
    GraphicsDevice.Clear(Color.CornflowerBlue);
    // TODO: Add your drawing code here
    base.Draw(gameTime);
}
- In the upcoming example, you'll see how to add the drawing code and use the
spritebatchclass. One thing to keep in mind is that items are drawn on screen in the order they are listed in your code, which explains why you want to clear the screen first every frame, before drawing anything else. - UnloadContent(): Just like the
LoadContent()method, this is called in the event of a graphics device reset and is where you unload all content from the device memory. This is used to prevent the accumulation of items in the graphics memory, which can eventually cause an out-of-memory exception if not managed properly.
protected override void UnloadContent()
{
     // TODO: Unload any non ContentManager content here
}
Before jumping in and modifying the project, there are a couple terms that were introduced above that could use some further explanation.
GameComponent: Located in the
Microsoft.Xna.Frameworknamespace, theGameComponentclass allows you to divide up your code into relevant modules and keep them from cluttering up the mainGameclass file. A game component must be registered with your game by adding it to theGame.Componentscollection. Doing this allows theUpdate()andInitialize()methods of the component to be called by the corresponding method of theGameclass.DrawableGameComponent: Also located in the
Microsoft.Xna.Frameworknamespace, theDrawableGameComponentclass works just like theGameComponentclass, with the addition of support for theDraw()method.
Although using the GameComponent and DrawableGameComponent classes can provide some organizational and efficiency benefits for your code, they're not required when making a game. Custom classes work just as well, although you lose some of the built-in plumbing that you get with the components. It's really about personal preference at this point, as there is no right or wrong approach.
Modifying the Game Project
Since you already have an active game project, it's time to add some code to it. There's no better place to start than the traditional “Hello World” message. As such, this is the perfect time to introduce you to another class: the SpriteFont.
Drawing Text
It's pretty easy to put an image of some static text on the screen (and I'll handle drawing images shortly), but if you want to draw text on your screen programmatically, you need a SpriteFont.
A SpriteFont is composed of two files. The first is an XML file that contains the definition of how you want the SpriteFont to be rendered. The second file is a single graphic image containing each character of a font, rendered at the size you specified in the XML file.
The image is loaded by MonoGame (in the LoadContent() method) and then sliced up into individual two-dimensional images (known as sprites), which can then be used to display text on screen via the DrawString() method of the SpriteBatch object.
In XNA, adding a SpriteFont was as easy as right-clicking the Content project in your Solution Explorer, selecting “Add SpriteFont” and customizing the XML file that loaded in Visual Studio.
Unfortunately, because this isn't XNA and the content pipeline in MonoGame is still in development, there are a few manual steps you'll need to perform in order to create and add any SpriteFonts to your game.
In order to add a SpriteFont to your project without a content pipeline, you'll need to compile it separately with the XNA Content Compiler, which you can find at https://xnacontentcompiler.codeplex.com/. Editor's note: Codeplex (and its archive) has been shut down as of July 21, 2021. Search GitHub instead. There's no executable release available, so you need to open and build the source code. It's a Visual Studio 2010 project, but it will build in later versions of Visual Studio without any problems.
Once you've built the content compiler, you'll need to feed it a SpriteFont definition file, which looks like the following XML snippet:
<?xml version="1.0" encoding="utf-8"?>
 <XnaContent xmlns:Graphics="Microsoft.Xna.Framework. Content.Pipeline.Graphics">
   <Asset Type="Graphics:FontDescription">
     <FontName>Verdana</FontName>
     <Size>12</Size>
     <Spacing>2</Spacing>
     <Style>Bold</Style>
     <CharacterRegions>
       <CharacterRegion>
         <Start>32</Start>
         <End>126</End>
       </CharacterRegion>
     </CharacterRegions>
   </Asset>
 </XnaContent>
You can use the text editor of your choice to create this file, but make sure to give it a .spritefont extension. It's a good idea to use the name and size of the font (i.e., verdana14.spritefont) when naming it, so you'll know what you're working with later.
There are a few values to pay attention to here:
- FontName is the name of the font you will be compiling, and must be installed locally on whatever computer you're developing with. The name must match the name of the font exactly, or the compiler won't be able to find it.
- Size is the fixed font size that you will render to.
SpriteFontscannot be resized like traditional fonts, so if you need multiple sizes of the same font, you must generate multipleSpriteFonts(one of each size) for use in your game. - Style is one of four values: Regular, Bold, Italic, or Bold Italic
With the SpriteFont definition file created, load up the XNA Content Compiler and follow the steps below (as shown in Figure 4).
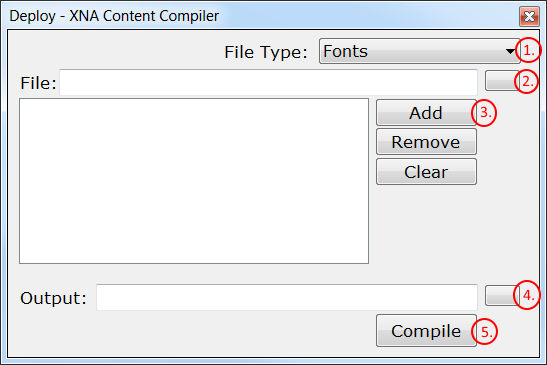
Once you compile the SpriteFont, you'll have an .XNB file. You add this to your MonoGame project in the Content folder. Follow these steps for the best results:
- In the Solution Explorer window of Visual Studio, right-click the Content folder in your project, select Add Existing Item, and select your .XNB file.
- Right-click on the SpriteFont in the Solution Explorer and select Properties.
- Set the Build Action property to Content.
- Set the Copy to Output Directory property to Copy if newer.
To use your SpriteFont to display text onscreen, you'll need to add some code.
Inside the Game1.cs file, at the class level, just after the SpriteBatch definition, add a SpriteFont variable, like so:
SpriteFont sfVerdana14;
In the LoadContent() method, after the TODO comment, load your SpriteFont:
sfVerdana14 = this.Content.Load<SpriteFont>
("Verdana14");
In the Draw() method, you'll need to Begin() a SpriteBatch, add the line of code to draw your text, and then End() the SpriteBatch. Add the following block of code just before the call to base.Draw(gameTime):
spriteBatch.Begin();
spriteBatch.DrawString(sfVerdana14,  "Hello World", new
Vector2(0,0), Color.Black );
spriteBatch.End();
The DrawString() method of SpriteBatch accepts a SpriteFont, which you just created. You'll also pass in the text string you want to draw, a Vector2D location (expressed as X,Y coordinates), and the color of the text. Feel free to experiment with different screen coordinates and colors.
That's all you need to do to add text onscreen in your game. Hit F5 to run and you'll see a CornflowerBlue screen with your text at the location you specified, as in Figure 5.
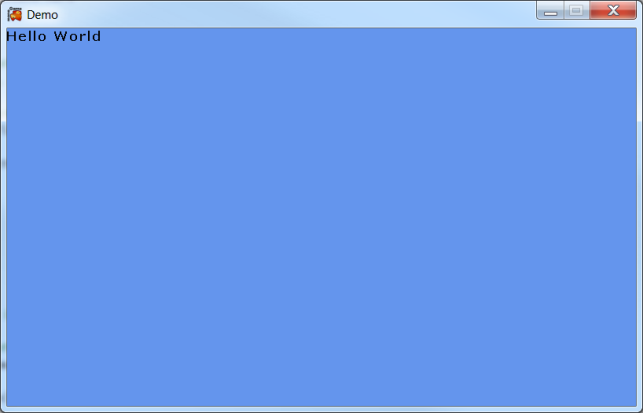
Next, you'll use the Update() method to move your text around onscreen.
Moving Text
In order to move your text around, you'll create some variables to store the screen position of the text and the speed at which you wish to move it. Start by adding these lines at the class level, just under your SpriteFont declaration, since they will be used by the Update() and Draw() methods, and declaring them inside those methods would just cause the value to reset.
Vector2 textXY = Vector2.Zero;
Vector2 textSpeed = new Vector2(50.0f, 50.0f);
Notice the Vector2.Zero in the snippet above? That's a shorthand way of instantiating with a value of (0, 0).
Next, you'll take the current position and add the speed multiplied by the game timer. This gives you a nice, smooth animation based on a consistent timer, rather than something more unpredictable like raw CPU speed. Put this code right after the previous two lines.
textXY += textSpeed * (float)gameTime.ElapsedGameTime.TotalSeconds;
Now you want to define some borders for your visible screen area, giving your text something to “bounce” against.
int MaxX = graphics.GraphicsDevice.Viewport.Width - 120;
int MinX = 0;
int MaxY = graphics.GraphicsDevice.Viewport.Height - 15;
int MinY = 0;
With those boundaries in place, you can now add the code to adjust the direction and speed of the text as it moves around the screen.
if (textXY.X > MaxX)
{
    textSpeed.X *= -1;
    textXY.X = MaxX;
}
else if (textXY.X < MinX)
{
    textSpeed.X *= -1;
    textXY.X = MinX;
}
if (textXY.Y > MaxY)
{
    textSpeed.Y *= -1;
    textXY.Y = MaxY;
}
else if (textXY.Y < MinY)
{
    textSpeed.Y *= -1;
    textXY.Y = MinY;
}
Whenever your text position exceeds either the X or Y boundaries, your speed is flipped between positive and negative and your position is adjusted accordingly.
The last step is to look in the Draw() method and change your DrawString() method to use your new textXY variable, instead of the hardcoded 0,0 values, like so:
spriteBatch.DrawString(spriteFont, "Hello World", textXY, Color.Black );
With that, you're done with this set of changes, and your Game class should look like Listing 1. Hit F5 and give it a run. Let it go for a few seconds so you can watch your “Hello World” text bounce around the screen from edge to edge.
Listing 1: The Game class, with moving text.
#region Using Statements
using System;
using System.Collections.Generic;
using Microsoft.Xna.Framework;
using Microsoft.Xna.Framework.Content;
using Microsoft.Xna.Framework.Graphics;
using Microsoft.Xna.Framework.Input;
using Microsoft.Xna.Framework.Storage;
using Microsoft.Xna.Framework.GamerServices;
#endregion

namespace Demo
{
    public class Game1 : Game
    {
        GraphicsDeviceManager graphics;
        SpriteBatch spriteBatch;

        SpriteFont sfVerdana14;
        Vector2 textXY = Vector2.Zero;
        Vector2 textSpeed = new Vector2(50.0f, 50.0f);

        public Game1()
            : base()
        {
            graphics = new GraphicsDeviceManager(this);
            Content.RootDirectory = "Content";
        }

        protected override void Initialize()
        {
            // TODO: Add your initialization logic here

            base.Initialize();
        }

        protected override void LoadContent()
        {
            spriteBatch = new SpriteBatch(GraphicsDevice);

            // TODO: use this.Content to load your game content here
            sfVerdana14 = this.Content.Load<SpriteFont>
            ("Verdana14");
        }

        protected override void UnloadContent()
        {
            // TODO: Unload any non ContentManager content here
        }

        protected override void Update(GameTime gameTime)
        {
            if (GamePad.GetState(PlayerIndex.One).Buttons.Back
            == ButtonState.Pressed
            || Keyboard.GetState().IsKeyDown(Keys.Escape))
                Exit();

            // TODO: Add your update logic here
            textXY += textSpeed *
            (float)gameTime.ElapsedGameTime.TotalSeconds;

            int MaxX = graphics.GraphicsDevice.Viewport.Width - 120;
            int MinX = 0;
            int MaxY = graphics.GraphicsDevice.Viewport.Height - 15;
            int MinY = 0;

            // Check for bounce.
            if (textXY.X > MaxX)
            {
                textSpeed.X *= -1;
                textXY.X = MaxX;
            }
            else if (textXY.X < MinX)
            {
                textSpeed.X *= -1;
                textXY.X = MinX;
            }

            if (textXY.Y > MaxY)
            {
                textSpeed.Y *= -1;
                textXY.Y = MaxY;
            }
            else if (textXY.Y < MinY)
            {
                textSpeed.Y *= -1;
                textXY.Y = MinY;
            }

            base.Update(gameTime);
        }

        protected override void Draw(GameTime gameTime)
        {
            GraphicsDevice.Clear(Color.CornflowerBlue);

            // TODO: Add your drawing code here
            spriteBatch.Begin();

            spriteBatch.DrawString(sfVerdana14, "Hello World",
            textXY, Color.Black );

            spriteBatch.End();

            base.Draw(gameTime);
        }
    }
}
Now that you know how to display and move text onscreen, doing the same with images is a breeze.
Drawing Images
Adding a 2D sprite image to your game is as simple as right-clicking the Content folder in your Solution Explorer and picking Add Existing Item. Browse to the image you wish to use. For best results, grab a .PNG file with a transparent background, such as the soccerball.png file seen in Figure 6 (and included in the downloadable code.)

After you add the image to your solution (this article assumes that you'll be using the soccer ball image), add the following line of code at the class level, where you defined the SpriteFont:
Texture2D soccerball;
A Texture2D type is used to store a two-dimensional graphic (also known as a Sprite) which you will pass to the Draw() method of your SpriteBatch object. Now that you have a variable to hold it, load the image by adding the following line in your LoadContent() method:
soccerball = this.Content.Load<Texture2D>("soccerball");
This loads the image into your GPU (and reloads it in the event of a device reset) so it will be ready for use by your game.
At this point, with the image loaded into your soccer ball variable, you're one line of code away from seeing it onscreen. Add the following line to the Draw method, inside the spriteBatch block:
spriteBatch.Draw(soccerball, new Vector2(50,50), Color.White);
Where you put this line in relation to the `spriteBatch.DrawString()`` call has a direct effect on how it is rendered. Remember that XNA draws from back to front by default, in the order the calls are made in the code. If you put this line after your “Hello World” text, you'll mask the text until it moves out from under the ball.
Remember that XNA draws from back to front by default, in the order the calls are made in the code.
Once again, you're ready to fire up your game. Hit the F5 key and sit back, marveling at the splendor of moving text and a static soccer ball competing for screen real estate. I've barely scratched the surface of what the SpriteBatch.Draw() method is capable of, but in the next section, you'll tackle some additional functionality.
Image Rotation and Shading
The SpriteBatch.Draw() method has a number of overloads for handling things like rotation, image origin, source rectangle (handy for slicing up those spritesheets into animations), and a lot more. Take a look at this method signature:
- SpriteBatch.Draw(Texture2D texture, Vector2 position, Rectangle? sourceRectangle, Color color, float rotation, Vector2 origin, Vector2 scale, SpriteEffects effect, float depth)
It's a bit longer than the one you previously used, but there's a lot more functionality here. The first two parameters, texture and position, should look familiar. Next is an optional parameter: sourceRectangle, which allows you to draw a specific area of a larger texture (such as a single cell of animation.)
You've seen the color parameter before in the previous example, but what you may not know is that you can use it to tint your sprite. Using Color.White actually means no tint at all. The next three parameters, rotation, origin, and scale, have a direct impact on how the image is rendered and will be the focus of the next enhancements to the Game project.
The effect parameter accepts a SpriteEffects enumeration that allows you to flip your sprite vertically, horizontally, or neither. You don't apply this value to the sprite unless you need to. Lastly, the depth parameter is used with sprite sorting, if you need to sort them in a manner other than back to front, in the order drawn in code.
To make the soccer ball rotate, you will change the Draw() method to use the signature described above, and pass in values to control the rotation and origin.
To start, add the following three variables at the class level:
float rotation = 0.0f;
Vector2 origin = Vector2.Zero;
float scale = 0.5f;
The rotation variable handles the degrees of rotation for the soccer ball.
In order to rotate the image, you need to know the point you are rotating around, which is stored in the origin variable. This isn't just the rotation point though; origin dictates where to draw the image in relation to the supplied positional coordinates. By default, this is 0,0, which means that the top left corner is drawn at the position you specify. By changing it to the middle of the image, you're drawing the image with an offset. If this seems confusing, wait until you run the code. We haven't changed the position value, but you'll notice the soccer ball is drawn further up and left than before, because of changing the origin.
Lastly, the scale variable dictates the size to render the image in relation to the original size. A value of 1.0 indicates full size, 0.5 is half, etc. The original image was kind of big, so I've scaled it down by half.
With those variables in place, the next step is to add this line of code to your LoadContent() method. Make sure to put it AFTER the line that loads your soccer ball image.
origin = new Vector2(soccerball.Width/2,
soccerball.Height/2);
This code sets the rotation origin to the center of the image, as determined by dividing width and height by two. There are a few different ways to handle setting the origin. You can define it at the class level if you know the specific resolution of the image, but if you prefer to do it programmatically, you need to do it after loading the image, since you won't know the size until then.
To rotate the image, you'll need to add the following code to the Update() method. You can put it before or after the code that moves your text, as long as it's before the call to base.Update().
rotation += (float)gameTime.ElapsedGameTime.TotalSeconds;
float circle = MathHelper.Pi * 2;
rotation = rotation % circle;
Just like with moving the text, you rely on the GameTime class to provide a consistent and smooth animation. A little bit of math to calculate the proper rotation degrees and you're done with the Update() method.
The last thing to do is change one line in the Draw() method. Change the spriteBatch.Draw() method to look like this:
spriteBatch.Draw(soccerball, new Vector2(100,
 100), null, Color.White, rotation, origin,
 scale, SpriteEffects.None, 0.0f);
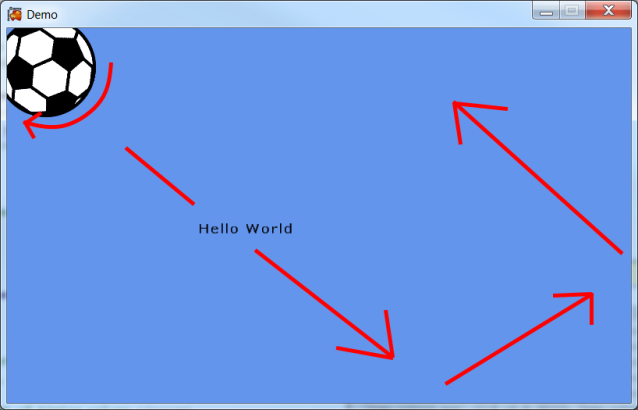
If you run the game at this point, you'll see a rotating soccer ball in the top left corner, and your text slowly gliding across the screen, just like in Figure 7. For a complete listing of how your Game class should look at this point, check out Listing 2.
Listing 2: The Game class, revisited, now with rotating image.
#region Using Statements
using System;
using System.Collections.Generic;
using Microsoft.Xna.Framework;
using Microsoft.Xna.Framework.Content;
using Microsoft.Xna.Framework.Graphics;
using Microsoft.Xna.Framework.Input;
using Microsoft.Xna.Framework.Storage;
using Microsoft.Xna.Framework.GamerServices;
#endregion

namespace Demo
{
    public class Game1 : Game
    {
        GraphicsDeviceManager graphics;
        SpriteBatch spriteBatch;

        SpriteFont sfVerdana14;
        Vector2 textXY = Vector2.Zero;
        Vector2 textSpeed = new Vector2(50.0f, 50.0f);

        Texture2D soccerball;
        float rotation = 0.0f;
        Vector2 origin = Vector2.Zero;
        float scale = 0.5f;

        public Game1()
            : base()
        {
            graphics = new GraphicsDeviceManager(this);
            Content.RootDirectory = "Content";
        }

        protected override void Initialize()
        {
            // TODO: Add your initialization logic here

            base.Initialize();
        }

        protected override void LoadContent()
        {
            spriteBatch = new SpriteBatch(GraphicsDevice);

            // TODO: use this.Content to load your game content here
            sfVerdana14 = this.Content.Load<SpriteFont>
            ("Verdana14");

            soccerball = this.Content.Load<Texture2D>("soccerball");

            origin = new Vector2(soccerball.Width/2,
            soccerball.Height/2);

        }

        protected override void UnloadContent()
        {
            // TODO: Unload any non ContentManager content here
        }

        protected override void Update(GameTime gameTime)
        {
            if (GamePad.GetState(PlayerIndex.One).Buttons.Back
            == ButtonState.Pressed
            || Keyboard.GetState().IsKeyDown(Keys.Escape))
                Exit();

            // TODO: Add your update logic here
            textXY += textSpeed *
            (float)gameTime.ElapsedGameTime.TotalSeconds;

            int MaxX = graphics.GraphicsDevice.Viewport.Width - 120;
            int MinX = 0;
            int MaxY = graphics.GraphicsDevice.Viewport.Height - 15;
            int MinY = 0;

            // Check for bounce.
            if (textXY.X > MaxX)
            {
                textSpeed.X *= -1;
                textXY.X = MaxX;
            }
            else if (textXY.X < MinX)
            {
                textSpeed.X *= -1;
                textXY.X = MinX;
            }

            if (textXY.Y > MaxY)
            {
                textSpeed.Y *= -1;
                textXY.Y = MaxY;
            }
            else if (textXY.Y < MinY)
            {
                textSpeed.Y *= -1;
                textXY.Y = MinY;
            }

            rotation +=
            (float)gameTime.ElapsedGameTime.TotalSeconds;

            float circle = MathHelper.Pi * 2;
            rotation = rotation % circle;

            base.Update(gameTime);
        }

        protected override void Draw(GameTime gameTime)
        {
            GraphicsDevice.Clear(Color.CornflowerBlue);

            // TODO: Add your drawing code here
            spriteBatch.Begin();

            spriteBatch.DrawString(sfVerdana14, "Hello World",
            textXY, Color.Black );

            spriteBatch.Draw(soccerball, new Vector2(50,50), null,
            Color.White, rotation, origin, scale,
            SpriteEffects.None, 0.0f);

            spriteBatch.End();

            base.Draw(gameTime);
        }
    }
}
In the interest of space, I won't go into moving the soccer ball across the screen, but I will tell you it can be done in exactly the same way as moving the “Hello World” text.
In the next section, you'll learn how to check for and respond to input from your players.
Responding to Input
The final thing to cover in this article is what makes the difference between a game, and the world's most boring screensaver: the ability for your player(s) to provide input and see a direct effect in your game.
If you take a look at the first two lines of the Update() method, you'll see that you are already checking for two forms of input: from the Game Controller (via the GamePad class) and the Keyboard (via the Keyboard class).
This piece of code checks to see if the Back button on the game controller being used by player one (there's support for up to four players locally) is pressed:
GamePad.GetState(PlayerIndex.One).Buttons.Back == ButtonState.Pressed
The Buttons collection contains a value for every button, bumper, stick and trigger on the controller. The ButtonState enumeration contains two values: Pressed and Released. Since you can check for either state, per button, this gives you a lot of flexibility.
The following piece of code gets the state of the keyboard to see what, if any, keys are pressed. In this case, you are checking for the Esc key.
Keyboard.GetState().IsKeyDown(Keys.Escape)
The IsKeyDown() function checks the state of whichever member of the Keys enumeration you pass to it. The Keys enumeration contains 160 entries, and includes a number of special function keys to cover most keyboard configurations.
MonoGame supports a variety of inputs in addition to GamePad and Keyboard, including Mouse, Touch, and Gestures. Other forms of non-physical input include GPS data, Accelerometer, Tilt sensor, and Voice.
Not all input types are available on all devices. For example, there is no support for Touch or Mouse on the Xbox 360, and most phones don't support the GamePad. Your PC probably has Mouse support, but not necessarily Touch.
Wrapping Up
With this, you now have enough to get started with MonoGame. You've learned what you need to get, where to find it, how to set up, and you've stuck your toe in the code enough to put some text and images on screen, and read a little player input.
All that's left is the game idea, and I bet you already have a million of those. If you don't, here are some suggestions for additional learning opportunities.
Next Steps
A lot of people try to go a little too big on their first game project. There are a lot of unfinished MMORPG (Massively Multiplayer Online Role-Playing Game) projects, and half-baked FPS (First Person Shooter) games because people tried to tackle more than they could handle and got burned out or frustrated and gave up. Start small. Seriously.
Tetris clones are a great way to learn the basic fundamentals of moving (and rotating) static, grid-based objects across the screen, and also covers basic collision detection and player input.
Tower Defense games cover things like basic pathfinding AI, shooting trajectories, simple animation, and unit placement via touch or click.
Space Shooter games like Galaxian, Galaga, Zaxxon, and even Space Invaders teach about patterns, speed of movement, scrolling backgrounds and more.
These are just some of the more simple ones, but even these have a lot more hidden complexity to them than you realize until you try to build one. Just imagine what goes into building the next World of Warcraft clone. The message here is that there's a lot to learn from the classics. Don't be too proud to take a look at what others have done before you and learn from it.
Also, keep in mind that any of the tutorials and starter kits written for XNA should work with little or no modification in MonoGame. There's a wealth of information out there just waiting for you to tap into it.
Table 1: MonoGame Supported Platforms
| Platform | Additional Information |
| Windows XP, 7, and 8 | MonoGame comes with templates for these OSs. You're all set. |
| Windows GL | This project type is for people who prefer OpenGL over DirectX |
| Linux | www.github.com/mono/MonoGame/wiki/Tutorials: Getting-Started-on-Linux |
| Mac OS | requires Mac Developer Program account https://developer.apple.com/programs/ |
| PlayStation 4 | requires acceptance in Sony Dev program www.us.playstation.com/develop/ |
| PlayStation Mobile | requires acceptance in Sony Dev program (bad link removed) |
| OUYA | www.devs.ouya.tv/developers/docs/mono-game |
| Android | www.gamasutra.com/blogs/MattHughson/20140428/216416/XNA_to_MonoGameAndroid__Porting_Primer.php |
| Windows Phone 8 | www.developer.nokia.com/community/wiki/XNA_Games_On_Windows_Phone_8_with_Monogame |
| iOS (iPhone / iPad) | requires iOS Developer Program account www.developer.apple.com/programs/ios/ |
Table 2: Frame Rates by Platform
| Platform | Target Frames Per Second |
| Windows PC/Linux/Mac | 60 |
| Xbox 360 | 60 |
| Android Phone | 30 |
| iPhone/iPad | 30 |
| Windows Phone | 30 |
