


JavaScript is more important than ever for building highly interactive Web applications. Libraries and frameworks, such as Backbone.js, Marionette.js, Ember.js, and Angular.js are popping up and growing quickly in both popularity and features. These libraries and frameworks make it easier to build very complex and powerful applications in a browser. They help usher in a new era of Single Page Applications (SPAs), creating an unprecedented level of interactivity and usefulness on the Web.
But not every Web app or every page on a site needs to be built with a SPA framework in order to be interactive. A lot of applications are better suited to a smaller scale of functionality. For these pages, there is a need for a high level of interactivity without the need for client-side routing and other SPA features. With a reduction in functional requirements for smaller pages, there is also a reduction in the list of appropriate frameworks and libraries for building the page. You don't need a complete MVC framework just to add form validation, for example. Many developers choose to write code with nothing more than jQuery when they don't need a complete SPA framework, and with good reason. The interactivity provided by jQuery can be easily augmented with plug-ins and add-ons to create further interactions.
One of the difficulties in building large jQuery applications is keeping code organized. It is very easy to get lost in a Christmas tree of doom – a deeply nested list of callback functions that seems to hold every single feature and interaction. The truth is that jQuery does not provide any guidance on organization or structure for code.
The good news is that you don't have to choose exclusively between jQuery and well-structured code that SPA libraries and frameworks help you to write. You can combine the simplicity and interactivity of jQuery-based applications with the building blocks of good structure from Backbone.js to create highly interactive pages that also have good code organization and structure.
What is Backbone.js?
Backbone.js is a library of components that helps developers add structure to JavaScript code in Web applications. From BackboneJS.org:
“Backbone.js gives structure to Web applications by providing models with key-value binding and custom events, collections with a rich API of enumerable functions, views with declarative event handling, and then connects it all to your existing API over a RESTful JSON interface.”
Backbone.js includes a handful of building blocks that provide a distinct set of features, including:
- Model: An object with attributes comprised of key-value pairs. Models encapsulate the data and associated behavior of data within an application.
- Collection: A collection of models. Collections allow groups of related models to be held together and managed as a whole. Common collection features such as adding and removing, iteration, filtering are provided.
- View: A generalized collection of methods and the configuration for managing and manipulating the DOM, and for displaying data from Models and Collections. Views provide a well structured approach to using jQuery's DOM events, they allow easy rendering of HTML templates, and more.
- Events: A minimal yet robust implementation of the observer design pattern for JavaScript objects. Events glue Backbone.js applications together. Every object in Backbone.js includes the Events system, allowing every Backbone.js object to trigger events and handle them.
- Router and History: A set of objects that manage the browser's history with URL hash fragments or HTML5's pushState technology. Routers and the History object allow an application state to be bookmarked or linked, reloading the page to exactly the place where it was left.
There are other small parts of Backbone.js, still, that become important to understand if and when they need to be customized. For a high level overview and for most applications, though, these six objects are the most important.
Looking beyond the individual pieces of Backbone.js, there is some debate about what to call it from an architecture and patterns perspective. Backbone.js fits within the Model-View-MV family of patterns quite clearly. It provides a set of objects that help to organize models and views, after all. But it doesn't quite fit into an MVC pattern, or MVVM pattern, or MVP, or anything else. It's easiest to call Backbone.js a member of the MV* family. Beyond this, it doesn't make much difference what people call it.
Building a Contact List
Dozens of application types require the storage and retrieval of contact information for other people, such as a CRM system, a time tracking app, accounting, or any of a number of other things. And although a contact app may not have the most exciting feature set ever, it provides a great example of an app that could use a high level of interactivity, but doesn't need to be a SPA.
A simple contact list only needs a handful of features:
- List of contacts
- Add a contact
- Edit a contact
- Delete a contact
- Contact data
It also needs data for to go with these features, including:
- Name
- Photo URL
- Email address
- Phone Number
- Notes
A simple contact list used in learning the basics of Backbone.js only needs to handle a single email address and phone number. You would want to allow multiple phone numbers and email addresses in a real application, but Backbone.js doesn't have nested or hierarchical models built into it. This makes it slightly more challenging to handle multiple values or nested objects and collections, although it's not difficult to add this functionality with a plug-in. A single email address and phone number will suffice for this application.
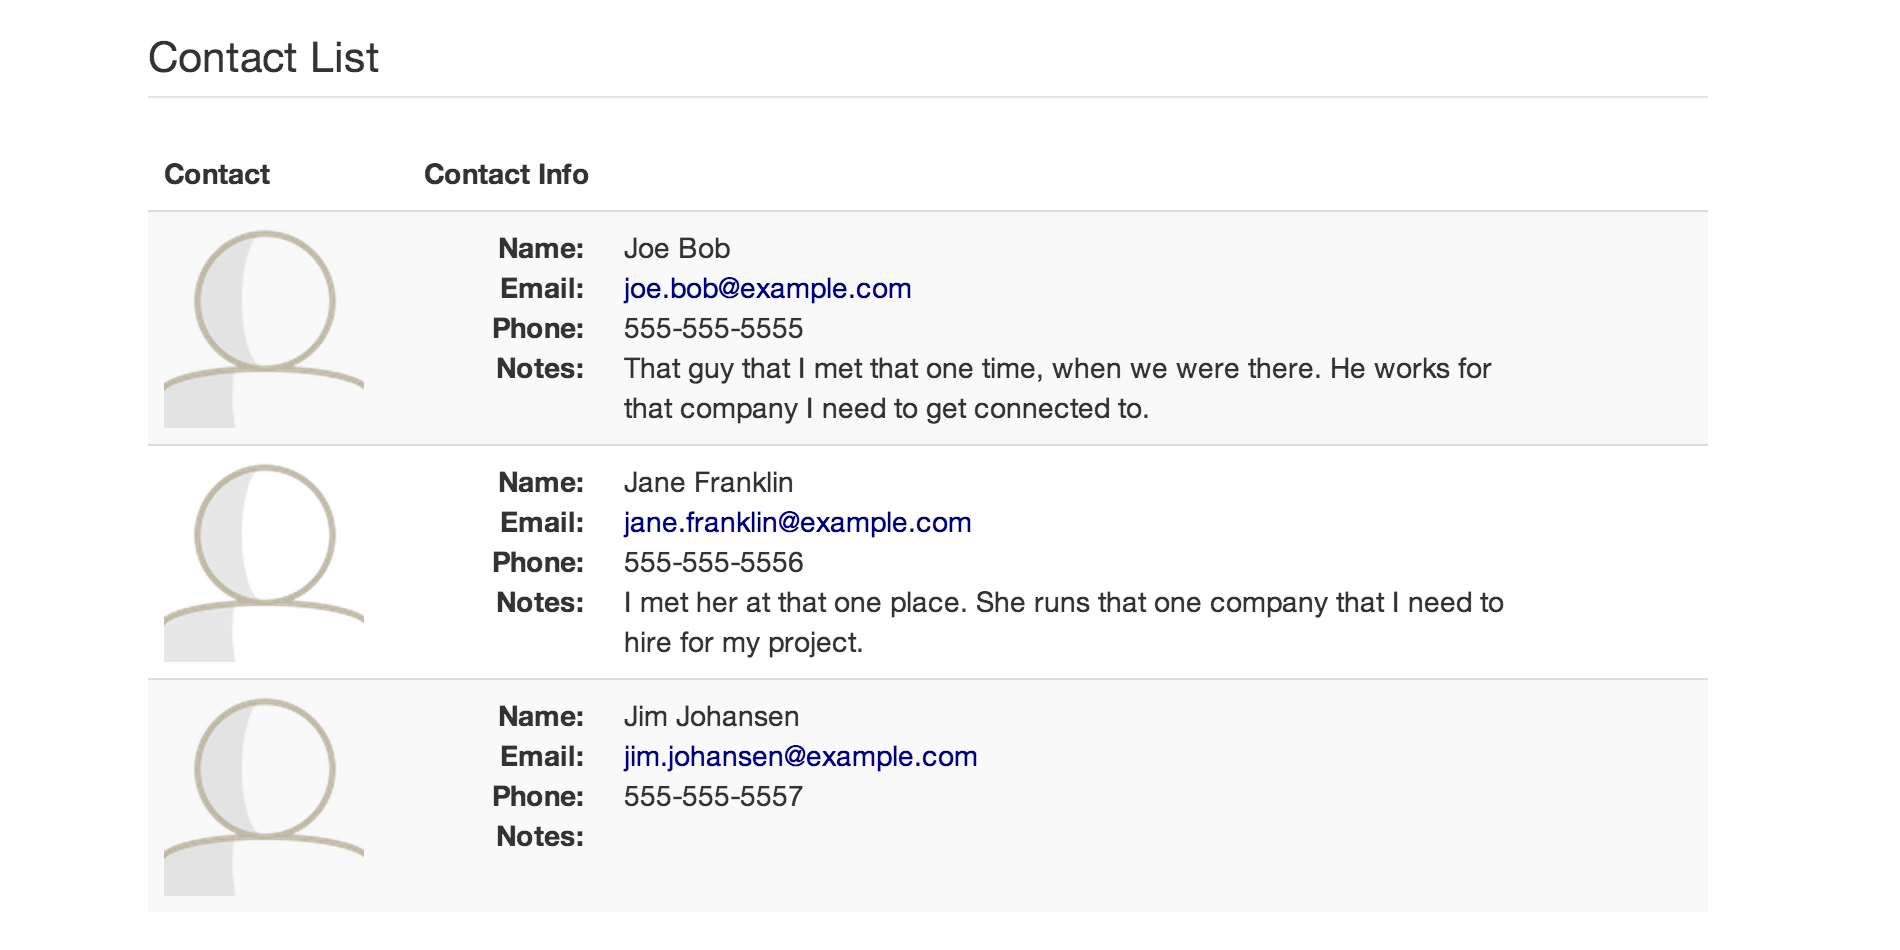
The layout for this application can be simple, as shown in Figure 1 and Figure 2. It only needs a list view and a single form to add and edit a contact.
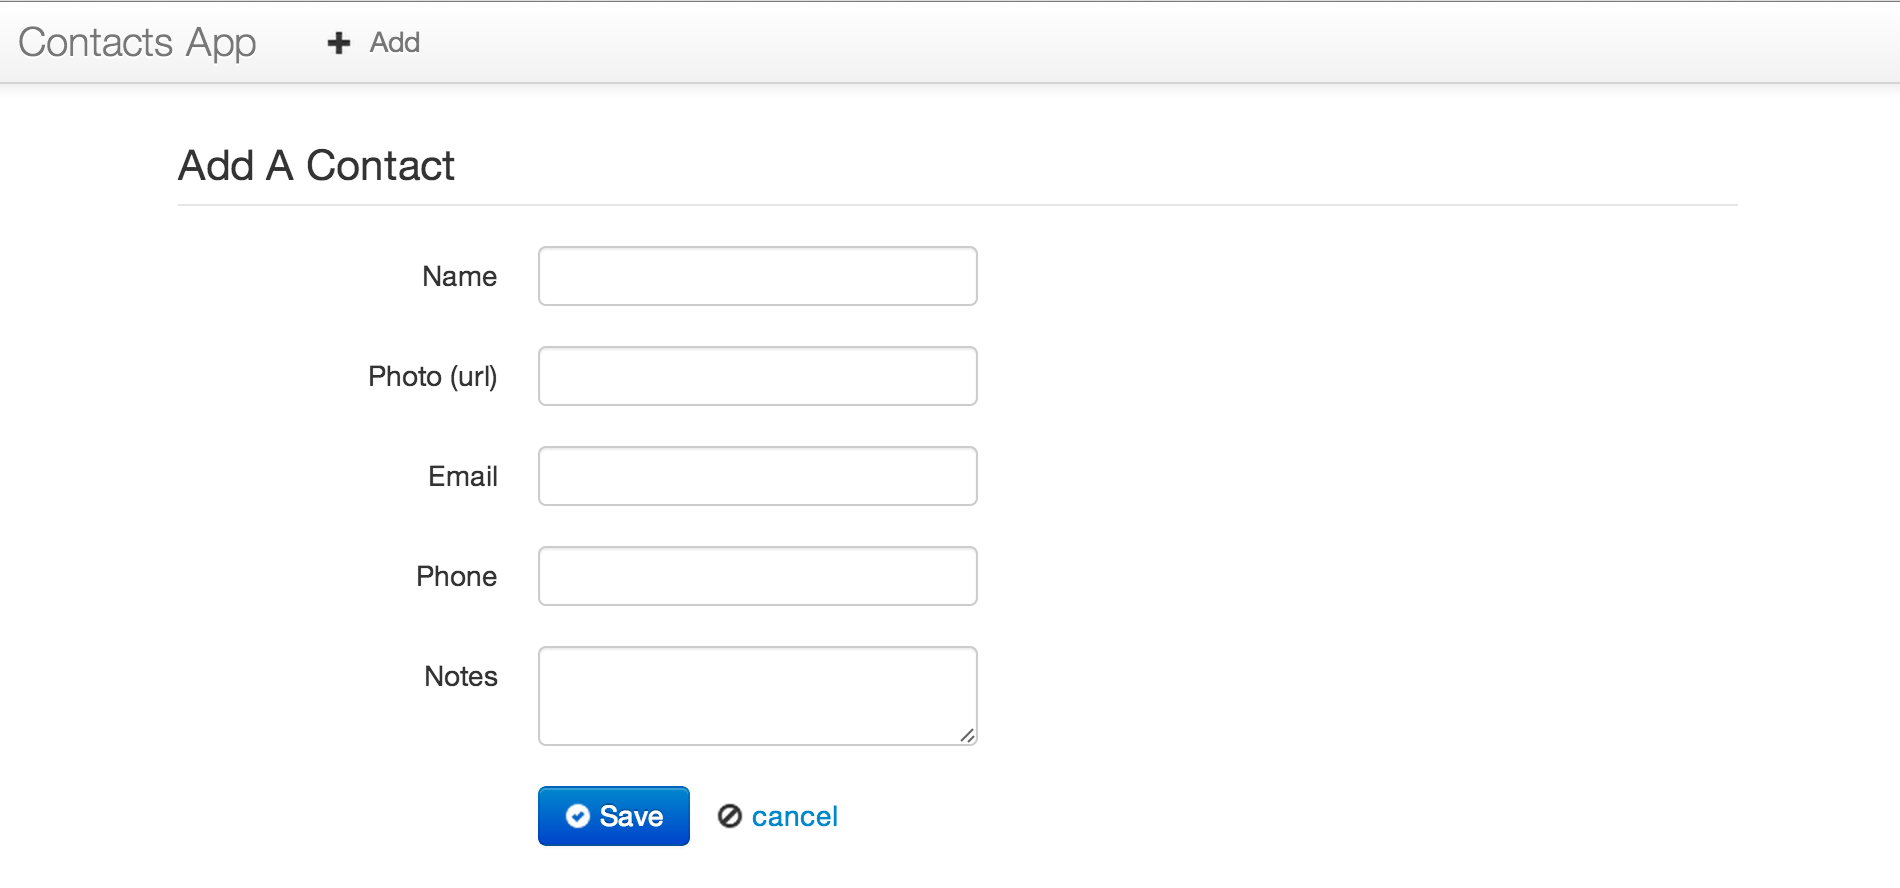
When you click the Add button, the form displays, allowing you to add a new contact. Clicking save sends the contact to the server. Clicking cancel clears the form and hides it again.
From the list of contacts, clicking the Edit button shows the same form as the Add process, but populates the form with existing contact information. Clicking save sends any edits that were made back to the server. Saving also updates the contact list with the latest information. Canceling discards any changes that were made and does not update the list.
An API Server
Backbone.js works best with servers that provide a REST-like API for data. This is easy to set up in most programming languages, include Ruby on Rails, NodeJS, ASP.NET MVC (with WebAPI), Python's Django, various PHP frameworks, and more. The important aspect is not the technology stack that the server uses. Rather, the emphasis is on the REST-like API that is provided for the various resources.
Backbone.js was developed in a Rails world and expects the API it communicates with to look like a Rails-generated API. Any resource that a Backbone.js app works with should have an API on the Web server that accepts and returns JSON, and conforms to the Rails URL and HTTP verb conventions.
In the case of a contact list, the API might look like this:
- GET /contacts: Return all contacts
- POST /contacts: Create a new contact using the data from the form, posting it as a JSON document.
- GET /contacts/:id: Get the contact specified by the :id parameter
- PUT /contacts/:id: Update an existing contact using form data that was posted as a JSON document. The contact to update is identified by the :id parameter
- DELETE /contacts/:id: Delete the contact specified by the :id parameter
The contact application built in this article is technology and server framework agnostic, as long as the server conforms to this basic API structure. How you implement the server stack is entirely up to you.
The Add Form
The first thing that needs to happen in the JavaScript for this app, is to handle the Add button click. Add a standard jQuery DOMReady callback function to ensure that the DOM is ready and available. Then, inside of the DOMReady callback function, add a jQuery selector that finds the #add element and listens to the click event. Call preventDefault on the event args to make sure the button click doesn't post back to the server.
$(function(){

    $("#add").click(function(e){
        e.preventDefault();
        showAddForm();
    });

    // other code will go here ...

});
Within the event's callback function, a call to showAddForm is made, to show the add form. This function finds the #add-edit-form element and shows it using an animation.
function showAddForm(){
    var form = $("#add-edit-form");
    form.slideDown();
}
Next, add an event handler for the click event of a #save button. This button exists within the #add-edit-form, but it can also be selected by ID, directly. Within this click handler, grab all of the data from the form input elements and post it to the server to create a new contact. When this is done, update the list of contacts with the new contact information, as shown in Listing 1.
Listing 1: Click the save button and post the data to the server.
$("#save").click(function(e){
    var formData = {
        name: $("#name").val(),
        photo: $("#photo").val(),
        email: $("#email").val(),
        phone: $("#phone").val(),
        notes: $("#notes").val()
    };

    $.ajax({
        url: "/contacts",
        type: "POST",
        dataType: "JSON",
        data: formData,
        success: function(){
            updateList(formData);
            clearForm();
        }
    });
});

function updateList(contact){
    // add the contact to the list
}

function clearForm(){
    // clear the form so another contact can be added
}
When the POST back to the server succeeds, it calls the updateList and clearForm functions, which do what you expect (the code for these has been omitted, for brevity).
Without completing the functionality for this simple application, you can see that the code is quickly turning into a mash of functions hanging out in the middle of nowhere. This style of loosely structured code is fairly typical for small pages with jQuery. Nearly every JavaScript and jQuery developer has written similar code, and this style will continue to be popular as it gets the job done for small tasks.
It is possible to write well-structured jQuery code, even if you aren't using a framework or library to provide that structure, of course. That tends to lead to re-inventing things when you should be focused on getting things done. Instead of spending time on building underlying structure, use the models, collections, views, and other types that Backbone.js provides and migrate your application in to a better structure, one step at a time.
From jQuery to Backbone.js: A Migration
It's tempting to jump straight in to Backbone.js at this point, but that would be a disservice to most developers. Starting from scratch is easy. The real challenge lies in taking existing code and migrating it to something else.
Taking a migration approach to Backbone.js does two things:
- Shows that Backbone.js can be added to existing projects, without an all-or-nothing re-write
- Shows the similarities and differences between writing jQuery on its own and using Backbone.js to structure jQuery
The Add form that was built with plain jQuery code will be migrated to Backbone.js, one step at a time. Before that can happen, though, you'll need to configure Backbone.js in your project.
Setting up Backbone
Backbone.js technically only has one hard dependency: Underscore.js. Underscore.js is like Batman's utility belt: an indispensable collection of tools, utilities, and toys that make JavaScript easier to work with. It brings many features of other languages, and some features from future versions of JavaScript, into existing browsers. Underscore.js, like Backbone.js, was created by Jeremy Ashkenas, and is maintained in the DocumentCloud organization on GitHub.
If you want to use Backbone.View to organize your DOM manipulation and interaction code, though, you also need a DOM manipulation library; jQuery is the natural (and most popular) choice in this case.
Lastly, Backbone.js works with a JavaScript document format called JSON. All browsers support the JSON format natively these days. If you need to support older or specialized browsers that don't support JSON directly, you will need to include the JSON2.js library from Douglas Crockford, the creator of the JSON standard.
With all of these files downloaded into a /js folder in your project, the script tag references in your HTML will look like this:
<script src="/js/json2.js"></script>
<script src="/js/jquery.js"></script>
<script src="/js/underscore.js"></script>
<script src="/js/backbone.js"></script>
Note that the order is somewhat important. Backbone.js must be listed after jQuery and Underscore.js. If you don't get at least this part right, Backbone.js won't work properly.
Once you have Backbone.js' needed files in your project and referenced in your HTML, you can get started with the migration.
Backbone.View and the Add Form
Backbone.View is the easiest way to introduce Backbone.js into an existing application. At its heart, a Backbone.View is nothing more than a few simple conventions for organizing jQuery code. Of course it allows for much more than just that, but starting with jQuery code organization makes it easy to get going.
Getting started with nearly anything in Backbone.js requires a call to extend the base type that you want to work with. If you're familiar with Java, this method name should sound familiar. If you're familiar with C#, this is the equivalent of ":" with a base class. The extend method in Backbone.js is how inheritance is done.
var AddForm = Backbone.View.extend({
    // add configuration, methods and behavior here
});
By extending from a base Backbone.js type, you can create your own specialized types that do the things you need in your application. In this case, you're creating a new View type called AddForm. This represents and works with the DOM elements for the #addform, which is the same form element that was previously manipulated by raw jQuery.
Within the { and } of this view definition, you can add your view's specific configuration, methods, and behavior. There are a number of configuration options and methods that Backbone.View recognizes and uses on your behalf. However, most of the code you write will be of your own design.
Rendering the #addform Input Fields
The most common function to add to a Backbone.View is a render function. The base Backbone.View has this method built into it, but it doesn't do anything more than return the View instance. It is effectively a no-operation method. This core method exists so that any application or framework can call a render method on a View instance.
Add a render method to your AddForm by declaring the method name with a “:” separating the name from the function. This is JavaScript's object literal syntax, and it's the syntax used to define Backbone.js types.
var AddForm = Backbone.View.extend({

    render: function(){
        var rawTemplate = $("#add-form-template").html();
        var compiledTemplate = _.template(rawTemplate);
        var renderedTemplate = compiledTemplate();
        this.$el.html(renderedTemplate);
        return this;
    }

});
There are only five lines of code in this view, but each of them is significant.
The first line loads the HTML contents of a DOM element into a variable called rawTemplate. This is an HTML template in the same sense as a server-side HTML template. It is a collection of HTML tags, with or without special markup for data and behavior, that can be used to generate raw HTML. You'll be adding this template to your HTML page in a moment.
The second line compiles the template in to a JavaScript function. In this case, Underscore.js is used as the template engine because Backbone.js relies on Underscore.js so it is already available in your application. Calling the _template method and passing in the raw template HTML compiles the HTML to a function. This function is then ready to produce the final HTML output from the template.
The third line executes the compiled template and produces HTML output from the template. In this case, the method is called with no parameters. If data is needed in the template, though, a JavaScript object can be passed in. The names and values of the attributes on that object are used to populate the template. You'll see this later on.
The fourth line takes the rendered HTML and stuffs it into the view through the $el attribute of the view. The $el attribute is a jQuery selector object that represents the DOM element that this view instance manages. Every view instance has a $el attribute and by default, it's a <div> element (although this can easily be changed). When working with a view instance, all DOM manipulation happens through the view's $el - including reading data, writing data to the DOM, updating CSS classes, animations, and any other work you would do with jQuery. The view is effectively an encapsulation of behavior for a given DOM element and its child elements.
The last line of this method returns the view instance. This allows you to chain methods and attribute access into a single line after rendering the view.
A Template to Render
In the render method for the AddForm, an HTML template was referenced using a jQuery selector. The contents of the #add-form-template DOM element were then extracted and run through Underscore.js' template method. For this to work, you will need a DOM element with the right ID and contents. But you don't want that DOM element to show on the page. You only want it available for rendering as a template. There are several ways to do this, the simplest of which may not be obvious: using a <script> tag.
Add a <script> tag to your HTML page and set the ID of the tag to add-form-template. Normally, when your browser sees a script tag, it tries to interpret the tag as JavaScript. This is not what you want, as the template you are creating doesn't contain executable script. Instead, it contains an HTML template. To prevent the browser from trying to execute the script, add a type attribute to the tag and set it to anything other than javascript or any other type that your browser may recognize. The most common type to use is text/html-template or something similar.
<script id="add-form-template" type="text/html-template">
</script>
The actual type doesn't matter that much as long as it is set to something that the browser doesn't recognize. It's good practice to set the type so another developer can recognize it as a template, though.
A <script> tag is used for two reasons:
- The HTML spec does not (yet) have a
<template>tag - The HTML template is hidden from view, but is still available for use
The goal of using a <script> tag for a template is found in the second reason. You want the HTML template to be available from your JavaScript code, but you don't want the un-rendered template to show up in the visual portion of the browser where a user would see it. Using a script tag with a custom attribute satisfies both of these needs. Script tags are never shown to the user, but supplying an ID makes it selectable from jQuery. The added need to supply a type is a side effect of using a script tag for another purpose, but this is an acceptable (and insignificant) cost.
Fill in the template with standard HTML markup, to create the inputs that are needed for adding a contact.
<script id="add-form-template" type="text/html">
    <label>Name: </label>
    <input type="text" id="name"><br>
    <label>Photo URL: </label>
    <input type="text" id="url"><br>
    <label>Email: </label>
    <input type="text" id="email"><br>
    <label>Phone: </label>
    <input type="text" id="phone"><br>
    <label>Notes: </label>
    <input type="text" id="notes"><br>
    <button id="save">Save</button>
</script>
With both the template and the AddForm view in place, it's time to render the form and stuff it into the DOM so that users can add images.
Viewing the View
Having a view definition is great, but it doesn't do much good until it's instantiated, rendered, and placed in to the DOM where users can see the content and interact with it.
Like other JavaScript objects, Java, C#, and other languages, Backbone.js objects are instantiated with the new keyword. Assign the new object instance to a named variable and you'll be able to call methods on the view as need, like this.
var addForm = new AddForm();
With a view instance in hand, you can call its render method to render the HTML template in to the view itself.
addForm.render();
If you look back to the last line of code in the render method, you'll remember that this method does not return HTML. Rather, it returns the view itself. The rendered HTML is placed inside of the view's $el, which is the DOM element that the view manages. This attribute is made available directly on the view instance, and it's what you will use to get the view's HTML into the DOM.
In the HTML page, add a div tag with an ID of main:
<div id="main"></div>
Back in the JavaScript code, select this element with jQuery immediately after rendering the view. Then take the view's $el and stuff it into the div.
var addForm = new AddForm();
addForm.render();

$("#main").html(addForm.$el);
This code replaces the contents of the showAddForm function from the jQuery code with which the app started.
function showAddForm(){
    var addForm = new AddForm();
    addForm.render();

    $("#main").html(addForm.$el);
}
Having done this, you'll see a form as shown in Figure 3.
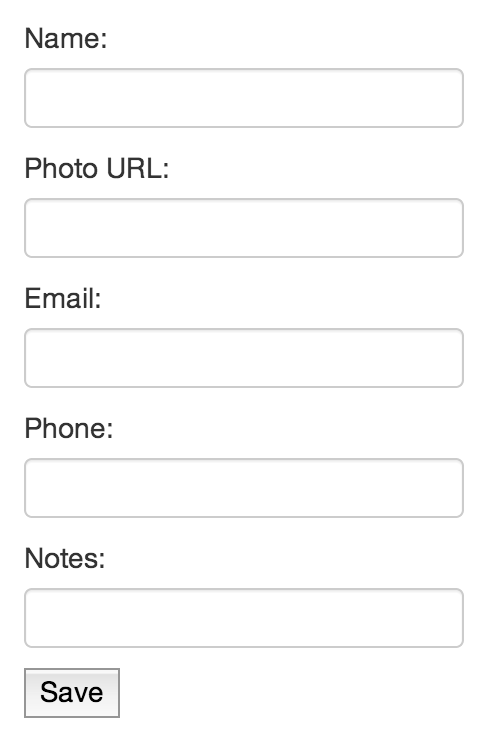
With that, the first bits of Backbone.js have been integrated in to the jQuery application. At this point, though, the only functionality from Backbone.js is to render and show the view. The next step will be to take the old #save click handler and move that into two parts: the event handler in the view and the code to save the contact in a Backbone.Model.
DOM Events and Backbone.View
To get the form data back to your server, from the form that the View rendered, you need to do three things:
- Handle the Save button click.
- Get the data from the form inputs in a manner that is easy to send to the server.
- Send it to the server and handle any response needed.
Handling the Button Click Event
The first step is to get the data from the form input, which is handled with the declarative events in the Backbone.View definition. The events configuration is a simple wrapper around jQuery's event setup using the .on function to create the needed event handlers. This means that you can use any valid jQuery event and any valid jQuery selector to define your View events. In this case, you'll only need to pay attention to the Save button. The button's click can be configured in the view itself, like this:
var AddForm = Backbone.View.extend({

    // configure the DOM events
    events: {
        "click #save": "saveClicked"
    },

    // handle the "click" of the "#save" button
    saveClicked: function(e){
    }

});
There are several things to note, here.
The events configuration is an object literal with an event declaration on the left and the method name on the right.
The event declaration includes the name of the event to handle and is optionally followed by a jQuery selector. When specifying a selector for the event handler, it's important to know that the handler is scoped within the view instance's DOM element: the $el of the View. You cannot select an element outside of this view instance, even if you specify a CSS ID.
The right-hand side of the event configuration contains the name of the callback method to use when the event is triggered. The name must be a valid method name on the view instance or prototype. Since this view has a saveClicked method defined in the event handler, a saveClicked method is added to the view definition.
The saveClicked method handles the actual event. It receives http://api.jquery.com/category/events/ for the event that you bound the handler to. This function contains the code to handle the click and responds accordingly.
Retrieving the data that a user has input into the form is as easy as running a jQuery selector to get the .val(). In fact, that's exactly what you do, with one difference.
The jQuery code for retrieving the name from the form was shown earlier:
$("#name").val()
This works in the current Backbone.View. In an application as simple as this one, using a CSS ID (which is supposed to be unique throughout the entire DOM), there's little chance of this not find the value that you expect. But this presents a problem in other common scenarios. Say the input is using a name attribute instead of an id:
<input name="name">
A selector for that input may look like this:
$("input[name='name']").val()
If there is more than one element in the DOM with a name of name, it returns multiple DOM items and possibly gives you the wrong value. Backbone.View solves this problem with one very small addition to the selector syntax:
this.$("input[name='name']").val()
Did you notice the difference? It's the addition of this. in front of the selector. This one little change does something very important for the Backbone.View: It limits the scope of the selector to the View's $el in the same way as the events configuration has been limited in scope.
By using this.$ instead of just $ to run a jQuery selector, you are guaranteed to get a result (or no result, if none is found) from the View instance and nowhere else on the screen. If you have 10 different forms on the screen, and each of them has an input element that matches this selector, this view instance only returns the data for the one that it controls. This assumes that the view's $el only contains one element matching this selector. If the view's $el contains more than one, all of them will be returned.
Given the use of this.$(...) as a selector within a view, it is easy to build a simple object literal that contains the data from the form.
saveClicked: function(e){
    // stop the browser from submitting the form
    e.preventDefault();

    // store the data in an object
    var formData = {
        name: this.$("#name").val(),
        url: this.$("#url").val(),
        email: this.$("#email").val(),
        phone: this.$("#phone").val(),
        notes: this.$("#notes").val(),
    };

    // ... do something with the data
}
There isn't anything particularly noteworthy in this code. You're merely preventing the browser from submitting the form by itself and then gathering the data in to an object literal. From here, you'll need to do something with the data, such as sending it to a server for storage in a database of some sort, and displaying the new contact in the app's contact list.
Saving Data with Backbone.js' Model
In the original jQuery version of this code, the data was pushed to the server using a jQuery ajax call (documented at https://api.jquery.com/jQuery.ajax/). The Backbone.js version of this code effectively does the same thing. But instead of calling $.ajax directly, it's wrapped in a Backbone.Model.
A Backbone.Model is a representation of your application's models or entities in the browser. It is a data structure that contains at least a minimal amount of behavior for loading, modifying, saving, and deleting data using an API on your server.
A Model is defined very similarly to a View. You start by extending a Backbone.Model and assign the result to a variable. This creates a new object type that can be instantiated as needed, with each instance containing its own data. A Backbone.Model instance is often correlated to a server-side model or database record, although this isn't always the case.
Define a Contact Model
Next, you need to create a Contact model for this application to use, passing an object literal into the extend method:
var Contact = Backbone.Model.extend({});
Within the Model declaration, options and other configuration can be provided. For instance, add a urlRoot attribute to the model definition and set it to /contacts.
var Contact = Backbone.Model.extend({
    urlRoot: "/contacts"
});
Backbone.Model implements a pattern called Active Record (not to be confused with Ruby on Rails' ActiveRecord or ActiveModel). This pattern says that an entity or model should know about its state, relative to the data store. In the case of a Backbone.Model, the data store is the server's API. The urlRoot attribute tells the Model what end point on the server's API to use, allowing the model to perform its own persistence operations.
Save the New Contact
Back in the add form's saveClicked method, create a new instance of a Contact model. Then call the .save method on the model, and pass the formData to this method as the first parameter. The save method also takes in a second parameter of an object literal. This parameter can contain any needed configuration for the save method, including callbacks for the jQuery .ajax call.
js
saveClicked: function(e){
    // ...

    // create a new contact and save it
    // using the form data
    var contact = new Contact();
    contact.save(formData, {

        // wait for a response from the server
        wait: true,

        // when the save is successful,
        // update the list of contacts
        // and clear the form
        success: function(contact){
            updateList(contact);
            clearForm();
        }

    });
}
With the urlRoot set to “/contacts”, a new model will be saved to the server's API at this endpoint. The model instance knows that it is a new model because there is no .id on the model or in the data. It performs and HTTP “POST” of the data back to the server, the same way that the original jQuery AJAX call for this app did. It also uses the provided options for the AJAX call and other behavior changes.
The wait option tells Backbone.js to wait for the server to respond before moving on. By default, this parameter is false. That means a call to .save will fire the success callback immediately, and will ignore the server response entirely.
The success callback is very similar to the previous use of the jQuery AJAX success callback. The one major difference is that the first parameter is not a raw object literal of data returned from the server. Instead, it is the model instance.
From here, the updateList function needs to be updated to work with a Backbone.Model instead of a raw object literal. To make this easier, a Backbone.Collection will be introduced for managing the list of Contact objects.
A List of Things with Backbone.Collection
A Backbone.Collection is a collection like you would expect in most other languages and frameworks. You can add and remove items, sort them, find a specific sub-set that match criteria, iterate through the items, and more. In Backbone, a Collection is specifically a collection of Model instances, and instances of the same type. By default, those instances are just Backbone.Model instances directly. But a Collection can be told to work with a specific type of model, easily.
Collections also provide some convenience features for loading and working with Models, through the server API. You can load an entire collection, for example, with one method call. There are easy ways to save an entire collection, as well, though this is not built in to Collections at the time of writing this.
Define a Collection of Contacts
Since you already have a Contact, and you now need to manage list of contacts, create a collection called ContactCollection and configure it to use the Contact model like this:
var ContactCollection = Backbone.Collection.extend({
    urlRoot: "/contacts",
    model: Contact
});
Now you can create an instance of this custom Collection, and add/remove and do other things with the Contact instances inside of it.
Notice the same pattern for creating this type, as with View and Model: calling the .extend method on the base type and passing an object literal with configuration for the type.
Specifying a model: attribute on the configuration tells the Collection instances what type of Model it will be working with. Any time you add a model or fetch model from a server, it is converted to this type, if it is not this type already.
Rendering a List of Contacts
Before you update the list of contacts with the one that was just added, it would be good to have the list rendered in the browser. That way, when you add a new contact, you'll see it right away. For this, you'll need a ContactListView. It will have a similar rendermethod as the AddForm, but the rendering will be done in a loop - once for each model in the collection that the view references.
<script type="text/template" id="contact-list-template">
    <li>
        <a href="mailto:<%= email %>"><%= name %></a><br>
        <a href="<%= url %>"><%= url %></a><br>
        Phone: <%= phone %><br>
        Notes:<br>
        <%= notes %>
    </li>
</script>
Listing 2 shows the complete ContactListView. Note that this view did not extend from a special or different view type. It extended from Backbone.View, the same as the AddForm. This is the base view type that all views in a Backbone.js application extend from, no matter their purpose and use.
Listing 2: Define a view to list contacts.
var ContactListView = Backbone.View.extend({
    template: "#contact-list-template",

    // tell this view it is rendering a list
    tagName: "ul",

    // render the list of contacts by iterating
    // over the view's collection, and rendering
    // for each of the models in the collection.
    // add the results to an array and stuff the
    // array in to the view's $el when it's done.
    render: function(){
        var results = [];

        var compiledTemplate = _.template(this.template);

        this.collection.each(function(contact){
            var html = compiledTemplate(contact.toJSON());
            results.push(html);
        });

        this.$el.html(results);

        return this;
    }

});
Second, there is a new option in this view, tagName. When a Backbone.View is instantiated, it creates a wrapper DOM element that it immediately places into the view's $el. This is how the view always has a DOM element to work with, even before the view has been rendered. By default, the DOM element it creates is a <div>. This can be changed to any tag name you want, though, by specifying the tagName attribute on the view. In this case, the view is rendering a list of Contacts, so it makes sense that it would render using a ul for a list.
The majority of the code is the same as rendering the AddForm. The one major difference is that the template rendering has been placed into an iterator on the view's collection. Instead of re-compiling the template in every iteration, the template is compiled once at the beginning of the method. Then the pre-compiled template is executed with the data for each of the contacts.
After each contact is rendered, the results are pushed into an Array. Once the rendering of each item is complete, the results are placed in the $el of the view instance. jQuery is smart enough to recognize the array, and appends all of the HTML appropriately.
Using the ContactListView
The ContactListView is used the same as the AddForm. You create an instance, passing any needed options to it, and then render it. Once it is rendered, you place the view's $el in the DOM so it is visible.
Since the ContactListView is supposed to display Contacts, and since it expects to have a collection attached to it, you'll want to pass a ContactCollection instance to the view instance.
For demonstration purposes, pre-populate the ContactCollection instance with some sample data, hard coded into the constructor of the collection, as shown in Listing 3.
Listing 3: Showing The Contact List View
var contacts = new ContactCollection([
    {
        id: 1,
        name: "Derick Bailey",
        email: "derick@example.com",
        url: "http://mutedsolutions.com",
        notes: "just some guy"
    }, {
        id: 2,
        name: "Ian Bailey",
        email: "ian@example.com",
        url: "",
        notes: "the most awesome little man, ever"
    }, {
        id: 3,
        name: "Ashelia Bailey",
        email: "ashe@example.com",
        url: "http://example.com/ashe",
        notes: "the best ballerina in the universe"
    }
]);

var contactList = new ContactListView({
    collection: contacts
});

$("#contact-list").html(contactList.render().$el);
Note that when you created the ContactCollection instance, you passed in an array literal, with three separate objects in the array. Each of the objects contains the data for a Contact, with an id, name, etc. The three objects in the array are parsed and processed in to Contact instances, creating a ContactCollection instance that has three Contacts.
The contacts collection is passed to the view, using the collection attribute on the constructor parameters. Like a Model, the View will recognize the presence of a Collection and appropriately attach it to the view for use. This collection is used in the view's render method to produce the desired list.
When the ContactListView instance is rendered, it produces a <ul> with three individual <li> items - one for each contact in the list.
After rendering, the view's $el is stuffed in to the #contact-list element in the DOM, showing the list to the user.
Responding to New Contacts
The last thing you need to do with the ContactListView is handle adding a new Contact to the collection. This is done with event bindings from the collection itself, within the view. There is no simple event configuration object for this, though. The event handlers must be added in the view's initialize method - the method that executes just after the object has been constructed - as shown in Listing 4.
Listing 4: Show the contact when a new one is added
var ContactListView = Backbone.View.extend({

    // the initialize method executes just
    // after the view is instantiated
    initialize: function(){
        this.listenTo(this.collection, "add", this.contactAdded);
    },

    // handle a contact being added
    contactAdded: function(contact){
        this.render();
    },

    // ... existing methods and config
});
The .listenTo method is one of two ways to bind an event from a Backbone.js object. The other option is the .on method, which may be more familiar. The difference is in how the relationship between the event triggering object and the event subscribing object is handled. With the tendency for Views to be quick lived - that is, for them to be created, shown and destroyed - in comparison to models, it is generally better to use the .listenTo method within a View. By using .listenTo, the View itself cleans up the event handler when the view is shut down.
In the initialize method, the “add” event from the collection is handled, setting up the view's contactAdded method as a callback. Any time a new model is added to the collection that was passed to the view, the “add” event triggers. If a ContactListView instance is around when this happens, the contactAdded method will handle the event, and re-render the list.
With the ContactCollection and ContactListView in place, you can get back to the workflow of adding a Contact to the application, and updating the list.
Updating the Contact List on Add
Look back at the success callback from the AddForm's call to save a new contact. In this method, a call to an updateList method is made. Previously, this method took the data from the form and added it to the DOM manually. With the ContactCollection and ContactListView in place, though, this code is no longer necessary. Rather than manually passing the new model around, all that needs to happen is for the contact to be added to the collection.
The easiest way to make this happen is to delete the updateList method entirely, and change how the AddForm works slightly. Instead of creating a new Contact directly, the ContactCollection's .create method can be used. This method works in the same basic way as the model's save method. In addition to creating and saving the model, though, it also adds the model directly to the collection, firing the “add” event.
Modify the saveClicked method of the AddForm so that it calls the collection's create method.
// AddForm
saveClicked: function(e){
    // ...

    // create a new contact and save it
    // using the form data
    this.collection.create(formData, {
        wait: true,
        success: function(contact){
            clearForm();
        }

    });
}
The success callback no longer calls out to the updateList method. Since the new contact is immediately added to the collection, the ContactListView will receive the “add” event and will re-render itself, showing the new Contact.
With the AddForm expecting a collection to be available, though, you will need to change the instantiation of this view so that it receives the same ContactCollection instance as the ContactListView.
var contacts = new ContactCollection(/* ... */);

// ...
var addForm = new AddForm({
    collection: contacts
});


// ...
var contactList = new ContactListView({
    collection: contacts
});
Now you can add new contacts through the add form and they will automatically show up in the contact list.
Beyond Restructuring jQuery Code
You can now add new contacts and they automatically show up in the list. But more importantly, you have a well structured code base. The different responsibilities of the application have been pulled apart and then orchestrated together to create the desired functionality. Best of all, though, you did this without having to throw away any of your investment in writing jQuery code. This was not an all-or-nothing endeavor. You were able to pick and choose the places where it was easy to bring in Backbone, and progressively move the application forward from there.
There is more that can be done with Backbone, as well. Applications can grow much larger, introduction additional needs. If you need to switch out content, for example, you may want to take advantage of Backbone.Router and allow people to bookmark or link directly to a given application state. At that point, you're looking at SPA territory and opening a new world of options and opportunities.
Moving beyond an introduction to SPAs, though, Backbone.js begins to show some of its relative weakness when compared to more complete frameworks. For example, Backbone.js doesn't provide a way to create hierarchical data sources, out of the box. This isn't difficult to do, but it requires writing your own code or using another plug-in to handle it. Additionally, Backbone.js tends to require a significant amount of boilerplate code-code that is copy and pasted between applications, and between objects with little or not change. The render function for a Backbone.View is a prime example of this. You'll end up writing the same render method over and over and over again, if you're not careful.
The problems of boilerplate and missing features are both a blessing and a curse. This allows you the freedom to use Backbone.js in ways that were never imagined originally. But it does require that you write more code than some other frameworks. Fortunately, the Backbone.js community is very large and has run in to nearly every possible problem and scenario with Backbone.js already. There are dozens, if not hundreds, of plug-ins and add-ons for Backbone.js that help reduce the amount of code that you need to write, while adding features and capabilities that the core of Backbone.js doesn't provide.
Additional Resources
There are a number of amazing resources out there for learning more about Backbone.js and its capabilities, everything from books to blogs and videos. Here are some of my favorites and recommended resources.
Books
Backbone.js Fundamentals
https://shop.oreilly.com/product/0636920025344.do
Editor's note: the URL now redirects to another book by the same author.
Addy Osmani has written a book discussing the fundamentals of Backbone, with a collaborative approach through the use of Github and community contributions. It is a comprehensive introduction to Backbone.js and the development ecosystem around it. It includes the core of everything you need to know, to get up and running, and move beyond simple applications like I've shown in this article. If you're not familiar with Addy's work in the JavaScript world, you need to be.
Backbone.js Tutorials
https://leanpub.com/backbonetutorials
Thomas Davis has collected a wealth of knowledge in small installments through his Backbone.js Tutorials blog. He has taken community input and information, and put it together in to a free e-book. It covers nearly every aspect of Backbone.js development, in simple blog-post sized chapters.
Building Backbone.js Plug-ins
Editor's note: Navigating to the URL provides a security warning.
My e-book on how-and more importantly, why-to build proper abstractions and add-ons for Backbone.js applications. This book will teach you the how and why of building plug-ins for Backbone.js. It provides first hand lessons learned, best practices, and patterns for creating flexible add-ons and framework components. And it's all based on real-world experience-both success and failure-from working with Backbone.js on dozens of projects, and building plug-ins and frameworks on top of it.
Screencasts
Playing With Backbone.js
https://tekpub.com/products/backbone
Rob Conery walks through the process of learning how to build a SPA with Backbone.js. Along the way, he shows a number of common pitfalls and problems, and how to work through them. I also make an appearance at the end of this series, introducing my MarionetteJS application framework.
BackboneRails.com
Brian Mann has a series of Backbone.js screencasts that primarily cover scalability and management of larger Backbone.js applications. He has a number of free episodes and paid episodes, covering everything from the history of SPAs, to building scalable systems, and more.
Hands-on Backbone.js
http://pragprog.com/screencasts/v-dback/hands-on-backbone-js
My screencast series on learning Backbone.js. The version of Backbone.js used in this is out of date, but the core concepts are all there, and the content is still valid. If you're a visual learner and want to follow along with a step-by-step instruction set, then this is for you.
Application Frameworks
One of the best categories of contributions from the Backbone.js community is that of application frameworks. There are a number of them out there, adding features and functionality for building larger and scalable application frameworks. These are the most popular, and I highly recommend looking at them if you plan on using Backbone.js for more anything more than a few simple objects.
MarionetteJS
Formerly known as Backbone.Marionette, MarionetteJS is a composite application architecture for Backbone.js and is the result of my own work on dozens of client applications, and hundreds of other systems built by developers around the world. It provides a layer of specialized View abstractions (ItemView, CollectionView, CompositeView) the ability to nest views inside of each other with a Layout, an Application bootstrapper, a simple module system, and much more.
LayoutManager
LayoutManager is a logical foundation for assembling layouts and views within Backbone. Tim Branyen - a core contributor to the Backbone.js project - has built a framework that works on conventions to create application layouts and nested view structures, quickly. It works both in browsers and in NodeJS on the server side, providing a lot of flexibility in where it is used.
ChaplinJS
ChaplingJS provides architectural guidance for building JavaScript applications on top of Backbone. Chaplin addresses Backbone's limitations by providing a lightweight and flexible structure that features well-proven design patterns and best practices. It does this through the use of Coffeescript in its implementation, but can still be used with JavaScript. Chaplin's controllers and router management are worth looking at, even if you're using another application framework.
Thorax
Thorax is an opinionated, battle-tested Backbone + Handlebars framework for building large-scale web applications. Thorax started life in Wal-Mart labs, supporting their mobile effort. The tight integration with Handlebars for template rendering provides a unique flavor of building Backbone.js applications that looks more like true MVC than most Backbone.js frameworks.
Aura
http://addyosmani.github.io/aura/
Aura is a decoupled, event-driven architecture on top of Backbone.js for developing widget-based applications. Originally an application framework just for Backbone, Aura has taken on new life in its ability to work with other MV* libraries as well. Aura takes the approach of widget based development, and application composition with those widgets. It incorporates a lot of JavaScript community knowledge, and scalability concerns from years of experience with large scale JavaScript systems.
Other Plug-ins and Add-Ons
There are hundreds of other plug-ins available, covering everything from nested model structures, to specific server API usage. For a more complete listing of what the Backbone.js community has provided, see the Backbone.js wiki page for extensions, plug-ins and resources.
