


Sometimes it happens that a new version of an operating system introduces a new type of application completely incompatible with older versions of the same system. The last time it happened I think it was with Windows 95. More than 15 years later, Windows 8 comes with support for a completely new segment of applications named Windows Store apps.
These applications can only run on Windows 8 and they have a brand new look and feel compared to other and older Windows applications. In addition, Windows Store apps follow a different pattern as far as publishing and sales are concerned. Windows Store apps, in fact, can be distributed for free or for sale through a central marketplace known as the Windows Store. This channel is a valid alternative for widespread distribution to classic direct user-led install of applications.
Windows 8 specific applications are not limited to personal computers but can also run on a variety of compliant devices, most notably Microsoft Surface devices.
In summary, developers can now create two types of Windows applications: classic Window apps that also run on multiple and older Windows platforms (i.e., Windows 7, Windows Vista) and Windows 8 specific apps that only run on machines and devices equipped with Windows 8. Classic Windows applications can only be distributed manually or via custom setup programs; Windows 8 apps can be distributed via the public Windows Store or under the control of the system administrator.
Windows 8 apps are based on a different API and a different runtime system - the WinRT framework. The new API is offered to developers in a variety of languages. In this article, you'll see how to build Windows 8 applications using JavaScript for the logic, and a combination of HTML and CSS for the user interface. Formerly known as Metro style applications, Windows 8 applications are now officially referred to as Windows Store apps.
Under the Hood of Windows Store Apps
As mentioned, you can write Windows Store apps in different ways. You can use HTML and JavaScript, as discussed in this article. You can also write applications using C#, Visual Basic or C++ as the programming language, and XAML to express the user interface.
All approaches deliver nearly the same programming power. This means that you can build the same application behavior regardless of the language and markup that you choose.
It goes without saying that JavaScript is fairly different from C++ and a good deal of difference also exists between C# and C++. While the programming power is nearly the same in all cases, the actual programming experience may be different as features and capabilities of the languages are not the same. I'll return to this point later in the article, but I'd like to mention it here: asynchronous programming is much easier to code in C# than in JavaScript, but it can be done equally in both languages.
Windows Store applications rely on a new infrastructure; this is what makes them incompatible with operating systems older than Windows 8. In Figure 1 you can see the Windows 8 runtime stack at a glance. Two parallel stacks live side by side and support two different application development models-one centered on JavaScript and HTML and one on XAML and C# (and other .NET languages).
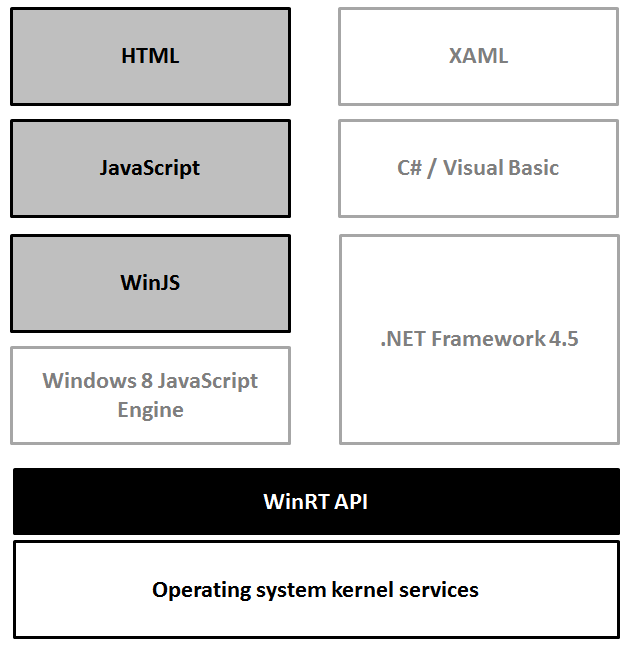
The WinRT API supplies several classes of functionality. In particular, you'll find media, networking, storage and presentation functions.
Any application interaction with the operating system is actually mediated by the WinJS library. Subsequently, any Windows Store application written with JavaScript must include the WinJS library and use its API to access available functions.
Your Windows Store application results from the combination of JavaScript files and HTML pages. Before running, the JavaScript code is compiled by the Windows 8 JavaScript engine and access to the WinRT subsystem occurs dynamically as the user interacts with the application.
Your First Windows 8 JavaScript App
To build applications for Windows 8 you need any version of Visual Studio 2012. To start with, the Visual Studio Express 2012 edition for Windows 8 is more than fine. You can get it from: http://www.microsoft.com/visualstudio/eng/downloads#d-2012-express. (Editor's note: You'll need to install a more recent copy of Visual Studio, as the 2012 edition is no longer available to download.) Once you install it, in an attempt to create your first Windows 8 application using JavaScript and HTML you face the dialog box of Figure 2.
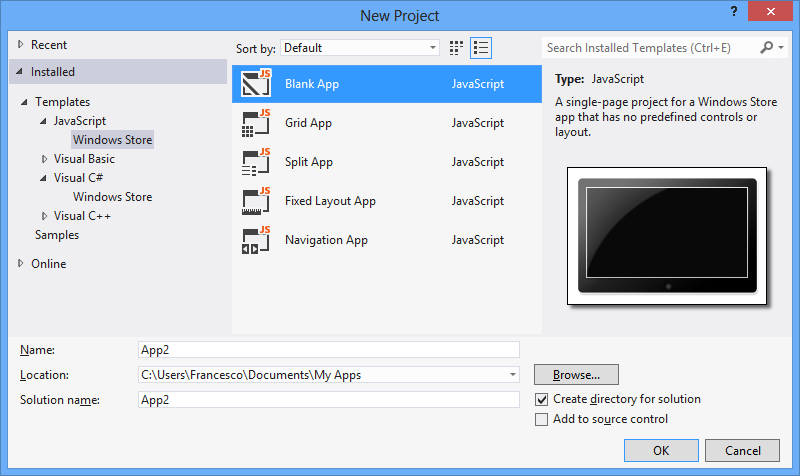
Personally, I never used (and have no plans to use) Grid, Split and Fixed Layout templates. I found them too specific and even quite difficult to adapt to my own needs, which are often significantly different from those represented in the template. Most of the time I start from the Blank App; I start from the Navigation App template if I need navigation capabilities between pages. To understand the internal mechanics of WinJS-based appl, the best you can do is just start from the Blank App template.
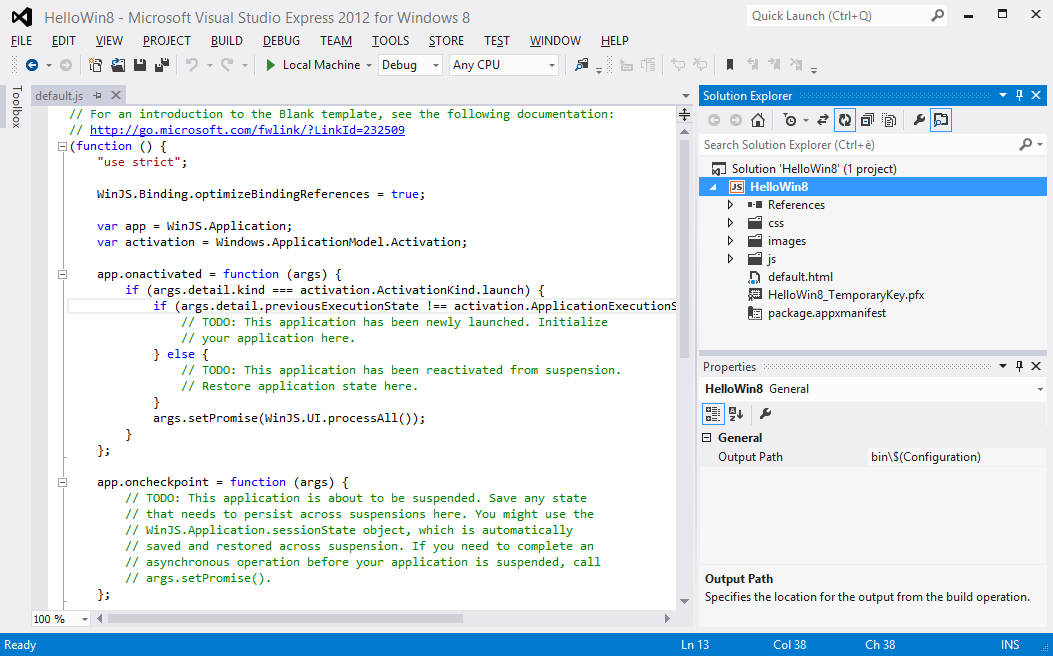
The app you get from the Blank App template consists of a single and nearly empty page with no visual controls, no widgets and no layout defined. Figure 3 shows the newly created project as it appears in Visual Studio.
It turns out that a Windows 8 app written using JavaScript looks like a self-contained web application made of HTML pages properly styled using CSS and powered by some JavaScript logic. If you are familiar with the web paradigm and client-side web development, then you only need to make sense of the Windows 8-specific API exposed to you via a few JavaScript files to link. Let's have a look at the HEAD section of the default.html page:
<head>
    <meta charset="utf-8" />
    <title>HelloWin8 Step2</title>

    <!-- WinJS references -->
    <link href="//Microsoft.WinJS.1.0/css/ui-dark.css"
          rel="stylesheet" />
    <script src="//Microsoft.WinJS.1.0/js/base.js">
    </script>
    <script src="//Microsoft.WinJS.1.0/js/ui.js">
    </script>

    <!-- Your app references -->
    <link href="/css/default.css" rel="stylesheet" />
    <script src="/js/default.js"></script>
</head>
The section with WinJS references should be common to all pages and enable the code behind the page to access WinRT functionalities. You should plan to have a different page for each screen of the application. The second section you see in the listing above refers to page-specific links for the page stylesheet and code behind. You stuff in default.css all styles you plan to use on HTML elements. The role of the default.js file is instead subtler.
When you open it up, you find the code in Listing 1 (cleaned up a bit for clarity):
Listing 1: The default.js file
(function () {
    "use strict";

    WinJS.Binding.optimizeBindingReferences = true;

    var app = WinJS.Application;
    var activation = Windows.ApplicationModel.Activation;

    app.onactivated = function (args) {
        if (args.detail.kind === activation.ActivationKind.launch) {
            args.setPromise(WinJS.UI.processAll());
        }
    };

    app.onready = function (args) {
        // Your bootstrap code here
    };

    app.start();
})();
Compared to the wizard-generated code, I removed all comments and empty branches. I also added the onready handler which plugs in the code that bootstraps your application.
Although the file default.js is named after an application's page, the code it contains has little to do with an individual page - it is the application's startup code. For this reason, I recommend that you create a separate set of files to contain the application's logic and keep default.js as the application's startup code.
If your application needs to do some work upon startup, you should add a handler for the onready event and call a specific function from there.
app.onready = function (args) {
    YourApp.init();
};
So you may add a new JavaScript file and begin it like below:
var YourApp = YourApp || {};
YourApp.init = function () {
// Start-up code
}
The YourApp object is intended to be the main repository of the application's logic. Needless to say, the new JavaScript file must be referenced from the default.html page and likely from any other page you may have in your application.
Building an HTML-based Rich Presentation Layer
The user interface of any page is based on HTML. Therefore you use HTML elements and CSS classes to lay out the graphics as you like it. With the sole help of HTML, however, you can hardly provide a Windows 8 typical experience to the user. Horizontal scrolling, square blocks, fading and hovering effects, rich tooltips are not certainly impossible to reproduce with HTML and JavaScript, but the code required is not trivial to write.
In plain web applications, most developers resort to ad hoc libraries such as jQuery UI to set up nice visual components. In Windows 8, you can rely on a bunch of native components that once applied to a basic HTML skeleton that can produce a result very close to what you can get with XAML and C#.
To arrange an effective Windows 8-style presentation, you attach ad hoc widgets to basic HTML elements in much the same way it works with jQuery UI and jQuery Mobile. The markup of a typical page is often a plain collection of DIV elements; ad hoc data-* attributes, however, transform that scanty DIV element into a colorful and animated component. As a result, it won't make any difference for the end user whether the application was built with JavaScript or C#. Let's examine the following snippet:
<div class="block-element">
<h3>DESCRIPTION</h3>
<textarea id="taskSubject" required></textarea>
</div>
<div class="block-element">
<h3>DUE DATE</h3>
<div class="block-element"
     id="taskDueDate"
     data-win-control="WinJS.UI.DatePicker" />
</div>
</div>
<div class="block-element">
<h3>PRIORITY (1=VERY LOW - 5=VERY HIGH)</h3>
<input id="taskPriority" type="range" />
</div>
Functionally speaking, the HTML contains two input fields: an input range area and a date picker. In effect, you can see an INPUT element of type range, but there's no clue of another INPUT element of type date or text. Instead, you see a DIV element decorated with a weird attribute: data-win-control.
The markup above is quite representative of the way in which you author a user interface in a Windows Store JavaScript application. You mix classic HTML elements with DIV elements with some Windows 8-specific behavior attached. It is essential to note that while you use HTML markup and CSS classes to author the user interface, the resulting page is not hosted within a classic web browser. This means, for example, that you may not feel the need to use jQuery to arrange Ajax calls and more importantly, you don't need the FORM element to post data to some backend layer.
The role of HTML is simply that of a markup language to author the user interface of each application screen. You'll plan to have an HTML page for each screen of the application; in the HTML page you can use basic HTML elements as well as generic DIV blocks enriched with some WinJS native functionalities. Because the underlying engine that processes the markup is based on Internet Explorer 10, you can make full use of HTML5 attributes in the markup such as the placeholder, autofocus and required attributes, and can use HTML5-specific values with the type attribute of INPUT fields.
To style markup elements, you should use CSS classes knowing that the underlying engine supports the CSS3 syntax to comfortably identify groups of page elements.
In the listing above, you may have noticed the data-win-control attribute. An acceptable value for the attribute is the name of a WinJS control class that internally contains the logic to append to the basic DIV element a richer HTML sub-tree that represents a particular piece of the user interface. For example, the following fragment renders a date picker in native Windows 8 style on top of the specified DIV element.
<div class="block-element"
id="taskDueDate"
data-win-control="WinJS.UI.DatePicker" />
</div>
Figure 4 shows the sample input form resulting from the above markup.
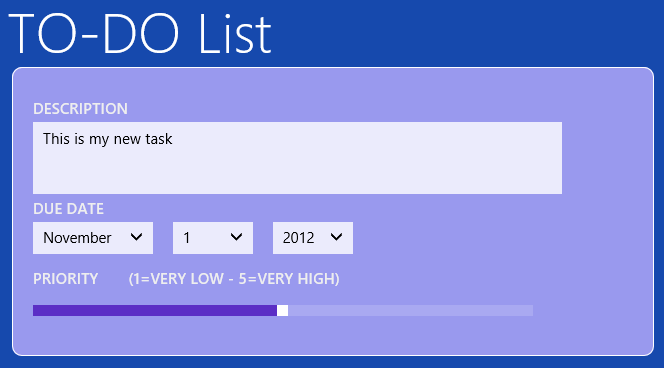
The TEXTAREA element is just rendered in the usual way only with a squared skin. The range element is automatically rendered as a slider, in much the same way it happens with any HTML5 page in Internet Explorer 10. The data-win-control attribute set to WinJS.UI.DatePicker produces an ad hoc interface with drop-down lists for month, day and year.
Table 1 summarizes the widgets available to Windows Store applications. All of them are activated on specific markup sub-tree (mostly plain DIV elements) through the data-win-control attribute.
Using HTML to render the user interface doesn't mean that interactions and page switches are working over HTTP. Therefore, you don't need to use the FORM element to save or process the content of an input form: all you need is a plain button with its own click handler.
<button id="buttonAddTask" />
You can add inline event handlers to HTML elements through attributes such as onclick and onchange; it is preferable, however, that you opt for a less obtrusive solution and add handlers via script code. This is where the aforementioned bootstrap function comes into play.
YourApp.init = function () {
    // Add event handlers as appropriate
    document.getElementById("buttonAddTask")
            .addEventListener("click", YourApp.addTaskClick);

    // Find a way to initialize the page
};
YourApp.addTaskClick = function () {
    // Do what's required to do when the user
    // pushes the button
};
In the init function you typically add any initialization code for the application and/or for a given page of the application. Keeping helper JavaScript functions defined as members of a global object - in this case the YourApp object - helps keeping the code clean and avoids pollution of the JavaScript global namespace.
WinJS Data Binding
In the bootstrap code of the application (or an individual page of the application) you might want to bind data to user interface elements. In XAML, you use the integrated data binding engine, preferably within a Model-View-ViewModel (MVVM) schema. In web applications, more and more developers are enjoying the KnockoutJS library that replicates the same pattern within HTML pages.
In JavaScript applications written for Windows 8, you can leverage a native engine that mimics the XAML data binding syntax. When it comes to data binding, it is all about having a way to set the data source for a section of the user interface and having a syntax to bind properties of the data source object to user interface elements.
A recommended practice to implement for each screen of the application is the following:
- Define a view model object that defines any data coming in and out of the screen.
- Set the view model object as the data source of the form.
- Use the WinJS data binding syntax to link user interface elements to data source properties.
A view model object is nearly a class in C# or Visual Basic. How would you get such a class in JavaScript? Here's an example:
var Task = WinJS.Class.define(function () {
    var that = {};
    that.description = "This is my new task";
    that.dueDate = new Date();
    that.priority = 1;
    that.status = "Not Started";
    that.percCompleted = 0;
    that.minPriority = 1;
    that.maxPriority = 5;
    return that;
});
You can use the Task function like a C# class. Here's how you can set a new instance of Task as the data source of an HTML page:
YourApp.init = function () {
    document.getElementById("buttonAddTask")
            .addEventListener("click", YourApp.addTaskClick);

    // Create the view model object
    var model = new Task();

    // Enable binding on the HTML element(s) of choice
    var root = document.getElementById("main");
    WinJS.Binding.processAll(root, model);
}
The processAll function takes an HTML element and a view model object and visits the entire sub-tree rooted in the element trying to resolve any data binding expressions found along the way. The net effect of the code above is that any data binding expressions underneath the element named main is resolved. Here's a sample of the WinJS data binding syntax:
<textarea id="taskSubject" required
          data-win-bind="innerText: description">
</textarea>
:
<input id="taskPercCompleted"
       type="number"
       min="0"
       max="100"
       data-win-bind="value: percCompleted" />
The data-win-bind attribute defines a data binding expression. An expression takes the form of:
targetProperty: expression
The target property refers to the HTML property that is going to receive the value calculated out of the expression. In its simplest form, the expression is just a path rooted in the view model object. The preceding example binds the value of the description property from the provided Task object to the innerText property of the TEXTAREA element.
The WinJS data binding also supports a formatting layer. It is a concept similar to converters you find in XAML. Here's how to pre-process the value of the percCompleted property on the data source to format it to a percentage string:
<span data-win-bind="innerText: percCompleted YourApp.percForDisplay" />
A WinJS converter looks like below:
YourApp.percForDisplay = WinJS.Binding.converter(
    function (value) {
        return value + "%";
    })
The WinJS data binding is not bidirectional. This means that in order to process data the user entered in a form you need to read it explicitly from the DOM, as shown in Listing 2.
Listing 2: Reading back data the user has entered in the form
YourApp.getTaskFromUI = function () {
    var task = new Task();

    var subject = document.getElementById("taskSubject");
    task.description = subject.value;

    var priority = document.getElementById("taskPriority");
    task.priority = priority.value;

    var status = document.getElementById("taskStatus");
    task.status = status.options[taskStatus.selectedIndex].value;

    var completed = document.getElementById("taskPercCompleted");
    task.percCompleted = completed.value;

    // Read date information from the WinJS date-picker widget
    var dueDate = document.getElementById("taskDueDate").winControl;
    task.dueDate = dueDate.current;

    return task;
}
If input elements are plain HTML elements you just use the DOM interface to read values. If input elements are WinJS widgets (i.e., a date picker was used) then you need to pass through the winControl extra property and then use the documented interface of the widget.
Dealing with List Views
In modern user interfaces, lists are a very common visual element. In Windows 8, in fact, you find a strong support for list-based views as the ListView widget seen in Table 1 demonstrates. A list view is a repeater component that takes a data bindable template and repeats it for each item found in a collection. The ListView widget in Windows 8 supports two view modes-as a vertical list and as a grid. Once data binding is completed, developers can easily switch from a list-based view to a grid-based view and vice versa. Listing 3 shows how to set up a list view in the HTML page of a Windows Store application.
Listing 3: Setup of a Windows 8 ListView component
<div id="newsItemTemplate"
     data-win-control="WinJS.Binding.Template"
     style="display: none;">
  <div class="listItem">
      <div id="titleDiv"
           data-win-bind="innerText: title"></div>
      <div id="categoryDiv"
           data-win-bind="innerText: category"></div>
      <div id="pubDateDiv"
           data-win-bind="innerText: pubDate"></div>
  </div>
</div>

<div id="listOfNews"
     data-win-control ="WinJS.UI.ListView"
     data-win-options="{ itemDataSource: RssReader.Items.dataSource,
                         itemTemplate: newsItemTemplate,
                         layout: {type: WinJS.UI.ListLayout},
                         selectionMode: 'single',
                         tapBehavior: 'directSelect' }">
</div>
You create a DIV element and bind it to the ListView widget through the data-win-control attribute. This step is necessary but not sufficient to populate the list with graphical items. First, you indicate a bindable item template; next, you bind the list to a collection of data objects.
You can configure data binding both programmatically in JavaScript code and declaratively via ad hoc markup. In the preceding example, things are done declaratively using the data-win-options attribute. You'll use this attribute to pass initial arguments to be used in the construction of the widget.
To initialize a ListView widget you must especially indicate the itemDataSource parameter. The parameter refers to the data source that the widget gets data from. In the example above, I'm using a global object that exposes a collection of data. I'll return to data source objects in a moment.
The itemTemplate parameter refers to the HTML template to be repeated within the list, once for each data item in the data source. The layout parameter refers to the object that describes the layout of the view. It can be a list or grid layout. Finally, selectionMode and tapBehavior refer to the selection mode (single item or multiple items) and the action that should follow the tap or click on an item. The value directSelect indicates that a tap or click produces a double effect: the item is selected and invoked. Alternate values for tapBehavior are toggleSelect (toggles selection of the list item), invokeOnly (item is invoked but not selected) and none.
Data-bound components such as the ListView component can't be bound to just a basic JavaScript array and require a very Windows 8 specific BindingList object. Let's have a look at the code below:
WinJS.Namespace.define("RssReader", {
    Items: new WinJS.Binding.List()
});
In light of this code, the RssReader.Items refers to a newly created (and thus empty) binding list object. The list object can be populated programmatically using an array-like programming interface; the actual binding to a Windows 8 data-bound component occurs through the dataSource property exposed by binding list objects.
To complete the example, here's some code that connects to an external URL, downloads a RSS feed, and fills up the list view with news.
WinJS.xhr({ url: "http://some-server" })
    .then(
          function (response) {
              RssReaderApp.parseFeed(response);
          },
          function (error) {
              // Recovery
          });
The WinJS.xhr object is a Windows 8 wrapper for the XmlHttpRequest object and is used to make out-of-band calls to remote URLs. A Windows 8 application is considered a desktop application from a security point of view; therefore there's no need to be concerned about cross-domain issues.
The response received from the remote endpoint takes the same form you should be acquainted with from using XmlHttpRequest. If you're expecting an XML response - as it is the case when you request RSS data - then you get it through the responseXML property of the received response object. Instead, if you're expecting, say, a JSON response then you might want to get the text response via the responseText property. The code in Listing 4 shows the code that parses RSS into the RssReader.Items object.
Listing 4: Parsing an RSS feed to a JavaScript object
RssReaderApp.parseFeed = function (response) {
    if (response.responseXML == null) {
        rssReaderApp.alert("Invalid data");
        return;
    }
    var items = response.responseXML.querySelectorAll(
        "rss > channel > item");
    for (var n = 0; n < items.length; n++) {
        var n = {};
        n.title = items[n].querySelector("title").textContent;
        n.link = items[n].querySelector("link").textContent;
        n.guid = items[n].querySelector("guid").textContent;
        n.pubDate = items[n].querySelector("pubDate").textContent;

        // Add the RSS item to the binding list
        RssReader.Items.push(n);
    }
}
Figure 5 gives an idea of a ListView in a Windows Store application.
Application View States
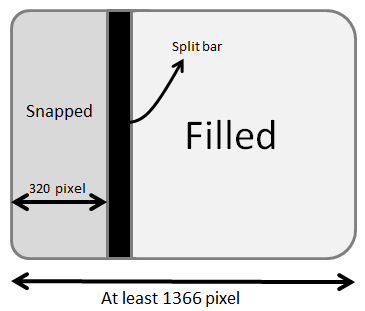
By default, Windows 8 runs native (i.e., Windows Store) applications in full screen. However, applications should be ready to handle four different view states: full screen landscape, full screen portrait, filled and snapped. Any Windows Store application receives proper notification when the user manages to change the view state. This typically happens when the user rotates a Windows 8 device thus changing its orientation or when the user resizes the application's screen to allow for two applications to be active and in foreground at the same time. There's probably not much to say about portrait and landscape full screen modes. Figure 6, instead, illustrates snapped and filled views.
A full screen application can be resized (shrunk actually) to make room for a second application. The added application is snapped to one edge of the screen and the application that was originally in full screen mode takes up approximately two/thirds of the screen. This application is now said to be filled. The two applications are separated with a split bar. By acting on the split bar the user can swap the states of the two applications so that the snapped becomes filled and vice versa. When this happens, the originally filled application is snapped to the opposite edge of the screen. According to Figure 6, by enlarging the split bar, the filled application is snapped to the right edge.
When snapped, an application is resized to a segment of the screen that is only 320 pixels wide and takes the entire height of the screen. Any application can experience both view states during its lifecycle. It's the user, not the application, that decides about the display mode. From the application's perspective, support for the various view states (including snapped and filled view states) is all about being ready to render any relevant content in a screen of different sizes.
The Windows 8 operating system sends ad hoc notifications to running applications to inform them about view state changes ordered by the user. For a developer, there are two main (and non-exclusive) ways to react to these view state changes. First, you can define different CSS styles for each view state you intend to target. Second, you can handle screen resize events and adjust the layout as appropriate. Let's just start here.
Listing 5 shows how to register a handler for the resize event of the host window.
Listing 5: Registering a handler for the resize event
YourApp.init = function () {
    :
    window.onresize = addEventListener('resize', YourApp.onResize);
}
YourApp.onResize = function () {
    var viewState = Windows.UI.ViewManagement.ApplicationViewState;
    var current = Windows.UI.ViewManagement.ApplicationView.value;
    switch(current) {
        case viewState.snapped:
            :
            break;
        case viewState.filled:
            :
            break;
        case viewState.fullScreenLandscape:
            :
            break;
        case viewState.fullScreenPortrait:
            :
            break;
    }
}
The Windows.UI.ViewManagement.ApplicationViewState object defines the four possible states of a Windows 8 application. The Windows.UI.ViewManagement.ApplicationViewState property returns the current view state at a given time. The resize handler tells when the view state changes. A change in the view means a change in the size of the screen and it may mean that you need to rearrange your layout to fit controls and visuals into the new screen size. When an application gets snapped, its area is only 320 pixels wide: it may make sense to hide some widgets or move some controls to the bottom to fit in the reserved screen. Doing so ensures the best possible experience for the user.
You handle the resize event when you need code to adjust the layout. For example, this may mean switching a list view from the grid layout to the list layout or replacing a large item template with a smaller one.
If your application screen layout is entirely based on relative sizes and automatically scales down on a smaller screen, then it may be that all you need is to switch to a different CSS stylesheet. If the layout can be adapted to the new size via CSS, then you don't need a resize handler but can leverage the built-in Windows 8 support for CSS media queries.
Any Windows 8 project has a default.css file that contains the following:
/* Media Queries */
@media screen and (-ms-view-state: fullscreen-
landscape) {
    /* styles here */
}

@media screen and (-ms-view-state: filled) {
}

@media screen and (-ms-view-state: snapped) {
}

@media screen and (-ms-view-state: fullscreen-portrait)
{
}
The @media keyword indicates a region of the stylesheet that should be applied only when the subsequent query is matched. The media query is a Boolean expression that results from the combination of a few environment variables exposed by the host window.
CSS media queries are a feature supported by most recent browsers and they're quite useful to build responsive (mobile) websites. The variables exposed by browsers are dictated by the W3C standard that rules media queries. (See http:// www.w3.org/TR/css3-mediaqueries.) In Windows 8, the host environment of WinJS applications also supports the -ms-view-state variable. As the name suggests, the variable is automatically set with the current view state. Any CSS styles defined in each @media { ... } block is applied automatically when the corresponding view state is set.
Next Steps
Windows 8 marks the debut of a significantly updated runtime platform - the WinRT platform. Like the .NET platform, WinRT supports several programming languages. Side by side with popular .NET languages such as C# and Visual Basic, you also find the JavaScript language.
If you're already familiar with C# and XAML then you probably want to stick to them and just focus on the WinRT API and its differences with the .NET Framework. If you lack a significant background in XAML, though, you might find the WinJS framework-the WinRT framework for JavaScript developers - a very pleasant surprise. This article just scratched the surface of WinJS programming, but hopefully it covered a wide spectrum of programming features available in Windows 8.
Table 1: Widgets available to Windows Store applications.
| Widget | Description |
|---|---|
| AppBar | Displays a horizontal application-specific command bar that is usually placed at the bottom of the screen and displayed when the user swipes from the edge with either the finger or the mouse. |
| DatePicker | Pops up a month/day/year calendar for users to pick up a date. |
| FlipView | Displays a collection of items (i.e., pictures) and allows a user to flip through them displaying one at a time. |
| Flyout | Displays a popup HTML message that disappears only when the user touches (or clicks) anywhere on the screen. |
| ListView | Arranges a collection of items in a variety of layouts; for example, as a grid or as a list. |
| HtmlControl | Embeds an HTML page in a given page. |
| Menu | Displays a flyout that looks like a standard menu list. |
| SemanticZoom | Enables the user to zoom between two different views of the same content. One view is the zoomed-out representation of the content; the other instead provides the zoomed-in view. |
| TimePicker | Enables the user to select a time in a graphically appealing way. |
| ToggleSwitch | Displays a standard user interface for users to turn an item on or off. |
| Tooltip | Displays a rich-text tooltip. |
| ViewBox | Elements displayed within a ViewBox automatically scale to fill the available space. The ViewBox widget also reacts to changes in the size of the container such as after a screen rotation or a window resize. |
