


The modern web ecosystem is made up of many different types of scenarios of how users interact with online content. With the increasing popularity of mobile devices along with countless hours at Starbucks and on airplanes, users may often find themselves in a position of wanting to use web content while not being able to enjoy reliable and continual access to the Internet.
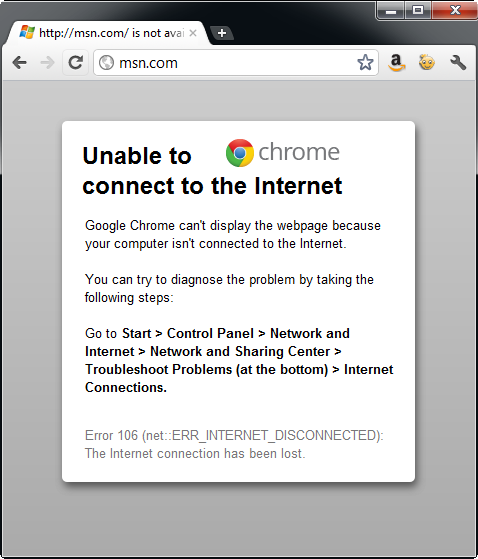
A website that is not configured to operate in a disconnected state is unavailable in any form if an Internet connection is not available. For instance, Figure 1 demonstrates the type of response you may encounter while trying to view http://msn.com while working without an Internet connection.
Fortunately “offline web applications” continue to work for users regardless of Internet connection status to the client. The availability is possible by the new HTML Offline Web Application API (http://www.whatwg.org/specs/web-apps/current-work/multipage/offline.html), also known as HTML Application Cache. An offline application is a packaged group of web pages, style sheets, and/or scripts files that are reliably available to the client whether or not a web connection is present.
Offline web applications are available through the new HTML Offline Web Application API, also known as HTML Application Cache.
Beyond simply serving pages to the user when an Internet connection is unavailable, often an offline application requires storage of user’s information. HTML Web Storage is able to store relatively large amounts of information on the client giving you the ability to save data locally and synchronize with the server as a connection to the web becomes available.
The example in this article uses the Application Cache and Web Storage APIs together to build an application that works offline to store user information and automatically synchronize with the server when available.
What Is the Application Cache?
As stated above, an offline application is a packaged group of web pages, style sheets and/or scripts files that are saved on the user’s machine in the application cache. When a request for a file from the application is initiated, instead of requesting the file from the web server, the file is served from the application cache. In order to keep the application packaged and versioned correctly, a file called the application manifest maintains a master list of files in the application. When connected to the web, the manifest is checked for updates and any new versions of the application’s files are downloaded in the background for the next visit to the page.
Pages loaded into the application cache are served from the cache whether or not a connection to the Internet is available.
Browser Support
As with any new web technology, the question of browser support is often a determining factor for widespread use by web developers. The good news is that the latest versions of the mobile web browsers support offline applications along with some very early releases of many desktop browsers. Unfortunately, Internet Explorer support is not scheduled until the release of version 10. Table 1 details the browser support for offline applications for a wide array of desktop and mobile browsers.
Anatomy of an Offline Application
There are a number of elements working in concert that enable an offline application to operate as intended. To get a quick understanding of the files, features and APIs involved in creating an offline application, review the different building blocks listed in Table 2. Each of the elements described in Table 2 play a crucial role in serving, enabling and maintaining offline applications.
Understanding Cache Manifest
The application manifest file acts as the master list of files for the offline application. The manifest is a simple text file that adheres to a few conventions as required by the Application Cache API. A typical manifest file may resemble the following example:
CACHE MANIFEST
# version 1

CACHE:
/home.htm
/contact.htm
/images/logo.png
/styles/global.css
/script.js

FALLBACK:
/events.aspx /events.htm

NETWORK:
/customer/list
All files in the manifest are downloaded and stored in the application cache together. If a single file listed in the cache encounters a problem during transmission from the server to the client then an error is thrown and none of the files listed in the manifest are loaded into application cache. The all or nothing rule allows you to confidently rely on the existence of the application’s files in the application cache if the manifest downloads without error.
The following explanation dissects the example line-by-line to help you fully understand the mechanics of the manifest file.
Required and Implied Elements
The first line of any application manifest file must read CACHE MANIFEST.
CACHE MANIFEST
This is a strict rule as you may not have whitespace, comments or any other information on the first line of the manifest. After leading with that term, then you have some flexibility as to how you craft the manifest file. The next section is the CACHE: section.
CACHE:
/home.htm
/contact.htm
/images/logo.png
/styles/global.css
/script.js
The CACHE: section includes the list of all HTML, CSS, images and scripts files that make up the application. Files listed in the CACHE section may include any files regularly found as a part of a web application. You may reference any application files in the manifest. In this context, “application files” include static HTML pages, CSS files, images and scripts as well as server processed pages or files. The manifest only cares about the resulting file as served to the browser.
The heading of CACHE: is optional. Any file listed in the manifest file that does not appear under any other section heading is assumed to be a file to load into the application cache. This flexibility may prove helpful if you choose to generate your manifest file programmatically. However, for consistency and clarity, consider using the CACHE: heading in order to make your manifest easily understandable.
Maintaining Application Versions
The second line in the manifest listing is a comment. Any line that begins with the hash (#) symbol is a comment in the manifest file.
# version 1
This comment, however, serves a specific purpose. In the Understanding Application Cache Event Lifecycle section later in this article, you’ll learn how the manifest file is used as the only point of reference to trigger changes in the application. In other words, if you save an update to the text in an HTML file and fail to make a change to the application manifest, then that change is never sent to the client. You must make a change in the manifest file so the update events fire for the application cache, which triggers a re-download of all the application’s files. Therefore, if you make a content change to an application file, you must have a mechanism for introducing change into the manifest file to prompt the client to re-download the contents of the manifest. A “version” comment works perfectly for this purpose.
The FALLBACK Section
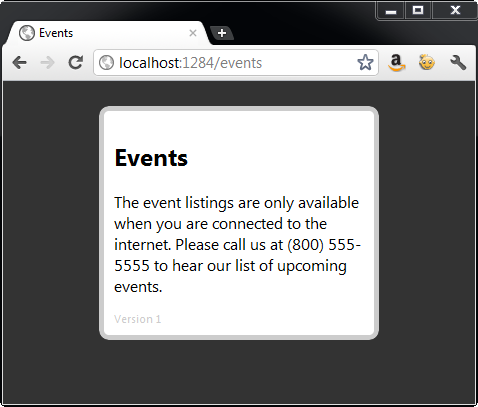
Consider a page in the application that listed upcoming events as served from a database on the website. While this page is not accessible without an Internet connection, you want your users to see something other than an “unable to connect” error page (Figure 1) when they click on links to the Events page. The FALLBACK section maps server resources to alternatives available in the application cache.
FALLBACK:
/events /events.htm
/images/headshots/ /offline-headshot.png
The FALLBACK section creates a mapping of alternative pages to serve to the user if a request to the original file fails or the computer is working offline. Associations between actual paths on the website and the fallback replacement are made by listing the full relative path to each location separated by a space.
While there are no wild cards allowed in fallback mapping definitions, URL patterns are respected in the FALLBACK section. For instance, if this website included thousands of headshots for every individual listed on the site, then you would not want to add each headshot to the manifest file. Adding all these files would bloat the payload of the application to include images that the user may never use. Instead, the FALLBACK section examines the /images/headshots/ path and knows that any path that includes /images/headshots/ is a part of the FALLBACK pattern and is served the mapped offline resource instead.
The NETWORK Section
The intent around the application manifest file is to define clear boundaries around the given application to ensure all the required resources are available on the client when there is no access to the Internet. While providing a cached option to the user is often possible, not all server resources are candidates for caching.
Search pages, dynamically constructed lists, user input forms and any other page that simply does not operate without the web server is not available for caching. The NETWORK section creates a whitelist of URLs that are excluded from control of the application cache.
NETWORK:
/customer/list
This example lists the URL to the customer list page which is built from the database. Even though this URL is not listed in the CACHE section, without the entry in the NETWORK section, any requests for URL that are not cached are cancelled by the browser. Adding the path to the NETWORK officially excludes the given URL from the browser’s control to maintain the application cache and directly sends all requests to the server.
While wildcards are not allowed in the NETWORK section, the asterisk character (*) will whitelist any URL that is not explicitly listed in the CACHE section of the manifest file. Using the asterisk would change your NETWORK section to:
NETWORK:
*
Mime Type and Encoding
In order to be processed correctly by the browser, the application manifest file must serve with the appropriate mime type and content encoding.
Manifest files must have the mime type of text/application-manifest. Further, the content encoding of the file must be set to UTF-8.
You may configure your web server to serve all files with the .appcache extension with the right mime type and content encoding. Alternatively, you may choose to set the mime type and encoding on the server for individual files. The example in this article configures each file individually.
Referencing the Manifest from the HTML Page
Once the manifest includes all the appropriate sections and is set to serve with the right mime type and content encoding, the manifest is ready to reference an HTML page.
To reference a manifest file in an HTML page, you use the new manifest attribute of the html element to point to the manifest file. If your manifest is a static file you may reference the file with the established .appcache file extension convention:
<html manifest="manifest.appcache">
When the browser recognizes a value for the manifest attribute then it knows to treat the page as an HTML offline application and initiates the checking event against the manifest file.
Understanding Application Cache Event Lifecycle
The Application Cache API uses a well-defined event lifecycle in order to help keep track of the state and status of application files. When a page pointing to a manifest file is encountered for the first time, the browser checks the application manifest to determine which files must be downloaded and added into the application cache. As each file is served to the client, the downloading and progress events fire until the entire contents of the files listed in the manifest are successfully loaded into application cache.
Any subsequent requests to the host page trigger the checking event to the manifest file. If the computer is offline then the contents of the application cache are used. If a connection is present then the checking event is fired and the manifest is examined to see if any changes are present. If there are no changes to the manifest, then once again, the contents of the application cache are used to render the application. However, if the manifest is changed then the files listed in the manifest are downloaded once again and the process repeats. Table 3 lists in detail each application cache event and the context in which it fires.
Understanding the Difference between HTTP Caching and HTML Application Cache
As you develop HTML offline applications, an important distinction to have a clear understanding of is the difference between HTTP caching and application cache.
HTTP (or browser) caching is the mechanism of saving a copy of a web page, image, script or style sheet to the browser cache when you visit a web page. This behavior is desirable and essential so web servers across the world are not inundated with unnecessary requests for files that are already present on a user’s machine. The files cached in the browser cache are often set to have relatively long (days, weeks and even sometimes longer) expiration dates in order to help improve the web’s performance.
The purpose of the application cache isn’t to save the server requests for performance reasons, but to make the application’s files available even when working offline. The problem is these two caching mechanisms may collide, giving you unexpected results from your application.
Consider a page configured to be available offline, but is cached in the browser cache for 24 hours. If you push a change to your offline application, it would take a full day before you were able to see the change to the page. Therefore you often need to disable browser caching on files saved in the application manifest in order to facilitate accurate file synchronization.
While no server-side framework technologies are required to enable HTML offline applications, the example featured in this article uses ASP.NET MVC in order to render the HTML and manifest files with browser caching disabled on the individual files.
The approach of disabling caching on a file-by-file basis on the server is used here for two reasons. The reason to use the server is that the use of HTML META tags is ineffective. There are META tags that purportedly are able to halt browser caching, but unfortunately these tags are often ignored by modern web browsers and therefore the desired result is not consistent or reliable. The reason to configure the caching rules on a file-by-file basis is to make the sample code portable. Rather than requiring you to make a number of changes in IIS before running the associated sample application with this article, programmatic configuration makes the example portable and able to run without any necessary web server customizations.
What Is Web Storage?
Web Storage takes client-side data persistence to the next level beyond the traditional HTTP cookie. In the past, the only option available to web developers to save information on a user’s machine was to write a cookie. While cookies are sufficient in many cases, often developers required a persistence mechanism that offered a higher capacity and more structured API.
Whereas the contents of a cookie are transmitted with each HTTP request and response, data saved in Web Storage remains exclusively on the client. The "client-only” nature of Web Storage data opens up the possibility to save much more information on the client than was ever possible before using HTTP cookies. While capacity limits may vary by browser and user settings, in general, Web Storage capacity is often approximately 5 MB on a user’s machine.
Web Storage is available under two different modes, local storage and session storage, as detailed in Table 4. While the scope and lifecycle of data stored in local vs. session storage varies, the API interface for accessing either type is exactly the same.
Browser Support
Web Storage enjoys support by a wide array of desktop and mobile browsers, even including Internet Explorer. Table 5 details the support landscape for the Web Storage API.
Introducing the "AlwaysNote” HTML Offline Application
Consider a field sales staff that regularly interacts with potential and existing clients. During the sales process, the salespeople must keep notes about each customer and need a system to collect feedback.
You are tasked with implementing a web application to manage the new data and existing customer data. A critical obstacle you must overcome is the fact that often the salespeople are in locations with little to no Internet connectivity available. In order to meet the requirements of your project, you must create an application that is capable of the following:
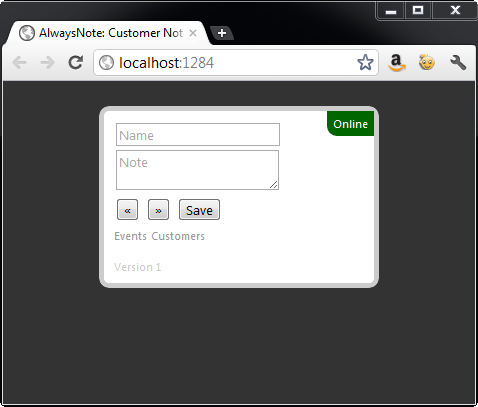
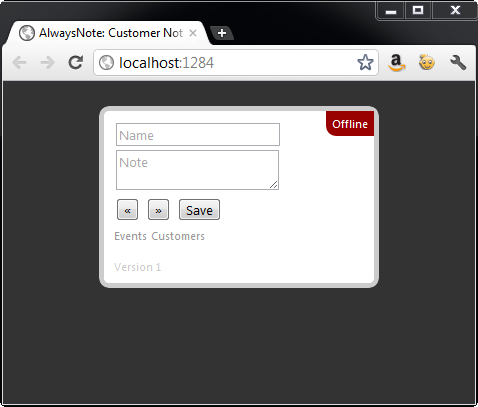
"AlwaysNote” is the name given to the application implemented in this article that fulfills each of the stated requirements. AlwaysNote responds to the online and offline status of the computer and displays a green "online” status message in the upper right corner of the form as depicted by Figure 2. When the computer is offline, the status message updates to a red "offline” message to indicate to the user that they are now working in offline mode as shown in Figure 3.
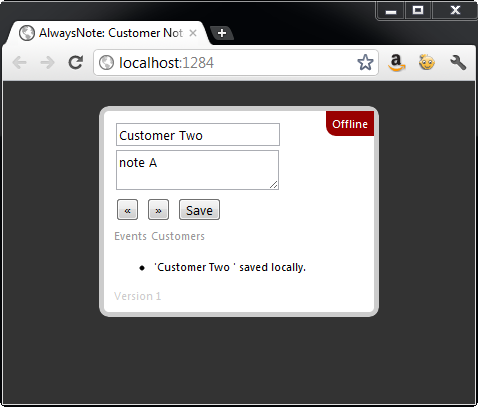
While working in a connected mode, user data is first saved into local Web Storage and then sent to the server as shown in Figure 4. When disconnected, as demonstrated by Figure 5, the data is stored only in local storage and will synchronize with the server as soon as an outside connection is available.

When a connection to the web is once again available, the application handles the online event and then sends all the records added or edited since the unavailabiltiy of the outside connection. Figure 6 demonstrates how the application responds to the recent availability of a network connection.

The AlwaysNote application uses a number of technologies together to support the offline application. Table 4 lists each technology and describes the role they play in the application.
When the user clicks on the Events link, the offline version of the events file is served from the application cache instead of sending the request to the server when working offline, as shown in Figure 7.
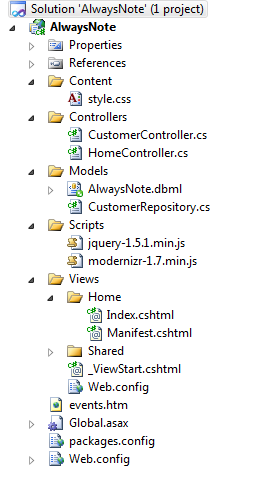
As you build up the code in this article you’ll add a number of files into a Visual Studio solution. Table 5 details the purpose of each file discussed in this example and Figure 8 depicts the structure in the Solution Explorer.
The Database
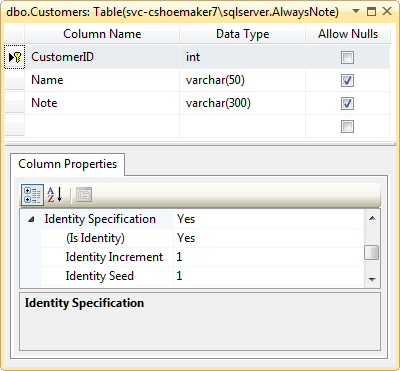
The database for AlwaysNote is made up of a single table. The Customer’s table includes CustomerID, Name and Note to store customer information. Figure 9 shows the configuration of the table in SQL Server.
Implementing Server Logic
Beginning at the lowest level of the application, the server logic implemented for AlwaysNote is responsible for writing data to the database, processing persistence requests from the client and configuring pages for use as an offline application. To begin, let’s review data access implementation found in the customer repository.
Customer Repository
The CustomerRepository class is responsible for doing the actual work of updating the database, which in this case, is the Customer table. Both the Update and Add methods use standard LINQ to SQL syntax to commit changes to the database. You can see the full code listing for the CustomerRepository class in Listing 1.
Customer Controller
To facilitate interaction between the view and the model layer there are a few support classes used to act as containers for messages between layers. The CustomerInputModel is used to encapsulate the data coming from the UI layer into the controller.
public class CustomerInputModel
{
    public string Name { get; set; }
    public string Note { get; set; }
    public int ID { get; set; }
    public string Key { get; set; }
}
The Name and Note properties are self-explanatory. The ID property holds the value of the CustomerID record in the Customer table. The Key property contains the index number of the record as it is entered into the local storage on the client. Tracking these two values independently makes synchronization a trivial task.
While the CustomerInputClass is responsible for carrying data coming from the UI, the CustomerViewModel is used to model data returned to the view. In this class the ID and Key properties fulfill the same purpose as described in the CustomerInputClass.
public class CustomerViewModel
{
    public string ID { get; set; }
    public string Key { get; set; }
}
The next step is to implement the CustomerController, which uses the CustomerInputModel and CustomerViewModel to interact with the view.
The Save method accepts an instance of the CustomerInputModel and attempts to save new or updates to customer information. If an ID value is present, then the values are updated, otherwise a new customer record is created.
A Key value is always available since the data is saved first on the client. Whether the date is new or updated the record’s ID is returned to the view. When the web page recognizes a response from the server, then the Key is used to look up the data saved in local storage and the ID value is updated to make sure the data stays in sync.
Listing 2 shows the code for the CustomerInputModel, CustomerViewModel and CustomerController classes.
Home Controller
The HomeController is responsible for returning the appropriately formatted view for the application. In this instance, browser caching is disabled for both the index and manifest pages. The manifest is further configured to return the text/cache-manifest mime type (through the ContentType property) and the page encoding is set to UTF-8 via the ContentEncoding property.
public class HomeController : Controller
{
    public ActionResult Index()
    {
        Response.Cache.SetCacheability(
            System.Web.HttpCacheability.NoCache);
        return View();
    }

    public ActionResult Manifest() {
        Response.ContentType = "text/cache-manifest";
        Response.ContentEncoding =
            System.Text.Encoding.UTF8;
        Response.Cache.SetCacheability(
            System.Web.HttpCacheability.NoCache);
        return View();
    }
}
Remember, the controller actions are used in favor of a static file, in this case to disable browser caching.
Listing 4 shows the full code for the HomeController class.
The View
The HTML structure of the view includes the online status container, HTML form elements, navigation and elements to provide user feedback on the page.
Listing 4 shows the full code for the index view.
Getting Started with the Script
The script for the view begins by handling the document ready event using the traditional jQuery syntax. All the other functions discussed in this article are scoped inside the ready function (as indicated by the ellipsis at the end of the code snippet).
Before discussing the meat of the script, first familiarize yourself with some of the utility functions used throughout the script.
$(function () {

    var customerIndex = 0;

    function logMessage(message) {
        $("#log").append("<li>" + message + "</li>");
    }

    function clearUI() {
        $("#name, #note").val("");
        $("#log").html("");
    }

    ...

});
The customerIndex variable’s purpose is to keep track of the locally-stored index of the current customer record. Many of the functions throughout the script reference this variable. The logMessage function is used to display messages to the user by adding items to an unordered list. The clearUI function removes any entered data from the form elements and clears the log list as filled out by logMessage.
Detecting an Internet Connection
Detecting an Internet connection is possible by querying the read-only window.navigator.onLine property. This property gets its value during the browser’s monitoring of network connectivity.
While the function simply returns the value of a single property, wrapping the call to the value may prove helpful during development. Once wrapped up, you can override the property’s actual value to test how your script is working in an offline mode without having to disable your wireless networking hardware. Further, you may choose to extend support for network detection as discussed in the sidebar, Rock Solid Connectivity Detection.
function isOnLine() {
    return navigator.onLine;
}
Now that you are able to detect the status of the Internet connectivity, the next step is to update the page to report the connection status. The reportOnlineStatus function uses the value from the isOnLine function to decide how to change the UI to reflect the network availability.
Depending on the presence of an Internet connection, the DIV is updated to either read “Online” with a green background or “Offline” with a red background, as applied via a CSS class.
function reportOnlineStatus() {
    var status = $("#onlineStatus");

    if (isOnLine()) {
        status.text("Online");
        status.
            removeClass("offline").
            addClass("online");
    }
    else {
        status.text("Offline");
        status.
            removeClass("online").
            addClass("offline");
    }
}
Now that the page knows how to for respond to connectivity changes, the next step is to handle the events that fire when the browser recognizes the connection state is changed.
Responding to Connectivity Changes
There are two events that the browser fires when a connection to the web changes availability. By subscribing to the online event, the page can easily update the UI to reflect the presence of an Internet connection and then send all the data entered while the connection was unavailable to the server.
When the application is unable to communicate with the web, then the UI is updated. No other actions are required at this point because the save logic is responsible for saving the data locally.
window.addEventListener("online", function (e) {
    reportOnlineStatus();
    saveToServer();
}, true);

window.addEventListener("offline", function (e) {
    reportOnlineStatus();
}, true);
Updating the Application Cache
When a new version of the application is made available, then the manifest is updated in order to push a change notification to the client. The updateready event fires once the manifest is checked for changes and all the files listed in the manifest are successfully downloaded. The event handler for the updateready event is available on window.applocationCache.onupdateready. When this event fires then you must swap in the new version of the files and then reload the page.
window.applicationCache.onupdateready = function (e) {
    applicationCache.swapCache();
    window.location.reload();
}
Swapping the cache is necessary because the version of the files the user sees at the time of download is the old version of the files. Once the new files are available on the client, they must be loaded into the cache. Once the new page is loaded into the cache then the browser must read the latest version of the page to display to the user. The easiest and most unobtrusive way to accomplish reloading the page is to programmatically reload the page in JavaScript.
Saving Changes
The first step in saving changes is to get an instance of the JSON object used to model data entered through the form. The interface for the model on the client is exactly the same as the CustomerInputModel on the server, except for the IsDirty property. The IsDirty property is switched to true when changes are made to a particular customer record so that only changes to edited (or new) records are sent to the server for processing.
The getModel function first defines the JSON object with the appropriate interface and then attempts to get an instance of that object from local storage based on the selected customer index value. Since the data is stored in local storage as a flat string, if a record is found then the string is parsed into a full JSON object by using the JSON.parse function.
If a record is not found at the index location then the empty model is returned to the caller in order to ensure a working instance of the object.
function getModel(index) {
    var model = {
            Name: "",
            Note: "",
            IsDirty: false,
            Key: "",
            ID: ""
    };

    if (localStorage[index] != null) {
        model = JSON.parse(localStorage[index]);
    }
    model.Key = index;
    return model;
}
The next two functions are responsible for doing the explicit work of saving any new changes first to the client and then to the server. The saveToLocal function begins by calling getModel and passing in the current customer index value. Once the model is available then all the latest values for each property are read from the form elements and placed into the model object. Next, the object is marked as dirty so the procedure that sends the changes to the server will know to send this object to the server. Then the JSON object is serialized into a flat string and then saved into local storage using the setItem function using the current customer index value as the key. Finally, the user is notified that the information is saved locally by calling logMessage to add an item to the unordered list on the page.
function saveToLocal() {
    var model = getModel(customerIndex);
    model.Name = $("#name").val();
    model.Note = $("#note").val();
    model.IsDirty = true;
    localStorage.setItem(customerIndex,
        JSON.stringify(model));
    logMessage("'" + model.Name + "' saved locally.");
}
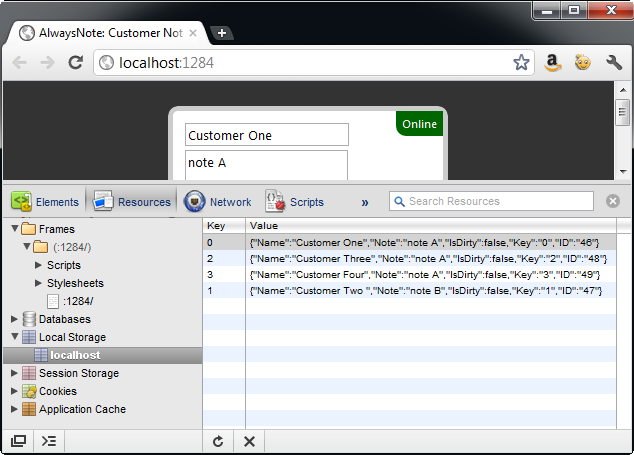
When the page is ready to take the data saved in local storage and send those changes to the server, the saveToServer function is called. The first operation in saveToServer is to loop through each of the items stored in local storage. During each loop iteration, the current model is extracted from local storage. Then the object is evaluated to see if IsDirty is set to true, which signifies that the object requires server processing. Figure 10 demonstrates how the JSON data appears when stored in local storage as a string.
If the object requires server processing then the jQuery post function is used to send the JSON object to the Save action on the CustomerController. When a response is returned from the server then the Key value is used to extract the model from local storage, set IsDirty to false and update the ID value from what came from the server. Then the JSON object is again serialized and saved into local storage. Finally, the UI is updated to notify the user that the changes are saved on the server.
function saveToServer() {
    for (var i = 0; i < localStorage.length; i++) {
        var model = getModel(i);
        if (model.IsDirty) {
            $.post("/customer/save", model,
                function (data) {
                    var key = data.Key;
                    var m = getModel(key);
                    m.ID = data.ID;
                    m.IsDirty = false;
                    localStorage[key] =
                        JSON.stringify(m);
                    logMessage("'" +
                        m.Name + "' saved to server");
            });
        }
    }
}
Tying each of these functions together is the logic implemented in the save button’s click handler. First, the browser’s support for local storage is detected by using Modernizr. If local storage support is available then the latest changes are saved by calling the saveToLocal function. Next, if a connection to the Internet is available, then any changes marked as IsDirty are sent to the server by calling the saveToServer function.
If local storage isn’t available then, for example purposes here, the user is simply alerted that the current browser is not supported. In the real world you may want to implement a more user-friendly approach.
$("#save").click(function () {
    if (Modernizr.localstorage) {

        saveToLocal();

        if (isOnLine()) {
            saveToServer();
        }
    }
    else {
        alert("AlwaysNote requires local storage.");
    }
});
Displaying Customer Information
In order to show the latest customer information to the user, the showCustomer function begins by calling getModel to extract the selected customer model. If the customerIndex is pointing to a record position that doesn’t have a value, then the model returns null. In the event of a new record then the UI is cleared of any previously entered values.
If, however, the customer record does exist then the current values are placed into the page’s form elements, which displays the latest values to the user.
function showCustomer() {
    var model = getModel(customerIndex);
    if (model == null) {
        clearUI();
    }
    else {
        $("#name").val(model.Name);
        $("#note").val(model.Note);
    }
}
Handling UI Navigation
When the user clicks on the “next” button then the customer index is incremented by one and then the page is instructed to show the current customer to the user.
$("#next").click(function () {
    customerIndex++
    showCustomer();
});
When the back button is clicked, then the customer index is decremented by one (as long as the index is not currently on the first record) and then the current customer is shown to the user.
$("#back").click(function () {
    if (customerIndex > 0) {
        customerIndex--;
        showCustomer();
    }
});
Listing 4 shows the full code listing for the script.
The Manifest File
Now that the HTML and script is implemented giving AlwaysNote the required behavior and structure, the next step to make the application available offline is to build and reference the manifest file.
The manifest includes a reference to the home view, style sheet, jQuery and Modernizr script files as well as the fallback file required to show users if they attempt to navigate to the events page.
The FALLBACK section creates the mapping from the server-side events to the client-side
CACHE MANIFEST
# version 1

CACHE:
/
/Content/style.css
/Scripts/<a href="http://modernizr-1.7.min.js">modernizr-1.7.min.js</a>
/Scripts/<a href="http://jquery-1.5.1.min.js">jquery-1.5.1.min.js</a>
/events.htm

FALLBACK:
/events.aspx /events.htm

NETWORK:
*
You can see the full code listing for the manifest file in Listing 5.
Referencing the Manifest File from the HTML Page
Once the manifest is crafted to include all the necessary files for the application, the next step is to reference the manifest from the HTML page. To create the link, you use a new manifest attribute off the html element to point to the manifest file:
<html manifest="home/manifest">
In this case, the manifest is served from the Manifest action off the HomeController.
Listing 4 shows the full code for the index view, and Listing 7 shows the style sheet for the view.
Fallback Page
Recall from the manifest file that the server events page is mapped to the local events page in the FALLBACK section of the application manifest. In order for the application to work properly, you must also include the fallback page in the CACHE section of the manifest. You can see the full code listing for the events fallback page in Listing 6.
Conclusion
Together, HTML Web Storage and Application Cache create a compelling and viable path to creating offline web applications. While some hurdles still exisg with Internet Explorer not yet supporting the application cache, nearly every other modern browser is capable of providing the environment you need in order to build disconnected applications that don’t skimp on rich features.
Listing 1: Customer repository (CustomerRepository.cs)
using System.Collections.Generic;
using System.Linq;

namespace AlwaysNote.Models
{
    public class CustomerRepository
    {
        public void Update(int id, string name, string note) {
            Customer customer = null;

            using (AlwaysNoteDataContext db =
                        new AlwaysNoteDataContext())
            {
                var query = from c in db.Customers
                            where c.CustomerID == id
                            select c;

                customer = query.SingleOrDefault<Customer>();

                customer.Name = name;
                customer.Note = note;

                db.SubmitChanges();
            }
        }

        public int Add(string name, string note)
        {
            Customer customer = null;

            using (AlwaysNoteDataContext db =
                        new AlwaysNoteDataContext())
            {
                customer = new Customer();
                customer.Name = name;
                customer.Note = note;
                db.Customers.InsertOnSubmit(customer);
                db.SubmitChanges();
            }

            int id = customer.CustomerID;

            return id;
        }
    }
}
Listing 2: Customer controller (CustomerController.cs)
using System.Web.Mvc;

using AlwaysNote.Models;

namespace AlwaysNote.Controllers
{
    public class CustomerInputModel
    {
        public string Name { get; set; }
        public string Note { get; set; }
        public int ID { get; set; }
        public string Key { get; set; }
    }

    public class CustomerViewModel
    {
        public string ID { get; set; }
        public string Key { get; set; }
    }

    public class CustomerController : Controller
    {
        public ActionResult Index()
        {
            return View();
        }

        public ActionResult Save(CustomerInputModel model)
        {
            CustomerRepository repository =
                        new CustomerRepository();

            int id = 0;

            if (model.ID > 0)
            {
                id = model.ID;
                repository.Update(id, model.Name, model.Note);
            }
            else
            {
                id = repository.Add(model.Name, model.Note);
            }

            CustomerViewModel vm = new CustomerViewModel();
            vm.ID = id.ToString();
            vm.Key = model.Key;

            return Json(vm);
        }

    }
}
Listing 3: Home controller (HomeController.cs)
using System.Web.Mvc;

namespace AlwaysNote.Controllers
{
    public class HomeController : Controller
    {
        public ActionResult Index()
        {
            Response.Cache.SetCacheability(
                System.Web.HttpCacheability.NoCache);
            return View();
        }

        public ActionResult Manifest() {
            Response.ContentType = "text/cache-manifest";
            Response.ContentEncoding = System.Text.Encoding.UTF8;
            Response.Cache.SetCacheability(
                System.Web.HttpCacheability.NoCache);
            return View();
        }
    }
}
Listing 4: Index page (Index.cshtml)
@{
Layout = null;
}
<!DOCTYPE html>
<html manifest="home/manifest">
<head>
<title>AlwaysNote: Customer Note System</title>
<link rel="Stylesheet" href="/Content/style.css"
type="text/css" />
<script src="/Scripts/<a href="http://modernizr-1.7.min.js">modernizr-1.7.min.js</a>"
type="text/javascript"></script>
<script src="/Scripts/<a href="http://jquery-1.5.1.min.js">jquery-1.5.1.min.js</a>"
type="text/javascript"></script>
<script>
$(function () {
var customerIndex = 0;
$("#back").click(function () {
if (customerIndex > 0) {
customerIndex--;
showCustomer();
}
});
$("#next").click(function () {
customerIndex++
showCustomer();
});
$("#save").click(function () {
if (Modernizr.localstorage) {
saveToLocal();
if (isOnLine()) {
saveToServer();
}
}
else {
alert("AlwaysNote requires local storage.");
}
});
function isOnLine() {
return navigator.onLine;
}
function getModel(index) {
var model = {
Name: "",
Note: "",
IsDirty: false,
Key: "",
ID: ""
};
if (localStorage[index] != null) {
model = JSON.parse(localStorage[index]);
}
model.Key = index;
return model;
}
function saveToLocal() {
var model = getModel(customerIndex);
model.Name = $("#name").val();
model.Note = $("#note").val();
model.IsDirty = true;
localStorage.setItem(customerIndex,
JSON.stringify(model));
logMessage("'" + model.Name + "' saved locally.");
}
function saveToServer() {
for (var i = 0; i < localStorage.length; i++) {
var model = getModel(i);
if (model.IsDirty) {
$.post("/customer/save", model,
function (data) {
var key = data.Key;
var m = getModel(key);
m.ID = data.ID;
m.IsDirty = false;
localStorage[key] =
JSON.stringify(m);
logMessage("'" +
m.Name + "' saved to server");
});
}
}
}
function logMessage(message) {
$("#log").append("<li>" + message + "</li>");
}
function clearUI() {
$("#name, #note").val("");
$("#log").html("");
}
function showCustomer() {
var model = getModel(customerIndex);
if (model == null) {
clearUI();
}
else {
$("#name").val(model.Name);
$("#note").val(model.Note);
}
}
function reportOnlineStatus() {
var status = $("#onlineStatus");
if (isOnLine()) {
status.text("Online");
status.
removeClass("offline").
addClass("online");
}
else {
status.text("Offline");
status.
removeClass("online").
addClass("offline");
}
}
window.applicationCache.onupdateready = function (e) {
applicationCache.swapCache();
window.location.reload();
}
window.addEventListener("online", function (e) {
reportOnlineStatus();
saveToServer();
}, true);
window.addEventListener("offline", function (e) {
reportOnlineStatus();
}, true);
if (isOnLine()) {
saveToServer();
}
showCustomer();
reportOnlineStatus();
});
</script>
</head>
<body>
<section>
<div id="onlineStatus"></div>
<input type="text" placeholder="Name" id="name" />
<textarea id="note" placeholder="Note"></textarea>
<div id="command">
<input type="button" value="&laquo;" id="back" />
<input type="button" value="&raquo;" id="next" />
<input type="button" value="Save" id="save" />
</div>
<a href="/events">Events</a>
<a href="/customer/list">Customers</a>
<ul id="log"></ul>
<div id="version">Version 1</div>
</section>
</body>
</html>
Listing 5: Cache manifest (Manifest.cshtml)
CACHE MANIFEST
# version 1

CACHE:
/
/Content/style.css
/Scripts/<a href="http://modernizr-1.7.min.js">modernizr-1.7.min.js</a>
/Scripts/<a href="http://jquery-1.5.1.min.js">jquery-1.5.1.min.js</a>
/events.htm

FALLBACK:
/events /events.htm

NETWORK:
*

@{
    Layout = null;
}
Listing 6: Static Events page (events.htm)
<!DOCTYPE html>
<html xmlns="<a href="http://www.w3.org/1999/xhtml">http://www.w3.org/1999/xhtml</a>">
<head>
<title>Events</title>
<link rel="Stylesheet" href="/Content/style.css"
type="text/css" />
</head>
<body>
<section>
<h1>Events</h1>
<p>
The event listings are only available when
you are connected to the internet.
Please call us at (800) 555-5555 to hear our
list of upcoming events.
</p>
<div id="version">Version 1</div>
</section>
</body>
</html>
Listing 7: Cascading style sheet (style.css)
body
{
    font-family:Segoe UI,Arial,Helvetica,Sans-Serif;
    background-color:#333;
}

section
{
    position:relative;
    padding:10px;
    width:250px;
    border:5px solid #ccc;
    background-color:#fff;
    -moz-border-radius: 10px;
    border-radius: 10px;
    margin-left:auto;
    margin-right:auto;
    margin-top:25px;
}

section a
{
    font-size:.7em;
}

section a, section a:link, section a:hover, section a:visited,
section a:active
{
    color:#999;
    text-decoration:none;
}

input,textarea
{
    font-family:Segoe UI,Arial,Helvetica,Sans-Serif;
}

input
{
    display:block;
}

#onlineStatus
{
    position:absolute;
    right:0px;
    top:0px;
    font-size:.7em;
    padding:6px;
    -moz-border-radius-bottomleft: 10px;
    border-bottom-left-radius: 10px;
    color:#fff;
}

#command input
{
    display:inline;
}

.online
{
    background-color:#060;
}

.offline
{
    background-color:#900;
}

#log li
{
    font-size:.7em;
}

#version
{
    font-size:.7em;
    color:#ccc;
}
Table 1: Browser support for Application Cache
| Browser | Earliest Supported Version |
|---|---|
| FireFox | 3.5 |
| Chrome | 5.0 |
| Safari | 4.0 |
| Opera | 10.6 |
| Internet Explorer | n/a |
| Android | 2.3 |
| iPhone | 2.1 |
Table 2: The main group of files and functionalities in an offline application.
| Part | Description |
|---|---|
| Assets | Application assets include the originating HTML file, any referenced script files, style sheets and images. Think of the assets as all the files your application normally requires in order to serve a web page to the user. |
| Cache Manifest | The cache manifest is the central nerve center of an offline application. Each file required for download to the user’s machine is listed in the manifest. A successful load of the manifest file ensures that the listed file contents of the application are successfully downloaded on the client and available for offline use. The application manifest file is described in more detail in the Understanding Cache Manifest section. |
| Event Lifecycle | Each time an “offline” HTML file is loaded in the browser, a number of events fire in the Application Cache API in an attempt to locate any changes published by the web server, notify of errors or keep the files unchanged. The offline event lifecycle is described in more detail in the Understanding Application Cache Event Lifecycle section. |
| Connectivity Awareness | At different times a computer running an offline application may or may not have access to the public web. Many offline applications are built to recognize when access to the Internet is available and take advantage of the connectivity to look for application updates, synchronize data or perhaps pull data down to the client for later use. Connectivity awareness is available in the browser through the read-only window.navigator.onLine property and by handling the window.online and window.offline events or by implementing custom detection mechanisms. |
Table 3: Detail of application cache events. Source: http://www.whatwg.org/specs/web-apps/current-work/multipage/offline.html#appcacheevents
| Event Name | Description | Next Events |
|---|---|---|
| Checking | The checking event is always the first event in the lifecycle. This event is fired when the browser is checking the manifest for changes or is making its very first request to the manifest. This event fires upon each request of a page in the application cache. | noupdatedownloadingobsoleteerror |
| Noupdate | The noupdate event fires after the manifest is checked for changes and no changes are available. | Last event in lifecycle |
| Downloading | The downloading event fires when the files in the manifest are being downloaded - as a result of an update or contacting the manifest for the first time. | progresserrorcachedupdateready |
| Progress | The progress event fires during the download process. | errorcachedupdateready |
| Cached | The cached event fires once all the files listed in the manifest are downloaded and stored in the application cache. | Last event in lifecycle |
| Updateready | The updateready event fires when old content in the application cache was re-downloaded as a result of a change in the manifest. When handling this event you may call window.applicationCache.swapCache to make the recently downloaded changes available to the browser. | Last event in lifecycle |
| Obsolete | The obsolete event fires when manifest returns HTTP 410 (gone) or 404 (not found) codes. | Last event in lifecycle |
| Error | The error event fires if any of the following conditions exist: Condition::The error event fires when….:: Manifest is not Available::the manifest returns a 410 or 404 HTTP, the attempt to contact the manifest is terminated:: Referencing Page Failed to Download::the page attempting to contact the manifest experiences a transmission error:: Fatal Error While Downloading Manifest Contents::a file listed in the manifest encounters an error while downloading:: Manifest Changes During Update::the manifest changes during an update process (in this case the manifest is contacted again to attempt another update):: | Last event in lifecycle |
Table 4: Explanation of the different Web Storage types.
| Storage Type | Description |
|---|---|
| Local | Local storage grants the ability to persist data in the browser beyond session scope and even closing of the browser. |
| Session | Session storage saves data in the browser only during a specific user session. |
Table 5: Web Storage browser support.
| Browser | Earliest Supported Version |
|---|---|
| FireFox | 3.6 |
| Chrome | 4.0 |
| Safari | 4 |
| Opera | 10.5 |
| Internet Explorer | 8 |
| Android | 2.3 |
| iPhone | 4.2 |
