


SharePoint is good for many things! That is, perhaps, what makes this product so interesting and successful. However, when a Swiss knife is good for many things it can work as a screwdriver, but it isn't probably the best screwdriver you've ever used! SharePoint, while good for many things, is probably better at some than others. One thing companies
use SharePoint a lot for is Document Management. SharePoint 2007 has document libraries. In those document libraries, users have facilities such as checkin/checkout, versioning, item level permissions, workflows, etc. On top of document libraries, SharePoint 2007 supports things such as policies, content types, and recycle bin. SharePoint 2010 will be even more exciting as it adds numerous new facilities that make SharePoint an even more compelling document management product.
In this article, I will examine some of those facilities. But before I go too much further, I must mention the standard disclaimer, that SharePoint 2010, at the time of writing this article, is currently in beta, and may change before it is finally released.
Document IDs
Lists in SharePoint 2007 have an “ID” column that is an integer that constantly increases. An ID column is unique across a document library but not unique across an organization. Also, it is difficult to tell an ID to be anything else except an integer, which prevents you from applying custom document ID formats to any document. In reality, organizations have their own schemes for numbering documents, and especially when you have documents spread across many sites and site collections, you want document IDs to be more meaningful.
A Document ID in SharePoint 2010 is a pluggable identifier for a document, or a document set (described later). It also provides a static URL or a permalink that opens the document or document set associated with the ID, regardless of the location of the document.
Thus, Document IDs provide you with an ability to reference documents as permalinks-links that don’t change or break as the location of the document changes-even if the document moves between site collections. Also, the format and generation logic of the generated Document IDs is customizable.
Let’s see how this actually works!
In order to use Document ID’s you have to first activate the Document ID service under Site collection features as shown in Figure 1.

After you’ve activated the service, go ahead and add a document in a document library in the site collection. The document now gets a unique Document ID (Figure 2).

Note the URL for the Document ID, which is a layout page with a query string as shown below.
DocIdRedir.aspx?ID=FPAA543DPY74-1-1
The above URL has no bearing on the document’s location! SharePoint 2010 remembers where that document is and since the ID never changes, you can always count on that permalink to work.
Document Sets
In a typical project where users are producing documents, frequently to accomplish one task, you may have not a single document but a set of documents that need to be treated as one. This is where document sets come into the picture. A document set is implemented as a site collection feature. Activating it gives you a special content type that allows you to group together multiple documents as a “set of documents.”
This gives you many interesting new options. For instance, a document set itself can have its own welcome page. This welcome page can tell users what the specific document set is all about. Since document sets are implemented as a content type, they get everything that a content type gets-versioning, workflows, policies, etc. Only this time around, the entire document set, i.e., multiple documents together, can participate in the business processes defined on the document set.
Let’s see how this works.
To use document sets, activate the site collection level feature called “Document Sets.” Then, in a document library, allow management of content types and add Document Sets as an allowed content type.
Now, you will be able to create a new document set from the “New” button under the “Documents” ribbon. Creating a new document set will simply ask you for a name and description. Now, using the welcome page, you can begin to add new documents in the document set (Figure 3).
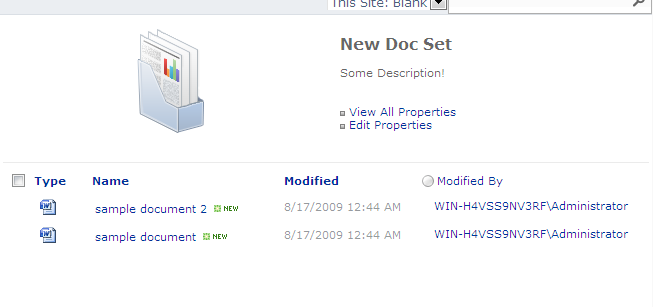
You can customize the welcome page to anything you want. But for now, click on the “View All Properties” link and you’ll see properties as shown in Figure 4.
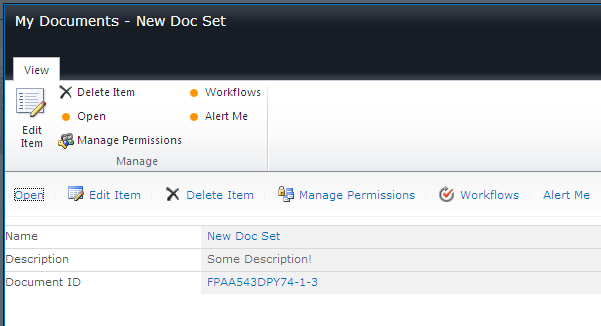
As you can tell, everything that you are used to seeing at a document level is now available at a document set level. Interestingly, the document set itself participates in the Document ID numbering as well. This truly lets you treat a set of documents as one entity.
Perhaps it is the simplest of the features that excite me the most. When you visit the ECB menu of a document set and choose to Download a copy, SharePoint 2010 automatically zips up the entire document set so you can download it as a single zip archive. How very thoughtful is that!?
Metadata
The world loves tagging content, and for a good reason! Folders can be too rigid to describe the haphazard organization of content being produced. For example, let’s say you buy a ring for your girlfriend. Is this a romantic thing or a financial thing? Well, perhaps both! (Please don’t tell my girlfriend I said that!). So it makes sense to tag it both under Financial and Romantic tags! This way you can discover the same content under both-something folders cannot do.
In SharePoint, multiple people can manage metadata at multiple levels. Through Central administration, the metadata manager for an organization can set up a taxonomy. The metadata manager has various tools at his disposal such as marking synonyms, importing metadata libraries, and also deprecating unused terms.
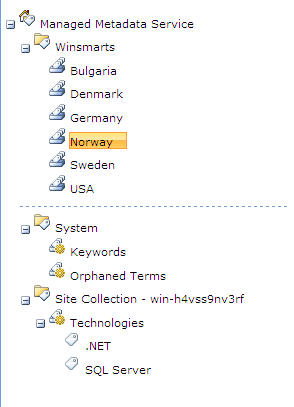
However, centralized taxonomies while essential in getting the tagging process started, rarely work without contributions from individuals familiar with the content. Thus taxonomy vocabulary works better only if it is embellished further by people who know the information they are dealing with better. Thus the metadata manager can delegate term sets to different site collections and appoint owners of certain term sets. Figure 5 shows these groups and term sets along with terms.
Once you set up this terminology, you can use this metadata in any site collection. In order to do so, however, you first have to activate the taxonomy feature with feature ID 73EF14B1-13A9-416b-A9B5-ECECA2B0604C. In the current beta versions of SharePoint 2010, this is a hidden feature, and you will thus have to use commandline stsadm commands to activate this feature. Since you will be using Windows 2008, don’t forget to right-click and choose Run as administrator on your Command Prompt window.
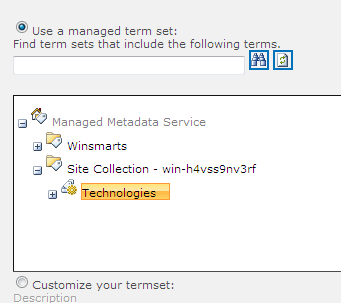
Once you’ve activated the feature you can then start using the metadata by simply adding a new column to a list. Just add a new column type of type “Managed Metadata” and customize the metadata term set to be used as shown in Figure 6.
Now go ahead and add a few items. I added a Technologies column and you can see that the column I added is now being driven by the managed metadata. I leave it up to you to play with the other various possibilities here. You can delegate the rights to add new terms into the taxonomy down to the end user for instance. Can you see how that is done?
Let me show you one rather exciting possibility-Metadata Navigation and Filtering. You simply activate the Metadata Navigation and Filtering feature. Then go into List Settings on a list that you have a metadata-driven column present. Under List settings, look for “Metadata Navigation Settings” and choose columns that you’d like to use in creating a metadata-driven view. Now when you visit the list again, you can now browse through the content of your list using the metadata. Nifty!
Content Organizer
Yet another exciting feature in SharePoint 2010 is the content organizer feature. The content organizer feature can make routing decisions for a document based on the metadata present on the document.
In order to use the content organizer, you will have to activate two features. One with ID 0C8A9A47-22A9-4798-82F1-00E62A96006E, which is the DocumentRoutingResources feature. And then the content organizer feature in the given site (SPWeb). By activating the feature, you are given a special document library called the drop off library.
Also, under Site Settings, you will see a section for Content Organizer rules. This is a simple list where you can specify rules that will examine the metadata of a document dropped in the drop off library, and based on those rules it will route the document to a destination location. SharePoint 2010 also has a similar feature called the Email Router feature, which works in a similar way but is more fine-tuned to handle challenges around handling and organizing e-mail messages where the subject lines can be the same for many different e-mail messages.
These features are incredibly interesting when paired with metadata-driven navigation. Imagine this: a landing document library, routing to another document library’s folders, with unique folder-based permissions. This way you can have metadata-driven based views, and the documents are secured per the permissions configured on the various document library folders.
Summary
Can I just say “wow”! SP2010 has so much new interesting stuff in it. I have barely scratched the surface of the nail of this friendly monster. Specifically about this release, I have said many times that Microsoft listened! They listened to every single gripe and feature request about SharePoint 2007 and did something about it. Now, there are still some cases of band-aids on top of band-aids, and some that are true genuine improvements. In my subsequent articles, I intend to slice and dice some really interesting improvements that have been targeted towards the developer. Sit tight!
