


WPF is finally gaining momentum, and so is Silverlight. Users are starting to take a serious look at Silverlight as an option for rich applications; some of them even have scenarios where targeting both platforms make sense. The Composite Application Guidance for WPF and Silverlight Applications has received improvements that help developers
building either WPF, Silverlight, or both types of composite applications.
The November/December 2008 issue of CODE Magazine contained an article by Brian Noyes titled “Build Composite WPF Application.” The article you are reading uses some of Brian’s samples, covering version 2 of the Composite Application Guidance for WPF and Silverlight. (Yes, the guidance now addresses Silverlight applications!) I recommend you read Brian’s article in case you haven’t already in order to better appreciate and understand the new additions to the guidance.
Improvements for the Reference Implementation Application
A Stock Trader Reference Implementation Application ships as part of the guidance. You can certainly use the application as learning material both for the Composite Application Guidance as well as WPF and Silverlight in general.
The Stock Trader application has gained a Silverlight version, as well as a nice facelift, making better uses of styles and animations. Figure 1 shows both the WPF and Silverlight versions of the application running.
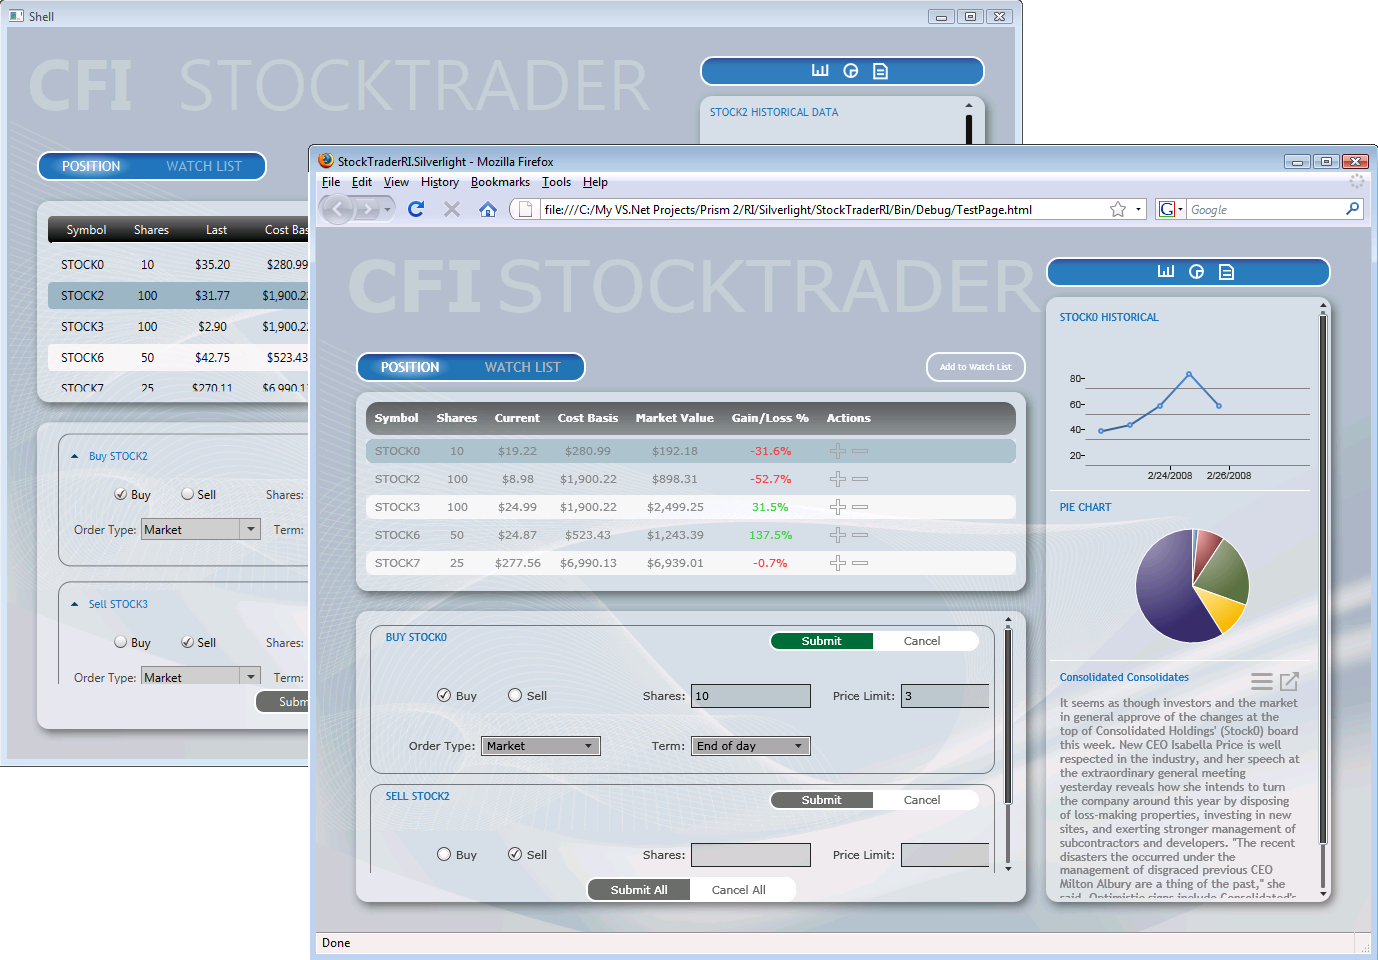
Both versions have the same set of functionality, and they share a good part of the same code base. Later on in this article you’ll see how the sharing is possible.
Migrating from Version 1 to Version 2
You may skip this section in case you haven’t built any applications on the Composite WPF. For those of you who have, you must be aware of some minor breaking changes that have been made to the Composite Application Library (CAL).
The previous version of the CAL targeted only WPF, and it contained an assembly named Microsoft.Practices.Composite.WPF, along with a matching namespace. Since the new version of the CAL also targets Silverlight, Microsoft renamed that assembly and namespace to Microsoft.Practices.Composite.Presentation. Likewise, Microsoft renamed the once named CompositeWpfEvent class to CompositePresentationEvent.
The module enumerators have been replaced with module catalogs. In the previous version, the UnityBootstrapper class used to have a GetModuleEnumerator method returning IModuleEnumerator:
protected override IModuleEnumerator
GetModuleEnumerator()
{
    return new ConfigurationModuleEnumerator();
}
The bootstrapper now has a GetModuleCatalog method returning IModuleCatalog:
protected override IModuleCatalog
GetModuleCatalog()
{
    return new ConfigurationModuleCatalog();
}
The ConfigurationModuleCatalog class replaces the ConfigurationModuleEnumerator one for modules defined in an external configuration file, which now also needs to indicate the name of the assembly for each module type:
<module
    assemblyFile="Appointment.Modules.Editors.dll"
    moduleType="Appointment.Modules.Editors.
               AppointmentEditorsModule,
               Appointment.Modules.Editors"
    moduleName="ApptEditorsModule"/>
You’ll need to address these changes when you update your existing application to the latest version of the CAL. Next you will see the main additions to the guidance and CAL.
UI Composition
The previous version of the CAL allowed for Views to be composed by view injection: a named region within the shell of the application (or within another view) is retrieved from a region manager, and a view is injected into it:
AppointmentListViewModel viewModel =
m_Container.Resolve<AppointmentListViewModel>();

IRegion region = m_RegionManager
.Regions[
     AppointmentConstants.AppointmentViewsRegion];

region.Add(viewModel.View);
region.Activate(viewModel.View);
View injection gives the developer control over when the view gets instantiated and added to the region (usually upon a module’s initialization or as a response to a user’s action), or removed from the region (also usually as a response to a user’s action). In order for this to work, however, it’s absolutely necessary that the region has been created by the time a view is to be injected into it.
In addition to view injection, version 2 also supports view discovery: views are associated with named regions by means of a region-view registry object (the RegionManager object has a RegisterViewWithRegion method to make it easy to register a view with a given named region):
m_RegionManager.RegisterViewWithRegion(
AppointmentConstants.AppointmentViewsRegion,
() =>
   m_Container.Resolve<AppointmentListViewModel>()
   .View);
With view discovery the developer only needs to register views with regions. Whenever a region gets created, it looks into the region-view registry to find out what views are registered for it. In the previous code snippet, the second parameter to RegisterViewWithRegion is a lambda expression that resolves a view model out of the Inversion of Control container, and then gets a reference to its View. Bear in mind that this expression will only execute at the time the region gets created. If you’re not using a container or any specific expression for coming up with an instance of the view, you can pass the Type object that represents the appropriate view, and the framework will use reflection to instantiate it:
m_RegionManager.RegisterViewWithRegion(
      AppointmentConstants.AppointmentViewsRegion,
      typeof(AppointmentListViewModel));
If a view gets registered with a region that has been already created, the region detects that and it immediately displays the view.
Commanding in Silverlight Applications
The Composite WPF brought us two types of commands built on top of the commanding system in WPF: delegate command and composite command, which help with promoting better separation of concerns by having the commands handled outside of the UI itself (usually in objects such as presenters or ViewModels). For a more in-depth explanation, please check Brian’s article mentioned at the beginning of this article.
Silverlight doesn’t currently have even the option for routed commands like WPF does, even though it does have an ICommand interface (which makes me believe I should expect commands in a future version of Silverlight). Version 2.0 of the CAL brings commanding support for Silverlight applications now, and it works almost like its WPF counterpart.
For example, you can bind a button to a command object like so:
<Button
    Content="Save"
    cal:Click.Command="{Binding SaveOrderCommand}"
/>
The WPF version would look like so:
<Button
    Content="Save"
    Command="{Binding SaveOrderCommand}"
/>
A Button control in WPF already has a Command property that you can bind to a command object, whereas a Silverlight button needs a Click.Command attached behavior applied to it. In order words, the attached behavior gives the control a functionality it wouldn’t have otherwise.
By default, commanding support in Silverlight 2.0 is only available to controls that inherit from ButtonBase. However, you can use the same pattern (attached behavior) to provide commanding support to other controls.
The reference implantation application has a good example of another attached behavior. Figure 2 shows a stylized TextBox where the user can type in a stock symbol and then press the Enter key in order to add that symbol to the watch list. A TextBox control doesn’t have such a behavior by default (executing some command whenever the user presses the Enter key). Listing 1 shows how you could implement this behavior (refer to reference implementation for full source code).
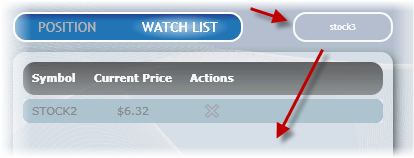
ReturnCommandBehavior inherits from the CAL’s CommandBehaviorBase, whose generic parameter indicates what control is to have the behavior attached to (in this case, TextBox). The behavior is implemented by hooking up to the TextBox’s KeyDown event; whenever the Enter key is trapped and there’s a TargetObject (that is, the behavior has a valid reference to a command object), the ExecuteCommand is called, therefore, executing the underlying command object.
Listing 2 shows the implementation for the ReturnKey class. That class is used to link a TextBox control to the ReturnCommandBehavior class. The ReturnKey class exposes a Command attached property, and internally it gels together the TextBox, the ReturnCommandBehavior, and the actual Command object that contains the logic to be executed.
That all may seem like a mouthful, but it’s actually quite simple to use (in fact, you’ve seen it before, when inspecting the Click.Command attached behavior for Button controls in Silverlight). The snippet below shows how to apply the new behavior to a TextBox:
<TextBox x:Name="txtAddToWatchList"
  Infrastructure:ReturnKey.Command="{Binding
  Path=AddWatchCommand}" />
Infrastructure is a namespace imported into the XAML file, and binding is used to add a delegate command to the ReturnKey.Command property. The delegate command in this case is an AddWatchCommand property available in the DataContext for the user control that contains the TextBox.
You can use this new behavior both in WPF as well as Silverlight applications, in the very same declarative way.
Sharing Code between WPF and Silverlight
You may find cases where you need both WPF and Silverlight versions of an application. For instance, when the user is in the office and needs access to full functionality, but may be occasionally offline from the network, the WPF version would be used. On the other hand, if the user is out of the office and needs access to a subset of the application’s functionality while online at a coffee shop, the Silverlight version would be used.
Supporting a different codebase for each version of the application, when there’s a lot of overlap between them, just isn’t fun. The two applications could probably share all the data access, business logic, and most of the UI logic, provided that you built the application with separation of concerns in mind.
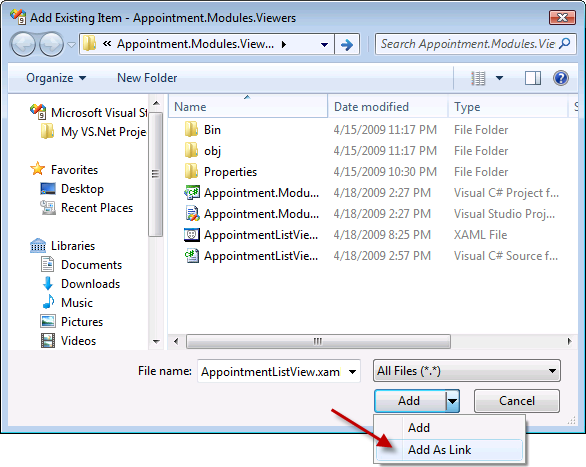
At the moment you cannot go to a Silverlight project and add a reference to a non-Silverlight assembly. One way to share code between WPF and Silverlight is to use Visual Studio’s capability of linking files between projects: when you add a file to a project, you can select Add Existing Item…, pick a file, and choose the option “Add As Link” (see Figure 3). Doing so will show the file in both projects, except that there is only one physical copy of it.
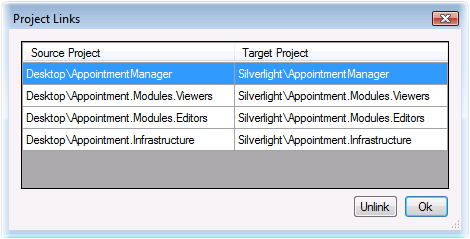
Adding files as a link between projects can be tedious and error-prone. Fortunately, you can use a ProjectLinker add-on for Visual Studio that comes with the Composite WPF and Silverlight guidance. With this little tool you can set links between a source project and a target project. Figure 4 shows the dialog that allows you to manage those links.
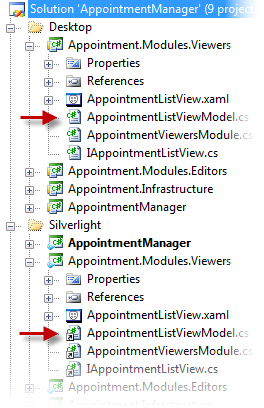
From that point on, once you’ve added a file to the source project, ProjectLinker takes care of adding the file as a link in the target project. In order for it to work smoothly, it’s recommended that you create two solution folders (one for the “desktop”, or WPF version, and one for the Silverlight version), and underneath those folders, the projects follow the same hierarchy for both versions. Figure 5 shows such mirrored structure; also notice the icons indicating that most of the files in the Silverlight projects are links to files in another project.
The only part of the application where sharing code between the two versions is difficult is the actual UI (that is, the forms, the user controls, etc.). WPF can do some things that Silverlight can’t (since the latter is a subset of the former). For instance, the WPF version of the application may have a screen that displays some rich 3-D data visualization, and since Silverlight doesn’t currently support 3-D, you cannot share the same view between both versions of the application.
To solve this, create two separate views, implementing them as appropriate in the target technology, and have them share everything else (both views can share most of the same UI logic if you used a separated presentation pattern, such as the Model-View-ViewModel pattern).
Multi-Targeting Strategies
In order to ease the development effort when building an application targeting both WPF and Silverlight from the get-go, you should consider the following strategies:
- Start with the lowest common denominator. It is usually easier to go from Silverlight to WPF than the other way around, so create the views (that is, the UI) in Silverlight first.
- Adopt separated presentation patterns. Make sure to create views as thin as possible, allowing as much code as possible to be shared between the two platforms. Look into patterns such as the Model-View-ViewModel and Supervising Controller.
- Aim to have single source files that are cross-compiled between the two versions of the application.
- Create a parallel project structure between the two targets; that helps when trying to find where things are, and it helps the ProjectLinker add-on do its job.
You’ll find cases where you cannot use pieces of a source file as-is in both WPF and Silverlight, and you’ll need to add some special handling. You can address those cases as follow:
- Conditional compilation: You can branch code using the #if compiler directive. Every Silverlight project is configured with the SILVERLIGHT conditional compilation symbol. You can use #if SILVERLIGHT to branch code accordingly.
- Partial classes: Put all the code for a class that your application can use as-is in both WPF and Silverlight into a single file (say, CustomerViewModel.cs); anything, specific to WPF around that class goes into a partial class (say, CustomerViewModel.Desktop.cs), whereas anything specific to Silverlight goes into another partial class (say, CustomerViewModel.Silverlight.cs).
- Partial methods: Within some class you make calls to a partial method, which may or may not be implemented by a partial class in one of the projects. If the partial method is not implemented, the compiler takes care of removing any calls to it.
- Separated class: If none of the options above fit your case (most likely because the code to support something is drastically different between the two platforms), create totally separated classes for each. Make sure to not depend directly on those classes, though; make them implement an interface, and have the classes used only by means of the interface.
The Shell
Building the shell of a Silverlight application isn’t different than building one for a WPF application:
- Create the shell as a UserControl (as opposed to a Window, which is usually the case in WPF).
- Add named regions to it, which are going to have views injected during runtime.
One small difference relates to how the shell is actually shown on the screen. In WPF, that’s usually done by calling a Show method on the shell (which normally inherits from the Window class):
public partial class Shell : Window, IShellView
{
    public Shell()
    {
        InitializeComponent();
    }
    public void ShowView()
    {
        Show();
    }
}
In Silverlight the shell inherits from the UserControl class, and there’s no Show method available. Instead, you assign the shell to the RootVisual property of the current application:
public partial class Shell : UserControl,
IShellView
{
    public Shell()
    {
        InitializeComponent();
    }
    public void ShowView()
    {
        Application.Current.RootVisual = this;
    }
}
Notice that both views implement an interface (in this sample, IShellView), which allows for the bootstrapper to be decoupled from the types of shells and their particular way of being displayed.
Listing 3 shows the bootstrapper class for the application. The CreateShell method resolves the view and presenter out of the container, which has the types registered in the ConfigureContainer method.
Data Templates and View Model
The Composite Application Guidance for WPF and Silverlight brings up an interesting suggestion for those building applications following the M-V-VM, or Model-View-ViewModel (or Presentation Model) pattern: instead of creating a view as a user control, use a data template.
Take the AppointmentEditView view from Brian’s article as an example. That view is implemented as a UserControl, and as such, it has a “code-behind” file, which looks like the following:
public partial class AppointmentEditView :
UserControl
{
    public AppointmentEditView()
    {
        InitializeComponent();
    }
}
There isn’t much there, and that’s good. However, the fact that that file is there may be tempting to a developer to start putting a lot of logic there, instead of letting the AppointmentEditViewModel class do the heavy lifting (it’s just too easy for a developer to double-click on a button and add a Click event handler for it right there in the code-behind, and at that point, who knows how much code is going to be put in there).
WPF has a great future called data template that determines how some data should be shown on the screen. A data template can target a specific data type. In an M-V-VM scenario, the ViewModel can be the data type for a data template.
I’ve changed Brian’s example to use this approach. Listing 4 shows the AppointmentEditorsResources.xaml file, which contains a data template that targets the AppointmentEditViewModel type. Data templates are put into resource dictionaries and they must be merged into the application’s dictionary. You could do this in the App.xaml file, but it’s better to let the module that contains the resource do the merging. I’ve added a RegisterResources method to the AppointmentEditorsModule class and added a call to this method to the module’s Initialize method:
private void RegisterResources()
{
    var dictionary = new ResourceDictionary();
    dictionary.Source = new
    Uri("pack://application:,,,/"+
    "Appointment.Modules.Editors;"+
    "Component/AppointmentEditorsResources.xaml");

    Application.Current.Resources
      .MergedDictionaries.Add(dictionary);
}
Now that I’ve defined a data template for the view-model, there’s no need for the ViewModel to expose a View property, so I removed that property as well as the need to inject the view through the ViewModel’s constructor.
Finally, instead of injecting the ViewModel’s View into a region, I can inject the ViewModel itself directly:
m_EditPanelRegion.Add(viewModel);
When the ViewModel gets added to the visual tree, WPF searches for a data template targeting that type and finds it because it’s been merged into the resource dictionary.
Summing Up
The Composite Application Guidance for WPF and Silverlight Applications provides developers with great direction for building applications that are loosely coupled, testable, and extensible. It works around limitations of both WPF and Silverlight, features a Composite Application Library containing the main plumbing for the proposed architecture, and has a nice reference implementation application to demonstrate the patterns and the library.
Listing 1: The ReturnCommandBehavior implementation
public class ReturnCommandBehavior : CommandBehaviorBase<TextBox>
{
    public ReturnCommandBehavior(TextBox textBox)
        : base(textBox)
    {
        textBox.AcceptsReturn = false;
        textBox.KeyDown += (s, e) => this.KeyPressed(e.Key);
    }

    protected void KeyPressed(Key key)
    {
        if (key == Key.Enter && TargetObject != null)
        {
            ExecuteCommand();
        }
    }
}
Listing 2: The ReturnKey implementation
public static class ReturnKey
{
    public static readonly DependencyProperty CommandProperty =
      DependencyProperty.RegisterAttached(
          "Command", typeof(ICommand), typeof(ReturnKey),
          new PropertyMetadata(OnSetCommandCallback));

    private static readonly DependencyProperty
      ReturnCommandBehaviorProperty =
      DependencyProperty.RegisterAttached(
          "ReturnCommandBehavior",
          typeof(ReturnCommandBehavior), typeof(ReturnKey), null);

    public static void SetCommand(TextBox textBox,
                                 ICommand command)
    {
        textBox.SetValue(CommandProperty, command);
    }
    public static ICommand GetCommand(TextBox textBox)
    {
        return textBox.GetValue(CommandProperty) as ICommand;
    }

    private static void OnSetCommandCallback(DependencyObject
        dependencyObject, DependencyPropertyChangedEventArgs e)
    {
        TextBox textBox = dependencyObject as TextBox;
        if (textBox != null)
        {
            ReturnCommandBehavior behavior =
                      GetOrCreateBehavior(textBox);
            behavior.Command = e.NewValue as ICommand;
        }
    }

    private static ReturnCommandBehavior GetOrCreateBehavior(
                                         TextBox textBox)
    {
        ReturnCommandBehavior behavior =
          textBox.GetValue(ReturnCommandBehaviorProperty) as
                          ReturnCommandBehavior;
        if (behavior == null)
        {
            behavior = new ReturnCommandBehavior(textBox);
            textBox.SetValue(ReturnCommandBehaviorProperty,
                            behavior);
        }
        return behavior;
    }
}
Listing 3: The bootstrapper class resolves the shell’s view and presenter out of container
class AppointmentBootstrapper : UnityBootstrapper
{
    protected override DependencyObject CreateShell()
    {
        var shellPresenter = Container.Resolve<IShellPresenter>();
        IShellView view = shellPresenter.View;
        view.ShowView();

        return view as DependencyObject;
    }

    protected override void ConfigureContainer()
    {
        base.ConfigureContainer();
        Container.RegisterType<IShellView, Shell>();
        Container.RegisterType<IShellPresenter, ShellPresenter>();
    }
}
Listing 4: A DataTemplate targeting a ViewModel
<ResourceDictionary
xmlns="<a href="http://schemas.microsoft.com/winfx/2006/xaml/presentation">http://schemas.microsoft.com/winfx/2006/xaml/presentation</a>"
xmlns:x="<a href="http://schemas.microsoft.com/winfx/2006/xaml">http://schemas.microsoft.com/winfx/2006/xaml</a>"
xmlns:cal="clr-namespace:Microsoft.Practices.Composite.
Presentation.Commands;assembly=Microsoft.Practices.Composite.
Presentation"
xmlns:local="clr-namespace:Appointment.Modules.Editors"
>
<DataTemplate
DataType="{x:Type local:AppointmentEditViewModel}">
<Grid>
<Grid.ColumnDefinitions>
<ColumnDefinition Width="Auto" />
<ColumnDefinition Width="*"/>
</Grid.ColumnDefinitions>
<Grid.RowDefinitions>
<RowDefinition Height="Auto" />
<RowDefinition Height="Auto" />
<RowDefinition Height="Auto" />
<RowDefinition Height="Auto" />
</Grid.RowDefinitions>
<TextBlock Grid.Row="0" Grid.Column="0"
Text="When"/>
<TextBlock Grid.Row="1" Grid.Column="0"
Text="Participants"/>
<TextBlock Grid.Row="2" Grid.Column="0"
Text="Subject"/>
<TextBox Grid.Row="0" Grid.Column="1"
Text="{Binding Path=Appointment.DateAndTime}" />
<TextBox Grid.Row="1" Grid.Column="1"
Text="{Binding Path=Appointment.Participants}" />
<TextBox Grid.Row="2" Grid.Column="1"
Text="{Binding Path=Appointment.Subject}" />
<StackPanel Grid.Row="3" Grid.Column="1"
Orientation="Horizontal">
<Button Content="Cancel"
cal:Click.Command="{Binding Path=CancelCommand}"/>
<Button Content="Save"
cal:Click.Command="{Binding Path=SaveCommand}"/>
</StackPanel>
</Grid>
</DataTemplate>
</ResourceDictionary>
