


Visual Studio is a great tool on its own and it can be extended.
By using the Visual Studio SDK (VS SDK), one can create powerful extensions to fit almost any developers’ needs.
As powerful as Visual Studio is, there’s still room for more. Developers often look for better ways to reach more information within Visual Studio, as well as tools that improve productivity when developing applications.
You can extend Visual Studio in three ways: with macros, add-ins, and packages. Which option you use depends on what you need to implement.
You can extend Visual Studio in three ways: with macros, add-ins, and packages. You can use each option depending on what you need to implement:
- Macros. Offering the simplest way to extend Visual Studio, you implement macros using the Visual Studio automation model (DTE), which only supports Visual Basic. Macros have the disadvantage that you must distribute them with all the source code.
- Add-ins. Also based on the Visual Studio automation model, but more powerful than macros, add-ins have the advantage of supporting any managed language. Also on the plus side, you distribute an add-in as binary.
- Visual Studio Packages (or VSPackages). The most powerful way to extend Visual Studio, VSPackages support native or managed languages and integrate closely with the Visual Studio IDE.
This article offers an overview of VSPackages, covering what’s necessary to create and distribute them. VS SDK comes with many tutorials and samples and there are How-to videos on the Web (see the sidebar, Samples, Tutorials, and Videos) that walk through the process in more detail than I can cover in one article; therefore, I’ll concentrate on the high level, covering the most important pieces, and pointing the reader to the places to go for more detailed information.
Creating a VSPackage
You build VSPackages on top of the Managed Packaged Framework (MPF), which sits on top of the package API and Interop Assemblies that talk to the underlying implementation of Visual Studio.
The VS SDK installs a few more project templates in Visual Studio, one of them being the Visual Studio Integration Package (Figure 1), located under Other Project Types > Extensibility on the New Project dialog box.
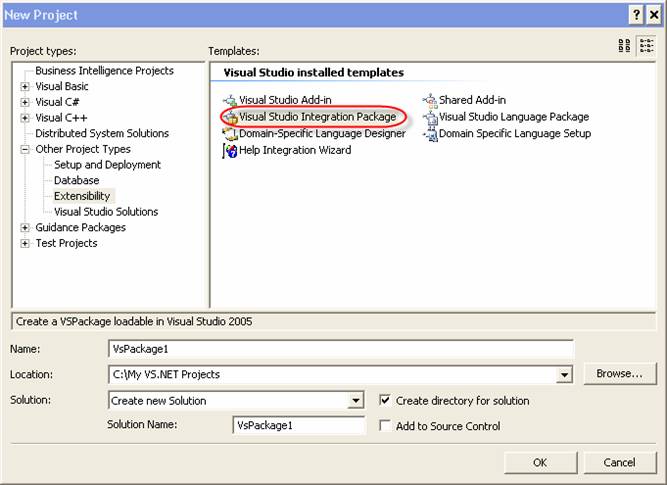
After this standard dialog box, the Visual Studio Integration Package Wizard guides you through creating the new package project:
- Select a programming language. The wizard currently supports Visual C++ and Visual C#. You can create or pick a key file to sign the new package.
- Supply basic VSPackage information. The wizard prompts you for details such as the company name, VSPackage name, version, icon, detailed information, and minimum Visual Studio edition (such as Professional or Enterprise) that the package is designed to at this step. This information goes into the Visual Studio splash screen and About dialog box and is also used to request a PLK for the package (covered later).
- Select VSPackage options. A package may add three types of functionality: Menu Command, Tool Window, and Custom Editor.
a. A menu command is a command added either to the menu at the top of Visual Studio or to a context menu (right-click).
b. A tool window is a window such as Solution Explorer, Properties, Output, etc., and as such, offers the same standard behavior for docking and floating as any other window in Visual Studio.
c. A custom editor is, like the name implies, a custom editor you can build to create support for new languages in Visual Studio, such as IronPython and IronRuby. This ability means that you can integrate more languages into the Visual Studio IDE besides those that ship with the product, such as C#, Visual Basic, and Visual C++.
When the wizard finishes its job, the VS SDK adds core elements to the solution to support the new package. For instance, if you selected Tool Window as part of the functionality for the package, the project contains a user control where you should place the visual controls for the window. The project also contains files for .NET code to handle the functionality that you will add to the package.
A CtcComponents folder contains pseudo-C++ files (ctc files) where you define things like menu, groups, buttons, etc. Fortunately, Microsoft is phasing out CTC files and replacing them with a friendlier, XML-based VSCT file format (which will ship in the SDK for Visual Studio 2008).
The wizard creates a few other files with .NET code required for the plumbing of the package within Visual Studio. Some of these files contain classes that map the C++ constants to .NET constants and other files contain configuration information for the package when it’s installed.
Source Code Outliner Power Toy
A great way to learn about VSPackages is by investigating the open source project called Source Code Outliner Power Toy (which you can download from CodePlex at http://www.codeplex.com/SourceCodeOutliner">http://www.codeplex.com/SourceCodeOutliner).
A Tool Window type of VSPackage, the Source Code Outliner provides a tree view of the source code currently opened in the editor, allowing for quick navigation to inside the editor (Figure 2).
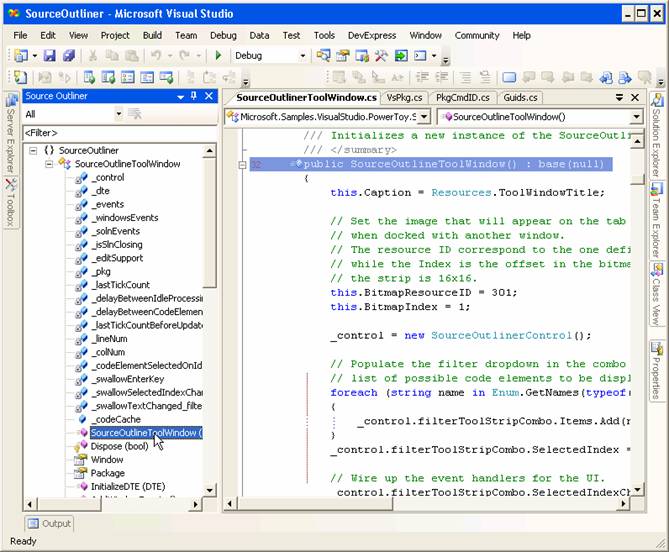
Inspecting the source code for this VSPackage you find a SourceOutlinerControl user control with the typical .NET code to populate a tree view.
Under the CtcComponents folder, pseudo-C++ files contain definitions required by the extensibility model. A Guids.h file contains constants created by the wizard for the package and command set IDs. The PkgCmdID.h file contains things like Menu Group, Command, and Bitmap IDs to be used by the package. The following code contains an excerpt of this file:
// Menu Group IDs

#define MyMenuGroup           0x1020
#define PowerToysSubMenuGroup 0x1150

// Command IDs

#define cmdidSourceOutliner1 0x102

// Bitmap IDs
#define bmpPic1 1
#define bmpPic2 2
The Resource.h file contains a list of Resource IDs for the package (such as images to be used by the menu). The SourceOutliner.ctc file contains the layout and type of commands used by the package (besides things like the default keyboard binding to activate commands). It also includes definitions for what goes on a Tool Window’s toolbar, if applicable. The reason why you need to define something like a toolbar here, as opposed to defining it on the user control, is so that it’s up to Visual Studio to render the element consistently with its other windows (see Figure 3 for an example as how the Solution Explorer Tool Window uses this).
Moving on to the C# code in this project, the wizard created a few files: Guids.cs (contains constants for the package and command set IDs to be used in the managed code), PkgCmdID.cs (contains constants for the Command IDs for the package), and VsPkg.cs (the actual class that inherits from the Package class).
The VsPkg.cs file contains the SourceOutliner class, which inherits from the Package class. A couple of attributes decorate the class to help Visual Studio when registering the package within the IDE. This class is also the main plumbing between the Visual Studio IDE and the custom Tool Window that the VSPackage created (keep in mind that the Tool Window is just a host for the user control that has most of the window’s UI elements).
All the other files in the project contain code that works with the Visual Studio automation model (DTE) to access the elements of the file being edited within the editor.
Experimenting with the Package
In order to experiment with the package being edited, you can select Debug > Start Without Debugging on the menu. This causes an experimental build Visual Studio instance to come up, which is an instance that is set by inspecting a different area of the registry and loading up only the necessary features of the IDE required for experimenting with the package being built.
On the new instance of Visual Studio you should be able to select View > Other Windows > Source Code Outliner Power Toy, causing the Tool Window to show up. Open up some source code in the editor and experiment with the Source Outliner Tool Window.
Be aware that you need to have Visual C++ installed in order to compile the package because of the pseudo-C++ files. (I did not have, since I don’t do any Visual C++ development, and soon found out I couldn’t compile the package without it.)
Deploying a VSPackage
In order to load a package, Visual Studio requires it to have a package load key (PLK). When developing and experimenting with a package, Visual Studio uses a developer load key (DLK); however, a developer is not allowed to distribute a package using this key. A package built without a valid PLK will only load on a machine that has the Visual Studio SDK installed.
A package built without a valid PLK will only load on a machine that has the Visual Studio SDK installed.
For you to install and load a package on any developer’s machine, you must request a PLK at the Microsoft Visual Studio Industry Partner Program Web site (http://www.vsipmembers.com">http://www.vsipmembers.com).
You must have Microsoft Passport authentication to log onto the VSIP Web site. Once logged in, the developer can request PLKs for each product intended to be released as a VSPackage. As part of the information about the package, the developer must provide the product name, a short description, a product description, and a product URL.
You can publish the package to the Windows Marketplace and provide more information about the product, such as whether there’s any charge for the product, whether there is a trial available, etc.
Shortly after you submit the information, you’ll receive an e-mail to let you know whether the VSIP has granted you the required PLK. Once the VSIP grants the PLK, you can log onto the Web site, retrieve the key, and use it as an embedded resource for your package.
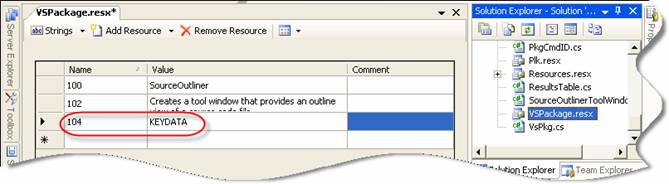
To add the PLK as an embedded resource, double-click the VSPackage.resx file on the project, add a new row to the resource file, assign it an ID on the Name field, and paste the PLK on the Value field (Figure 4).
Next, you must update the ProvideLoadKey attribute on the class in the VsPkg.cs file:
[ProvideLoadKey(
          PackageConstants.VisualStudioEdition,
          PackageConstants.VersionString,
          PackageConstants.ProductName,
          PackageConstants.CompanyName,
          PackageConstants.PLKResourceID)]
Notice that the author of the Source Code Outliner package has created a PackageConstants class to help with the readability of the code. The package reads the resource ID for the PLK off of the PLKResourceID constant, so that’s where you have to change it to the resource ID you created (Figure 4). You’ll find that the constant is currently defined to value 1; this is the value to indicate that the package is using the developer load key (DLK) when it loads. You should change that value to 104.
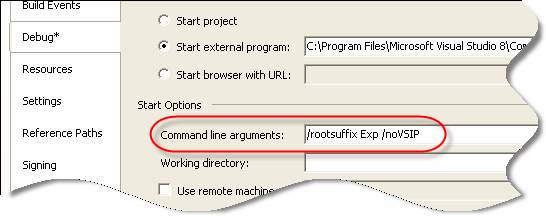
Finally, you need to change the command line arguments on the Debug Project settings. The default value for package projects is /rootsuffix Exp. You must change that value to /rootsuffix Exp /noVSIP(Figure 5). This switch tells Visual Studio to load the package in debug mode as if it were deployed normally, instead of using the DLK.
Once you have tested the package and you are ready to distribute it, you can then deploy it just like any other .NET application, either using a Setup project or the Windows Installer XML (WiX).
Join the Community and Extend Visual Studio
This article presents an overview of VSPackages; a powerful way to extend Visual Studio. I am sure you can think of a few things that you’d like to add to Visual Studio. There is already a community being built around Visual Studio Extensibility, so if you feel like contributing, you may want to check out the Source Control Outliner project in CodePlex, as well as other open source projects.
