


With Windows XP Tablet PC Edition, Microsoft introduced more than just a powerful platform for users. Through the associated SDKs, Microsoft has also empowered developers to create advanced ink-enabled applications.
Recognizer objects provide the means to recognize handwriting as text. Similarly, gestures can be recognized and interpreted in any way the developer desires. Other objects allow for the division of digital ink into paragraphs, lines, and segments. The combination of these objects allow for the creation of very advanced applications. However, these options do not cover the complete range of features needed to create next-generation ink-enabled applications.
So what is missing? In short, the ability to add meaning to ink beyond the simple recognition of text. Users may add drawings, for instance. With ink recognizers, even a simple line is considered to be text and is thus recognized with very poor results. You need the ability to identify whether a part of a document is text or a drawing before recognition is applied.
Also, once a drawing element such as a line is identified, its meaning must also be interpreted. It could be meant as a true drawing, but it could be a line connecting an annotation with another part of a document, or it could be an underlined word. This sort of meaning can only be derived by using contextual analysis that looks at large sections of ink rather than just individual strokes that make up characters or words. And even if the line is ultimately identified as a true drawing, how can the system recognize drawing primitives such as circles, squares, or triangles?
The first-generation Ink SDK features do not make it easy to handle any of these scenarios. Furthermore, spatial analysis functionality is missing. Ink Divider objects can break digital ink into various segments, but logical context is limited. Segments are not the same as words, for instance. This makes it difficult to handle scenarios such as reflowing ink, which is necessary when ink-space gets resized. If a window containing ink changes its size, individual words of ink may need to move onto the next line and the rest of the ink has to move accordingly. Without the means to recognize concepts such as lines and words reliably, it is difficult to implement ink reflowing. Also, as ink moves, logically associated ink such as an underline or an annotation needs to move as well. To implement such a scenario successfully, relationships between different ink segments need to be recognized.
Another aspect of spatial analysis is the ability to assign names to certain sections of ink. In digital equivalents of paper forms, for instance, you would find different areas such as a space for a name or address.
The new InkAnalysis API (available in Windows Vista™ as well as downlevel to Windows XP through a redistributable) provides the means to handle all these scenarios with ease. This API is available as part of the new Windows® SDK, which contains the new WinFX® components (see msdn.microsoft.com/windowsvista/getthebeta). Note that the WinFX SDK has a dependency on the .NET Framework 2.0.
The InkAnalysis API supplements existing features that are still available. However, the API also supersedes the existing objects, especially the recognizer objects (specifically the Recognizer and RecognizerContext objects) and the ink Divider object. In essence, the InkAnalysis API combines the two different but related technologies that are required for handling digital ink: recognition and layout analysis and classification.
Ink recognition, often called handwriting recognition, is the task of analyzing strokes of ink in order to turn them into a text-based version of the ink that can be handled as standard strings. This is done based on specific language and culture assumptions for the ink that is to be recognized. In other words, ink recognition is the computer reading someone’s handwriting. Ink recognition can also be applied in a slightly different way. For instance, ink recognition could analyze sheet music for the purpose of turning it into some sort of standard data format, such as MIDI. Or ink recognition could be used to read Egyptian hieroglyphs. With the new InkAnalysis API, you can add drawing primitives and basic shapes to the list.
Ink layout analysis and classification, on the other hand, deals with the overall layout and spatial distribution of ink. Microsoft defines two areas of ink parsing: classification and layout analysis. Ink classification concerns itself with finding semantically meaningful parts such as paragraphs, words, or drawings. In many cases it is helpful to find such semantics before applying handwriting recognition. For instance, it makes no sense to apply handwriting recognition to drawings. The InkAnalysis API provides the means to do so using ink classification, a feature that was not available previously. Furthermore, the InkAnalysis API allows you to break ink into a hierarchical tree, which then directly provides the means to perform recognition on individual tree branches.
Layout analysis refers to the computational analysis of ink strokes and their positions relative to each other with the intent to find spatial and semantic meaning. This goes beyond the relatively simple task of finding lines and paragraphs. In simpler terms, layout analysis can find things such as annotations, bulleted lists, flow charts, and much more.
Basic Ink Analysis
To create a first ink analysis example, let’s start with a basic ink-enabled Windows Forms application just as if you were to create a conventional ink recognition example. If you are not familiar with ink development, here is the short version of how to create such a form.
Using the Microsoft® Tablet PC SDK, any form or control can be ink enabled. To do so, create a standard Windows Forms app and add an InkOverlay object. This object is part of the Microsoft.Ink namespace, exposed from Microsoft.Ink.dll, which needs to be added to the project references. (It is listed as Microsoft Tablet PC API in the Add References dialog box.) You can then link this object with any control to be ink-enabled by associating the ink overlay with the control’s window handle. When the InkOverlay’s Enabled property is set to true, ink collection and ink rendering are enabled on the control, including the ability to add, select, erase, and otherwise manipulate ink. The digital ink information is stored in an Ink object, accessible from the InkOverlay, where it can be accessed for recognition, programmatic manipulation, or storage.
To provide a good ink experience, it is important to create an inkable area of sufficient physical dimension. A good choice is a Panel control, perhaps with white background, that covers the majority of a window. Of course it is also possible to enable an entire window (Form) for inking, but in most scenarios other controls are needed in the interface, such as buttons. Therefore, the Panel approach is usually preferable.
To follow this Panel approach, create a new Form in the .NET-targeted language of your choice, drop in a Panel control, and name it inkPanel. To ink-enable the panel, add the following lines of code to the form:
private InkOverlay overlay;

public Form1()
{
    InitializeComponent();
    this.overlay = new InkOverlay(this.inkPanel);
    this.overlay.Enabled = true;
}
The InkAnalysis API operates based on ink and stroke information, which is collected in the InkOverlay’s Ink object. Fundamentally, ink analysis is as simple as creating an instance of an InkAnalyzer object, pointing it at ink, and calling the Analyze method (to use InkAnalyzer, you must add a reference to Microsoft.Ink.Analysis.dll, which, as of the February 2006 Community Technology Preview, is available in %ProgramFiles%\ReferenceAssemblies\Microsoft\TabletPC\vl.7\).
Here is the simple code needed to trigger ink analysis:
InkAnalyzer analyzer = new InkAnalyzer(this.overlay.Ink, this);
analyzer.AddStrokes(this.overlay.Ink.Strokes);
analyzer.Analyze();
This analyzes all the strokes of ink added to the analyzer. This configures the analyzer and causes it to create analysis results internally that you can subsequently access. To access the root of the hierarchical ink representation, start with the RootNode property of the analyzer after executing Analyze:
ContextNode root = analyzer.RootNode;
To perform text recognition, you use the GetRecognizedString method of either the type-specific Node or the analyzer itself:
string text = analyzer.GetRecognizedString();
// ... or ...
string text = root.GetRecognizedString();
It is also possible to access all the hierarchical subelements of the root node individually. The individual elements found that way will vary with the exact ink the user writes. But, in general, immediate subnodes of the root node are likely to be paragraphs or drawings. The following code iterates over all child nodes and retrieves their handwriting recognition results one by one:
StringBuilder text = new StringBuilder();
foreach(ContextNode subNode in root.SubNodes)
{
    text.Append(subNode.GetRecognizedString());
}
It is important to realize the hierarchical nature of the analysis tree. Performing recognition on the root node returns the complete recognized text for all the ink data added to the analyzer. Performing recognition on the subnodes returns subsections of the entire document, most likely paragraph by paragraph (again, depending on the exact data). Each paragraph can then be broken down further by accessing its children, and so forth.
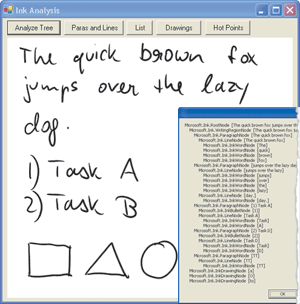
It is relatively easy to walk the entire tree in a recursive fashion. The code in Figure 2 performs such a tree walk and shows the recognition results of each node in the tree, as well as the node type. The complete code for the form shown in Figure 1 is included with the code download for this article.
The result of walking through the analysis tree can be seen in Figure 1. If you look closely, you can see the individual nodes on the tree and their types, as well as the recognition results.
You may see ink examples that use the ToString method of a Strokes collection to retrieve recognition results. For example, instead of using GetRecognizedString as I did in the previous sample, I could have used:
string text = node.Strokes.ToString();
This is not recommended as it is a legacy feature of the ink API. Using Strokes.ToString in this fashion does not take advantage of the processing and contextual analysis performed by InkAnalyzer. Thus, the recognition results could vary depending on whether the recognizer looks at strokes making up a whole paragraph or line of ink, or whether it just looks at the strokes for an individual word. This is due to how the recognizer rates recognition quality. If a whole sentence is recognized, grammatical and other language rules can be used to aid recognition; while in scenarios with individual word recognition, only spelling can be used to verify which recognition results are likely. You should avoid these issues by instead using GetRecognizedString. Additionally, I’ve wrapped usage of the InkAnalyzer with a C# using statement in order to ensure that InkAnalyzer.Dispose is called when I’m done with it. Calling InkAnalyzer.Dispose is mandatory to avoid resource leaks.
Paragraphs, Lines, and Words
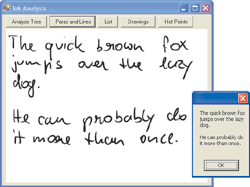
An important part of ink analysis is the ability to find logical segments of text such as paragraphs, lines, and words. The previous example looks at the whole logical tree of ink nodes, which includes this information. Often it is preferable to specifically look for certain types of text. This can be achieved either through the Type property of each node or through the FindNodesOfType method on the analyzer object. The code in Figure 3 looks at all paragraphs and, subsequently, at all lines within a node. This makes it possible to recognize handwriting and preserve line breaks at the same time.
Of course, a similar result (which can be seen in Figure 4) could have been achieved using the older Divider object, but it would have been somewhat more difficult. Also, this approach is more powerful than the ink divider. For instance, this example would completely ignore drawings, since the FindNodesOfType method is used to return paragraphs only. The ink Divider is not capable of such distinction. Ink analysis is even capable of identifying more sophisticated logical elements of ink, such as bulleted lists.
Analysis of bulleted lists requires the identification of bullets of any kind. Bullets exist within paragraphs. Whenever a bullet is found, it is the first element within a paragraph. The bullet itself does not have any text beyond the label of the bullet (such as *, or 1., or A). The text that goes along with the bulleted list item is the first line element within the paragraph. This is not a subnode of the bullet, but a sibling. Unfortunately, there is no way to find siblings easily. Therefore, the way to find bulleted-list elements is to look at paragraphs and then check whether the first item within the paragraph is a bullet.
Another approach is the use of the FindNodesOfType method to retrieve all bullets. From there on, you can look at the parent (which is the paragraph) and then look at the paragraph’s second item, which is the text that goes along with the bullet. Better approaches would depend on the specifics of the scenario at hand. If the goal is to extract bulleted lists from a large amount of ink that may include non-bulleted text, then it is better to first retrieve a list of bullets using FindNodesOfType. If the goal is to process a large amount of ink-text and simply handle bulleted lists appropriately if encountered, then the paragraph-by-paragraph approach is preferable.
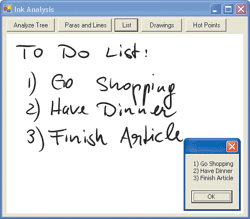
Figure 5 shows an example of a numbered list. Figure 6 provides the code that produces this result. Note that this example performs recognition on the line of ink associated with the bullet, as well as the bullet itself, to retrieve the bullet label.
Analysis Hints
The InkAnalysis API does an amazing job out of the box, but it is possible to improve results further and make it easier to work with the API at the same time by using analysis hints. Analysis hints allow the developer to provide additional information to the recognizer and the analysis engine. For instance, you can set "factoids" to specify information about the type of text that is expected. This drastically improves recognition results for hard-to-recognize text such as e-mail addresses.
Factoids have been available on simple recognition objects since the first versions of the ink API. However, what makes analysis hints special is that separate areas on an ink canvas can have different factoids. For instance, it is possible to create an area on a form that is dedicated to receiving a specific kind of ink input. The following defines a rectangle within the ink panel that is dedicated to writing a name:
   Rectangle nameRect = new Rectangle(
       100, 10, inkPanel.Width-110, 60);
   AnalysisHintNode hint =
      analyzer.CreateAnalysisHint(
          GetInkSpaceRectangle(nameRect));
   hint.Name = "Name";
In this example, a new node called Name is added to the analysis tree. The Name area is defined by a rectangle that begins 100 pixels from the left and 10 pixels from the top of the form, goes across almost the remaining width of the panel, and is 60 pixels tall. From this point on, the developer has the choice to refer to everything written in this area by name. It thus becomes easy to recognize ink entered in the Name area of the form. To do so, you simply access the Name node and retrieve all linked nodes in the following fashion:
ContextNodeCollection names = analyzer.GetAnalysisHints("Name");
if (names.Count > 0)
{
    AnalysisHintNode hint = (AnalysisHintNode)names[0];
    string name = hint.Links[0].DestinationNode.GetRecognizedString();
}
The linked node is generally a WritingRegionNode, which contains a paragraph and one or more lines. It is possible to either recognize the whole writing region or drill down further in a fashion identical to what you have seen in prior examples.
Note that the rectangle defining the input area has to be defined in ink space. Ink is collected and stored at a much higher resolution than it is displayed onscreen. Generally, developers are familiar with screen coordinates and thus like to define regions using that system. However, these coordinates have to be converted into ink coordinates before they can be used as analysis hints. A detailed discussion of ink versus screen coordinates is beyond the scope of this article, but here are two simple methods that convert screen X and Y coordinates to ink X and Y coordinates using a GDI+ Graphics object and the PixelToInkSpace method exposed by the Renderer object associated with the InkOverlay:
private int GetInkX(int screenX) { return GetInkPoint(screenX, 0).X; }

private int GetInkY(int screenY) { return GetInkPoint(0, screenY).Y; }

private Point GetInkPoint(int screenX, int screenY)
{
    using(Graphics g = this.CreateGraphics())
{
    Point p = new Point(screenX, screenY);
    this.overlay.Renderer.PixelToInkSpace(g, ref p);
        return p;
    }
}
The GetInkSpaceRectangle method seen previously uses these methods to convert a screen-space rectangle into an ink-space rectangle. The complete code used to convert the rectangle is included in the code download.
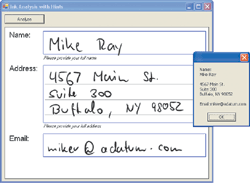
This analyzer hint is a rather basic one that serves the main purpose of creating a named, simple-to-access ink input area on a form. This is useful for the simulation of a paper form that has a number of distinct fields that need to be filled out. However, analysis hints offer a lot more than that. The following code example sets aside another part of the ink panel to allow for the entry of an e-mail address:
Rectangle emailRect = new Rectangle(100, 280, inkPanel.Width-110, 60);
AnalysisHintNode hint3 =
    analyzer.CreateAnalysisHint(GetInkSpaceRectangle(emailRect));
hint3.Name = "Email";
hint3.Factoid = "EMAIL";
E-mail addresses are difficult to recognize because they use odd characters like @ and they often use sequences of characters that cannot be found in recognizer dictionaries. However, they also follow a specific pattern. They must have one and only one @ sign. They cannot have spaces, and they must have at least one dot after the @ sign. This is valuable information for the recognizer, so setting this factoid will dramatically increase the ability to recognize e-mail addresses.
There are a large number of factoids, many of which are culture specific. For an exact list of factoids, refer to the Mobile PC and Tablet PC Development Guide. Note that it is possible to set a factoid for a complete ink area and not just a specific region by creating an analysis hint without specifying a limiting rectangle. Only one such global analysis hint can exist for an ink analyzer object.
Another valuable analysis hint feature is the ability to set analysis guides. Guides define an area of ink, the number of lines and columns, and the height of each line. Finding the baseline of each line of text in a free-form ink area is an inexact science. Also, finding character heights is difficult and thus the distinction between uppercase and lowercase characters can be inaccurate. Using guides, you can define the height of the midline, an imaginary line along the top edge of a half-height character like "u."
The following code snippet defines an address area within the ink panel that contains three lines and no columns. The entire space is 150 pixels tall, with a little bit of margin at the top and bottom so the user isn’t immediately penalized if they happen to write outside the defined area. This leaves 45 pixels per line. Considering that the midline is usually a little higher than half the height of an uppercase character, I define the midline to be 25 pixels. The last two parameters passed to the RecognizerGuide object define the writing rectangle (the ideal writing rectangle for each individual line without the margin of error granted to the user) and the overall rectangle the guide is for (measured relative to the area assigned to the overall hint). Of course, all these screen coordinates have to be converted to ink space:
Rectangle addrRect = new Rectangle(100,100, inkPanel.Width-110, 150);
AnalysisHintNode hint2 =
    analyzer.CreateAnalysisHint(GetInkSpaceRectangle(addrRect));
hint2.Name = "Address";
Rectangle drawnRect = new Rectangle(5, 10, addrRect.Width-20, 45);
Rectangle writingRect = new Rectangle(0, 0, addrRect.Width, 50);
hint2.Guide = new RecognizerGuide(3, 0, GetInkY(20),
    GetInkSpaceRectangle(writingRect), GetInkSpaceRectangle(drawnRect));
The trouble is that while you have now perfectly defined various subareas of the ink panel, the user does not know about these areas, since there is no visual indication of these areas in the user interface. It is therefore advisable to add such indicators. In general it is done with a few simple lines of GDI+ drawing code that is linked to the paint event of the ink-enabled control. Figure 7 shows one such paint event handler, and Figure 8 shows the result.
Drawing Recognition
Recognizing drawings has been traditionally difficult to implement with the Tablet PC SDK since there was no predefined functionality for this purpose. The InkAnalysis API takes a first step towards solving the problem by providing the ability to recognize drawing primitives such as rectangles, circles, triangles, and the like. The following code snippet extracts all drawing nodes and retrieves the names of the individual shapes:
StringBuilder text = new StringBuilder();
using(InkAnalyzer analyzer = new InkAnalyzer(this.overlay.Ink, this))
{
    analyzer.AddStrokes(this.overlay.Ink.Strokes);
    analyzer.Analyze();

    ContextNodeCollection drawings =
        analyzer.FindNodesOfType(ContextNodeType.InkDrawing);
    foreach(InkDrawingNode drawing in drawings)
    {
        text.AppendLine(drawing.GetShapeName());
    }
}
MessageBox.Show(text.ToString());
Figure 9 shows this code in action. Of course, just like with other nodes, each drawing node has a number of additional properties associated with itself, such as the position of each element, the bounding box, and drawing specific information such as the position of the four corners of a rectangle. These points are known as hot points. Each ink drawing node has an array of associated hot points. For most shapes, hot points are the start and end points of individual lines. Circles and ellipses are the exception, with hot points defining four points at 0, 90, 180, and 360 degree points.
Figure 9 also shows drawings analyzed for hot points. I created a GDI+ drawn overlay that renders red lines from hot point to hot point. The methods responsible for this behavior can be seen in Figure 10. Note that all hot points are defined in ink space coordinates and need to be converted to screen coordinates before they can be rendered with GDI+. The code for the coordinate conversion can also be found in Figure 10.
The Bigger Picture
Ink analysis really shines when it comes to analyzing large segments of ink for dependencies and semantic meaning. Not only does ink analysis break digital ink into a hierarchical tree, it also creates links between these hierarchical nodes. I have already shown an example of such links in the analysis hint examples, where a certain area within an ink surface is represented by a named node that links to ink nodes that fall within the on-screen area occupied by the analysis hint node. This is an example of a link that is introduced manually. But ink analysis can also find such links based on contextual meaning. Based on this ability, it is possible to find multiple segments of ink that form a logical unit, such as a word and an underline, as well as self-contained segments that relate to each other, such as a paragraph and an associated annotation, or two different shapes in a flow chart.
Links can be explored through the Links collection that is present on each context node in the analyzed hierarchy. For instance, a word node can be associated with an underline by a single element in the links collection. Figure 11 shows an example that draws colored bounding boxes around linked objects (blue for the link source and red for the link destination). In this example, the underline is linked with the word "brown." This example is a slightly more sophisticated version of the very basic ink context hierarchy example at the beginning of the article.
Instead of displaying the hierarchy in a messagebox, it is displayed in a treeview control. Each node in the treeview maintains a link to the ink context node created by the ink analyzer. The ink context node is assigned to the Tag property of each tree node, so it can be accessed at a later point in time. This enables the app to react to clicks on various TreeView nodes by selecting the ink and recognizing the handwritten text associated with each node:
private void treeView1_AfterSelect(object sender, TreeViewEventArgs e)
{
    ContextNode inkNode = (ContextNode)e.Node.Tag;
    // Recognize the text
    this.textBox1.Text = inkNode.GetRecognizedString();
    // Select the associated ink
    this.overlay.Selection = inkNode.Strokes;
}
Also, the Paint event of the ink panel can be used to draw bounding boxes around linked objects for the current selection. The code in Figure 12 accomplishes that task. Note that once again, the bounding box coordinates need to be converted from ink space to screen space.
A slightly more complex version of this example is available in the code download. In that example, ink analysis is triggered automatically 2 seconds after the user writes the last stroke of ink. If more ink is added later, analysis is triggered again. This is accomplished by listening for the Stroke event on the InkOverlay, which fires every time a stroke of ink has been completed. The event handler code associated with this event resets a timer object with an interval of 2000 milliseconds (2 seconds). If another stroke occurs within those 2 seconds, the timer is reset. Otherwise, the timer fires and triggers the analysis, which populates a treeview as in the example just shown. Whenever the user selects a node in the treeview, the associated ink is selected, and bounding boxes are drawn to show the links. The code used to do so is almost identical to the snippets you just saw, with the exception of some more sophisticated screen refresh code. Also, the code includes a method that converts ink space coordinates to screen space coordinates.
Figure 13 shows another ink document analyzed by the same code. This time, ink analysis is used to find links between various elements of a flow chart. In particular, a line (the source object) has two separate links to connect two shapes in the chart. If we were to look at each of the two shapes by itself, we would find that it has links to the text within itself, and so forth.
Using link analysis, it is possible to create advanced behavior. For instance, linked objects can be moved automatically whenever one of the objects involved in the link scenario is moved around. This enables you to keep logical units, such as words and underlines, together. In other scenarios, ink may be manipulated in different ways. For instance, if the Step 2 shape from Figure 13 is moved down, the enclosed text has to move, but the line that connects the Yes/No shape with the Step 2 shape should not move, but stretch instead. With the basis laid by link analysis, this represents a relatively simple computational problem that can be resolved based on the number of linked objects and their positions.
Link analysis represents one of the biggest improvements in the Tablet PC SDK. Without ink analysis (and link analysis), such scenarios used to represent problems of such magnitude that it wasn’t feasible for the average developer to resolve them using old-style recognizers and ink dividers.
Other Technical Aspects
All the features introduced in this article so far are directly aimed at producing recognition and analysis results. However, there are a few other technical aspects that should be mentioned as well. For one, there is the aspect of performance. Any form of ink recognition and analysis is computationally expensive. This is especially true for large ink documents. For such scenarios, synchronous analysis may not be feasible. Instead, large ink documents need to be analyzed continuously in the background.
To perform background analysis, use the analyzer’s BackgroundAnalyze method instead of the Analyze method shown in this article. Since this method is executed asynchronously, it does not directly return a result. Instead, an event-driven model is used to indicate that analysis is complete, or new analysis results are available.
Another important new feature of ink analysis is the ability to store results to disk. Using conventional recognizer objects, recognition was performed in memory only. Of course, it was possible to retrieve recognition results and store them as text, but it was not possible to serialize the state of a recognizer object. If a large ink segment was reloaded later, all recognition had to be performed again, which can be a very time consuming task. Results may also vary depending on the configuration of the recognizer. Using ink analysis, the state of the analyzer can be serialized. The analyzer object provides SaveResults and Load methods for this purpose.
The ability to save the state of the analyzer is particularly useful since the analyzer can perform incremental analysis and recognition. This means that additional strokes of ink can be added for analysis and the analyzer will only have to analyze data associated with the new strokes. Depending on the exact scenario, only the added strokes may be analyzed, or a slightly larger set of strokes may be involved if the relationship between existing and new strokes needs to be analyzed. In almost all scenarios, the workload for the analyzer will be significantly reduced compared to re-analyzing a complete document. Performance reasons alone make InkAnalysis preferable over older ink objects.
If you are interested in Tablet PC development, then take some time and familiarize yourself with the new ink analysis services. This technology is currently available in beta, but it is at the very top of my "technologies I want to use as soon as possible" list, because it provides a number of key improvements over older Ink API components and technologies.
