


If you want to capture your users' imaginations, enable drag-and-drop.
Drag-and-drop doesn't fulfill requirements, but it contributes to making your application appear more professional and easy to use. In Windows Forms applications, drag-and-drop operations consist mostly of handling a series of events. By accomplishing a few mandatory steps and working with the information available in the event arguments, you can easily facilitate dragging and dropping files, text, and any other sort of serializable data objects. This article demonstrates how to import files from the Windows shell and how to enhance some UI controls to make them accept input via drag-and-drop. Notable examples are the TextBox and the PictureBox controls.
Drag-and-drop is one of those programming features rarely listed in the user requirements document because it is perceived as secondary and minor. Sure, drag-and-drop doesn't make your application run faster, nor does it add anything to the core business of the application. Drag-and-drop is not the solution to any core business issues and doesn't add any new functionality to the application. Yet drag-and-drop is a feature that, if missing, users promptly miss and are quick to add to the wish list for the next upgrade.
The first step to enable drag-and-drop in a form or control is setting the AllowDrop property to True.
As a matter of fact, drag-and-drop greatly simplifies how people use virtually any application. It makes transferring data from one control to the next, and from and to other applications and to the Windows shell itself, into a straightforward activity. Drag-and-drop has existed for a long time in Windows and had its first fully message-based SDK available with Windows for Workgroups in an earlier software era.
The advent of OLE made the drag-and-drop transition from messages to functions and generalized the format of the data being moved. Implementing drag-and-drop, though, remained a sort of nightmare for most programmers. Things were much easier for Visual Basic developers and you'll still find that model at the root of the .NET Framework support for drag-and-drop.
Enabling Drag-and-Drop in Forms and Controls
All .NET components allowed in a Windows form have a Boolean property named AllowDrop, which is set to False by default. Turning that value to true is the first and key step to enabling drag-and-drop in a form or a control.
Some drag-and-drop functionality is built into the Control class, which implements very basic functionality required by classes that display information to the user. The Control class handles user input through the keyboard and mouse. Drag-and-drop results from a combined use of the mouse and keyboard. It is worth noting that in the .NET Framework, the Form class?the base class for all Windows form windows?inherits the Control class. This means that the set of drag-and-drop features is common to all forms and controls.
Accomplishing drag-and-drop operations is done handling a series of events and setting a few properties, most notably the aforementioned AllowDrop property. Table 1 lists the key members involved in all drag-and-drop operations.
The AllowDrop property is useful if you want the form or control to accept data from external applications or controls. A form or control that only exports data through drag-and-drop doesn't need to set the value to True.
Let's review the sequence of events and related steps that occur when data is being dragged from, or dropped onto, a form or control.
To make the form or control the target of a drag-and-drop operation, you start by setting AllowDrop to True. Next, handle the DragDrop event, indicating that the operation is complete. The event arguments include the data being moved and its format. In the handler of this event, the target of the drop decides what to do and how to refresh its own user interface in light of the drop.
During the operation, a few other events occur. They are: DragEnter when the mouse enters the control's bounds; DragOver while the mouse is moved within the control's bounds; and DragLeave when the mouse leaves the control. These events are necessary in a limited number of circumstances, like when you're refreshing the UI to reflect the exact, and continuously changing, position of the mouse.
DoDragDrop is the method that governs the whole drag operation. The method fires events to the target and the source as needed.
To start a drag-and-drop operation, begin writing a handler for the control's MouseDown event. The event occurs whenever the (left) mouse button is pressed within the control's bounds. Pressing the mouse button is the first low-level event in any drag-and-drop operation.
The mouse down alone is not a reliable indicator that a drag-and-drop operation has started. When the mouse down event is fired, first store the coordinates at which the mouse button was pressed. More exactly, create a rectangle of a fixed and system-defined size centered around the point of click. Next, when the MouseMove event arrives, verify that the current coordinates of the mouse point are outside that rectangle. If so, the user is moving the mouse enough to denote a real drag-and-drop action. The beginning of the drag-and-drop operation is marked with a call to DoDragDrop. You call this method from within the MouseMove event handler.
Next, retrieve the data to drag and pack it in a serializable object. The DoDragDrop method takes two arguments: the actual data and the allowed effects. You pass actual data through an Object variable, using any valid .NET class, including custom classes.
The parameter indicating the allowed effects of the operation is any combination of the values defined in the DragDropEffects enum type. Note that if you're dragging across the boundaries of the application (or between objects in the same application but managed by code in different AppDomains), your data object must fulfill an additional requirement: the data should be serializable or, at least, implement the IDataObject interface. Note that base classes like String, MetaFile, and Bitmap are considered serializable even if they don't explicitly implement the ISerializable interface.
GiveFeedback is used to provide users with some feedback about the possible outcome of the ongoing operation, be it a copy, move, or link of the dragged data. Any call to GiveFeedback occurs within the initial call to the DoDragDrop method that any source control does to start a drag-and-drop operation. DoDragDrop determines the control under the current cursor location and raises the event if the control is a valid drop target.
If there is a change in the keyboard state (e.g., the CTRL key is pressed), the QueryContinueDrag event is also raised to ask the user whether to continue or conclude the operation. The control's code determines what to do by setting a value in the event argument's data. If the operation must continue, the DragOver event is raised followed by the GiveFeedback event. The DragOver and GiveFeedback events arrive in a pair so that the user is given the most up-to-date feedback on the mouse's location.
Table 2 summarizes the steps to making a control or a form function as the source and the target of a drag-and-drop operation.
Those are the basics of drag-and-drop operations; now let's review the code needed to support a few common situations.
Getting Files from the Windows Shell
When you select one or more files in any Explorer window, the names of the files are packed in an array of strings and passed along during the drag-and-drop operation. Suppose you have an MDI application and set the AllowDrop property of your main window to true. What happens when you drop one or more files selected from the shell onto that window? The drag-and-drop infrastructure fires the DragDrop event to the object that is the target of the drop: your form.
Implementing drag-and-drop from within a TextBox control is more complicated than with other controls. This is mostly due to the fact that the TextBox control handles the MouseDown event on its own.
More precisely, you need to handle a couple of events: DragOver and DragDrop. The former is useful to check the type of data being dragged and determines whether that data is of any interest to you. The latter finalizes the operation accepting the file names as effective input of the application. Listing 1 shows a possible implementation. Both events store arguments using an instance of the DragEventArgs class. The class counts the properties listed in Table 3.
Of particular interest is the property Data. It is a member of type IDataObject, an interface that gathers the methods to get and set data to drag and drop. The interface lists four methods: GetData, GetDataPresent, GetFormats, and SetData.
Any data coming to you through a drag-and-drop operation is normally available in multiple formats. The GetFormats method returns an array of strings with the names of the supported formats. You can check them all using the following code:
For Each fmt As String In e.Data.GetFormats()
    ' Output format name and type
    Debug.WriteLine(fmt + " (" + _
          e.Data.GetData(fmt).ToString() + ")")
Next
The .NET Framework groups the most commonly used data formats in the DataFormats enum type. The GetData method extracts and returns the data of the specified format and GetDataPresent indicates whether data is available in a given format. Finally, you use SetData to add data in a given format to the container being moved across controls.
When the Windows shell initiates the drag-and-drop operation, data is moved in six different formats: an array of shell IDs, the DragContext structure, the InShellDragLoop structure, the FileName, the FileNameW, and the FileDrop. The first three types are memory streams; the latter three are arrays of strings. The first three types are supported for backward compatibility toward Win16 and Win32 applications. FileName, FileNameW, and FileDrop are formats specifically designed for .NET applications. Of these, only FileDrop is significant in the vast majority of situations.
It is interesting to illustrate the difference between FileDrop and the other two formats. First and foremost, only the FileDrop format guarantees that, in case of multiple selections, all the file names are reported. FileName and FileNameW return a one-element array, the currently focused shell item. In addition, FileName returns the MS-DOS name of the file in the old 8+3 format; FileNameW returns the long file name. For example, you can get the focused item using the following code:
Dim s() As String
    s = CType(e.Data.GetData("FileNameW"), String())
    Dim fileName As String = s(0)
Filling a TextBox
More often than not, drag-and-drop involves moving or copying text from various types of text boxes hosted by different applications, like the Office suite of applications. The TextBox component doesn't natively support drag-and-drop, but can be extended in order to allow drops and to drag text out. Let's see how to tweak a .NET Framework TextBox control so that it can import the text dragged from external applications.
It's a three-step task: set AllowDrop to True on the TextBox; write a DragOver handler to control the drag-over process; and write a DragDrop handler to finalize the whole operation (see Listing 2).
In the DragOver event, first, check the type of data being dragged. If the drag-and-drop operation is not carrying plain text, the control refuses any drop. Otherwise, it determines the effect of the operation by looking at the state of the keyboard. The default effect, if allowed by the source, is Copy, meaning that the data is copied to the control and not removed at the source. If the CTRL key is held down, and the Move effect is allowed, the effect is set to Move.
If you observe how drag-and-drop works in Microsoft Word, you'll notice that a little caret is displayed close to the mouse pointer to denote the insertion point (see Figure 1).
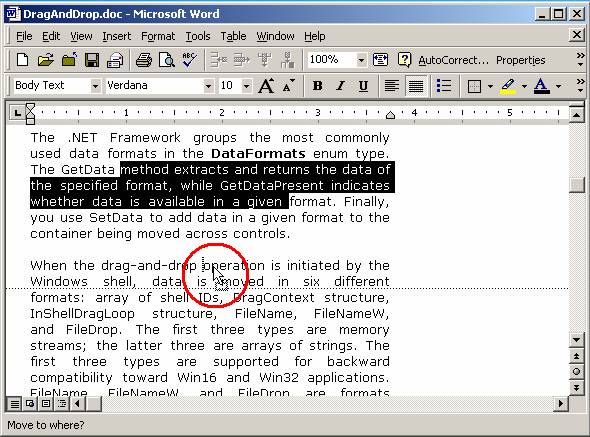
To obtain a similar effect on a plain TextBox control, you can physically move the caret to the character closest to the mouse pointer. The .NET Framework provides no built-in class or method to read caret information like the current row and column position. You also need to resort to a trick to set the caret position.
TextBox1.SelectionStart = charIndex
TextBox1.SelectionLength = 0
Set the SelectionStart property to an integer value that represents the 0-based index of the character in the control's buffer. At the same time, set the length of the selection to 0. As a result, the caret is moved close to the specified character. How can you determine the index of the character at a certain mouse position? Luckily enough, the Win32 Edit window?the Win32 counterpart of the TextBox control?supports the EM_CHARFROMPOS message. This message takes in the coordinates of a point within the TextBox's client area and returns the 0-based index of the nearest character. To send this message to the TextBox, you need to interop with the underlying Win32 infrastructure. The code in Listing 3 shows the interop .NET class that calls into a Win32 DLL.
The .NET Framework provides full support for calls directed at the Win32 SDK. No matter how optimized the interop layer is, minimizing the number of calls and the quantity of data being marshaled back and forth is an elementary rule of good programming. For this reason, I've written a small Win32 C++ DLL that exposes just one function: GetCaretInfo. The function takes the handle of the TextBox and returns a structure named CARETINFO (see Listing 3).
Internally, the function retrieves the screen coordinates of the point underneath the mouse and translates it into client coordinates in which the origin corresponds to the top-left corner of the TextBox. The coordinates are passed as an argument to the EM_CHARFROMPOS message and the index of the nearest character is returned. This information is packed into the CARETINFO structure and returned. Figure 2 shows how the caret follows the mouse pointer during a drag-and-drop operation.

Figure 2 shows data being dropped from Microsoft Word. As the yellow ListBox demonstrates, the same text is available in various formats, including rich text format and HTML. Which format you choose is completely application-specific. For example, if you're dropping onto a RichTextBox control, select the RichTextFormat option.
Filling a PictureBox from a File
In the previous example, I only considered one possible output: plain text. But you can design controls that accept a variety of data types. For example, the TextBox can be further extended to accept a drop from the shell and display the contents of the file. I'll demonstrate this feature for a PictureBox control.
If you try to set the AllowDrop property on the PictureBox control at design-time, you're probably going to have a hard time. For some reason, the property is not listed in the Property Grid, although it's perfectly supported. You must set it using code.
PictureBox1.AllowDrop = True
The DragOver event handler ensures that the data comes from the shell and contains just one file name.
If Not e.Data.GetDataPresent("FileNameW") Then
   e.Effect = DragDropEffects.None
   Return
End If
e.Effect = = DragDropEffects.Copy
The DragDrop event handler retrieves the file name and attempts to extract the image in it. Note that at this point, no check has been made on the type of file. It can certainly be a JPEG as well as a TXT or a DOC file. You can filter the file type in the DragOver event or accept any file and try to render its contents as an image.
If the file doesn't contain an image, a default image is displayed, as in the leftmost image of Figure 3.

Note that if the image you assign to the PictureBox's Image property is not a valid object (that is, the source file is not a graphic file), an exception is thrown. Furthermore, it is important that you explicitly open and close the source file. To minimize coding, you could resort to the following.
PictureBox1.Image = bmp.FromFile(fileName)
The functional effect is the same, but a significant drawback is just around the corner. The image file results lock (don't respond to changes) until you terminate the application. The sample image, shown when the dropped file is not a valid file, is generated using a bunch of GDI+ code.
    Public Function DummyImage() As Image
      Dim bmp As New Bitmap(200, 100)
        Dim g As Graphics = _   Graphics.FromImage(bmp)
        g.DrawString("No Valid Drop.", _
                     New Font("Impact", 20), _
                     Brushes.DarkRed, 10, 10)
        g.Dispose()
        Return bmp
    End Function
Dragging Text Out of a TextBox
It's pretty common that a drag operation starts when a MouseDown event is fired. Note that this is only the most intuitive scenario, certainly not a rule. Any event could be used to initiate a drag-and-drop procedure. Also note that certain controls have custom drag-specific events, as is the case with the ListView and TreeView controls. These controls fire the ItemDrag event to notify you that a drag operation is in course.
If you want to extend an existing control with drag-and-drop functionality, the first step is identifying the start event. For dragging text out of a TextBox, choose the MouseDown event. Setting up a drag operation is, in theory, pretty straightforward. You write a handler for the start event, place a call to the DoDragDrop method that all Control and Form objects expose, and finalize the operation when the method returns and you know the outcome of the operation (copy, move, or whatever). Does this sound like fun? Well, it's not for all controls. Try writing a MouseDown event handler for a TextBox and you'll run into trouble right away.
The TextBox control, in fact, does a lot of work in the MouseDown window event. To implement drag capabilities, you need to override the default behavior regarding text selection. To accomplish this, you can't just write handlers for known events; you really need to derive a new class and override the WndProc method. Overriding WndProc gives you enough power to control the message flow that makes each Windows Forms control reside and interact within the core Windows UI infrastructure. To write a successful WndProc override, you need to know a lot about Win32 SDK programming and messages.
Let's define a new TextBox class.
   Namespace Wintellect
        Public Class TextBox
            Inherits System.Windows.Forms.TextBox

        End Class
    End Namespace
You also need to import a few constants. I don't know why Microsoft didn't create an enum type with all the Win32 SDK messages exposed as mnemonic constants. At any rate, here are the definitions you need for the messages of interest. I've extracted them out of the winuser.h header file that you find in the Visual Studio 98 installation, for example.
 Private Const WM_LBUTTONDOWN As Integer = &H201
 Private Const WM_LBUTTONUP As Integer = &H202
 Private Const WM_SETCURSOR As Integer = &H20
The WndProc method is defined as follows:
Overrides Sub WndProc(ByRef m As Message)
        Select Case m.Msg
            Case WM_LBUTTONDOWN
                MyMouseDown(m)
            Case WM_SETCURSOR
                MySetCursor(m)
            Case Else
                MyBase.WndProc(m)
        End Select
    End Sub
You overrule the behavior of the TextBox in case a MouseDown message is received or a SetCursor. WM_LBUTTONDOWN arrives when the left mouse button is depressed, but before the mouse is moved or the button is released. WM_SETCURSOR is sent whenever the control needs to render the cursor. (The role of this message will be clear in a moment.) In all other cases, the control behaves as usual and the base WndProc method is invoked.
So what's going on and what are the goals of this code? The idea is to enable the following scenario: the user selects some text and moves the mouse over the selected text. When this happens, the mouse pointer changes to an arrow. (It is an I-beam by default.) To implement this feature effectively, you need to handle the low-level WM_SETCURSOR message. Incidentally, this is also the behavior of Word when you drag-and-drop text within a document window. The code below illustrates the SetCursor handler.
    Private Sub MySetCursor(ByVal m As Message)
        If IsOverSelectedText(m.HWnd) Then
            Cursor.Current = Cursors.Arrow
        Else
            Cursor.Current = Cursors.IBeam
        End If
    End Sub
The Message class represents the information associated with each Windows message. The HWnd property is the handle of the underlying window. In this case, it corresponds to the Handle property of the TextBox. IsOverSelectedText is a helper function that retrieves the current position of the mouse and compares it to the selected text. IsOverSelectedText exploits the IsOnSelectedText member of the CARETINFO structure, as illustrated in Listing 3.
    Function IsOverSelectedText(ByVal hWnd As IntPtr)_
       As Boolean
  Dim ci As NativeMethods.CARETINFO
        ci = NativeMethods.GetCaretInfo(hWnd)
        Return ci.IsOnSelectedText
    End Function
In Listing 4, you can see the source code of the WM_LBUTTONDOWN message handler. When the mouse button is depressed, notice whether the mouse is over the selected text. If not, do as usual and yield to the base WndProc method. Otherwise, you can detect whether or not a drag operation has been started. How do you do that? A drag operation is defined as any movement of the mouse from the click point that exceeds a system measure. The .NET Framework uses the SystemInformation.DragSize constant to indicate this value. Although undocumented in the .NET Framework, there's a better way to detect a drag operation called a Win32 API function.
The function is named DragDetect and lives in the user32 DLL. The DragDetect function takes the handle of the window within which the drag takes place and the current mouse position. It returns a Boolean value. To simplify things and minimize data marshaling, I've defined a Win32 wrapper for this function: IsDragging. Here's the C++ source code:
BOOL APIENTRY IsDragging(HWND hwndTextBox) {
   // Get the current mouse position
   POINT pt;
   GetCursorPos(&pt);
   return DragDetect(hwndTextBox, pt);
}
At this point, you're pretty much done. What remains to do is just calling DoDragDrop and packing the information for the target. You pass the text currently selected in the TextBox.
' Capture the outcome of the drag operation
dropEffect = DoDragDrop(SelectedText, _
                        DragDropEffects.Copy)
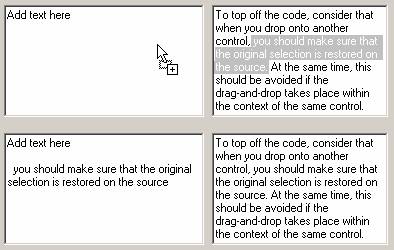
DoDragDrop is the method that governs the whole drag operation. The method fires the proper events to the target and to the source as needed. Pass in the data (plain text, in this case) and the allowed effects (only copy, in this case). When the method returns, the operation has completed and you must update the source accordingly. You need to do nothing special if the drag ended in a copy. If it ends in a move, cut the selected text from the source TextBox.
To top off the code, consider that when you drop onto another control, you should make sure that the original selection is restored on the source. At the same time, this should be avoided if the drag-and-drop takes place within the context of the same control. Figure 4 shows a sample application with two TextBox controls that support drag-and-drop.
Dragging Between PictureBox Controls
Implementing drag-and-drop from within a TextBox control is more complicated than with other controls. This is because the TextBox control handles the MouseDown event on its own; subsequently, custom code must interact with that implementation. Supporting a drag operation from a PictureBox control is significantly easier.
Earlier in this article, I discussed how to drop a file name onto a PictureBox control and have it display the contained image, if any. Can you drop an in-memory bitmap too? And can you drag-and-drop images between PictureBox controls? Sure! Let's see how.
Adding drop support to a PictureBox control for bitmap objects is as easy as checking an extra condition in the DragOver handler.
If e.Data.GetDataPresent("FileNameW") Or _
   e.Data.GetDataPresent(DataFormats.Bitmap) Then
       e.Effect = DragDropEffects.Copy
       Return
End If
The dragged data object that contains a bitmap becomes an acceptable drop for a PictureBox control. When the drop occurs, you examine the data being carried and decide how to proceed.
If e.Data.GetDataPresent("FileNameW") Then
   LoadPictureFromFile(e)
   Return
End If

If e.Data.GetDataPresent(DataFormats.Bitmap) Then
   LoadPictureFromBitmap(e)
   Return
End If
Dragging a picture from a PictureBox control is easy too: you can blissfully choose the MouseDown event to start the operation. In this case, there are no drawbacks or caveats because the PictureBox control has no need to process the message and there's no risk that you will break existing behaviors.
    Sub PictBox_MouseDown(ByVal sender As Object, _                         ByVal e As MouseEventArgs) _
    Handles MyBase.MouseDown

     Dim obj As New DataObject
        obj.SetData(DataFormats.Bitmap, Me.Image)
        obj.SetData(DataFormats.Metafile, Me.Image)
        Dim eff As DragDropEffects
        eff = DoDragDrop(obj, DragDropEffects.Copy)
    End Sub
To pack data, you can use an instance of the DataObject class. This class provides a default (but recommended) implementation of the IDataObject interface. To add data, you call SetData one or more times, each time indicating a value and a data format. The same information can be stored in various formats to reach a wide range of clients. In the example above, the image is saved as a bitmap and metafile. This simple thing makes it possible for you to drag from the TextBox to a PowerPoint slide. Go ahead and believe!
Conclusion
Drag-and-drop is not reputed to be a feature that makes your application richer from a functional point of view. Perhaps this is a debatable point. What drag-and-drop does is make applications easier and more intuitive to use. In this article, I've discussed the basics of drag-and-drop in the .NET Framework, and focused on the members, the classes, and the model that makes it work. Next, I've provided a few practical examples including how to enhance TextBox and PictureBox controls to accept drops and drag their data out.
Although drag-and-drop can be easily implemented within the context of an application, my advice is to insulate the code in the body of individual controls by building a custom library of components that know how to accept this intuitive and immediate form of input.
