


Many companies have been relying on COM components in the last couple of years. That includes Microsoft.
Using COM components made it possible for different programming languages to reuse logic between them, by agreeing to a standard defined by the COM specification.
Many developers wrote VFP applications using COM components, usually for data access logic and business logic. As a VFP developer you'll be relieved to know that you can reuse those components in .NET, allowing you to easily create a .NET User Interface (a Web application, for instance) that uses those VFP components, instead of throwing them away and rewriting everything from scratch. On the other hand, the .NET Framework comes with many classes that VFP developer might want to use in their VFP applications, and that is also possible.
Many companies have been relying on COM components in the last couple of years. That includes Microsoft.
Whether you use a COM component from .NET, or a .NET component from a COM-enabled environment (such as VFP), the mechanism that allows for that is called COM Interop.
Why COM Interop?
COM-enabled languages can use COM components created in any language because those components conform to the standards defined by COM. Most languages have different types, or treat common types in a different way, and therefore, in order to make components created in different languages talk to each other, they have to be compatible, and it is COM that determines the common rules.
.NET goes a step further trying to address issues with the COM standards (such as DLL hell), and it uses different approaches that lead to a very different set of standards. COM components and .NET components are not compatible by default. However, keeping in mind that many companies have put a lot of work into COM components, Microsoft added a mechanism to .NET so that .NET components can see COM components as if they were .NET components, and COM components can see .NET components as if they were COM components.
Calling VFP Components from .NET
In order for .NET to see COM components, you must create a proxy (or wrapper). This proxy, called Runtime Called Wrapper (or just RCW), is an object that sits between COM and .NET, and translates calls from .NET to COM. To the .NET client, the proxy looks like any other .NET component, and the proxy takes care of interpreting the calls to COM. Creating the RCW is not a daunting task, as you will see in a minute.
You first create a COM component in VFP. The following code creates a sort of business object class that.NET will use. (We say sort of business object because the data access code is there too, but separating layers is not the point we're trying to make here):
Define Class CustomerBizObj As Session OlePublic
   DataSession = 2  && Private Session

   Procedure Init
      Use Home(2) + "\Northwind\Customers.dbf"
   EndProc

   Procedure GetCustomerList() As String

      Local lcOut As String
      lcOut = ""
      Cursortoxml("Customers","lcOut",1,0,0,"1")
      Return lcOut
   EndProc
EndDefine
The GetCustomerList method retrieves a list of customers, returning the results in an XML string. Note that you must declare the return type, otherwise VFP will define the return type to be of type variant in the type library (a file that defines the methods and other things that are in a COM component). A variant is really bad because .NET doesn't support a variant type. On the .NET side, the developer must know in advance what data type is actually getting returned in order to be able to use it.
You declare the class using the OlePublic keyword, marking it to be exposed as a COM component. For this demo we created a project called COMInteropSample and added the CustomerBizObj.prg to the project. We need to build the project as a Multi-threaded COM server (.dll).
You can use the following code to test the COM component in VFP:
*-- Instantiate the object.
oCustomerBizObj=;
   CreateObject("COMInteropSample.CustomerBizObj")

*-- Call the method a save XML returned to file.
StrToFile(oCustomerBizObj.GetCustomerList(),;
    "c:\CustomerList.xml")

*-- Release the object.
Release oCustomerBizObj

*-- Show XML.
Modify File c:\CustomerList.xml
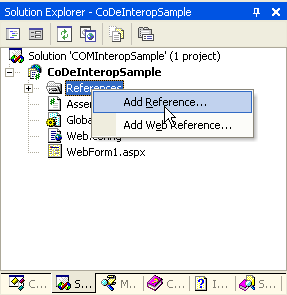
Next you can create any sort of .NET application. For this example we've created an ASP.NET Web Application, and we chose to use C#, but the language really doesn't matter. After we created the project we added a reference to the COM component in the .NET project. You can do this by going to the Add Reference option on the Project menu, or by right-clicking the References node on the project through the Solution Explorer window (Figure 1 shows that). From the dialog box, click the Browse button, and navigate to the COMInteropSample.dll that was created when the VFP project was compiled.
Next we created a CustomerList.aspx Web Form, and added a DataGrid control (named dgCustomers) to it.
The CustomerBizObj class created in VFP will be contained within a namespace called cominteropsample, so we added the line using cominteropsample; at the top of the code-behind my Web Form. Inside that namespace you'll find the class named CustomerBizObjClass. This Web Form displays the list of Customers returned by the GetCustomerList method on the business object. The following code snippet shows the Page_Load method on the Web Form, which runs every time the page loads:
private void Page_Load(object sender,
    System.EventArgs e) {

    CustomerBizObjClass customer =
        new CustomerBizObjClass();

    DataSet dsCustomers = new DataSet();

    dsCustomers.ReadXml(
        new StringReader(
        customer.GetCustomerList()));

  this.dgCustomerList.DataSource = dsCustomers;
  this.dgCustomerList.DataBind();
}
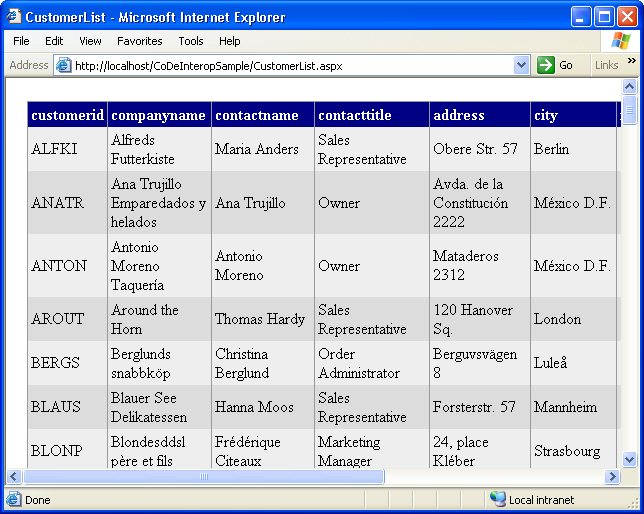
As you can see, the code just instantiates the CustomerBizObjClass as well as a DataSet. The DataSet is then filled with data based on the XML returned from GetCustomerList. The DataSet's ReadXml() method takes care of the transformation from XML to ADO.NET data. Finally, the DataSet is bound to the DataGrid. Other than the specifics of using DataSets and StringReaders, using the VFP component is just a matter of instantiating objects and calling methods, as the VFP developer is very used doing in VFP. Figure 2 shows the results of running that page.
Remember what seemed to be a daunting task of creating the RCW (that proxy that intermediates .NET calls to COM components)? That's been created automatically by the Visual Studio .NET IDE as soon as a reference to the COM component was added to the .NET project. If you select the cominteropsample reference on the Solution Explorer window and look at its Path property, you should see something like the following:
C:\YourProject\obj\Interop.cominteropsample.dll
YourProject should be whatever path you have to the .NET project you've created. The important detail to notice here is that the path doesn't point directly to the cominteropsample.dll (created by VFP). Instead, it points to an Interop.cominteropsample.dll. This DLL is the RCW created by .NET. This proxy will help .NET to communicate with the COM component. It has a class with the same name as the one exposed by the COM component, but with the class word added to it (thus, the CustomerBizObjClass that's instantiated in the .NET sample). In other words, whenever your application instantiates that class in .NET, the proxy will know how to instantiate the COM component, and whenever a method is called in that class, the proxy will know how to translate the .NET call into a COM call.
The Type Library Importer Tool
When a reference to a COM component is added to a .NET project by using the VS.NET IDE, VS uses a tool called the Type Library Importer, accepting default values for it. Some of those defaults determine that the proxy will be named after the COM DLL, but preceded by the word “interop” (such as in Interop.cominteropsample.dll), and the proxy class will be placed inside a namespace also named after the .dll (such as cominteropsample*).*
XML Web services have been promoted more than any other feature in .NET, and they are indeed very useful.
Many developers want to have more control over the process of creating the RCW. This means they want to have more control over the namespace where the proxy is going to be placed, and where the proxy DLL is going to be created. Developers can use the Type Library Importer tool (Tlbimp.exe) for that. This command-line tool that comes with the .NET SDK is in the folder "C:\Program Files\Microsoft Visual Studio .NET 2003\SDK\v1.1\Bin*".* You can run the tool at a DOS prompt like this: (We broke the lines for better readability, but this would all be typed on one line.)
tlbimp.exe
"C:\YourVFPProject\BizObjects.dll"
/out:
"C:\YourDotNetProject\bin\Proxy.BizObjects.dll"
/namespace:BizObjects
Notice that you specify the COM DLL, and then use the switch out in order to specify where you want to locate the proxy and what you want to name it. Use the namespace switch to specify the name of the namespace the proxy class will be contained on.
At this point you can remove the reference created previously in the .NET project for the COM component. You can add a new reference pointing to the Proxy.BizObjects.dll you just created. (The RCW is already a .NET class so VS.NET won't try to create another proxy). You can rewrite the using statement at the top of the Web Form as using BizObjects.
Calling .NET Components from VFP
There are many .NET classes that can be useful for the VFP developer, and VFP developers can use those classes through COM interop. For instance, you might want to use the classes that provide GDI+ features. Listing 1 shows a class created in .NET that wraps up some GDI+ functionality. We compiled the class into a class library project in .NET. The most important thing to note here is that the project has been marked as “Register for COM Interop.” To do that, right-click on the project, select Properties, select Configuration Properties ? Build, and then set the Register for COM Interop option to True to expose a .NET class as a COM component (Figure 3).

After you compile the project you can immediately use the class through COM from VFP. However, in order to provide a better experience for the user of such class, you might want to apply some attributes to the class. For instance, the class showed in Listing 1 has the following attributes applied:
[ClassInterface(ClassInterfaceType.AutoDual)]
[ProgId("VFPAndDotNet.ImageHelper")]
The ClassInterface attribute, set to ClassInterfaceType.AutoDual, enables the IntelliSense support in VFP. The ProgId attribute specifies the ProgId that VFP will use when instantiating the .NET component as a COM component. For example, you can use the ImageHelper class in VFP like so:
*-- Instantiate the .NET class as a COM component.
oHelper = CreateObject("VFPAndDotNet.ImageHelper")

*-- Set some properties.
oHelper.Copyright = "Claudio Lassala"
oHelper.ImageFile = "C:\MyImage.BMP"
oHelper.SaveFileAs = "C:\CopyOfMyImage.jpg"

*-- Call a method on the class.
oHelper.ProcessImage()
From the VFP side there is no indication that the object being used is a .NET object.
Calling .NET Web Services from VFP
The one.NET feature that was (and still is) mentioned more than any others is the ability to use .NET to create XML Web services. Web services are methods of functions that are exposed to the Web through a standardized protocol called SOAP. SOAP enables you to access to components in a platform and language neutral fashion. This means that any language and operating system can call any Web service no matter how the Web service was created. This, of course, means that Visual FoxPro can call Web services created in Visual Studio .NET.
We'll show you how to create a .NET Web service before we call one You can easily do this using the Visual Studio .NET IDE. (Note: If you do not have Visual Studio .NET installed, you can probably follow the example by calling an existing Web service such as one of the many Web services found listed with www.UDDI.org).
If you're following along you have Visual Studio .NET loaded. First create a new ASP.NET Web Service project. The language you choose to use does not matter. This example will use VB .NET but if you are more familiar with C#, you should have no difficulty following the examples. Figure 4 shows the New Project dialog box.

When you create a new ASP.NET Web Service project, the Visual Studio .NET IDE automatically includes all the required references and creates a Web service source code file (Service1.asmx), with a hello world method as a template. For our purposes we'll delete that method and instead change the code to what you see in Listing 2. You may have noticed that most of the code in Listing 2 is inside a “designer region,” which means that developers should never have to touch it. The important part of Listing 2 is the following method:
<WebMethod()> _
Public Function GetCurrentTime() _
  As DateTime
    Return DateTime.Now
End Function
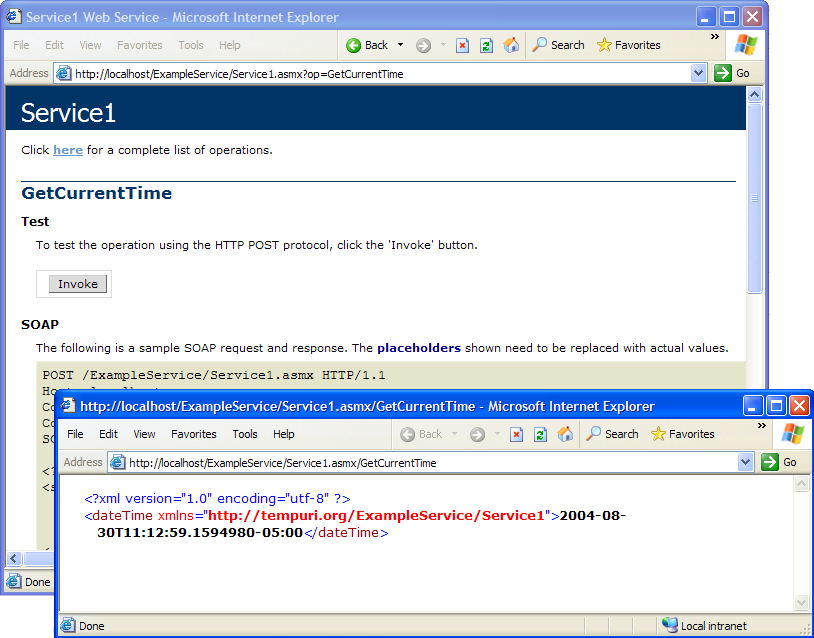
This method simply returns the current date and time as a DateTime data type. The only unusual aspect about this is the <WebMethod()> attribute. This attribute tells the ASP.NET runtime that this method is to be exposed through a Web service according to the SOAP standard.
You can start your Web service project (simply press F5) to see a test bench interface in Internet Explorer. In this example, the service is rather simple since it only has one exposed method. Click the link to that method and then click the “Invoke” button to run the service. (Note: If your method accepted parameters this interface would provide textboxes to enter those parameters.) You can see the result in Figure 5. The return value of the method is wrapped in XML, which is the key mechanism that allows you to call this service from Visual FoxPro.
You can register a Web service in VFP through the Task Pane Manager under it's special “Web Services” tab. Click the first link provided in this window, Register an XML Web Service. In the Web Service registration dialog box (Figure 6) you'll specify a URL that describes the Web service and tells VFP what methods as well as parameters and return values are supported by the service. ASP.NET-based Web services provide a WSDL (Web Service Description Language) URL that provides exactly that information. You can find the URL by launching the test bench in Visual Studio .NET (click F5), to launch the service test bench start page. At the very top of the page there is a link to the “Service Description” of the Web service. In our example, the URL is similar to the following:
http://localhost/ExampleService/
Service1.asmx?WSDL
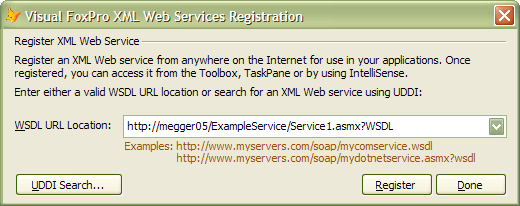
Note that in a real-life scenario, you need to replace “localhost” with the name of the domain the Web service resides on (such as www.codefocus.com).
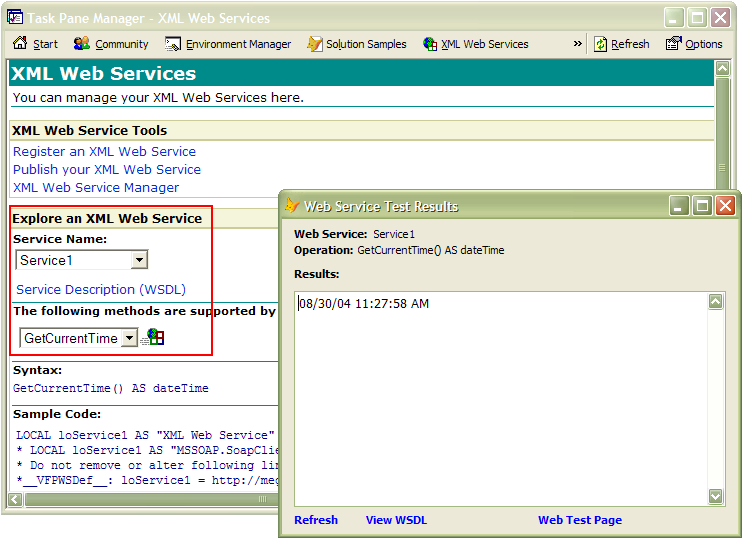
After you register a Web service with the VFP Task Pane you can test it immediately through the Task Pane Manager. Simply pick the service you would like to test (“Service 1” in our example) and the method you would like to call, and click on the icon next to the method drop-down list. You can see the result in Figure 7. You now know that the Web service works in VFP and you can start using it from within a VFP program. Doing this requires a little bit of code. The good news, however, is that the Task Pane also provides sample code (the bottom left of Figure 7 shows the start of the sample code) that you can use directly by dragging and dropping that code into a source code window. Listing 3 shows code created based on the sample code provided by the Task Pane. Note that Listing 3 contains a lot of code that is not strictly required including error handling. The important code is the following:
loWSHandler =
NEWOBJECT("WSHandler",;
    IIF(VERSION(2)=0,"",;
    HOME()+"FFC\")+"_ws3client.vcx")
loSvc =
loWSHandler.SetupClient(;
    "http://.../Svc.asmx?WSDL",;
    "Service1", "Service1Soap")
MessageBox(loSvc.GetCurrentTime(
))
Note: We shortened the URL to make it more readable. Please replace the URL with the URL of the service you created.
The sample code instantiates the WSHandler object, which is VFP's connector to a Web service. This object is then configured with the WSDL URL. Subsequently, we call the GetCurrentTime() method, which returns a .NET DateTime variable. VFP automatically assigns the return value to a VFP DataTime variable even though the two formats internally differ slightly. Since the value is returned as a DateTime you can perform additional operations on it. For instance, you can retrieve the time portion using the following commands:
LOCAL ldCurrentDateTime
ldCurrentDateTime = ;
  loService1.GetCurrentTime()
? TToC(ldCurrentDateTime,2)
Note that automatic type assignment does not happen all the time. It is possible, some would say likely, that the Web service will return a data type that is not natively supported in Visual FoxPro. This typically happens when the return value is a complex object, such as an ADO.NET DataSet. In that case the return value would be complex XML, which you must parse before VFP can use it. In the case of a DataSet VFP has an XMLAdapter class. (Note: For more information about the XMLAdapter class, see the “What's New with Data in Visual FoxPro 9” article in this issue, or search for “XMLAdapter” on www.code-magazine.com.) For other complex objects, parsing the XML may be a little more complex, but using tools like XMLDOM, it is never overly hard.
Exposing VFP Objects as Web Services
Visual FoxPro does not support a native way to expose VFP objects as Web services, but there are several other Microsoft tools and technologies that you can use to accomplish this goal. In previous versions of VFP, Microsoft recommended the SOAP Toolkit (and in fact provided tools to automatically publish VFP Web services using this toolkit). This approach is now not recommended anymore, mainly because the SOAP Toolkit uses either ASP or ISAPI “listeners” to react to incoming requests. Neither technology is recommended at this point, and is only supported by Microsoft based on the standard Microsoft support policy. The better way to go at this point is to expose VFP objects through modern ASP.NET Web services.
The overall idea for this approach is simple: First, create a VFP object and expose it as a COM object. You can access this COM object from ASP.NET using a simple wrapper service to expose individual methods. For instance, consider the following VFP object:
DEFINE CLASS TestClass AS Custom OLEPublic
    FUNCTION GetName() AS String
        RETURN "John Smith"
    ENDFUNC
ENDDEFINE
Here is the wrapper class used to expose this object through ASP.NET as a Web service:
Imports System.Web.Services

< WebService(Namespace := _
    "http://MySvc.org/Service1")> _
Public Class TestService
    Inherits WebService

#Region " Designer Generated Code "

    <WebMethod()> _
    Public Function GetName() _
      As String
        Dim oVFPObject As New _
          TestProject.TestClass()
        Return oVFPObject.GetName()
    End Function

End Class
For more details on how to use VFP COM objects in .NET, please refer to the earlier section on COM Interop.
Visual FoxPro and OLE DB
Another way to interact with Visual FoxPro data from .NET is via the Visual FoxPro OLE DB provider. Listing 4 demonstrates querying data from the sample NorthWind.DBC file and displaying it on an ASP.NET page.
You can simply call this method from an event in an ASP.NET Web Form (such as the Load event). The code first opens an OLE DB connection to a VFP database container. Next the code executes a SELECT statement fills the results into an ADO.NET DataSet using a DataAdapter. You can then use this DataSet like any other ADO.NET DataSet. In this example, we use it as the bound data source for a DataGrid.
Further details of accessing VFP data through OLE DB is beyond the scope of this article. The core concept however is relatively simple and pretty similar to accessing SQL Server data.
Conclusion
COM Interop makes it easier for the developer to use VFP components in a .NET application, preventing the developer from rewriting portions of logic such as data access and business rules when time constraints and budget don't allow for that. The same mechanism also enables the developer to use .NET classes from VFP, adding even more power to existing VFP applications.
Web services are a more open process and allow your VFP application to work with environments that do not support COM or .NET. Web Services work over the Internet, hence automatically adding remote invocation as a free benefit.
Interop on the database level is also a viable option. This works both ways: .NET can access VFP data through OLE DB. VFP, on the other hand, can access many of the data sources .NET uses, such as SQL Server. (We skipped this topic since SQL Server data access with VFP has been discussed many times).
Claudio Lassala, Markus Egger, and Rod Paddock
Listing 1: A ImageHelper class that wraps up GDI+ funcionalities
using System;
using System.Drawing;
using System.Drawing.Imaging;
using System.Drawing.Drawing2D;
using System.Drawing.Text;
using System.Runtime.InteropServices;

namespace MiscClasses
{
  /// <summary>
  /// The ImageHelper class wraps up some GDI+ functionalities.
  /// </summary>
  [ClassInterface(ClassInterfaceType.AutoDual)]
  [ProgId("VFPAndDotNet.ImageHelper")]
  public class ImageHelper
  {
    public ImageHelper() {}

    private string strImageFile;
    public string ImageFile
    {
      set { this.strImageFile = value; }
      get { return this.strImageFile; }
    }

    private string strCopyright;
    public string Copyright
    {
      set { this.strCopyright = value; }
      get { return this.strCopyright; }
    }

    private string strSaveFileAs;
    public string SaveFileAs
    {
      set { this.strSaveFileAs = value; }
      get { return this.strSaveFileAs; }
    }

    public void ProcessImage()
    {
      // Declare some variables.
      Bitmap SourceBitmap = null;
      Bitmap TargetBitmap = null;
      Graphics bmpGraphics = null;
      Image thumbnail = null;

      try
      {
        // Create a bitmap representation of the source image.
        SourceBitmap = new Bitmap(this.ImageFile);

        // Create an empty bitmap for the target image.
        TargetBitmap =
              new Bitmap(SourceBitmap.Width, SourceBitmap.Height);

        // Create a graphic object based on our target bitmap size.
        bmpGraphics = Graphics.FromImage(TargetBitmap);

        // set Drawing Quality for the image.
        bmpGraphics.InterpolationMode = InterpolationMode.High;
        bmpGraphics.TextRenderingHint =
                                   TextRenderingHint.AntiAlias;
        bmpGraphics.SmoothingMode = SmoothingMode.HighQuality;

        // Creates the rectangle where we'll draw the image.
        Rectangle compressionRectangle =
                      new Rectangle(0, 0,
                         SourceBitmap.Width, SourceBitmap.Height);

        // Draw the original image on the graphic object.
        bmpGraphics.DrawImage(SourceBitmap, compressionRectangle);

        // Add logo.
        Image imgPhoto = Image.FromFile(@"c:\MyCompanylogo.jpg");
        Bitmap bmPhoto =
                  new Bitmap(imgPhoto.Width, imgPhoto.Height,
                        PixelFormat.Format24bppRgb);

        // Draw logo on source image.
        Graphics grPhoto = Graphics.FromImage(bmPhoto);
        bmpGraphics.DrawImage(imgPhoto,
                    TargetBitmap.Width - imgPhoto.Width, 1);

        // Add copyright info.
        bmpGraphics.DrawString(@"Copyright © 2004 - " +
                    this.Copyright, new Font("Arial Black",12),
                    new SolidBrush(
                     Color.FromArgb(153, 255, 255, 255)),3,
                                 SourceBitmap.Height - 24);

        // Save image to disk.
        TargetBitmap.Save(this.SaveFileAs, ImageFormat.Jpeg);

        // Create thumbnail.
        thumbnail = TargetBitmap.GetThumbnailImage(
                                72,98,null,IntPtr.Zero);
        ImageFormat format = TargetBitmap.RawFormat;
        thumbnail.Save(this.SaveFileAs + "_thumbnail.jpg", format);
      }
      catch
      {
        throw;
      }
      finally
      {
        // Dispose objects.
        if (SourceBitmap != null)
          SourceBitmap.Dispose();
        if (TargetBitmap != null)
          TargetBitmap.Dispose();
        if (bmpGraphics != null)
          bmpGraphics.Dispose();
        if (thumbnail != null)
          thumbnail.Dispose();
      }
    }
  }
}
Listing 2: A first Web service created by ASP.NET and the Visual Studio .NET IDE
Imports System.Web.Services

<System.Web.Services.WebService(Namespace := _
  "http://tempuri.org/ExampleService/Service1")> _
Public Class Service1
    Inherits System.Web.Services.WebService

#Region " Web Services Designer Generated Code "

    Public Sub New()
        MyBase.New()

        'This call is required by the Designer.
        InitializeComponent()

        'Add your own initialization code after
        'the InitializeComponent() call

    End Sub

    'Required by the Web Services Designer
    Private components As _      System.ComponentModel.IContainer

    'NOTE: The following procedure is required by the
    'Web Services Designer
     'It can be modified using the Designer.
    'Do not modify it using the code editor.
    <System.Diagnostics.DebuggerStepThrough()> _
    Private Sub InitializeComponent()
        components = New _
          System.ComponentModel.Container()
    End Sub

    Protected Overloads Overrides Sub Dispose( _
      ByVal disposing As Boolean)
        'CODEGEN: This procedure is required by
        'the Web Services Designer
        'Do not modify it using the code editor.
        If disposing Then
            If Not (components Is Nothing) Then
                components.Dispose()
            End If
        End If
        MyBase.Dispose(disposing)
    End Sub

#End Region

    <WebMethod()> _
    Public Function GetCurrentTime() As DateTime
        Return DateTime.Now
    End Function

End Class
Listing 3: Calling the ASP.NET Web service from within a VFP program
LOCAL loService1 AS "XML Web Service"
* LOCAL loService1 AS "MSSOAP.SoapClient30"
* Do not remove or alter following line. It is used to
* support IntelliSense for your XML Web service.
*__VFPWSDef__: loService1 =
  http://megger05/ExampleService/Service1.asmx?WSDL , Service1 , Service1Soap

LOCAL loException, lcErrorMsg, loWSHandler
TRY
    loWSHandler = NEWOBJECT("WSHandler",;
      IIF(VERSION(2)=0,"",HOME()+"FFC\")+;
      "_ws3client.vcx")
    loService1 = loWSHandler.SetupClient(;
      "http://megger05/Svc/Service1.asmx?WSDL", ;
      "Service1", "Service1Soap")

    LOCAL ldCurrentTime as Datetime
    ldCurrentTime = loService1.GetCurrentTime()
    MESSAGEBOX(Transform(ldCurrentTime))

CATCH TO loException
    lcErrorMsg="Error: "+;
      TRANSFORM(loException.Errorno)+;
      " - "+loException.Message
    DO CASE
        CASE VARTYPE(loService1)#"O"
            * Handle SOAP error connecting
            * to web service
        CASE !EMPTY(loService1.FaultCode)
            * Handle SOAP error calling method
            lcErrorMsg=lcErrorMsg+CHR(13)+;
                loService1.Detail
        OTHERWISE
            * Handle other error
    ENDCASE
    * Use for debugging purposes
    MESSAGEBOX(lcErrorMsg)
FINALLY
ENDTRY
Listing 4: Code to query FoxPro data from ASP.NET
Public Sub GetFoxProData()
   Dim cConnString As String
   cConnString = "Provider=vfpoledb.1;"
   cConnString += Data Source=\\JAWATEST\NorthWind\NorthWind.dbc"
   cConnString += ";Exclusive=false;Nulls=false"

   '-- connect to database
   Dim oConn As New OleDbConnection
   oConn.ConnectionString = cConnString
   oConn.Open()

   '-- create a command object to query
   Dim oCMD As New OleDbCommand
   oCMD.CommandText = "select * from customers"
   oCMD.Connection = oConn

   '-- create the adapter class for filling
   '-- our dataset
   Dim oAdapter As New OleDbDataAdapter
   oAdapter.SelectCommand = oCMD

   '-- go get the data
   Dim oDS As New DataSet
   oAdapter.Fill(oDS, "customers")

   '-- clean up
   oConn.Close()

   '-- view the data
   Me.DataGrid1.DataSource = oDS.Tables("customers")
   Me.DataGrid1.DataBind()
End Sub
