


Microsoft has opened wide Office development to Visual Studio .NET developers by creating the Microsoft Visual Studio Tools for the Microsoft Office System. These tools work with Microsoft Office 2003 Professional Edition.
In its previous versions, Microsoft has spent considerable time making Office available for integration with other Windows-based applications. The ability to integrate with Office began with DDE, went on to OLE 1.0, then to automation, and finally added Visual Basic for Applications. The Visual Studio Tools for Office combine the vision of its predecessors with the functionality of the future in Office 2003.
Office is a staple in most corporations, and .NET developers can easily take advantage of its power and omnipresence. The Visual Studio Tools for Office provide the ability to use .NET code with Office 2003 applications. With it, you can create code using Microsoft Visual Basic .NET (VB.NET) or C# (or other .NET languages) and integrate that code into your own Office 2003 tools.
Installing Visual Studio Tools for Office
The first step to using the Visual Studio Tools for Office is to install it; it should be available by the time of this printing.
A cool .NET feature allows you to import a library and access its properties and classes via an alias.
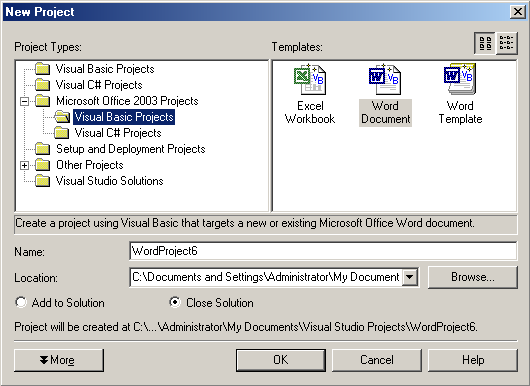
The installer adds a new section called Microsoft Office System Projects to the Visual Studio .NET New Project dialog box. These new project types are divided by language (C# or VB.NET) and by Office 2003 application (only Microsoft Excel 2003 and Microsoft Word 2003 at this time). Figure 1 shows the New Project dialog box with the Visual Basic projects type selected.
Creating Your First Project
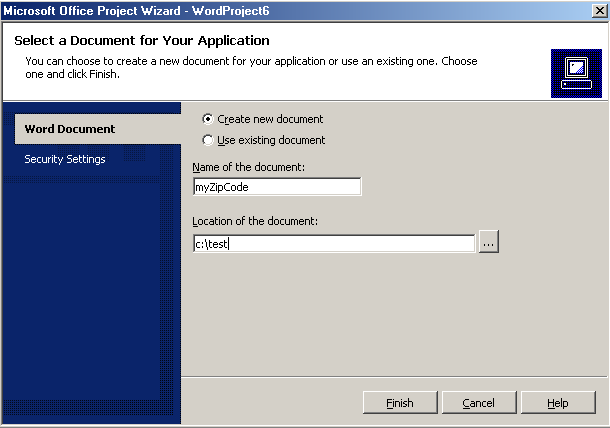
Now that you've installed Visual Studio Tools for Office and selected a language, you can create a new project for the type of document with which you want to integrate. Upon selecting the document type, a wizard prompts you to choose options to create a new document or attach code to an existing document (Figure 2).
Once you have selected the appropriate behavior, the wizard creates a new Visual Studio Tools for Office project. This project includes code suitable for the type of project you selected. This article discusses a Word 2003 application.
Examining the Code
Once the wizard has run, you can examine the project it created. The first item to examine is the references added by the wizard. The wizard creates a project with all the standard .NET references (System, System.Data, System.XML, etc.) and it also adds references to Microsoft.Office.Core, Microsoft.Office.Interop.Word and Microsoft.VBE.Interop.Forms. These references are assemblies used to communicate with Office 2003 and are installed when you perform a complete installation of Office 2003. If you haven't installed them from your Office 2003 CDs, the Visual Studio Tools for Office will do that for you.
The next item to examine is the class created by the wizard. The class created by the wizard is partially defined in Table 1.
One item to note is that the routine is defined as a Sub and not a function.
Other items to note are the properties ThisDocument and ThisApplication (ThisDocument is known as ThisWorkbook in Excel 2003 projects). These variables are references to the current document and application. These two variables are cast as their proper Office data types in the _Startup() subroutine created by the wizard.
Friend WithEvents ThisDocument As Word.Document
Friend WithEvents ThisApplication As Word.Application
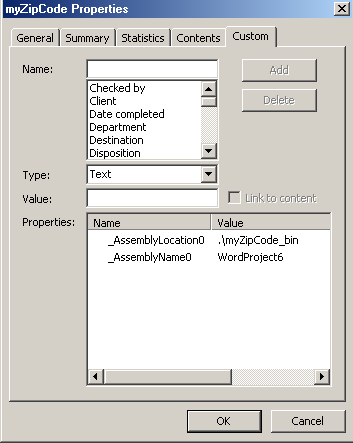
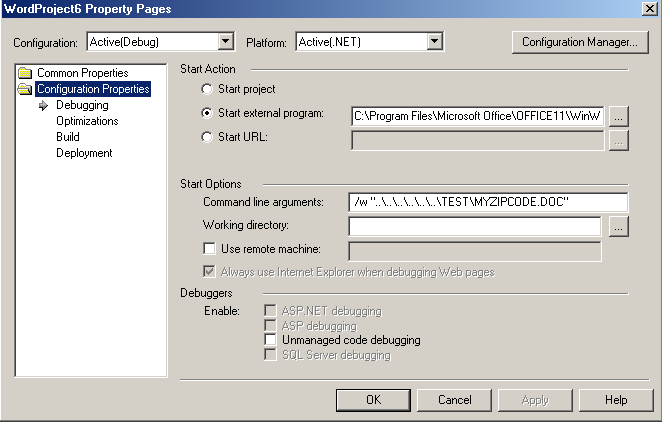
One last thing to note is how your project links to the workbook or document defined in the wizard.Figure 3 shows the Project Properties dialog box and how the Visual Studio .NET project is linked to Word 2003 and the specified document.Figure 4 shows the Properties dialog box from Word 2003 and how the document is linked to a .NET assembly. In Figure 4, you can see how easy it would be to replace the auto-generated _AssemblyLocaltion0 and _AssemblyName0 properties with your own assemblies.
As you can see, the interface is pretty simple for interacting with Office 2003 applications from Visual Studio .NET. Now let's go to work and make this thing do something.
Hello World
No article on using a new technology would be complete without a new-fangled Hello World example. To create your new Hello World functionality, add the following code to the Document_Open() subroutine and press F5:
ThisDocument.Range.Text = "HELLO WORLD"
From this code, you can see that you are adding text to the Range object of the Word 2003 document. Not too difficult, is it?
Moving On
The next step is to create an application that deals with more complex code and issues than Hello World.
One of the great things about Visual Studio .NET is its ability to create and consume Web services. It would be nice to take advantage of this in your Word 2003 applications as well. That's what this next set of code will do.
The interface is pretty simple for interacting with Word and Excel 2003 applications from Visual Studio .NET.
First, let's create a simple Web service with a WebMethod called GetZipInfo(). The WebMethod returns the city and state for a passed-in Zip Code.
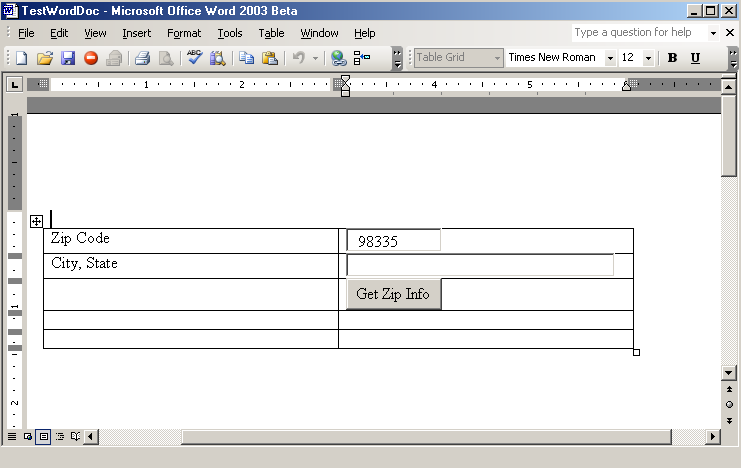
Next, you'll add some data entry controls to your Word 2003 document. These data entry controls are:
- A button named cmdGetZip and captioned “Get Zip Info”
- A textbox named txtZipCode
- A textbox named txtResult
You can add these controls to your Word 2003 document via the Control Toolbox in Word 2003. Your Word 2003 document should look like the document in Figure 5.
Now that you have created your Word 2003 document with the proper controls, you can create your Web service, adding code to the interface with controls and adding code to call the Web service.
Creating the Web Service
The first step is to create a Web service called ZipService with a WebMethod called GetZipInfo. To create a Web service, open the New Project dialog box in Visual Studio .NET. Select Create New ASP.NET Web Service and call it ZipService. Add the following code to your Web service:
<WebMethod()> _
Public Function GetZipInfo(ByVal cZip As String) As String
    If cZip = "98335" Then
        Return "Gig Harbor, WA"
    ElseIf cZip = "90210" Then
        Return "Beverly Hills, CA"
    Else
        Return "???"
    End If
End Function
Build the Web service by pressing F5. You can now return to your .NET/Office 2003 code.
Interfacing with Controls
The next step is to add code to interface with the controls you added to your Word 2003 document. This is a multi-step process:
Referencing and Importing the Microsoft Forms Library
The first step to integrating with the Microsoft Forms 2.0 library is to add a reference to that library. To do this, right click on the References section of the Solutions Explorer and then choose References from the shortcut menu. Now select the COM tab, select the first Microsoft Forms 2.0 reference from the dialog box, and press the Select and OK buttons. You can now use this library in your applications.
One of the great things about Visual Studio .NET is its ability to create and consume Web services.
The next step is to add an Imports statement to the top of your class. The following code adds the Forms library to your class:
Imports myForms = Microsoft.Vbe.Interop.Forms
As you can see, this library is imported and aliased to the name myForms. This is a cool .NET feature that allows you to import a library and access its properties and classes via an alias.
Adding Reference Properties to Your Controls
The next step is to add Reference properties to the controls on your Word 2003 document. The following code adds reference properties for each control:
Friend WithEvents myButton As myForms.CommandButton
Friend WithEvents myZip As myForms.TextBox
Friend WithEvents myResult As myForms.TextBox
One item to note is the inclusion of the WithEvents option. These controls send events to your .NET code, which requires use of the WithEvents option.
Casting Your Controls
After adding the reference variables to your code, you need to cast these controls as the proper object types. The following code uses the FindControl() (which can be found in the code created by the Office Project Wizard) and the Ctype() function to cast the reference properties as the proper object types:
myButton = CType(FindControl("cmdGetZip"), myForms.CommandButton)
myZip = CType(FindControl("txtZipCode"), myForms.TextBox)
myResult = CType(FindControl("txtResult"), myForms.TextBox)
The Ctype() function is used to cast an object from one type to another. The FindControl() call returns a handle to the object you wish to cast.
Creating the Event Sink
The final step in this process is to add code to your class to trap the Click event sent from the button on your Word 2003 document. To do this, add the following code to your class:
Dim cZip As String = myZip.Text
Dim oWS As New wsZipService.Service1
Dim cResult As String = oWS.GetZipInfo(cZip)
myResult.Text = cResult
From this code, you can see the Handles statement. This control handles the Click() event of the myButton object.
The rest of the code simply instantiates the Web service, sends the proper Zip Code to the Word 2003 document, and returns the information to the Results text box.
Running Your Example
Now you can run your example using one of two methods. You can press F5 and run the example directly from Visual Studio .NET or from Word 2003. Running your application from the F5 option is how you debug these applications.Figure 6 shows the code above running in debug mode.
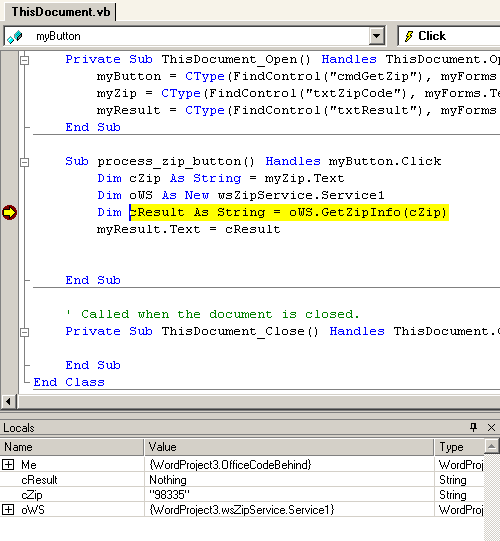
The other mechanism for running this code is to simply open the document in Word 2003. Word 2003 takes care of loading the assembly and calling the code in it.
Conclusion
As you can see, integrating Visual Studio .NET and Office 2003 is pretty simple. You can use the user-friendliness of Office 2003 along with the power of Visual Studio .NET in your applications without having to resort to VBA code. That's pretty cool.
Thanks go out to Ken Getz for helping with the research for this article.
Table 1: Definition of the class created by the Visual Studio Tools for Office Wizard.
| Property/Method | Description |
|---|---|
| ThisDocument | Handle to the current document |
| ThisApplication | Handle to the current application |
| ThisDocument_Open | Subroutine called when the document opens |
| ThisDocument_Close | Subroutine called when the document is closed |
| `FindControl()` | Function that searches the current document for a handle to a control. Used for accessing controls added to a document |
| `Range()` | Returns a `range` object that can be manipulated in workbooks and documents. In Excel, a range can be defined as a cell or range of cells. |
| `Other` functions and properties | There are literally hundreds of others. For the purposes of this article, the ones defined above are the ones most commonly used when integrating with Office. |
