

Software development is a collaborative process.
This article is the first in a series focused on the tools and techniques developers use to effectively work in concert. Special attention will be paid to the needs of distributed teams where some or all of the team members travel frequently or work remotely.
The creation of good software has always been a collaborative endeavor. Even if only one person designs, implements, tests, documents and maintains the software, the developer must collaborate with users to ensure the finished product meets its design goals. Clearly, in multi-developer teams, collaboration is integral as developers must communicate to each other and with the end user in an iterative fashion. Fred Brooks in his book “The Mythical Man Month” (1995 Addison Wesley), demonstrated that adding developers to a project does not always result in faster production. Simple combinatorics shows the communication effort expended between N developers rises at least quadratically as a function of N. Combine this with the national trends toward working at home, reduced travel budgets, and increased travel restrictions, and you can easily see the need for a robust set of tools to allow developers to work together from distributed and dynamic locations. Our own company includes a half dozen associates in two different countries and our clients may be found as far away as The Netherlands and Malaysia. This is the first in a series of articles on collaborative software development. This series will explore the tools, tricks and techniques available for those who work in teams and yet yearn for the 35 second commute from kitchen to office.
The Source
The series will begin by looking at the life-blood of any development process: the source code. If you are developing software, it is a given that your project will include some source code. Your project's source code represents the decisions made in your trek from software-need-determined to software-need-fulfilled. Every decision, large or small, will affect the source code in some way. The time of the decision-plan-code-test cycle will have a dramatic impact on the time expended in a project. In addition to source code, there are a number of other artifacts your project may produce. There may be requirements documents, test scripts, artwork, end-user documentation, audio clips etc; in short, many different, constantly changing files which when combined, represent the finished product. Factor in a distributed development team and you can see the challenge before us. How can developers collaborate on this set of ever-changing files? And how can they do it securely and efficiently? Some measure of control must be placed on these artifacts or your effort will dissolve into chaos. This brings us to the topic of this article, source control. We will look at source control in general and then specifically at some tools available to aid distributed teams in tracking and controlling the revisions of the files on which they work.
In general, source control is a process supporting the following key ingredients:
The process above does not imply any particular tool. In fact, the system above may be implemented via e-mail between developers. However, as the number of files grows and the number of individuals working on those files grows, one would expect to be spending an increasing amount of time maintaining this process and less time actually developing the software. Due to this fact, tools have been developed to support this process automatically.
Basic Terminology
Check-out: The process of taking a current copy of a particular file and placing a flag on it so others are aware of the status.
Check-in: The process of returning code to the repository, resetting the flag that was placed when the code was checked out.
Rollback: Undoing changes and reverting to a previously saved version of a file or files.
Branching: Deciding to maintain two different (yet controlled) versions of the same code
Merging: Re-combining branched files, or re-combining versions of the same file that have been edited simultaneously.
Tag or Label: This is a global “version number” or “milestone marker” you can apply to a file, group of files, or entire project. With a label in place, one can go back to that point of the project at any time.
Pin: the process of holding a shared file (or set of files) static in one project while allowing changes to continue in projects
Overcoming the Inertia
Software developers are commonly resistant to adding tools that they feel may alter their familiar, well-established, development practices. This inertia is understandable, we have all spent time learning a new tool only to discover that the cost of using it outweighed the benefits. If you are not using it now, source control will definitely affect the way you work on software. It will also make some common tasks slightly more difficult, and as such, many developers put it off to another day. I would urge you to consider otherwise especially if your development team consists of one or more developers. The case for using automated version control is very strong, and in a distributed team environment, it is really hard to imagine working effectively without it.
Here is a list of things you can do with a good source-control package. Consider each of these a “nudge” that will hopefully overcome the inertia.
With source control you can:
Roll your code back
Have a bad day or week? You can roll back any file or set of files to a previous point in time (like back to when your application worked).
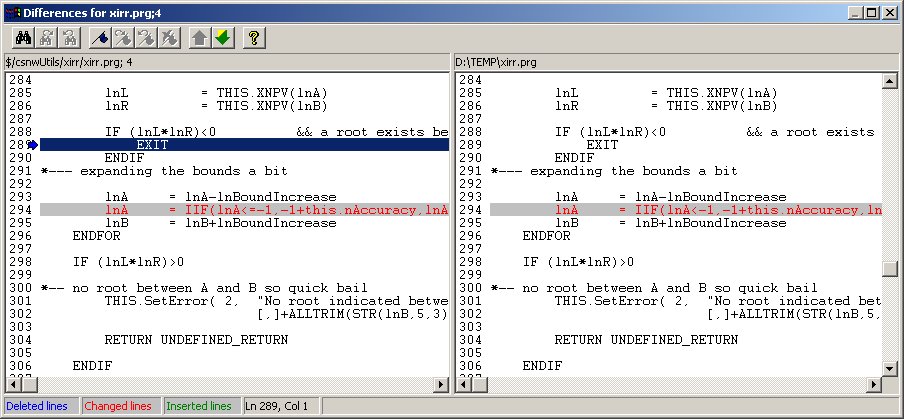
Compare differences
Has something broken recently? Check the differences between the current version of the source file and any previous version. A complete incremental history is kept of every file.
Work on files simultaneously with others
Allow multiple users to edit the same text file simultaneously. When the users check the file in, the changes are automatically merged. If changes to the same line have been made, the user is prompted to decide what the final result should be.
Share code between projects without maintaining multiple versions of the shared code
This feature is very handy for reusable framework modules. Projects may share this code by maintaining links to a single controlled copy of the source files. If you make a change to the shared module, it is immediately updated in all linked projects.
Pin shared code to avoid revision
If a project using shared code needs to be kept unchanged (even if changes occur to the shared files), those files may be pinned at any particular version, and unpinned later if needed, to allow updates of the shared code. This is very useful for controlling the introduction of new versions of third-party frameworks that your applications may rely on.
Expand Keywords
This feature allows automatic keyword expansion in text files. This means you can have your source code's revision log and file header automatically updated each time you check code in.
Shadow a project
You can assign a particular folder to always contain a current version of the source. This “shadow” folder is automatically updated and can be a good backup target or used for testing, etc. We use this feature to shadow our Web projects to the Web application testing server. This way, remote users can update .html, .asp, and other Web application files automatically without needing access to the Web application folders themselves?a rare blend of convenience and security.
Deploy projects on demand
Similar to the Shadow feature above, projects may also be deployed on demand to local folders or even ftp sites. Projects may be deployed to multiple locations at the same time. Combine this feature with the ability to pin projects at any particular state and you have a robust method of managing code images on multiple staging and production servers.
Getting Started with Source Control
In the next section you will learn how to install and use a source code control system. This section will concentrate on using Microsoft Visual SourceSafe. Visual SourceSafe ships with Microsoft's Visual Studio and is also available as a stand-alone product. See below for a list of links to other source control tools, some of which are free.
Installing VSS
Before you install source code control you need consider the system on which your code will be stored. It is recommended that this system have fault-tolerant features, however you can install source code control systems on reasonably equipped systems so long as you have a good backup solution. The following list makes recommendations about the hardware you use.
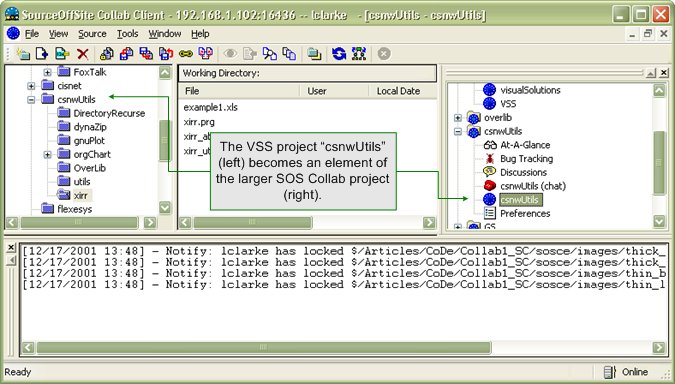
Once you have performed the basic install, you will want to set up some users and projects. The Visual Source Safe user list is independent from any of your network user accounts. Use the VSS Administration console to set up users. Projects may be set up using the standard VSS client. One of the defining characteristics of VSS is that it is project based rather than file based. The primary unit you work with in VSS is a “project.” Projects can include files and other projects. VSS uses a file folder metaphor to allow the user to interact with the various projects. Users may be added and assigned specific rights to certain projects.
Setting up users
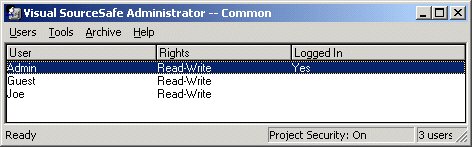
Users are set up through the VSS Administration console (Figure 1). VSS can support numerous isolated source databases each with its own set of users. Since you can keep multiple projects in a single database, your need for multiple source databases will probably be limited to different divisions on your company or different projects that do not need to share code. Start with one database to begin with, but know that you have options for splitting out projects in the future if needed. You will first want to give your admin account a strong password, and remove the ‘guest’ account.
Create project
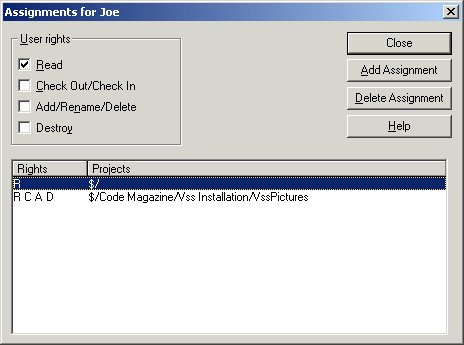
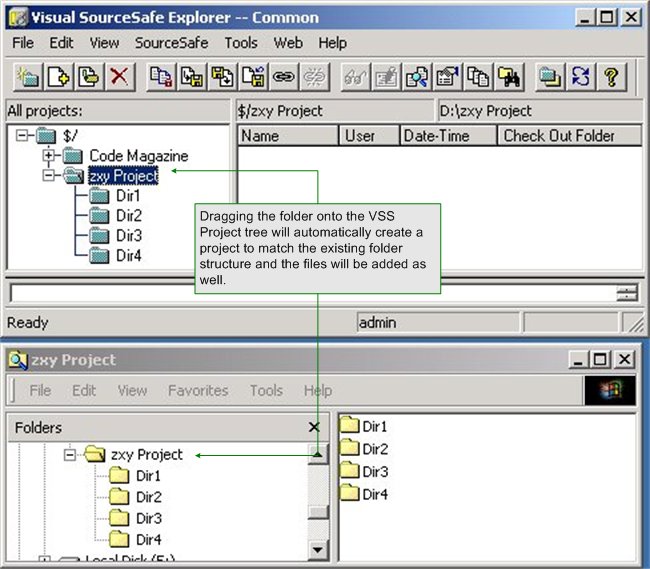
Once you have installed SourceSafe and set up your users you need to set up a project. Projects are created in the VSS Client in a way completely analogous to creating folders on a hard drive. To do this, right-click on the root $/ project folder and choose ‘Create Project…’ give it a name and you are done. In Figure 2 you can see we have done this three times, creating three nested projects. Source files may be placed in any one of these project folders. Before we add files, let's establish some security settings for these projects. Security is managed through the VSS Administration console. In the “Tools” menu you will see options to set rights by user or rights by project. Figure 3 shows user Joe getting different rights for different projects.
Once you have set up your projects and established you user accounts and rights you can start using VSS to manage your source code. In this you have two options, IDE integration (which is supported for many different products including VC++, VB, VFP etc) or you can use the VSS client itself to check code in and out.
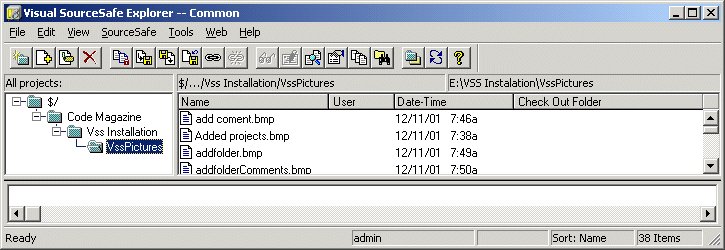
To add a file to source control (refer to Figure 4), right click on the project folder you wish to add a file to and select “Files, Add Files…” and navigate to the file you wish to add. It does not matter where the file resides on your disk, once it is added to source control there is no “link” between the original file on the disk and the one in source control. Once you have added files, you will likely want to check them out to work on them. To do this, you will first have to establish a “working directory” for that particular project. A working directory is where files will be copied for work when they are checked out. When you check files in, the copies will remain in the working directory but will be marked as “read only” to help you avoid making changes to files without first checking them out. To establish a working folder, just right-click and choose "Set Working Folder…".
To check out the file, just right-click on the file's icon and choose “Check Out…” see Figure 5. You can also check out an entire project folder (and all sub folders) by selecting the same option on the folder icon.
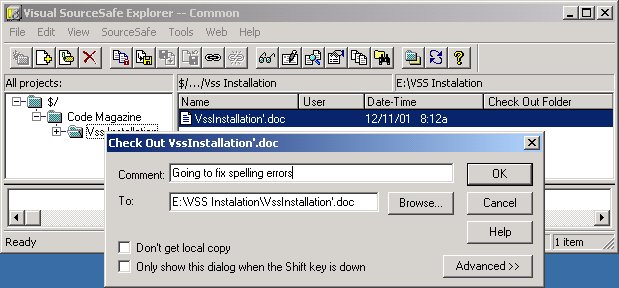
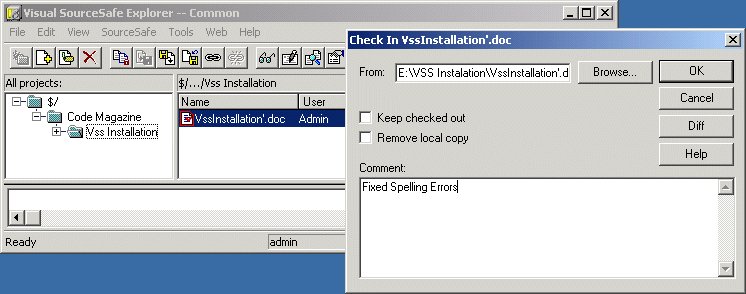
When you check out a file, the copy in the working folder will be marked as “read/write” and you can edit it as needed. To check a file back in, return to VSS, right-click on the file and choose check-in (Figure 6). If you are using the IDE integration, your IDE will manage these check-in/check-out operations for you. See below for more information on IDE integration. Finally, you can always view the difference between your local copy and the copy in VSS by choosing “Diff…” from the right-click menu, see Figure 7.
IDE Integration
It should be noted that all the Visual Studio tools as well as MS Office applications will integrate with VSS. This means that you can perform the basic check-in/checkout tasks from your familiar IDE. In fact, Microsoft has provided a Common Source Code Control API to allow third party products to integrate with VSS. See http://members.home.net/preston/cvsscc.html for some interesting details on this. Also, VSS can be automated, which means you can easily write your own tools that access and perform operations on the VSS database. See http://msdn.microsoft.com/library/techart/vssauto.asp for more information on automation.
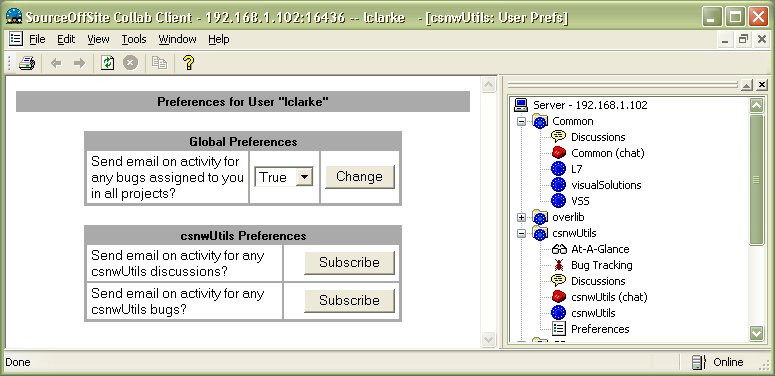
Note the VSS client requires file access to the VSS server, this typically means LAN access. So what about the distributed team? It can be difficult to support this sort of connection securely for remote users. However, remote users typically have Internet access and source control with VSS can be supported via TCP/IP. An excellent product for this job is Source-Gear's Source-Off-Site which has been available for years. However, Source-gear has recently released a new version of their product called Source-Off-Site Collaborative Edition (SOS Collab) which enhances the product with tools aimed at the distributed software development team. We recently participated in the beta test of this product and feel that it has good potential for collaborative software development.
Source Control from a distance
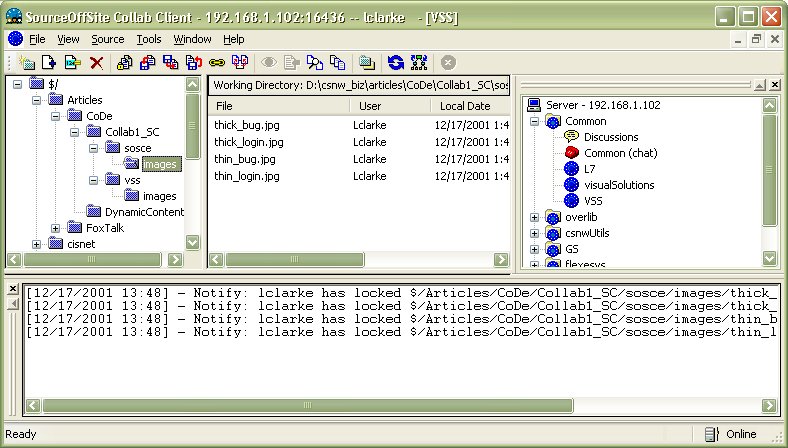
Source-Off-Site is a tool that facilitates developers accessing source code control over thin network connections like dial-up or DSL. This product is necessary because VSS typically transports large amounts of data across a network line and requires a mapped drive to do so.
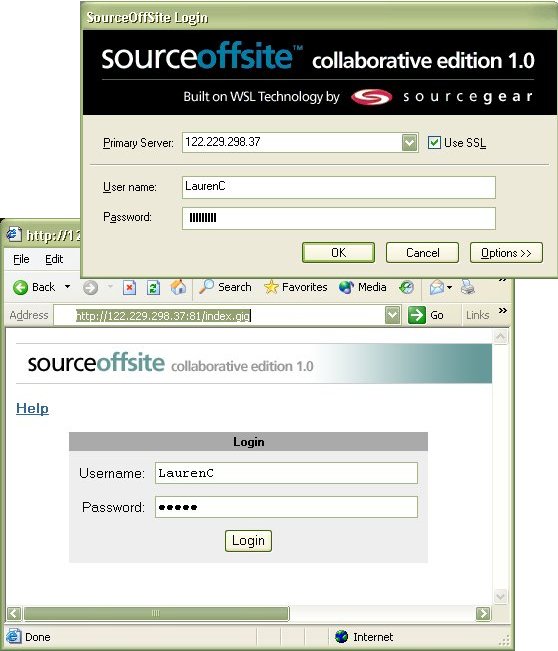
As might be expected, there are two parts to the SOS Collab system, the server (which integrates with VSS) and the client which you use at the remote end. In fact, there is a little more to the picture at server-side, as you will install the SOS Collab Primary Server as well as the SOS Collab Web-Server. On the client side, you have the option of using a full-featured thick client, or a browser-based client.
Server Side Components
On the server side, both the SOS Collab primary server and the Web server are required. These applications run as services on the host machine and together they dish responses to both types of client. IIS, the typical Microsoft platform Web server is not required. If you choose to have IIS on your SOS Collab server (perhaps to support other intranet apps) it can be arranged so that they do not conflict via judicious port assignments. You will also need MS SQL Server or MSDE to store support data files such as chat logs. Installation is relatively simple, just use the wizards provided.
Client Side Components
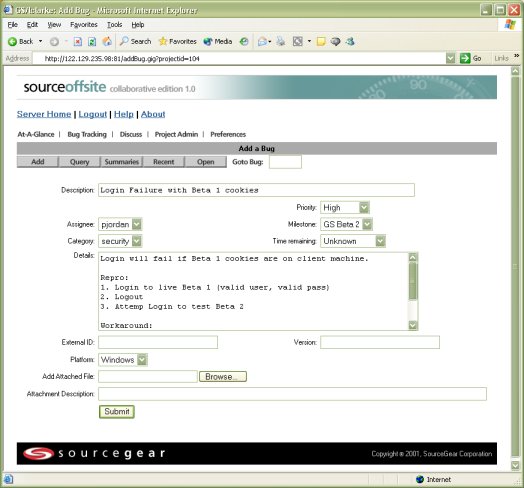
On the client side, the thick client offers all the core functionality of the standard VSS Client, and much more. Bug Tracking, Chat, Milestone tracking, project discussions and support for multiple projects are all integrated into the SOS Collab. The SOS Collab thin-client is browser based and offers limited, but useful features including a project overview, bug tracking, and project milestone tracking. While it is possible to use both clients on the same machine (at the same time actually), developers will typically use the thick client exclusively to do development work, project managers and people on the road may find the thin client more convenient.
Configuration of SOS Collab
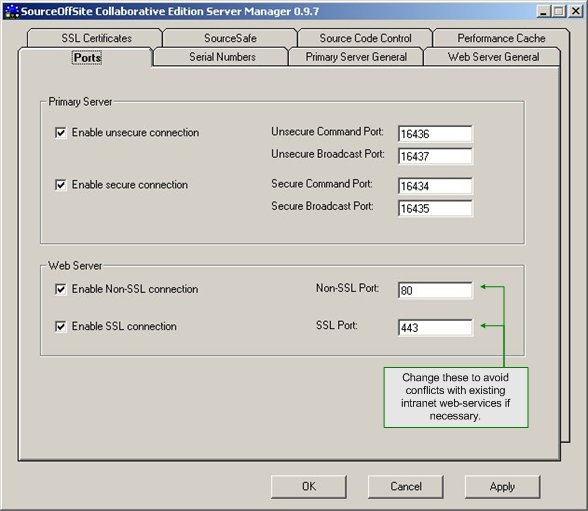
SOS Collab requires a data store for ancillary information such as chat logs, bug records, milestones etc. SOS Collab may be configured to use MSDE or SQL Server as the data store. Both the Primary Server and Web Server install as system services. Note that certain changes to your VSS database will not be reflected in the SOS Collab servers unless they are restarted. During beta testing, it was not always clear what changes would require a restart. When in doubt, restart the servers to ensure a refresh. Also, if you intend to run IIS or some other Web service on the same machine as the SOS Collab servers, you will have to arrange for the port usage to avoid conflicts. This is easily done from the SOS Collab admin console (see Figure 8).
Extending SOS Collab
The fact that SOS Collab uses SQL Server to store its data offers some obvious custom reporting options. Preliminary documentation on SOS Collab states that it uses XML messaging to communicate to the thick client and that this interface will be documented for others to use. This opens some promising doors for the future in that source control, bug tracking etc, might eventually be integrated with other tools.
SOS Collab Pros, Cons and ERs
SOS Collab looks to be a good starting point into a new field for Source-gear. The integration of bug-tracking and milestone tracking with source control is quite promising. Chat and project discussions are also interesting additions, but they may need some polish before becoming truly useful. It is disappointing that the IDE client present in the basic SOS client is missing in the SOS Collab version. It is reportedly high on the list a priorities to add to the product in future versions. Apart from that, the key ingredient lacking in the current version is, in a word, integration. The various components: chat, bug tracking, milestones, source control, discussions, are displayed side-by-side in the interface, but they are not really integrated. Conspicuously absent is the ability to easily link between entities. For example, while in a chat, it would be nice to be able to type BUG#1234 and have it rendered into a hyperlink that would take the user to that particular bug report. A myriad of other examples where linking between different project entities would be an obvious time-saver. Note that these observations were taken from the Beta 2 version of the product. By the time you read this, SOS Collab will have shipped and may have changed since the beta.
Conclusion
Even for single-person projects, source control is important. For teams it is indispensable. To quote a recent FoxPro DevCon speaker: “If you are not using source control, there is something wrong with you.” Perhaps a bit overstated, but not far off the mark. The time spent learning and integrating source control into your everyday work cycle will pay immediate dividends and the cost of not using solid source control is just too high to ignore. There a many tools for this job, we've just described a few here, check the links provided for more options.
Looking Ahead
Effective collaboration is more than version control; care must be taken to ensure your team is expending resources in an efficient manner, one that provides the client with the most value. The next article in this series will investigate how an increasingly common tool known generically as a “wiki” can help a distributed team work on a project effectively.