


Dragon NaturallySpeaking and its associated Developer's Suite provide everything you need for speech recognition: stable ActiveX controls, quality documentation, and end-user “hand-holding” tools for installation and configuration issues.
Like many software developers, I tend to be an early adopter of new technology. While it can be fun to stay on the “bleeding edge,” being an early adopter can also have its pitfalls (that's why the edge is “bleeding”). Sometimes, when you adopt first-generation hardware or software that falls short of its promises, you are left with such a bad taste in your mouth that you become skeptical. This skepticism can, in turn, prevent you from adopting later generations of the same technology.
This happened to me with speech recognition software. When I tried it several years ago, it was not much more than a novelty. After training the software extensively to understand my voice, it was still barely useful for even simple desktop commands. Dictation was pretty much out of the question. I was unimpressed and quickly stopped using it until recently, when someone encouraged me to try it out again.
Although my expectations were very low, I was quite surprised, and I continue to be more and more impressed by this software every day. For example, this entire article was dictated into the computer and the keyboard was used primarily for “coarsely-grained” editing tasks.
In the last couple of years, the accuracy of recognition has dramatically improved, as faster processors and lower RAM prices have combined with new software abilities to recognize entire phrases.
Dragon NaturallySpeaking Developer Suite
I was already getting excited about the instant power and value of this new software when I saw one of my very favorite words - ActiveX. Although in retrospect it makes a lot of sense, I can't imagine the stunned look on my face when I realized that I could have access to such a powerful tool in my Visual FoxPro applications.
Not only does Dragon Systems provide ActiveX controls, but every one of them works in the Visual FoxPro environment. However, there are some problems that we will discuss.
The Dragon NaturallySpeaking SDK contains the following ActiveX controls:
- Engine control
- Microphone button
- Custom dictation
- Voice-command
- Voice text
- Dictation edit
Making Your Application Speech-Aware
On a machine that has any of the off-the-shelf NaturallySpeaking packages already installed, you don't have to do anything other than start NaturallySpeaking before your application is started. There really is nothing more involved in making your application speech-aware. Once Dragon is up and running with the microphone turned on, any application that is in the foreground receives the output of the speech recognition engine.
The downside of this is that it requires your user to take an additional step - starting the speech recognition software. The Dragon Systems ActiveX engine control is designed to allow you to make your applications speech aware without that step, simply by activating global dictation capabilities with a single property. However, getting Visual FoxPro application windows to properly register with the engine control is difficult. It can be made to work but I could not do so reliably.
This is too bad, because if it did work properly it would make most of the speech recognition capabilities available with virtually no changes to an application. You could drop a couple of ActiveX controls on your form and you would get all of the behaviors and capabilities without having to depend on the user to start the speech recognition software. Unfortunately it is quite difficult to make it work in VFP.
Lucky for us, there's more than one way to accomplish what we want.
Using the Dragon ActiveX Controls In VFP
Before you begin, make sure that you have added all six of the Dragon NaturallySpeaking ActiveX controls to your ActiveX control list in VFP (choose TOOLS | OPTIONS | CONTROLS to get the proper dialog for adding ActiveX controls).
In most cases, an application will require both an engine control and a microphone button control. Create a new form and add an engine control (which looks like a hammer) and a microphone button control (which looks like a microphone). Using the engine UI property of the engine control, you can specify whether or not your application will cause a microphone icon to appear in the taskbar tray. If you set this property to .T., your end users will also have right-click access (on the taskbar tray icon) to all the Dragon NaturallySpeaking menus and dialogs.
Since we're not using global dictation, the engine control is not absolutely required, but it has other handy functions that we will discuss later. It's good to get in the habit of always including it. Select the engine control and add the following line of code to its Init() method to properly register your application with the speech recognition engine:
this.Register()
When you drop the microphone button on a form, it starts out large - the graphic will look odd, and as you resize it, the picture will be cropped. Don't worry about it. The next time you open the form, the graphic will be properly scaled to the size of the button.
You also need to set the AutoRegister property of the microphone button:
AutoRegister = .T.
The microphone button can provide not just an on/off switch, but also a visual response mechanism, depending on how you size it. If you make it rectangular instead of square, it will also display a VU meter to indicate a signal at the microphone. It is handy to show the VU meter so the user can see that the microphone is connected properly. It also shows when the microphone is in “sleep” mode.
Using a Custom Dictation Control to Update VFP Controls
The custom dictation control provides the solution to the problems of global dictation and VFP form registration. This control allows continuous dictation into any type of window (as opposed to the dictation edit control, which works only with standard Windows edit controls), but we will write our own code to keep the internal dictation buffer and the VFP form controls synchronized.
It is easiest to think of the custom dictation control and its dictation buffer as a text box that you can't see. It has properties similar to a text box, such as Text, SelStart and SelLength. We will use these properties to keep a visible form control, such as the text box, in sync with the dictation buffer.
Think of it as two text boxes on the form that update each other. The synchronization extends not only to the text values in the controls, but also to the current selection in the control. That's what we have with the custom dictation controls, except that we just can't see the results in the dictation control.
Drop a custom dictation control on your form and add the following code to the Init() method:
WITH thisform
    .DictCust.Register()
    .DictCust.Active = .T.
ENDWITH
This registers the custom dictation control with the speech recognition engine and activates it.
Now, let's add the additional code to synchronize the dictation buffer with the on-screen VFP form controls. Open the GetChanges() method of the custom dictation control and add the following code:
LPARAMETERS HaveChanges, Start, NumChars, Text, SelStart, SelNumChars, VisibleStart, VisibleNumChars
LOCAL loFormControl

loFormControl = thisform.ActiveControl

*- Make sure we have a dictation compatible
*- control and skip it if not
IF NOT PEMSTATUS(loFormControl, "SelLength", 5) OR NOT PEMSTATUS(loFormControl, "SelStart", 5) OR NOT PEMSTATUS( loFormControl, "Text", 5 )
    RETURN
ENDIF

*- Update the values of the parameters which are
*- all passed by reference
*- from the Speech recogition engine
WITH loFormControl
    HaveChanges = .T.
    Start = 0
    NumChars = -1
    SelStart = .SelStart
    SelNumChars = .SelLength
    Text = .Text
    VisibleStart = 0
    VisibleNumChars = LEN( Text )
ENDWITH
RETURN
Finally, open the MakeChanges() method of the custom dictation control and add the following code:
LPARAMETERS Start, NumChars, Text, SelStart, SelNumChars
LOCAL loFormControl

loFormControl = thisform.ActiveControl

*- Make sure we have a dictation compatible control
*- and skip it if not
IF NOT PEMSTATUS(loFormControl, "SelText", 5) OR NOT PEMSTATUS(loFormControl, "SelLength", 5) OR NOT PEMSTATUS(loFormControl, "SelStart", 5)
    RETURN
ENDIF

WITH loFormControl
    *- Make sure there is something in the
    *- buffer before changing any text
    IF (NumChars > 0 OR LEN( Text ) > 0)
        .SelStart = Start
        .SelLength = NumChars
        .SelText = Text
    ENDIF
    .SelStart = SelStart
    .SelLength = SelNumChars
ENDWITH
The code in each of these methods tests whether or not the form's currently active control is compatible with dictation. That means that the control has the same properties mentioned earlier (Text, SelText, SelLength). If we have a compatible control, then we go through the steps of synchronizing the buffer and the control. GetChanges() updates the dictation buffer from the form control and MakeChanges() does just the opposite.
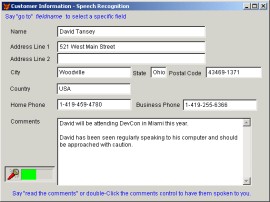
Now, when we run our form, any controls that pass the test (such as text boxes, edit boxes or combo boxes) will accept dictation. This means that after you place your cursor into the address line one field, you can simply say something like “five twenty one west main street” and the results will appear in the text box as “521 West Main Street”. It is worth mentioning that the software is very adept at recognizing numbers, so dictating postal codes and other similar items is a snap.
Your controls will now also respond to most select-and-say commands, which allow you to verbally correct mistakes in your dictation. For instance, if the address you had just dictated was actually an Avenue and not a Street, you could simply say “select street” to highlight the entire word “Street”, and then say “avenue” to replace the word “Street”.
A user will also have full access to the correction dialog, which can be used when the speech recognition engine misunderstands something that the user has said. For instance, if the user noticed that the address was recognized as “bye 21 West Main Street”, he could just say “correct that” to bring up the correction dialog (Figure 1).
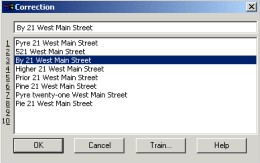
In the correction dialog, you're presented with other close matches, and can select any of them just by saying, for example, “select 8” to select item No. 8 from the list. It is not required, but is a good idea, for a user to retrain the speech recognition engine when phrases are misunderstood. All the steps can be controlled by voice as in the following:
say: “correct that”
say: “select 8”
say: “click train”
say: “click record”
At this point, the user is prompted to recite the phrase they selected and then the phrase the recognition engine originally chose.
say: “click done”
say: “click OK”
Now, the results in the text box not only reflect the proper phrase, but the speech recognition engine has also been retrained to better recognize that phrase in the future.
If you need the entire range of select-and-say commands, you can get them through the dictation edit object and Microsoft's rich text format ActiveX edit control. However, this approach has challenges with registration and activation of the control at the proper times, and is beyond the scope of this article.
Becoming Speech Centric / Responding to Voice Commands
We can take the first steps toward making our application “speech-centric” as opposed to just “speech-aware” by adding a series of voice commands that will allow us to navigate our data entry form.
A voice menu consists of one or more voice commands that you activate or deactivate as a group. Each voice command specifies a word or words that you want users to speak to perform an action in your application. When the speech engine recognizes that a user's phrase matches the words specified in a command on an active voice menu, the CommandRecognize event fires.
You must create the voice menu first and then add commands to it as described below.
To add voice commands, we need a voice menu object but we can't create it directly. The only way to create a voice menu object is by calling the MenuCreate() method of the voice command object. So, let's start by adding a voice command object called VoiceCmd to the form (it looks like an exclamation point).
Because the voice menu object cannot be created directly, it also cannot be created using the AddObject() method of the form - so we need to create a form property for it, to keep this object in scope. Add a property to your form called oVoiceMenu and initialize it to .NULL.
Select the voice command object, open its Init() method, and add the following code:
*- Gets this control in communcation with the SR engine

this.Register("")

*- Get a Voice Menu object from the Voice command object.
*- The third parameter is the language id (0x409 = US
*- English) but the manual says this parameter
*- is unused. The fourth parameter is the dialect which
*- the manual says is unused.

thisform.oVoiceMenu = this.MenuCreate("Order Entry", DictCustomer Menu", 0x409, "", 1)

*- Add the commands for our application specific 'grammar'

WITH thisform.oVoiceMenu
    .Add(1,"Go to Name","Navigation","Select Name field")
    .Add(2,"Go to Address Line 1","Navigation", "Select Address line 1 field")

    *- FOR BREVITY NOT ALL FORM FIELD
    *- COMMANDS ARE SHOWN

    .Add(11,"next field","Navigation", "Select the next field")
    .Add(12,"previous field","Navigation", "Select the next field")
    .Active = .T.
ENDWITH
RETURN DODEFAULT()
The code starts by registering the control with the speech recognition engine. This control has a number of parameters for its MenuCreate method, but the only ones of real interest are the third parameter (language ID) and the fifth parameter (required, and always takes the value 1 to represent the constant vcmdmc_CREATE_TEMP. (I have to assume that some of these more cryptic parameters are intended for future use.)
Now that we have a voice menu hooked into the oVoiceCmd property of the form, we can begin to create some voice commands. The Add() method of the voice menu object allows us to add a command. This assigns an ID and a verbal utterance representing the command, but doesn't make a specific reference to any action or form control yet. That will be handled by the CommandRecognize() method.
First, let's look at the kind of commands we added. My sample form has ten different data entry controls representing the basic contact information for an individual. Although I added a voice command for each of the controls, I show only two examples here. The first one responds to the command “go to name”, and the second one responds to the command “go to address line 1”. Now, when the user runs the application and utters these commands, the CommandRecognize() event will fire. So let's add the following code to the CommandRecognize() method to carry out some action when a command is recognized:
*** ActiveX Control Event ***
LPARAMETERS command, id, action, listresults

WITH thisform

    DO CASE
        CASE ID = 1
            .txtName.SetFocus()
        CASE ID = 2
            .txtAddressLine1.SetFocus()

        *- FOR BREVITY SAKE NOT ALL COMMAND
        *- ACTIONS ARE SHOWN

        CASE ID = 11
            KEYBOARD "{TAB}"
        CASE ID = 12
            KEYBOARD "{BACKTAB}"
        CASE ID = 13
            .txtComments.DblClick()
    ENDCASE

ENDWITH
RETURN
When the event occurs, we test the ID of the command that was recognized and take whatever action we want. In the first two cases, we have the actions to correspond to the first two navigation commands defined in the Init() method. All they do is call SetFocus() on the appropriate control. The actions for the “next field” and “previous field” command actions are equally simple, requiring just a single FoxPro KEYBOARD command with the appropriate keystroke (TAB or BACKTAB).
The CommandRecognize() event is driven by the ID of the voice menu command rather than the actual utterance, so you can create more than one command to achieve the same effect. In other words, you can define synonymous phrases. We will use that capability here to deal with a small problem.
The basic select-and-say vocabulary includes the command “tab-key” but it doesn't work well with VFP. Because of the use of the SelText property for interaction with the custom dictation control, the end result of commands like “tab-key” is that the character code is included in the text string of the control and the desired field movement is not executed. By adding a command to our voice menu that has the same definition (“tab-key”), we can grab control when the command is recognized and then use FoxPro's KEYBOARD command to get the results we want. To avoid having to define additional actions in the CommandRecognize() event, we just reuse the command ID's that we defined for the commands “next field” and “previous field”. Here's an example of that code from the Init() method again:
.Add(11,"tab-key", "Navigation", "Select the next field")
.Add(11,"next field", "Navigation", "Select the next field")

.Add(12,"shift tab","Navigation","Select the next field")
.Add(12,"previous field","Navigation", "Select the next field")
Looking deeper, there's additional flexibility available with command recognition. You can define variable portions of a phrase that can match any of the values in a list. The list consists of multiple alternative utterances represented by a single placeholder at a specific point in a voice command. When the user speaks the command, saying any one of the defined utterances at the specified point, the speech engine recognizes the command and the event code is carried out.
Ultimately, we have created a limited grammar that is specific to our application. The great thing about a limited grammar like this is that there are very few command phrases for which a user will need to train the speech engine. This approach also minimizes the recognition time for commands.
Displaying the Train Menu Dialog Box
With a single call to the TrainMenuDlg() method of the voice command object, your application can display the train menu dialog box (Figure 3). This will allow users to train to commands in the voice menus so that Dragon NaturallySpeaking is more likely to recognize them correctly. The dialog box automatically collects all of the words in your limited command grammar, displays a list of those words for training, and prompts the user to speak each word in sequence.
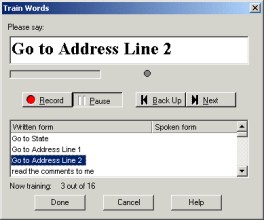
It is important to note that all changes to speech files are cached and are never saved except explicitly. Even if you're not going to utilize the train menu dialog, the end user will have access to the correction dialogs for verbal commands. Therefore, it's important to check whether the speech files have been changed using the property, and then save them using the engine control's SpeakerSave().
Making Your Application Talk Back
The final tool we have available is the voice text control, which allows us to make the application “speak” by turning text into speech. While this feature may initially seem to be just a curiosity or novelty (it does a darned good impersonation of Dr. Stephen Hawking), this tool is critical for creating applications that are not only hands-free, but also eyes-free.
As an example, we will add a function to make the application read the contents of the comments field out loud. We put the code into the DblClick() method of the comments field, but to get the full effect we will also add a new voice command to the voice menu to drive the same function.
Add a voice text control to your form (it looks like a loudspeaker) and add the following code to the Init() method (for some reason, this control requires a non-null string in the second parameter to indicate the application type):
this.Register("", "VFP")
Then, select the comments field (or any field on your form that you want the application to be able to read back to you) and add the following code to its double-click method:
WITH thisform

    *- Turn the mic off while computer is speaking
    .MicButton.object.MicState = 1	&& micOff

    *- Computer "Speaks" what is in this control
    .VoiceText.Speak(This.Text)

    *- Wait for the "Speaking" to finish but give the OS control in between tests
    DO WHILE .VoiceText.IsSpeaking
        DOEVENTS
    ENDDO

    *- Turn the mic on when computer is through speaking
    .MicButton.object.MicState = 2	&& micOn

ENDWITH
Select the voice command object and add the following command to the Init() method where we already added voice commands:
.Add(13,"read the comments","Commands", "Recites the contents of the comments field")
Finally, we need to add an action to the CASE statement in the CommandRecognize() method to act on our new “read the comments” command:
CASE ID = 13
    .txtComments.DblClick()
Now, when we run our form, we can say “read the comments” and the entire contents of that edit box will be read out loud by the computer.
Setup and Configuration Dialogs
Because setup and configuration of a user for speech recognition can be complicated, Dragon Systems was smart enough to expose all of their configuration and setup dialogs for NaturallySpeaking with the engine ActiveX control. By using its DlgShow() method, you can invoke any of 16 different dialogs to allow configuration and setup of NaturallySpeaking (some functions are available only in certain versions). There are a variety of things that you can do, including:
- Connect and test the speakers
- Connect, position, and test the microphone
- Adjust the input volume
- Create a set of user speech files
- Run General Training to help Dragon NaturallySpeaking adapt to the user's voice
- Run Vocabulary Builder to personalize the default vocabulary
A speaker, or “user” in Dragon NaturallySpeaking terminology, is a set of speech files containing acoustic information about a user's voice, as well as vocabulary and language-model information. Because the engine control exposes functions for creating, loading, saving or deleting a speaker (either with your own user interface or theirs), it's easy to see how you could correlate the logon user IDs of your application with the selection of a speech recognition user.
Conclusion
Performance and price improvements in personal computers have helped dramatically to make speech recognition software a possibility on many machines, and the performance curve will keep improving. Speech recognition offers a very natural input mechanism for many people (imagine the possibilities for verbal data entry by disabled individuals who have lost the use of their hands).
You can see that it's very easy to incorporate speech recognition into your applications, but be sure to make the decision carefully. It's more complicated than just understanding the target performance of the deployment machines. For instance, what is the physical work environment? A noisy environment might make it impossible to use speech as a reliable interface. Some applications will not tolerate even occasional misrecognition. Different concerns might come from users who are resistant to new methods of working.
In any case, remember that understanding how to make the speech user interface adapt or conform to existing job practice is helpful in gaining acceptance in any situation.
