


Business-To-Business (B2B) communications are rapidly becoming an essential component in today's economy.
Some say B2B transactions will soon outnumber Business-To-Customer (B2C) transactions. While we have learned how to do B2C quite efficiently, B2B presents an entirely new set of challenges that we have yet to resolve. Previous attempts were successfully used, but were too expensive to be used as often as B2C. Microsoft tries to resolve this dilemma with Microsoft BizTalk Server 2000, and it is looking promising! This article provides a first in-depth overview.
At the time I'm writing this article, Microsoft BizTalk Server Beta 1 has been available for about one month. This latest release has changed the face of BizTalk significantly. Many of the basic concepts seen in previous versions have been changed and renamed, and a major new piece - namely BizTalk Orchestration - has been introduced. Basically, everything that has been written about BizTalk Server 2000 before Beta 1 was available is already outdated.
This scenario hit me just before I went to the Visual FoxPro DevCon in Miami where I was scheduled to present a BizTalk Server 2000 session. With less than a month before the conference, I had to throw away everything I had prepared for my session and start over. Needless to say that the documentation for this beta version was not only incomplete, but sometimes also referred to the Technology Preview version that became available several months earlier and was therefore plain wrong. Nevertheless, BizTalk Server 2000 is a fascinating product every developer should know about. This article is an attempt to make the first contact more straightforward and less painful.
Overview
No doubt, Business-To-Business (B2B) communication is important. I could start my article with a review of the history of business and trading starting thousands of years ago, and my points would still apply, but I'd rather stick to the present. B2B is everywhere. All businesses that don't start manufacturing products from scratch need to order items of some kind. And even the companies that do (such as the software industry) need to order office supplies, have to pay rent and need to pay firms for their professional services. Then of course, there is the other end of the spectrum. Businesses sell things (or at least they hope to do so), very often to other businesses rather than consumers.
“So Markus” you say, "what's new about that? People buy and sell stuff on the web every day.". And that is correct of course, but those sales take a typical Business-To-Consumer (B2C) approach. People browse to a web store, add a couple of items to their shopping cart, and check out. This approach works very well. It is relatively easy and inexpensive to implement. Once a web store is established, all consumers use the same interface and go through the same steps. The biggest obstacle at this point are different browsers and “smart devices” being used to navigate the store, forcing us to implement either a very simple interface or different versions thereof.
But are these scenarios really efficient for B2B communications? Imagine a large enterprise that needs to order office supplies on a regular basis. Should they really go through the same steps in our web store and provide their credit card number every time? There has got to be ways to automate this! Also, businesses expect a greater level of service. What if they want to know about the current status of their order? Should they really need a person that does nothing all day but check the UPS web site manually with tracking numbers we email to them?
There is overhead on the sellers end also. What if the ordered product wasn't in stock and we need to order more? What if our vendor is no longer producing the ordered product, or what if the party that placed the order got upset about the long delivery time and decides to cancel the order? Without a proper system in place, all of those tasks are non-trivial and require either a lot of manpower or sophisticated technology (have you ever tried to span a transaction over operations that take several weeks?).
“That's true”, I hear you say, "but why do I care? I'm not working in a large enterprise, nor do I have Fortune 500 clients. So this isn't something I'm interested in…". Wrong! Here's a scenario that explains why: EPS Software Corp. (the publisher of this magazine) also sells products to developers. However, the tools division isn't large and the fulfillment department is even smaller. In fact, EPS doesn't even sell any products directly, but only uses resellers such as West Wind Technologies. West Wind has a web store. You can go to that store and order EPS products. When someone makes a purchase, one of two things could happen: 1) West Wind has the product in stock (or ships via download), or 2) they are out and we have to ship the product (or it is a product West Wind doesn't stock at all). If the second scenario is true, West Wind asks us to drop-ship the product. This usually causes a small crisis in our one person fulfillment department. An invoice has to be created, FedEx has to be notified, sometimes we have to produce new CDs, perhaps we even have to order from our vendor, and eventually we can notify West Wind of a successful shipment. This potentially can also get even more complicated. Sometimes someone places an order, yet the price they are willing to pay is not acceptable, either because the price is a mistake, or because somebody tries to trick us into selling cheaper In that case, we have to call them back (or send an email) and tell them about the problem, which usually results in an uncomfortable situation for both sides. Or perhaps the business partner failed to indicate a price. In this case we produce a quote and send it back. At the same time, other administrative tasks pile up, because our “shipment department” was already too busy. But hiring yet another person is way beyond that division's budget. Automating all these tasks is the only way we can compete with larger companies.
Of course, the above scenarios describe microscopic steps in a world of interwoven transactions. Every business has a large number of business partners who in turn have a large number of partners on their own. All of them are using their individual processes, tools and standards. Even with the advent of XML problems remain due to the flexibility of XML and the lack of industry standards.
No wonder B2C over the web was implemented first: B2B is darn hard!
Several attempts have been made to fix this problem. EDI is the most popular one. Unfortunately, all previous attempts have been expensive to implement and were largely inflexible. Therefore, they defeated the main purpose of B2B and were out of the question for small companies. That was before XML. Now, Microsoft attempts to offer a solution with “Microsoft BizTalk Server 2000”.
The Routing Services
Being able to route documents (pieces of information) to business partners, in whatever format they expect and whatever transport mechanism they use, is a basic requirement for all B2B operations. For this reason I discuss this service first, although the Orchestration part (see below) is more innovative and exciting.
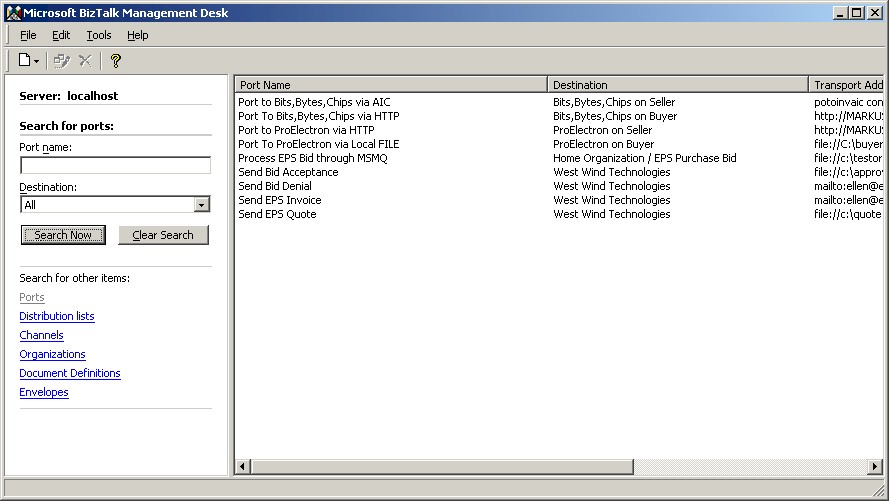
BizTalk Routing Services are configured through the BizTalk Management Desk (Figure 1). The first item managed are Organizations. Organizations are business partners that want to communicate with each other. Initially, there is only the organization that owns the BizTalk Server Site. This organization is named “Home Organization”. Other names can be attached to that organization, but we won't go into any details about that in this article (check our the Code Magazine web site - www.code-magazine.com - for a BizTalk Server whitepaper I wrote that discusses many things in more detail than we are able to do here).
In this article, I will use the relationship between EPS Software Corp. and West Wind Technologies as an example scenario. EPS Software Corp. would be the “Home Organization”. “West Wind Technologies” is a partner organization we need to set up. To do so, simply click File/ New/ Organization and provide a name. No more details are required at this point.
Before we can start doing business with West Wind, we need to think about the kinds of transactions that will take place. The first transaction in our example is a “Purchase Bid”. This is a special kind of transaction we use at EPS. It is very similar to a purchase order. The main difference is that the buyer indicates to us what they are willing to pay for the ordered item. This is important because of the way our business works. For example, West Wind may provide a special conference rebate at live events. In this case, we agreed on covering that rebate on our end as well, and will accept a lower price than normal.
To handle this kind of order, we specify a “PurchaseBid” Document Definition. BizTalk Server provides the BizTalk Document Editor, a tool to create XML schemas (among other formats). Figure 2 shows the document format we use for purchase bids. We can save the document specification locally, or in a WebDAV folder (see sidebar). Once we've done that, we can reference the document specification from within the Management Desk as a “Document Definition”. Separating definitions and specification provides extra flexibility. We could easily change the specification (schema) used by a definition by swapping it out globally.
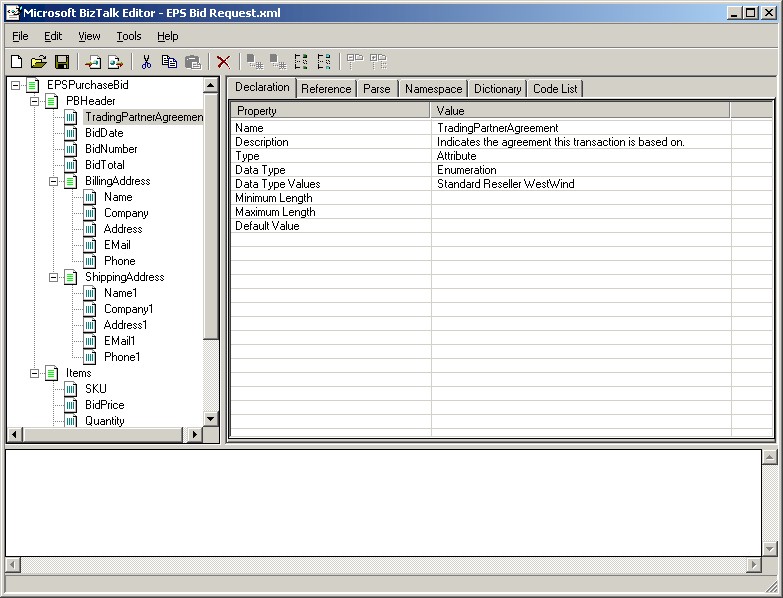
Note that this is a document format we use internally. However, we cannot expect that all our business partners will use this format. In fact, we can't even count on the fact that our business partners will use BizTalk or some kind of other B2B mechanism. West Wind Technologies, for example, always sends the orders in XML format defined by the West Wind Web Store product. Here's an example XML string produced by the Web Store:
<?xml version="1.0"?>
<westwindstore>
<itemsold>
<invoicenumber>098324</invoicenumber>
<name>Markus Egger</name>
<company>EPS Software Corp.</company>
<address><![CDATA[13810 Champion Forest Dr.
                Suite 202
                Houston, TX 77069
            ]]></address>
<shipping/>
<email>megger@eps-software.com</email>
<phone>(281) 866 7444</phone>
<sku>OOBOOK</sku>
<descript>Advanced OOP</descript>
<qty>1</qty>
<price>49.95</price>
<itemtotal>49.95</itemtotal>
</itemsold>
</westwindstore>
To handle this document format, we create another schema (or ask West Wind to provide one) describing this document. Again, we are using the BizTalk Document Editor to do so.
At this point, we reach a significant hurdle. How can we translate the provided document format into the expected format? Although this might be easy for one specific transaction, it requires sophisticated tools to handle a large number of business partners that have incompatible and non static transaction types. Luckily, BizTalk Server 2000 has a tool for this as well. It is called the “BizTalk Mapper” (Figure 3). Using the Mapper, you can open two document specifications (such as the West Wind Store Order and the EPS Purchase Bid) and map the fields using simple drag & drop operations.
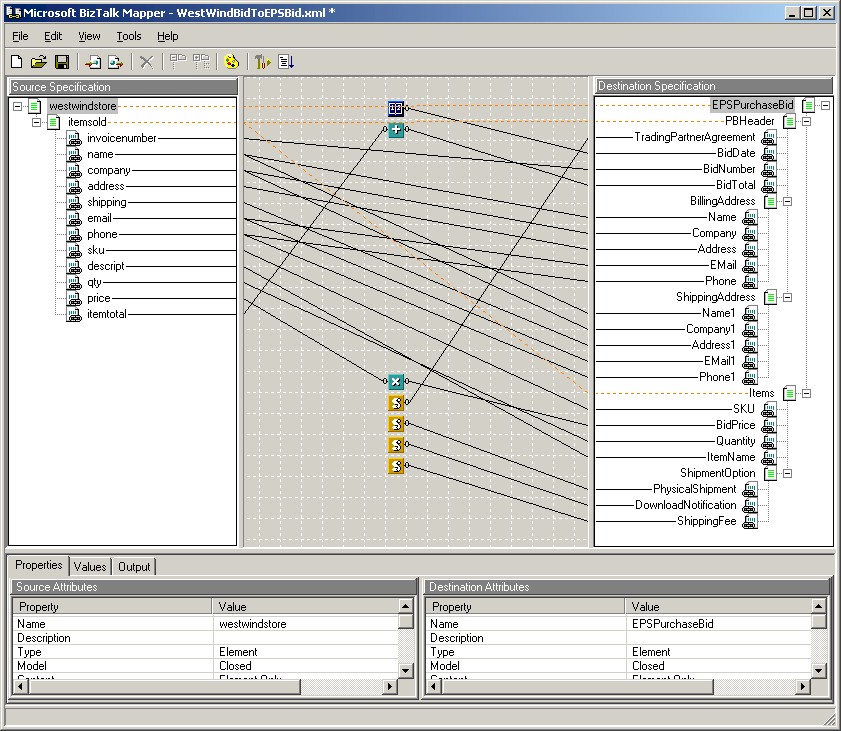
Unfortunately, not all documents are easy to map. In our example, we face the challenges that the EPS Purchase Bid requires some additional dates as well as some calculated values. These things are accomplished by using “Functoids”. Functoids are simple operators, functions or scripts that can be used add additional logic to the translation. We use a mathematical Functoid to sum up the order total, a date Functoid to fill in the current date, and a script Functoid to call to a COM component that determines which trade agreement is to be used for the purchase bid. (Actually, I'm only showing off here. The script returns a hard-coded value, but the point is that I could have called a COM Component…)
Once I'm done creating my map, I can test it right within the Mapper. In this case, the Mapper provides some default values so we can test the outcome. It is quite smart in doing so, as long as we specified field types in the document specification. Optionally, we also can specify test values.
Once we are convinced that our map works, we can compile it. This creates an XSL Stylesheet (the Mapper is really just a fancy Stylesheet editor) that we can save to our WebDAV folders (or to a local file but this not as common).
Our First BizTalk Transaction
Now that we have provide a way for our documents to interface with each other, we are ready to perform our first transaction. This raises the question of what we want to do with the document once we receive it. For this first example, we will simply write it to a file on the hard disk. In the real world of course, this would start the large scenario I described in the overview section. I will explain how to handle that further down.
To route the document to the file, we need to set up a BizTalk Port. Ports tell BizTalk what to do with a document once it is on the routing engine. To create a new port, we click File/ New/ Port/ To an Application. If we wanted to route to another organization, we would chose to create a Port to an Organization instead, but since we want to handle this document internally, we specify the Application we want to use. An Application in the BizTalk sense is simply a name that gets attached to a set of transactions. This is very useful because we could later trace documents for a specific Application (again, this is a subject we can't fully explore in this article, but I discuss it in depth in the online whitepaper). You can create Applications in the properties of the Home Organization.
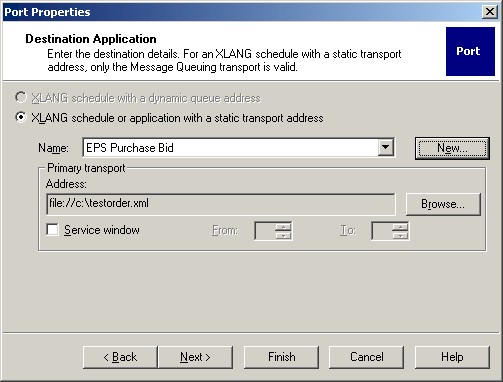
When we create a new port, we first need to specify its name. I chose "Process EPS Purchase Bid. The next step is more important (Figure 4). We chose the Application the transaction belongs to and (this is the key!) the Primary Transport. This specifies the destination of the document as well as the mechanism used to transport the information. Typically, this is either HTTP/HTTPS or SMTP (email) when routing to another organization, or Message Queue or Application Integraton Components (AICs) for messages routed to internal applications. In addition, we have the opportunity to route to a file. This is convenient for demos and also allows integrating applications that are not BizTalk ready, yet are able to import and export from and to flat files.
Application Integration Components are a very interesting option. They allow extending the BizTalk Routing Services with any mechanism you would like to have. Implementing an AIC is straightforward. BizTalk exposes a simple interface you need to implement. You could do so in any tool capable of implementing interfaces such as Visual Basic, C# or Visual FoxPro 7. Again, discussing this in detail is beyond the scope of this article, but I explain it in my online whitepaper.
For now, we simply choose the file mechanism and “C:\TestOrder.xml” as the address. In the remaining steps of the wizards we accept all the defaults.
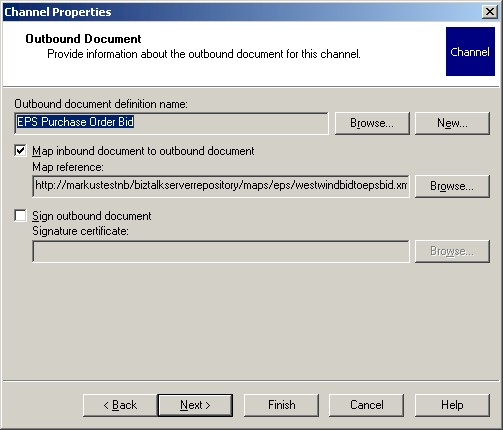
Great! BizTalk now knows what to do with a document that ends up in its routing engine. But how does it get there in the first place? The answer is “through a Channel”. Channels are the counterparts of Ports and allow us to submit a document to the routing engine. To make our example work, we right-click on the port we created and select New Channel\ From Organization. The first steps are easy. We specify a Channel name (I chose “PB from West Wind”) as well as the source of the document (West Wind Technologies). In step 3, we define the inbound document format. In our example this is the “West Wind Store Order” Document Definition we created above. So far so good, but now we need some magic to happen. In step 4, we specify that the outbound document format is the EPS Purchase Order Bid. The term “outbound” is somewhat confusing at this point since we are really routing into the BizTalk engine. I assume we have to see this purely from the Channel's point of view.
At this point, BizTalk realizes that it doesn't know how to convert the inbound document in the outbound document, so we have to tell it to use the map we created above (see Figure 5). The remaining steps are straightforward. We can simply accept the defaults.
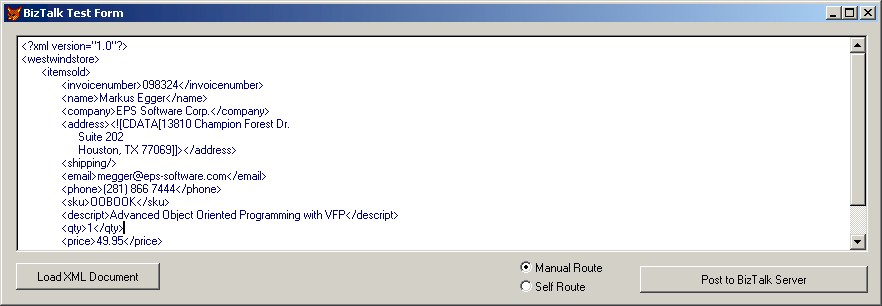
We are now ready to let BizTalk take over and handle all traffic from West Wind automatically. We now simply have to provide some kind of mechanism to trigger the routing. Since West Wind doesn't really know about our efforts to implement BizTalk, they simply send us emails containing the XML documents. So we start out with a simple Visual FoxPro or Visual Basic form that talks to BizTalk. Figure 6 shows that form. It simply provides an editbox we use to paste the incoming XML. Whenever we click the “Post to BizTalk Server” button, the routing mechanism gets triggered. This is done through a simple COM based interface named the “BizTalk Interchange Interface”. Here's the Visual FoxPro code used in that button:
LOCAL loBT AS BizTalk.Interchange
LOCAL lvResult

loBT = CREATEOBJECT("BizTalk.Interchange")
lvResult = loBT.Submit(1,THISFORM.Edit1.Value,;
           "West Wind Store Order",;
           "Organization Name","West Wind Technologies",;
           "Organization Name","Home Organization")
The Visual Basic code is very similar (don't forget to add project references to the BizTalk Interchange component!):
DIM oBT AS Object
DIM sResult AS String

SET oBT = CREATEOBJECT("BizTalk.Interchange")
lvResult = oBT.Submit(1, Edit1.Text,_
           "West Wind Store Order",_
           "Organization Name","West Wind Technologies",_
           "Organization Name","Home Organization")
The code is easy to understand. We create an instance of the Interchange object and use the Submit() method to route the text in the editbox (which complies to the “West Wind Store Order” format) from “West Wind Technologies” to the Home Organization. The Organization Name identifies both organizations. We could use different identifiers if we set them up in the Organization Properties.
We can now go ahead and run the form, paste the XML listed above, and click the “Post to BizTalk Server” button. The routing engine will then try to locate a Channel from West Wind Technologies that uses the specified format as the inbound document. Once that channel has been located, BizTalk will find the associated port and will therefore route the document to a file named TestOrder.xml which will appear in the root directory of the C drive. If you browse that document, you will see that it has the same content we submitted, but the format has been converted to match the EPS Purchase Bid schema.
Note that we could now proceed and add more Channels linked to the same port. Those Channels could specify different document formats, allowing us to add new trading partners quickly without having to change our internal mechanisms (which so far has been a simple file, but this is about to change…).
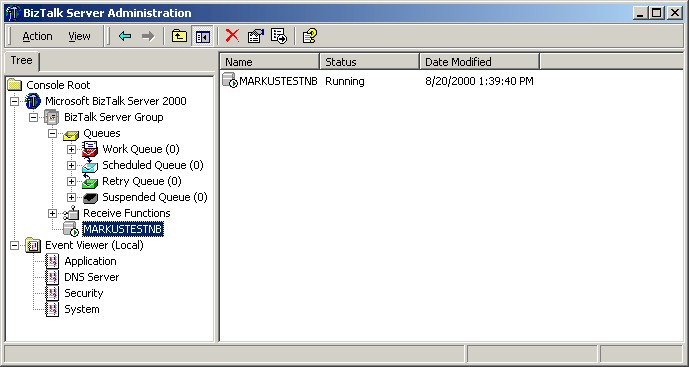
Sometimes however, this doesn't work out the way we want it to. You may have a typo in the source document rendering it invalid according to the schema we specified. In this case, BizTalk won't be able to route that document. All transactions BizTalk couldn't route appropriately will end up in the “Suspended Queue”. You can look at that queue from the BizTalk Server Administrator interface (Figure 7). You can right-click on the suspended document to retrieve more information about the problem at hand.
Automatic Routing
So far, so good. But once West Wind realizes we are using BizTalk they may be willing to change their mechanism from sending email to posting information to a web site that could take over the task we perform manually in our form. We could handle this easily. One option is an ASP page. Here's the code that makes up your entire page:
<%
Dim oBTS, objADO

if Request.totalBytes = 0 then
Response.Write "No Data Posted From BizTalk Server."
Err.Raise vbObjectError+ 101,,"No Data Posted."
Response.End
end if

Set objADO = CreateObject("ADODB.Stream")
objADO.Open
objADO.Type = 1
objADO.Write Request.BinaryRead(Request.TotalBytes)
objADO.Position = 0
objADO.Type = 2

Set oBTS = Server.CreateObject("BizTalk.Interchange")
oBTS.Submit 1, objADO.ReadText, "West Wind Store Order",_
   "Organization Name","West Wind Technologies",_
   "Organization Name","Home Organization"
Set oBTS = Nothing
%>
Although the syntax has changed slightly, we are still performing the same basic task. We are instantiating an instance of the BizTalk.Interchange object and submitting the message. Only this time the message came in as the request information that's provided by ASP. Also, we had to take a detour through ADO to convert the submitted document into Unicode, a task we didn't have to worry about in the form example.
As you may have noticed, the ASP page didn't contain any interface. This is OK, because it will never be used from a browser. Our business partners will simply perform an HTTP/POST operation to the URL we provide and will therefore never see the interface. The way that is chosen to implement that HTTP/POST operation is up to the organization. The easiest way is to use BizTalk Server on their end as well, but it can be any HTTP enabled client.
For those of you using Web Connection or Visual WebBuilder, here is some code you can put into a process object or a VFP code snippet:
LOCAL lcDocument, loBT, lvResult
lcDocument = Request.Form()
loBT = CREATEOBJECT("BizTalk.Interchange")
lvResult = loBT.Submit(1,lcDocument,;
           "West Wind Store Order",;
           "Organization Name","West Wind Technologies",;
           "Organization Name","Home Organization")
Again, there is no need to convert the incoming information because Visual FoxPro takes care of the conversion.
Another step we can take to further automate the task is to create self-routing documents. In the examples we dealt with so far, we manually provided information about the document itself as well as the involved organizations. Using either the BizTalk Framework (see sidebar) or envelopes (see online whitepaper), you can embed this information inside the submitted document. This way you can provide a single URL for all business partners rather than setting up individual ones for each organization and transaction type.
BizTalk Orchestration
At this point, we have overcome a major hurdle in B2B operations, which is the conversion of document formats. We now have to deal with the large, long running business process triggered by the incoming request. This is where the fun starts if you use BizTalk Orchestration (replace the word “fun” with “problem” if you don't use Orchestration!).
BizTalk Server 2000 ships with a tool called the BizTalk Application Designer. This is basically a Microsoft Visio 2000 based design tool. It utilizes a flow chart based approach for designing (orchestrating) potentially long running and complex B2B scenarios. Figure 8 shows a picture of the Application Designer.
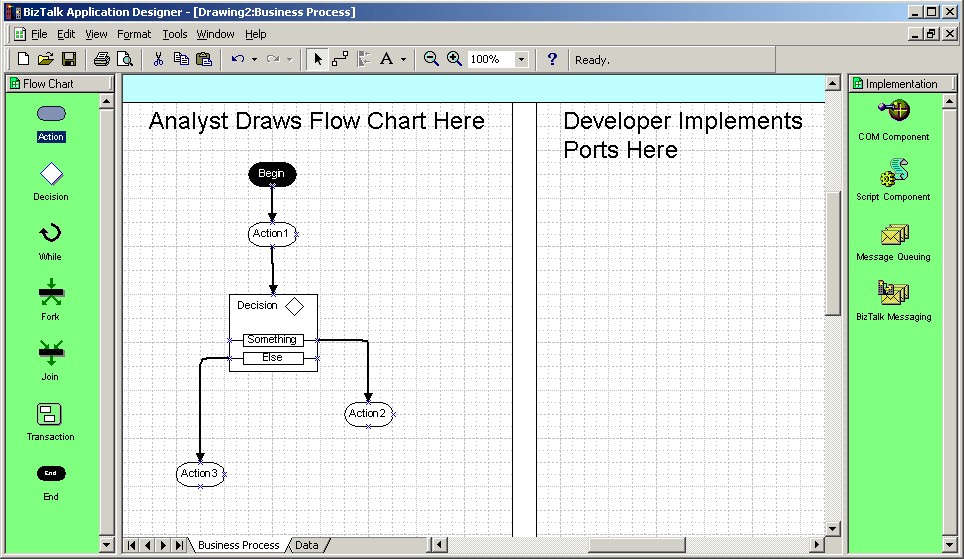
The basic concept is simple: Every scenario has a main entry point labeled “Begin”. The designer or analyst then drops more flow chart items on the diagram, such as action items, decisions, splits, joins and transactions. All the flow chart items are then connected to each other, in order to indicate the proper flow of events.
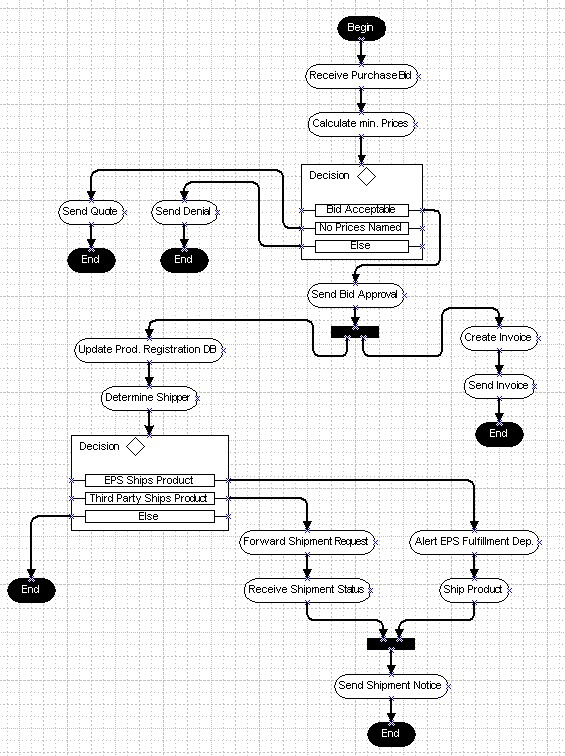
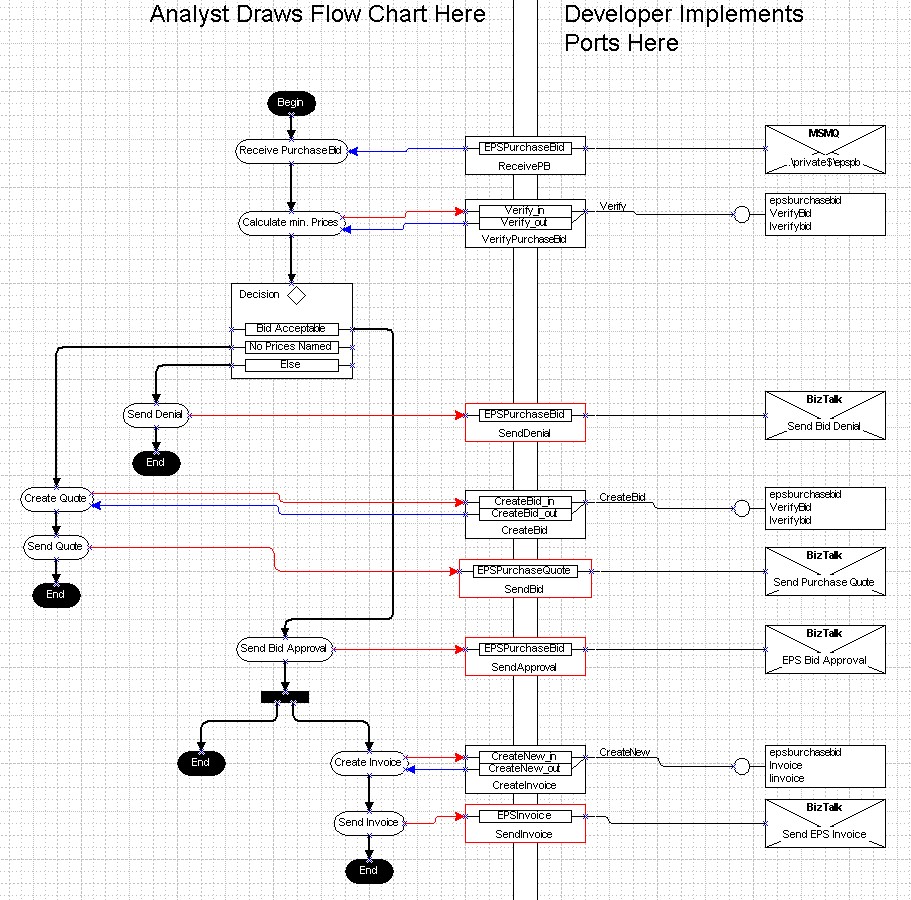
In the example in Figure 8, I dropped the “Action 1” item on the diagram, and then I highlighted the “Begin” shape and dragged the bottom connection point to the action item in order to connect the two items. I then added the decision shape. By default, decision shapes only have the “Else” statement, so I right-clicked on it, clicked “Add Rule” and added the “Something” decision. I also connected the previous action with the decision shape. Subsequently, I added to more action shapes and connected each individual rule to one of the shapes. The diagram isn't done at this point, but you get the idea. Figure 9 shows a larger diagram that describes the entire EPS Purchase Order and fulfillment process as I described it in the overview section of this article. The analyst or domain expert does this part.
By now you probably think: “Another diagramming tool, so what?” But there is more to come! The Application Designer is not only a flow-chart tool, but it is also a compiler at the same time! The developer can implement the solution in the same diagram and compile it into an “XLANG Schedule”. This is a compiled BizTalk Application that is based on the XLANG XML standard. This caught your attention? Good! Let's go ahead and implement this scenario.
To keep the example simple, I will only implement a small subset of the diagram displayed in Figure 9. Figure 10 shows the first few steps (stretched out to make it easier to view) of the implementation.
But let's do this a step at a time, starting out with the first shape at the top-right corner. As you can see, this is an MSMQ item. For now, I assume that this scenario is started when a message gets put into a message queue. For now, we will not worry about how it gets there. To create this shape, simply drag and drop the Message Queuing shape on your diagram. This will launch a wizard. In the first step, you are asked to specify a port. This is not a port in the BizTalk Server sense. Just imagine a port as a connection between the right and left side of the diagram, and you won't be too far off (there is a little more to it, but we won't worry about that for now). Name the first port “ReceivePB” and proceed to the next step (can you spot that port in the diagram in Figure 10?).
Now, the wizard asks whether we already know what queue we want to use or whether this will be determined at runtime. In our example, we will hardcode a queue name, so we know it. Select the “Known at design time” option and proceed to the next step where you are asked to specify a queue name. To make the example further down work, name the queue ".\private$\ReceivePB". Note that this requires MSMQ to be installed on your system, and it also requires the specified queue to exist (for more information see the online whitepaper).
OK, back to the wizard. In the last step (“Advanced”) use the default settings and click “Finish”.
This created a port and the MSMQ shape, but it did not yet create a connection to the first action shape in the diagram. To create that connection, highlight the “Receive Purchase Bid” shape and drag the right handle of the shape to the port. This will bring up another dialog. Select the options “The XLANG Scheduler Engine should asynchronously deliver the message” and “Create a new message” and click “OK”. You are now asked to specify a message name and an XML root element name. For both, use “EPSPurchaseBid”. This specifies that we will receive a purchase bid message and the root node of the incoming document is “EPSPurchaseBid”. We could also specify a schema for the incoming document, but for now, we'll simply click OK.
The diagram should now show a blue arrow going from the port to the action shape. If the arrow is red and pointing the other way, double-click the “Receive Purchase Bid” action shape and change the "Message Direction" property to “Receive”.
We are now ready to receive a Purchase Bid, so let's do something with that information. Our flow chart defines that the next step is to calculate the prices (to see whether or not the bid is acceptable). To do so, I created the following Visual FoxPro 7 COM component:
DEFINE CLASS VerifyBid AS Session OLEPublic
   PROCEDURE Verify (BidDocument AS String) AS Integer
      LOCAL loXMLDOM, loAgreement, loBidTotal
      loXMLDOM = CREATEOBJECT("Microsoft.XMLDOM")
      loXMLDOM.LoadXML(BidDocument)

      loAgreement = ;
         loXMLDOM.SelectSingleNode(;
         "EPSPurchaseBid/PBHeader/@TradingPartnerAgreement")

      IF loAgreement.Text = "WestWind"
         RETURN 1
      ELSE
         loBidTotal = ;
            loXMLDOM.SelectSingleNode(;
            "EPSPurchaseBid/PBHeader/@BidTotal")

         IF VAL(loBidTotal.Text) > 0
            RETURN 0
         ELSE
            RETURN -1
         ENDIF
      ENDIF
   ENDPROC
ENDDEFINE
The component is rather simple. It has one method that receives an XML string (a bid document) as a parameter and returns 1 if the bid is acceptable, 0 if it is not and -1 if no prices were named (the return value therefore is of type “integer”). The business logic is obviously not very sophisticated. We simply check whether the bid came from West Wind. If so, we accept it, otherwise we check whether a price was named. If no price was named, we return -1 to indicate that a quote has to be generated, otherwise we return 0 which means that we decline the bid. This of course does not accurately model our business logic, but serves only as a simple example to demonstrate the concepts. Of course, we can implement the same component in Visual Basic. Here's that code:
Function Verify (ByVal BidDocument AS String) AS Integer
   DIM oXMLDOM as Object
   DIM oAgreement AS Object
   DIM oBidTotal AS Object

   SET oXLDOM = CreateObject("Microsoft.XMLDOM")
   oXMLDOM.LoadXML(BidDocument)

   SET oAgreement = _
      loXMLDOM.SelectSingleNode( _
      "EPSPurchaseBid/PBHeader/@TradingPartnerAgreement")

   IF oAgreement.Text = "WestWind" THEN
      Verify = 1
   ELSE
      SET oBidTotal = _
         oXMLDOM.SelectSingleNode( _
         "EPSPurchaseBid/PBHeader/@BidTotal")

      IF Val(oBidTotal.Text) > 0 THEN
         Verify = 0
      ELSE
         Verify = -1
      END IF
   END IF
End Function
Let's move back to the BizTalk Application Designer. Drop the “COM Component” shape onto the diagram. This launches a wizard similar to the one for the Message Queue shape. First, we define a new port. This time, we name it “VerifyPurchaseBid”. In step 2, we specify that we want to use the XLANG Scheduler Engine to instantiate the component. In step 3, we select the component we just compiled. I named mine “EPSPurchaseBid”, so I scroll down until I see that component, expand it, and select the “VerifyBid” class (which is the class we just created…). In the next step, we need to specify the methods we want to use. So far, the only method we have is “Verify”, so we select this one and click “Finish” to complete the process.
Again, we created an implementation shape and a port, but the port isn't connected to the “Calculate min. Prices” action shape. We create the connection in the same way we did above (select the action shape and drag the right handle to the port). This launches a dialog where we chose to execute the method synchronously and that we want to create a new message. Once we click “OK”, a dialog appears showing us all the parameters and return values supported by the component. BizTalk is smart enough to read the type library to find the names and types of parameters as well as the return type and parameters that are passed by reference and can therefore produce output (Visual FoxPro 7's strong typing feature comes in handy…).
We don't need to change anything in this dialog and simply accept all the defaults by clicking “OK”.
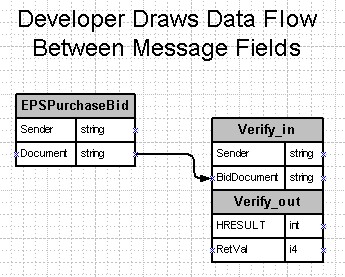
So far, our example is relatively simple and straightforward. We receive one XML document and pass it to a COM component that receives one parameter and returns a value indicating whether or not we are good to go. However, this could be much more complex if our component had more parameters. For this reason, we also have to design the data flow. This can be done in the second page of the diagram (see Figure 11). The idea is simple. The document that is coming in through the first port we designed (from the message queue) is routed to the BidDocument parameter of the second port (our COM Component).
It's going pretty well so far. We receive a message from a queue, hand it over to the COM component and receive a return value indicating whether we can accept the bid. We will now use the decision shape to put that return value to work. To do so, double-click the “Bid Acceptable” rule in the decision shape (make sure you double-click the rule and not the entire shape!) to get the Rule Properties dialog. Put the following code in the script expression field:
Verify_out.RetVal = 1
The specified expression can be any valid VBScript expression. The syntax is a little weird at first, because the entire block of return values is presented to us as an object named “Verify_out” and the return value we specified in our component is accessible through the “RetVal” property.
I'm sure you can manage to create the script for the “No Prices Named” rule. We do not have to create any script expressions for the “Else” rule.
Let's proceed with the flow after the “Else” rule. All we have to do here is send a denial message. We can do so using the BizTalk routing services. Simply drop a “BizTalk Messaging” shape on your diagram, name the new port “SendDenial”, specify we want to send a message, and specify a BizTalk Server Channel. Since we don't have a Channel to send a denial yet, you have to use the BizTalk Management Desk to create a new Channel. I named my channel “Send Bid Denial”. The new Channel will be created using the same steps as described above. As a rough guideline, first create a BizTalk Server Port to an organization (you can also use an existing port) such as West Wind Technologies. Then create the Channel that is linked to that port and name it “Send Bid Denial”. The inbound document format will be the EPSPurchaseBid document we have been using throughout this XLANG example. You can choose any document format you want for the outbound document. If the outbound document format is different from the inbound document, you will have to create a map to covert it. I created a special “BidDenial” document format. It is also up to you (or the administrator) to specify where the document should be routed. In my example, I set the port up to route to an email address for test purposes.
Once you are done creating the port on the diagram, select the “Send Denial” action shape and connect the right handle to the port. This will launch the “Add Message” dialog as in the previous scenarios. However, this time we can reuse the “EPSPurchaseBid” message we defined as the incoming message from the queue. To do so, select “Add a reference to an existing message” and click “OK”. If the arrow is red and points to the port, it is correct, otherwise, double-click the action shape and change the message direction to “Send”.
Reusing the message saved us some work. Since we already specified how the “EPSPurchaseBid” is set up, we don't have to specify document formats or the data flow.
Since this branch of the scenario ends after the denial notice is sent, we are finished with this portion. You can now go ahead and repeat the process for the bid approval and the quote. To keep the scenario simple, I recommend ending the flow (for now) after the approval notice. You can later implement the rest of it.
Executing the XLANG Schedule
We are done implementing the application, so let's go ahead and compile it. This is a simple step. First, save your diagram, then select “Make XLANG xxx…” from the file menu of the BizTalk Application Designer. This will create a compiled XLANG schedule and store it on your harddrive. We are now ready to execute it.
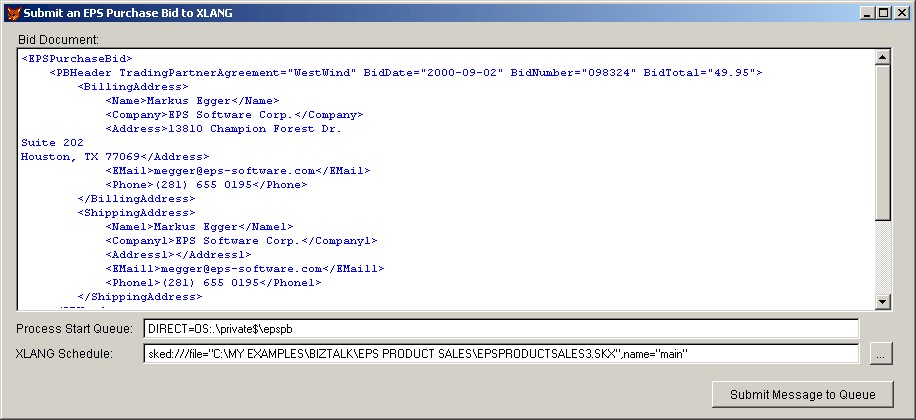
The schedule we implemented requires a message to be placed in the specified queue before we can execute the XLANG Schedule. I created a form that performs this task for us. You can see it in Figure 12. The basic idea is simple. We first place a message in the specified queue (which requires a bit of coding) and execute the XLANG Schedule, which will pick up the message and perform the flow of events we implemented.
Here is the Visual Basic code that places a message from the form in the queue:
!!! Code incomplete
Dim oMSMTxDisp As msmq.MSMQTransactionDispenser
Dim oMSMQQueue As msmq.MSMQQueue
Dim oMSMQInfo As msmq.MSMQQueueInfo
Dim oQueueMsg As New MSMQMessage
Dim strData As String
Dim fSend As Boolean
Dim txt As TextStream
Dim mybyte() As Byte

oMSMQInfo.FormatName = "DIRECT=OS:.\private$\epspb"
Set oMSMQQueue = oMSMQInfo.Open(MQ_SEND_ACCESS,_
   MQ_DENY_NONE)
mybyte = StrConv(DataToQueue, vbFromUnicode)
QueueMsg.Body = Edit1.Text

Set MSMQTx = g_MSMTxDisp.BeginTransaction
oQueueMsg.send g_MSMQQueue, MSMQTx
MSMQTx.Commit

Set QueueMsg = Nothing
Set MSMQTx = Nothing
And here is the Visual FoxPro version:
LOCAL loMSMQMessage AS MSMQ.MSMQMessage
LOCAL loMSMQInfo AS MSMQ.MSMQQueueInfo
LOCAL loMSMQQueue AS MSMQ.MSMQQueue
LOCAL loMSMQTransaction AS MSMQ.MSMQTransactionDispenser

loMSMQTransaction = ;
    CREATEOBJECT("MSMQ.MSMQTransactionDispenser")

loMSMQInfo = CREATEOBJECT("MSMQ.MSMQQueueInfo")
loMSMQInfo.FormatName =;
    "DIRECT=OS:.\private$\epspb"
loMSMQQueue = loMSMQInfo.Open(2,0)

loMSMQMessage = CREATEOBJECT("MSMQ.MSMQMessage")
loMSMQMessage.Body = THISFORM.Edit1.Value

LOCAL lvTrans
lvTrans = loMSMQTransaction.BeginTransaction()
loMSMQMessage.Send(loMSMQQueue,lvTrans)
lvTrans.Commit()
Once the message is in the queue, we execute the actual XLANG Schedule. Here's the Visual Basic version:
DIM oXLANG AS Object
SET oXLANG = GetObject(Text1.Text)
And the Visual FoxPro code:
LOCAL loXLANG
loXLANG = GETOBJECT(THISFORM.Text1.Value)
The basic idea is to pass the value of the textbox along as a moniker for GetObject(). The value could be something like this:
sked:///file="C:\BIZTALK\SALES.SKX",name="main"
In this case, the “sked” moniker is used to execute a schedule named “C:\BizTalk\Sales.SKX” and we use the main entry point for execution. This moniker behaves similarly to a moniker for Word documents. In that case, Word gets instantiated and the document is opened right away. In the same fashion, the XLANG Schedule is opened and executed right away without having to call a method.
When you run this code, the document will get processed and routed according to the schedule we just defined. If the bid was acceptable, we will get an approval notice, a denial notice or a quote. Where those documents will show up (and in what format) depends on your BizTalk Server Port configuration. As mentioned above, I like to route to email addresses and files for testing purposes.
At this point you probably wonder how we can execute this schedule automatically when West Wind Technologies sends an order. The easiest way would be to specify the schedule as a Port destination. Unfortunately, this is not possible in beta 1, although I'm told this is planned for the final release. For now, you need to add the queuing mechanism to your ASP page (or whatever your receiving mechanism is) and then start the schedule by using the GetObject() functionality.
Conclusion
Although I'm told this article is already way to long, I'm only able to give you a very rough overview of the services provided. There are many important topics such as security and document tracking that I haven't been able to talk about at all. Many of those issues are discussed in my whitepaper, which is available for online. Other issues and more detailed discussions of specific issues will be provided in future issues of Code Magazine.
