


Automatic asynchronous messaging is an important technique for scalable, component-based applications.
Microsoft provided its first asynchronous messaging mechanism in the form of Microsoft Message Queue Server (MSMQ). This technology is the basis for Queued Components, a COM+ feature that makes asynchronous messaging as simple as calling regular COM Components.
Asynchronous messaging is an established technology that is one of the fundamental building blocks of many Windows DNA applications. In short, asynchronous messaging is a technique in which tasks are initiated by a component or application, but are executed in a delayed fashion while the caller proceeds immediately with other tasks. This is useful in a variety of scenarios.
Imagine an online store, for instance. Shoppers order items, go to the checkout screen, and click a button to complete the order. At that point, a backend application performs a number of tasks. Credit card information is verified, inventory is adjusted, the order is passed to the fulfillment department, statistics are updated, a confirmation email is sent, and finally, a confirmation page is returned to the shopper who has been waiting for all of this to happen. However, not all of these tasks have to be performed synchronously. The inventory could be adjusted a few seconds later. The fulfillment department could be notified about the order minutes or even hours later, and we'd still be fine. The statistics might be updated once a week.
You get the idea. All we really need to do is take note of all the tasks that need to be done (using a mechanism that guarantees that none of the tasks will get lost), then proceed on with the important tasks such as verifying the credit card and sending the confirmation page. This results in a much faster hit, which not only makes the user's wait shorter, but also makes for a much more scalable model (many short hits are easier to scale than fewer long ones).
Another example can be seen in disconnected scenarios where certain components may not be available at all times. Let's revisit the example above, this time not with an online store, but with a sales rep who visits customers and takes their orders on a notebook computer. In general, the same steps as above need to take place. In this case, however, time is not critical, since the sales rep cannot enter several hundred orders per second. What is important is that the computer is not connected to the corporate network. This means that the components that update the statistics, notify the fulfillment department, and verify the credit card are not accessible until the computer is connected back to the network. Again, we can simply take note of these tasks and perform them as soon as the required components become available.
Very often, asynchronous messaging is accomplished using Microsoft Message Queue Server (MSMQ). MSMQ handles the “taking note” part described above. In other words, rather than updating statistics right away, we send a message to MSMQ with information about the task at hand (typically, but not always, in XML format). Later on, we retrieve that note from MSMQ and perform the actual task. MSMQ works very well for this kind of operation. However, using MSMQ directly requires a significant amount of custom source code. The application needs to be specifically designed to post information to the queue, and the components need to manually read information from the queue. All of this isn't rocket science, but it sure is a lot of work and is also inflexible, since the asynchronous messaging is hardwired in the source code.
Queued Components are different. They make use of MSMQ, but hide all of the complexity. Except for insignificant changes in the source code of the calling application, setting up Queued Components is a purely administrative task. This makes it easy to convert a regular synchronous component for asynchronous operation.
In this article, I will not describe the use of MSMQ directly, since that is an entirely different subject. This article will focus solely on Queued Components and their implementation.
Basic Ideas
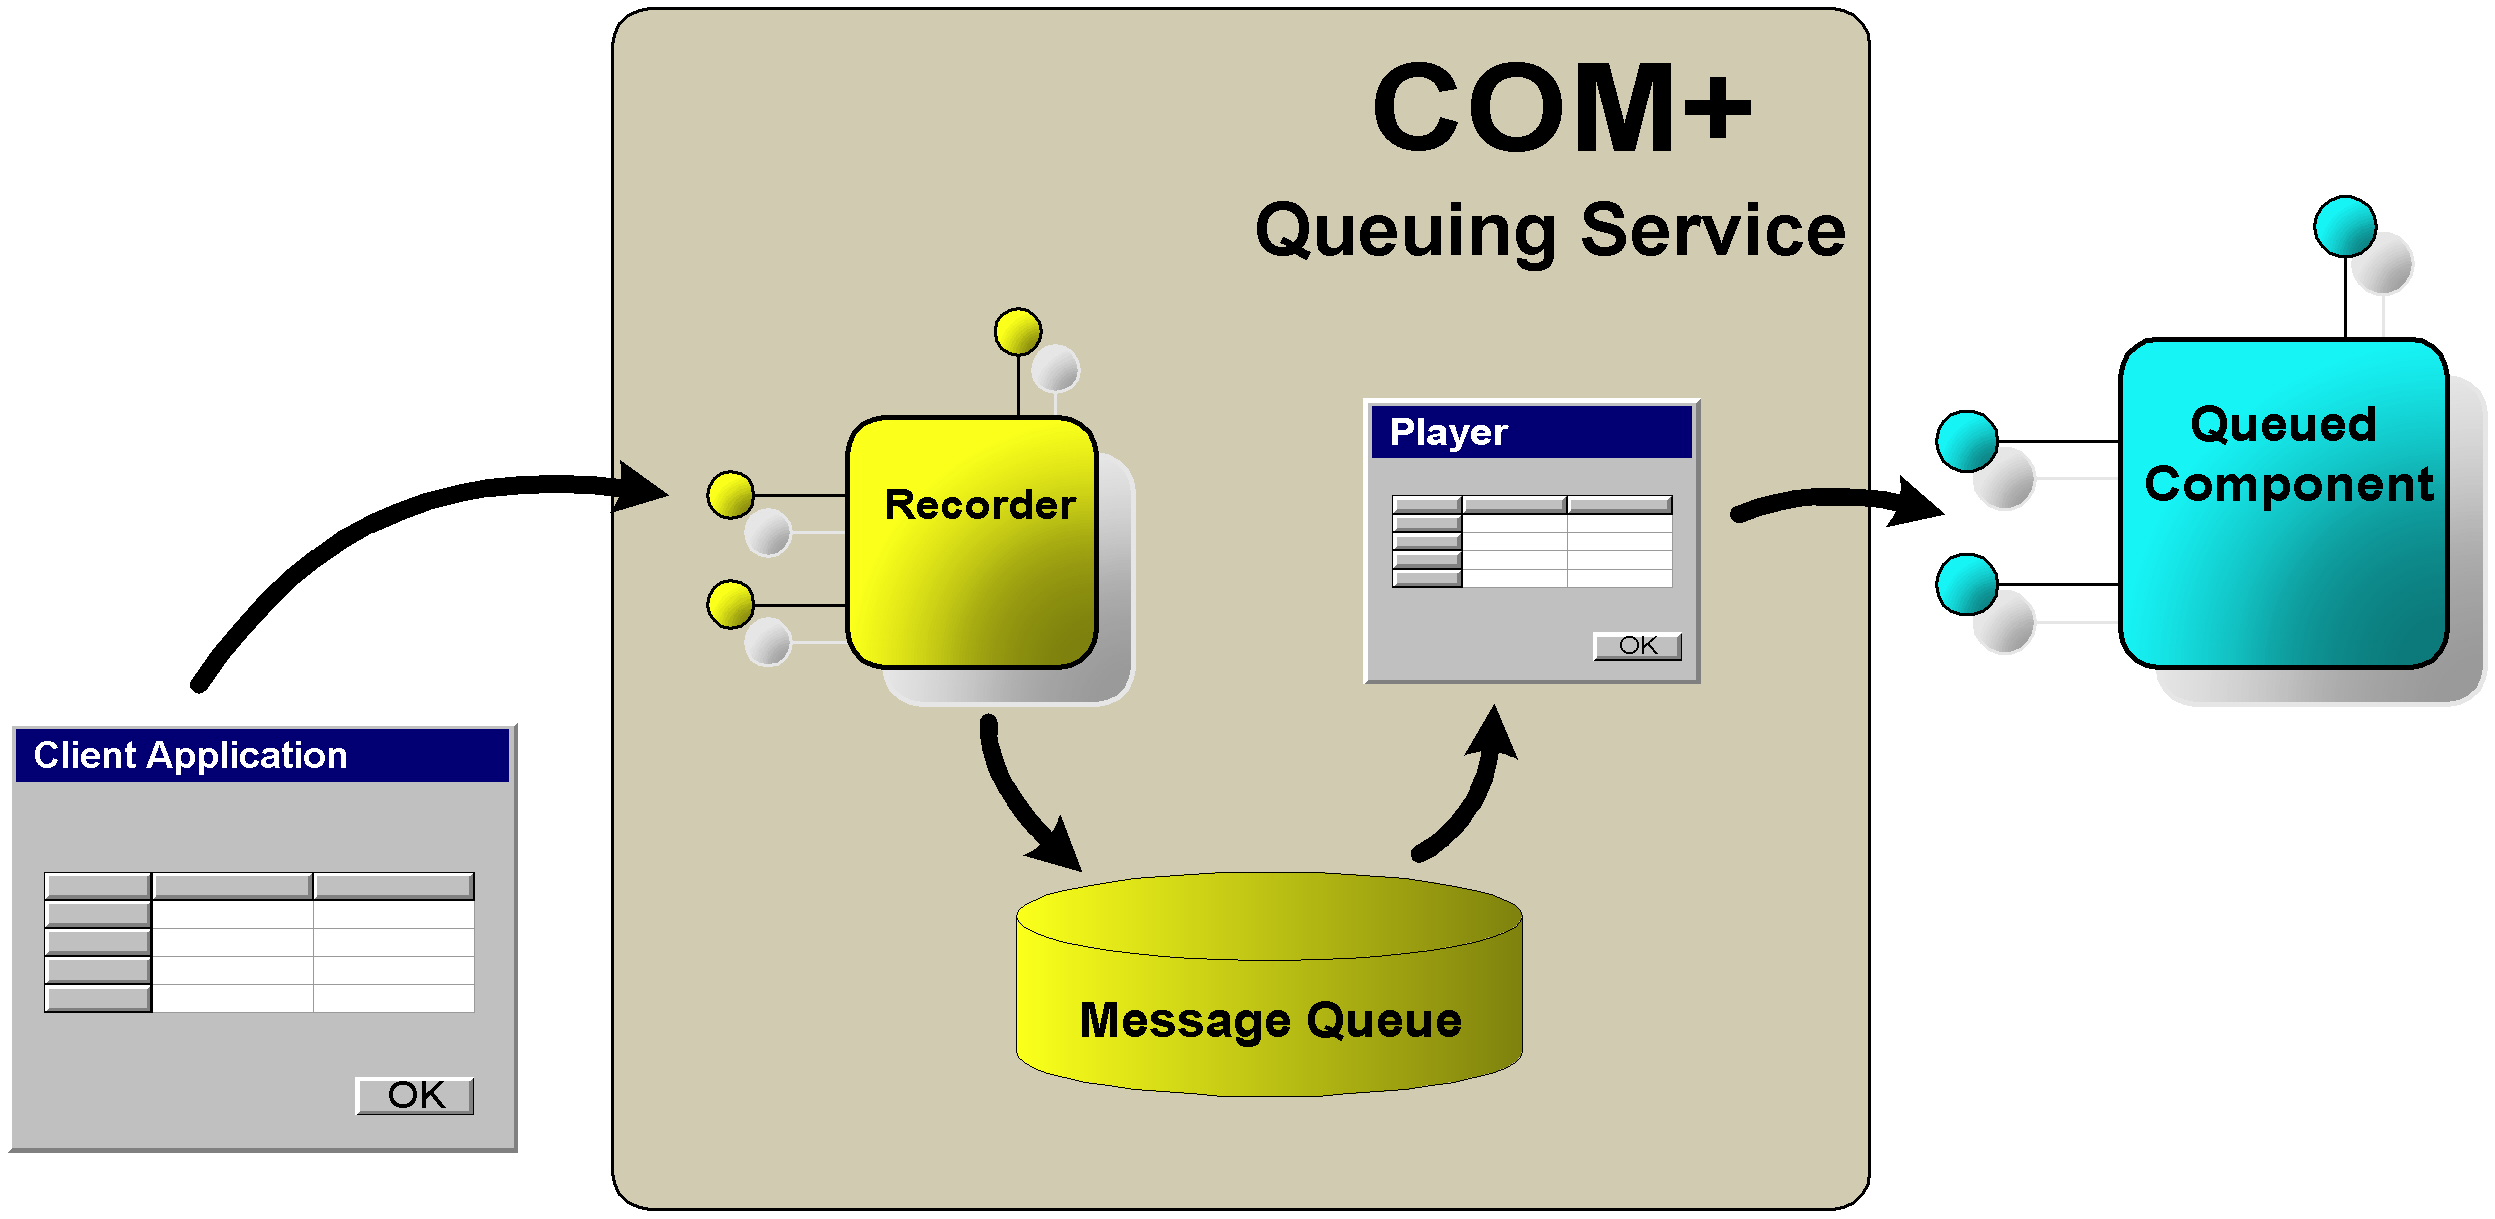
The basic ideas behind Queued Components are simple. A calling application instantiates the Queued Component much like a regular component. Or, at least that application thinks that it has instantiated the component. In reality, it has instantiated a recorder component that looks exactly like the queued component, meaning that it is an object with the same methods and properties as the actual component. To the calling application, the recorder object is indistinguishable from the real component. The recorder is provided by COM+, and records the messages sent to the component. In other words, when the originating application calls a method such as Execute(), the method doesn't really get executed, but the recorder just memorizes that this call took place (by placing it in the queue).
Later on, COM+ provides a player component that instantiates the real component (the one the calling application thought it was using) and plays all the recorded messages. At this point, the Execute() method will finally be executed, as if the call were coming live from the original calling application. In fact, the component does not know whether it is being called by the COM+ player or by the actual application. Figure 1 demonstrates this process.
When we consider this scenario, one unique characteristic of Queued Components becomes clear: Since the component is not actually instantiated when the client talks to it, no answer can be expected. This means that no return values can be expected, and no properties can be read. In fact, these are strictly prohibited. All methods must return nothing (void), all parameters must be passed by value (rather than by reference), and properties are write-only. Some of these requirements are not fulfilled by all COM-capable applications. Visual FoxPro 6.0, for instance, cannot define the type of the return value to be void. By default, Visual FoxPro 6.0 will always return a logical true (.T.). Visual FoxPro 7.0 supports typing of return values (see Ellen Whitney's article, A preview of Visual FoxPro 7.0,in this issue), so all of my Visual FoxPro code examples will use version 7. Visual Basic 6.0 fulfills all of the requirements for Queued Components, although some of them need to be set specifically. Visual Basic parameters, for instance, are passed by reference unless specified otherwise.
Our First Queued Component
Armed with this information, we are ready to create our first Queued Component. As an example, I'll continue where I left off in my Loosely Coupled Components article in the Spring 2000 issue. In this example, we have my wife telling me to take out the garbage (I'm not married, but we'll ignore that detail for the sake of this example). This time, however, we'll take a different approach. Rather than creating an event subscriber/publisher system where we hope that someone is listening for the request and will take care of it, we now commit to taking care of this task asynchronously. (It was pointed out to me that most wives have only one husband, making the scenario described in the COM+ Events article less likely than an asynchronous scenario, where the lone husband takes out the garbage 5 days later.)
Here's the Visual FoxPro (7.0) code for the husband component:
DEFINE CLASS Husband AS Session OLEPublic
    PROCEDURE TakeOutGarbage (What as String) AS Void
        StrToFile(What,"C:\Done.txt")
    ENDPROC
ENDDEFINE
This component simply puts a file named “done.txt” on the hard drive, containing the name of the room needing garbage removal. (Note: I'd rather show a messagebox for demonstration purposes, but this isn't allowed in VFP COM components, since it isn't a good idea to show interfaces in COM components.) All that is left to do now is to compile the class into a multi-threaded COM DLL. I called my project VFPQueuedHousehold, resulting in a COM class name of VFPQueuedHousehold.Husband.
Let's have a look at the same component in Visual Basic code:
Public Sub TakeOutGarbage(ByVal What As String)
    MsgBox What
End Sub
As you can see, the Visual Basic component is slightly simpler, because the default return value is void. Also, we don't have to mess with output files for this example, since Visual Basic allows messageboxes in COM components. On the other hand, we have to specify that the parameter is passed by value (which is the default in Visual FoxPro). Now, we rename the class to “Husband” and the entire project to VBQueuedHousehold (this is done in the VB property sheet), and compile the component.
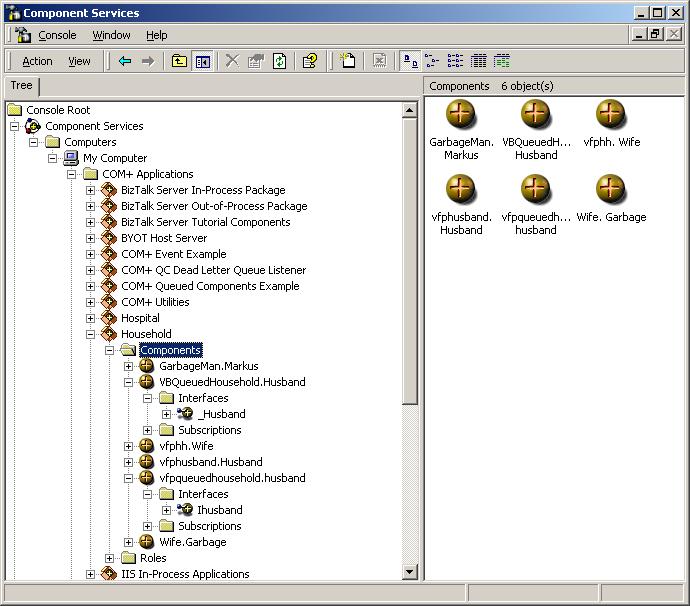
No matter what language you use to implement this example, you now need to register the COM component in the COM+ Catalog. To do so, start the Component Services admin interface from your Windows Start Menu and drill down to COM+ Applications under Component Services (Figure 2). In my case, I'm reusing the same application I've already created for my COM+ Events example in the Spring 2000 issue (named “Household”). You can simply create a new COM+ Application by choosing and right clicking on the COM+ Applications node and selecting New and then Application to create an empty application.
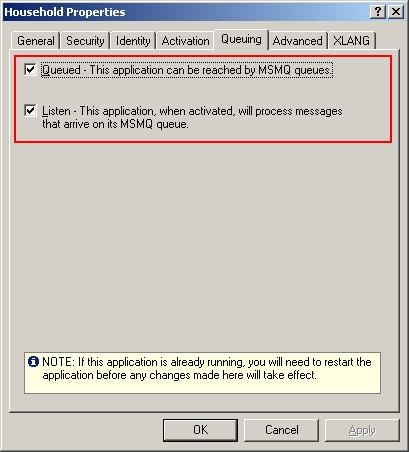
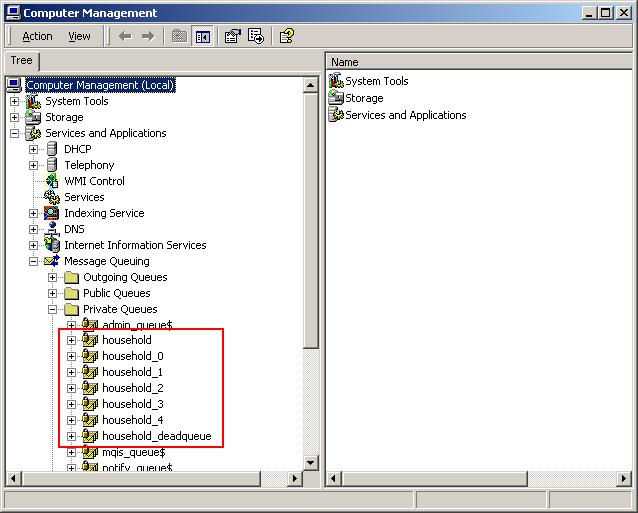
In order for a COM+ Application to execute some of its components asynchronously, it has to be configured as a Queued Component application. This can be done in the application properties (see Figure 3). Activating the queuing ability in a COM+ Application does not mean that the entire application will be executed asynchronously. It simply means that some of its components may be executed in that fashion. Also, make sure that you configure the application to listen for Queued Components. Otherwise, our current example will not create any results, since the application is not paying attention (although some may claim that this is a very accurate implementation of the wife/husband scenario). Once the application is set up for asynchronous execution, COM+ automatically creates several queues in MSMQ. You can see these queues in the MSMQ admin interface, which is available through Computer Management in your Administrative Tools. Figure 4 shows the queues set up for our current example. (Note: Since Queued Components are based on Microsoft Message Queue Server, the Queuing Service needs to be installed on your computer. See sidebar “MSMQ” for more information.)
We are now ready to add our new components to the Household COM+ Application. This is a very simple step. Right-click the Components node within the Household application and select the choice to add a new component. Then, just follow the steps of the wizard. Make sure that you choose to install a new component and select the DLL files from your hard drive, rather than selecting a registered component from the registry. Selecting a pre-registered component will not read the component's type library properly, resulting in missing information about the component's interface.
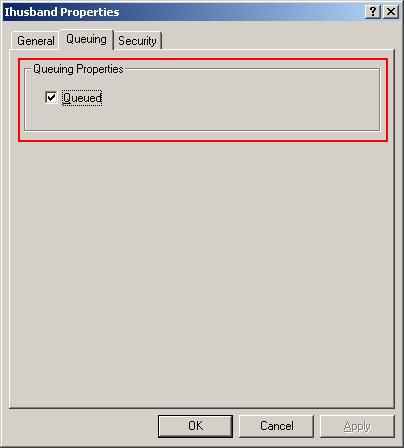
At this point, we've created a queued application and we've added a component (or several components depending on whether or not you've followed the COM+ Events example from the Spring 2000 issue). We now need to specify what components within the application can be executed in a queued fashion. Actually, we don't do this on a component-by-component basis, but rather on the interface level. Drill down into the component until you see the interfaces (in our example, both classes have one interface, but there could be more), and right-click to see the properties. In the Queuing page, check the Queued checkbox (see Figure 5). Again, this doesn't mean that the interface will always be executed asynchronously, but that it may be queued, depending on how it is called.
Our First Asynchronous Call
Now it's time to use our first Queued Component. I will use Visual FoxPro's Command Window to instantiate the component, since this is the quickest and easiest way to do it. (For those of you who are not familiar with the Visual FoxPro Command Window: This window allows you to type in even complex commands, which are executed right away. It's one of my favorite Visual FoxPro features.)
Here is the code that instantiates the component as a queued component:
oHusband = GetObject("queue:/new:VFPQueuedHousehold.Husband")
The Visual Basic code is very similar:
Dim oHusband As VBQueuedHousehold.Husband
Set oHusband = GetObject("queue:/new:VBQueuedHousehold.Husband")
“But hey, wait a minute,” I hear you say. “This isn't standard object instantiation code!” And you are right. For Queued Components, we have to use GetObject() and a moniker instead of CreateObject() (see sidebar “Monikers” for more information). This allows COM+ to intervene in the object instantiation and create the recorder object instead of the real component. If we used CreateObject() instead, we would instantiate the component in synchronous mode. This allows us the flexibility to operate the same component in different modes. This is the only difference in source code between synchronous and asynchronous components.
Note that when instantiating Queued Components, you need to have appropriate access rights (see sidebar “Security Settings” for more information). In the current example, we do not enforce any access checks. Make sure that you turn security off for the entire application and set the authentication level to “none”.
Now that we have a reference to the component, we can execute the method:
oHusband.TakeOutGarbage("Kitchen")
However, nothing happens when we do this. That's normal (as most wives will tell you). Remember that we are not really talking to our component, but to a recorder which tricks us into believing that it is the component. It will not start doing anything until we are finished recording a complete series of messages. One way to indicate the completion of the process is to release the object reference by setting it to nothing (in Visual Basic) or .F. (in Visual FoxPro).
However, when we do that, still nothing happens. That is strange, isn't it? Well, no, not really. What has happened so far was simply a recording being placed into the queue. In fact, you can look into the Household queue and see the message that COM+ has created. So, how do we trigger the execution of the component? Well, to make this easy for now, simply right-click the Household application in the COM+ Catalog, and click Start. This triggers the COM+ player, and the component will actually execute, creating either the Done.txt file on your hard drive, or displaying the messagebox, depending on whether you instantiated the Visual FoxPro or the Visual Basic version.
Note that there is a peculiarity about this process: Once you start an application, it's not all that easy to shut it down. Even if you manually right-click and choose shut down, the component will behave differently the second time you execute it. In fact, it will fire right away, because the application hasn't really shut down. To force a shutdown, you actually have to close your instance of Visual FoxPro or Visual Basic (there is no difference between the two environments in this regard) and then right-click the application and shut it down. This results in interesting side effects when testing Queued Components, since there can seem to be inconsistencies in behavior each time a Queued Component is executed. Also, note that changes in the COM+ Application setup aren't applied until the application is shut down and restarted.
This seems very inconvenient, but it isn't a big problem in real applications, because Queued Components are typically called from other components that shut down frequently.
Starting the Components
So far, so good, but we cannot expect the user or system administrator to start the components manually when the time comes to perform the tasks (although some wives claim it takes several manual attempts to get the husband going). Luckily, we can programmatically start the components by communicating with the COM+ Catalog through its COM interface. This can be done from within the application that calls the Queued Component, or it can be done using a scheduled script or perhaps a scheduler application.
First, let's execute the application from within Visual FoxPro. Here's the code to do so:
oCatalog = CreateObject ("COMAdmin.COMAdminCatalog")
oCatalog.StartApplication("Household")
There is also a method to shut down the application. Note that the shutdown limitations described above apply.
As expected, the Visual Basic code isn't much different:
DIM oCatalog AS COMAdmin.COMAdminCatalog
SET oCatalog = CreateObject("COMAdmin.COMAdminCatalog")
oCatalog.StartApplication("Household")
There are a number of different ways this code can be executed. You can run it right after completing the Queued Component execution. This will force execution as soon as possible, which might be instantaneous, or might be much later in a scenario where the Queued Component runs on a different computer that is not currently available.
Often, Queued Components are meant to be executed at scheduled times. Statistics can be updated at night or on weekends, for instance. To accomplish this, we can use a scheduler application such as the Windows 2000 Server Tasks Scheduler. Here's a simple Visual Basic Script:
DIM oCatalog
SET oCatalog = CreateObject("COMAdmin.COMAdminCatalog")
oCatalog.StartApplication("Household")
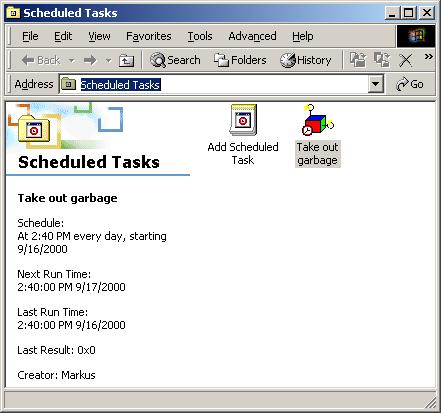
I put this code into a file named schedule.vbs. The next step is to register this script with the task scheduler. Simply open the task scheduler, click “Add Scheduled Task”, and follow the steps of the wizard. The trickiest part is to schedule a script rather than an application. To do so, first select wscript.exe from your Windows/System32 directory. In the last step of the wizard, bring up the advanced properties dialog and specify the full run-command including the script file that is to be executed:
C:\WINNT\System32\WScript.exe "C:\Household\schedule.vbs"
You have great freedom in the way you schedule execution. Figure 6 shows the scheduler with a scheduled script.
We can now go ahead and call the Queued Component from Visual FoxPro or Visual Basic without having to worry about starting the application. The schedule will then be executed automatically.
Thinking Asynchronously
Thinking asynchronously is a weird concept! It means starting a thought, while being too impatient to wait for your own conclusion. This doesn't make a lot of sense (although I sometimes find myself in that very situation) unless you communicate the initial thought to someone else. If the thought is important, however, you need a way to see if the other person handled it and if they will eventually provide you with the solution. In many ways, that's exactly what happens with Queued Components.
Although the basic implementation of Queued Components is simple and straightforward, some of the implications are more severe than they first seem. The most important aspect is that the call made to a Queued Component needs to be self-sufficient. If your wife tells you to take out the garbage but doesn't tell you from what room, you can simply ask her for the missing information. This is not the case in a Queued Component. All of the information needs to be available when the component executes, or it has no choice but to fail. This raises the question of how we can handle that failure.
Considering that I'm not married, I assume that leaving the garbage where it is would be appropriate. After all, the fault wasn't on my end. More experienced husbands, however, claim that this would be a fatal mistake. We need a way to communicate the problem back to the wife. In the real world, this is easy, but in a COM+ scenario, it is not. After all, different clients can use the same Queued Component. One option would be to pass the name of an error handler component as well as a machine name along with all the other information. The husband component could then use that Queued Component to communicate the problem.
A simpler solution is the use of transactions. They allow a flexible exception handling methodology that can be adjusted by an administrator, and can allow components to run multiple times before the exception handling takes effect. We will look at that scenario in a moment. Yet another solution is passing a reference to another Queued Component. Although Queued Components normally cannot receive references to other COM objects (they would not necessarily be available when the component executes), passing queued objects for callback purposes is an exceptional case that is supported.
Here is a Visual FoxPro example for the use of a callback object:
DEFINE CLASS Husband AS Session OLEPublic
    PROCEDURE TakeOutGarbage(What as String, Callback as Object) AS VOID
        IF Empty(What)
            Callback.Complain("No parameters specified.")
        ELSE
            StrToFile(What,"C:\Done.txt")
        ENDIF
    ENDPROC
ENDDEFINE

DEFINE CLASS WifeCallback AS Session OLEPublic
    PROCEDURE Complain(Problem as String) AS VOID
        StrToFile(Problem,"c:\callback.txt")
    ENDPROC
ENDDEFINE
The Husband class is a modified version of the first husband we used. I added a second parameter for the callback object and a check to make sure that the first parameter isn't empty. If it is, the callback object is invoked and the scenario ends. Otherwise, we proceed to writing the file to disk, just as we did before.
The second class is designed to be the callback class. It receives one parameter, which simply gets written to disk.
Here's the code that is used to run the example:
oCallback = GetObject("queue:/new:VFPQueuedHousehold.WifeCallback")
oHusband = GetObject("queue:/new:VFPQueuedHousehold.Husband")
oHusband.TakeOutGarbage("", oCallback)
The Visual Basic example is very similar. We define two class modules. Here's the first one:
Public Sub TakeOutGarbage(ByVal What As String, ByVal Callback As Object)
    If What = "" Then
        Callback.Complain ("No parameters specified.")
    Else
        MsgBox What
    End If
End Sub
This is a modified Husband class that makes sure a parameter was passed. It also receives a second parameter, which is the callback object. Here's the code for that component:
Public Sub Complain(ByVal Problem As String)
    MsgBox Problem
End Sub
You can run this example from a simple Visual Basic program such as this:
Dim oHusband As VBQueuedHousehold.Husband
Dim oCallback AS VBQueuedHousehold.WifeCallback
Set oCallback = GetObject("queue:/new:VBQueuedHousehold.WifeCallback")
Set oHusband = GetObject("queue:/new:VBQueuedHousehold.Husband")
OHusband.TakeOutGarbage("",oCallback)
Note that the instantiation of the callback object really takes place twice. The first time is when the Queued Component is called to serve as a parameter, and the second time is when the Queued Component actually needs to call back. COM+ takes over all the details involved in this process.
No matter how you end up handling the callback scenario, the communication with the caller should be asynchronous to avoid losing the advantages of the queued architecture.
Transactions
Like all other COM+ Components, Queued Components support transactions. In fact, transactions are very important in asynchronous scenarios, to avoid losing messages as well as to indicate problems.
When a Queued Component runs inside a transaction, it uses SetComplete() or SetAbort(), depending on whether or not the component was successful. When a Queued Component issues a SetAbort() to indicate an execution problem, the possible reasons are plentiful. Perhaps a database or another computer wasn't available. Perhaps some violation occurred. Either way, the message cannot just be dropped, but needs to be handled in some way. Very often, a simple retry may solve the problem. Perhaps a resource becomes available in time, or a conflict has been resolved.
Queued Components automatically put the message back into the queue for a later retry. However, unsuccessful components should not remain in the system forever. For this reason, there are several retry queues with the numbers (0 to 4) after the queue name. Every time execution fails, the message gets pushed down to the next queue.
Eventually, COM+ will give up and the message will be posted to the “deadqueue”. From this queue, no additional retries will be issued. COM+ has tried to revive the message several times and now considers it dead. It is now up to the developer to pick up the corpse and handle the situation appropriately.
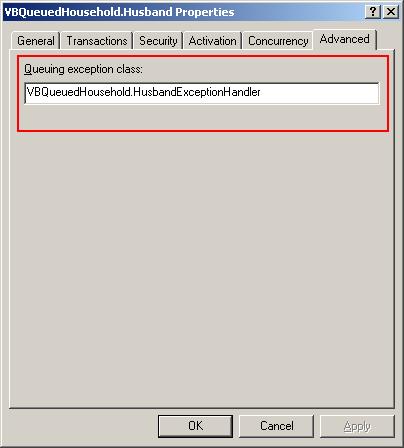
The easiest way to do this is by providing a queuing exception class. This class is specified in the properties of the COM+ component (not the Interface!) as shown in Figure 7. The exception class implements the same interface as the one called in a queued fashion. When a message is posted to the deadqueue, the exception class will be used for delivery rather than the real Queued Component. This provides the developer a simple and straightforward way to handle the problem. An alternative solution is to watch for messages in the deadqueue manually and handle errors appropriately, although an exception class is much easier.
Conclusion
The ability to create asynchronous scenarios so easily with Queued Components makes the complex task of creating scalable, distributed applications a much simpler process. It provides a straightforward way to perform slow tasks at a later point in time or perhaps on another computer. It also provides a simple way to call components on a machine that may not currently be available.
All of these features come with virtually no code modifications. However, the developer has to learn to “think asynchronously” to use this great functionality as efficiently as possible.
