


Reliably, like clockwork, Microsoft churns out a new version of its IDE behemoth. March 7th, 2017 was one of those occasions, as Microsoft released Visual Studio 2017. Even with the regular cadence of incremental updates to Visual Studio, the big version jumps always offer plenty of new features. This new version is no exception.
What are the main features? Is there one big theme? Well, yes and no. Visual Studio is a very big and very mature product. Some features have been around for a long time, and others, such as the editor and the compiler infrastructure, have received a massive overhaul in recent versions. This time around, Microsoft is leveraging these new features and pushing them to the max. At the same time, Microsoft is now looking at the new development landscape and they're making sure that their development tools support all the latest scenarios. It's fair to say that the focus of Visual Studio 2017 is on performance, productivity, and supporting the latest development scenarios, such as cloud and mobile development. That's quite an ambitious goal.
Before I dive into the specifics of Visual Studio 2017, I'd like to discuss scenarios that exist in parallel with those covered by Visual Studio. Over the last few years, Microsoft has drastically corrected its course when it comes to development scenarios. For instance, Microsoft has embraced the world of Open Source, including scenarios far beyond its own Windows platform. Microsoft welcomes Linux developers into its world. Microsoft supports iOS, Android, and HTML developers of all flavors. This requires an adjustment in tools and a much larger toolbox. Visual Studio is the Big Daddy of Integrated Development Environments (IDEs). It has a very important role to play, but even with all its new whistles and bells, it doesn't address every scenario.
It's hard to imagine a reason you wouldn't prefer Visual Studio 2017 over older versions. I recommend that you install it today!
For instance, many Web developers like using lightweight tools for specific tasks, and they want to be able to do so on any platform (Windows, Mac, Linux, etc.). Visual Studio doesn't lay claim to that scenario, but Microsoft supports it with its new (and very popular) Visual Studio Code tool (download for free from www.visualstudio.com). Visual Studio Code lacks many features that a full IDE has, but on the other hand, Visual Studio Code is a really good editor. And that's what it aims to be: a tool for people who like to edit text-based files and do so very efficiently.
In a related scenario, developers like to write code on the Mac, and there are plenty of reasons to have a full IDE for that. Visual Studio is a Windows tool, but Microsoft now has Visual Studio for the Mac. This tool is great at writing cross-platform code (such as can be done with .NET Core) and it's especially great at writing Xamarin applications. (Visual Studio for the Mac grew out of the older Xamarin Studio product, now owned by Microsoft; Microsoft acquired Xamarin.)
This article isn't about Visual Studio Code or Visual Studio for the Mac. CODE Magazine has other articles addressing those. However, it's important to know that these tools exist in addition to “regular” Visual Studio. Many developers will be using all of these tools (and more) in their daily development routine. I encourage you to check these tools out and consider them to be additional options, while not forgetting about the core product of Visual Studio 2017.
So where do we start with Visual Studio 2017? Why, with setup, of course!
The Acquisition Experience
You'll notice the first new feature of Visual Studio 2017 before you even launch it for the first time! Microsoft has completely redesigned the set-up experience, and the process is now not called “set up” anymore. Instead, I'm talking about “product acquisition.” The end result is the same: You're installing Visual Studio on your computer.
Although the name-change may seem insignificant, the actual process is anything but. Microsoft now gives you the ability to install Visual Studio in very specific ways, and do so easily, by first identifying the “workloads” you're interested in. A “workload” is a set of features related to the kind of development work you do. For instance, you could install the “C++ Workload” if you're interested in C++ development. If you also want to develop .NET Core apps, you also pick that workload. This allows you to only pick the things you really want and create a much more lightweight Visual Studio experience. Perhaps you really aren't interested in C# development, so why install any of the C# components? Now you don't have to anymore. Figure 1 shows the UI used for this process.
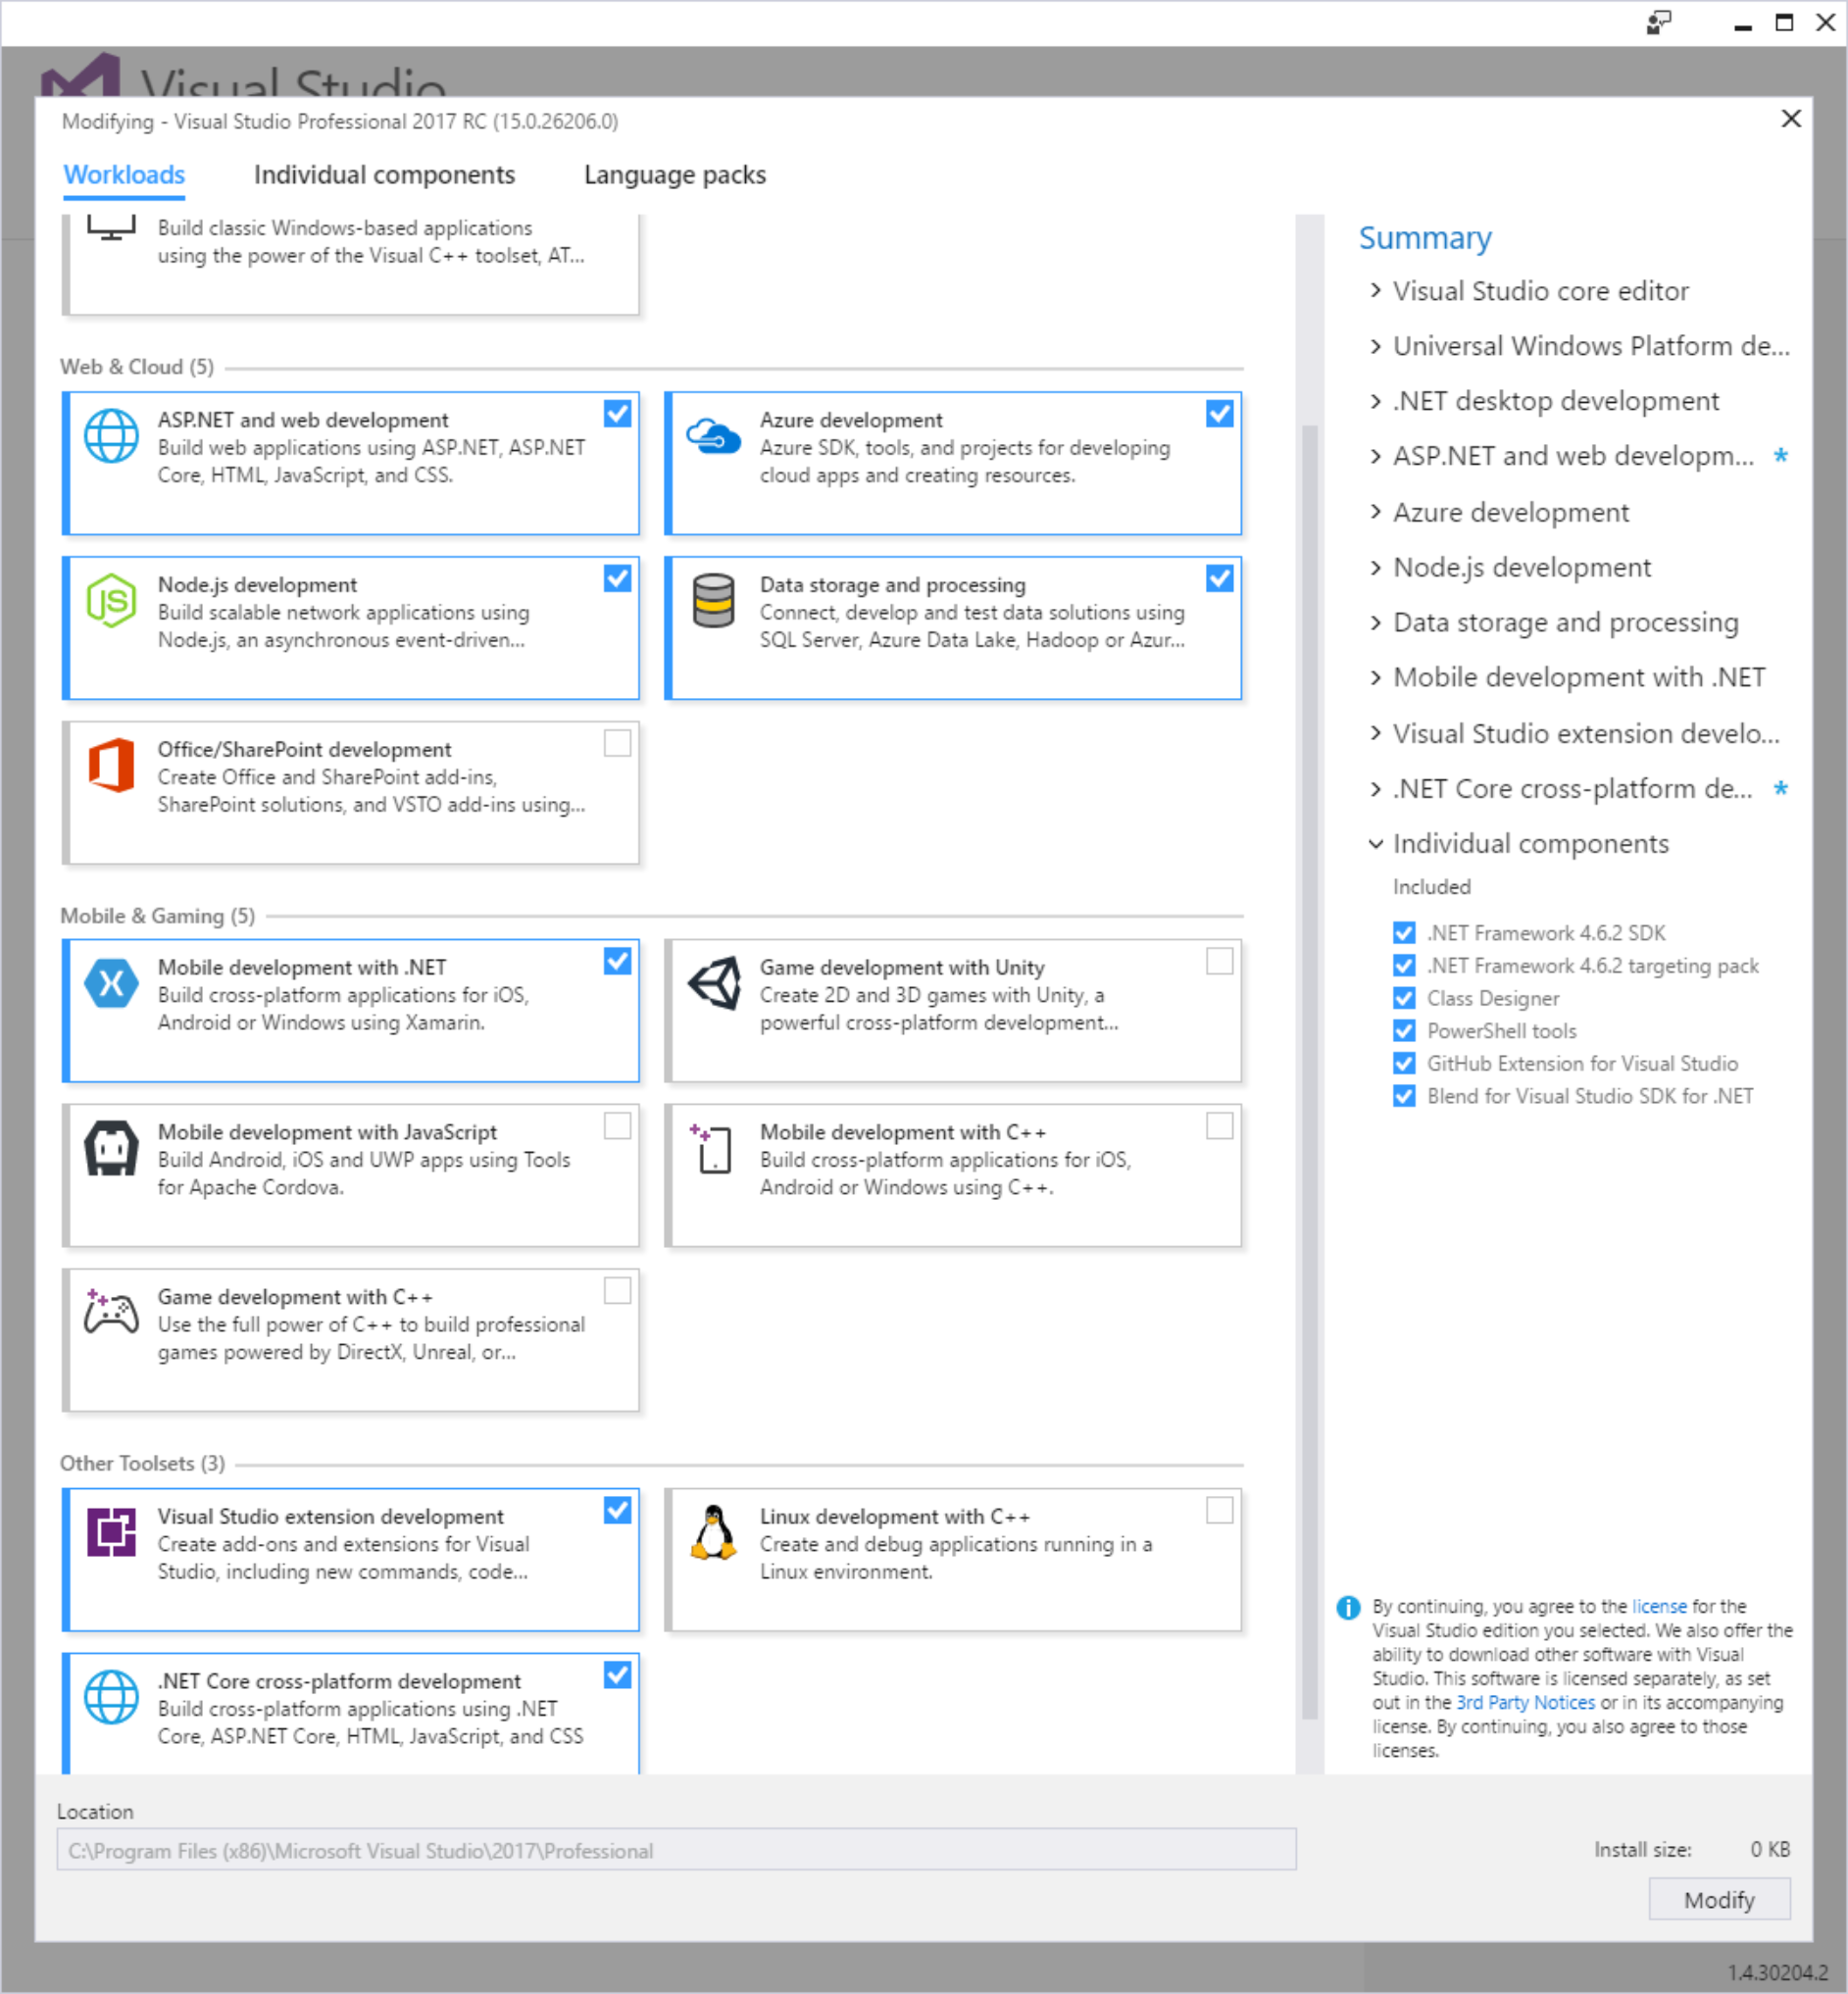
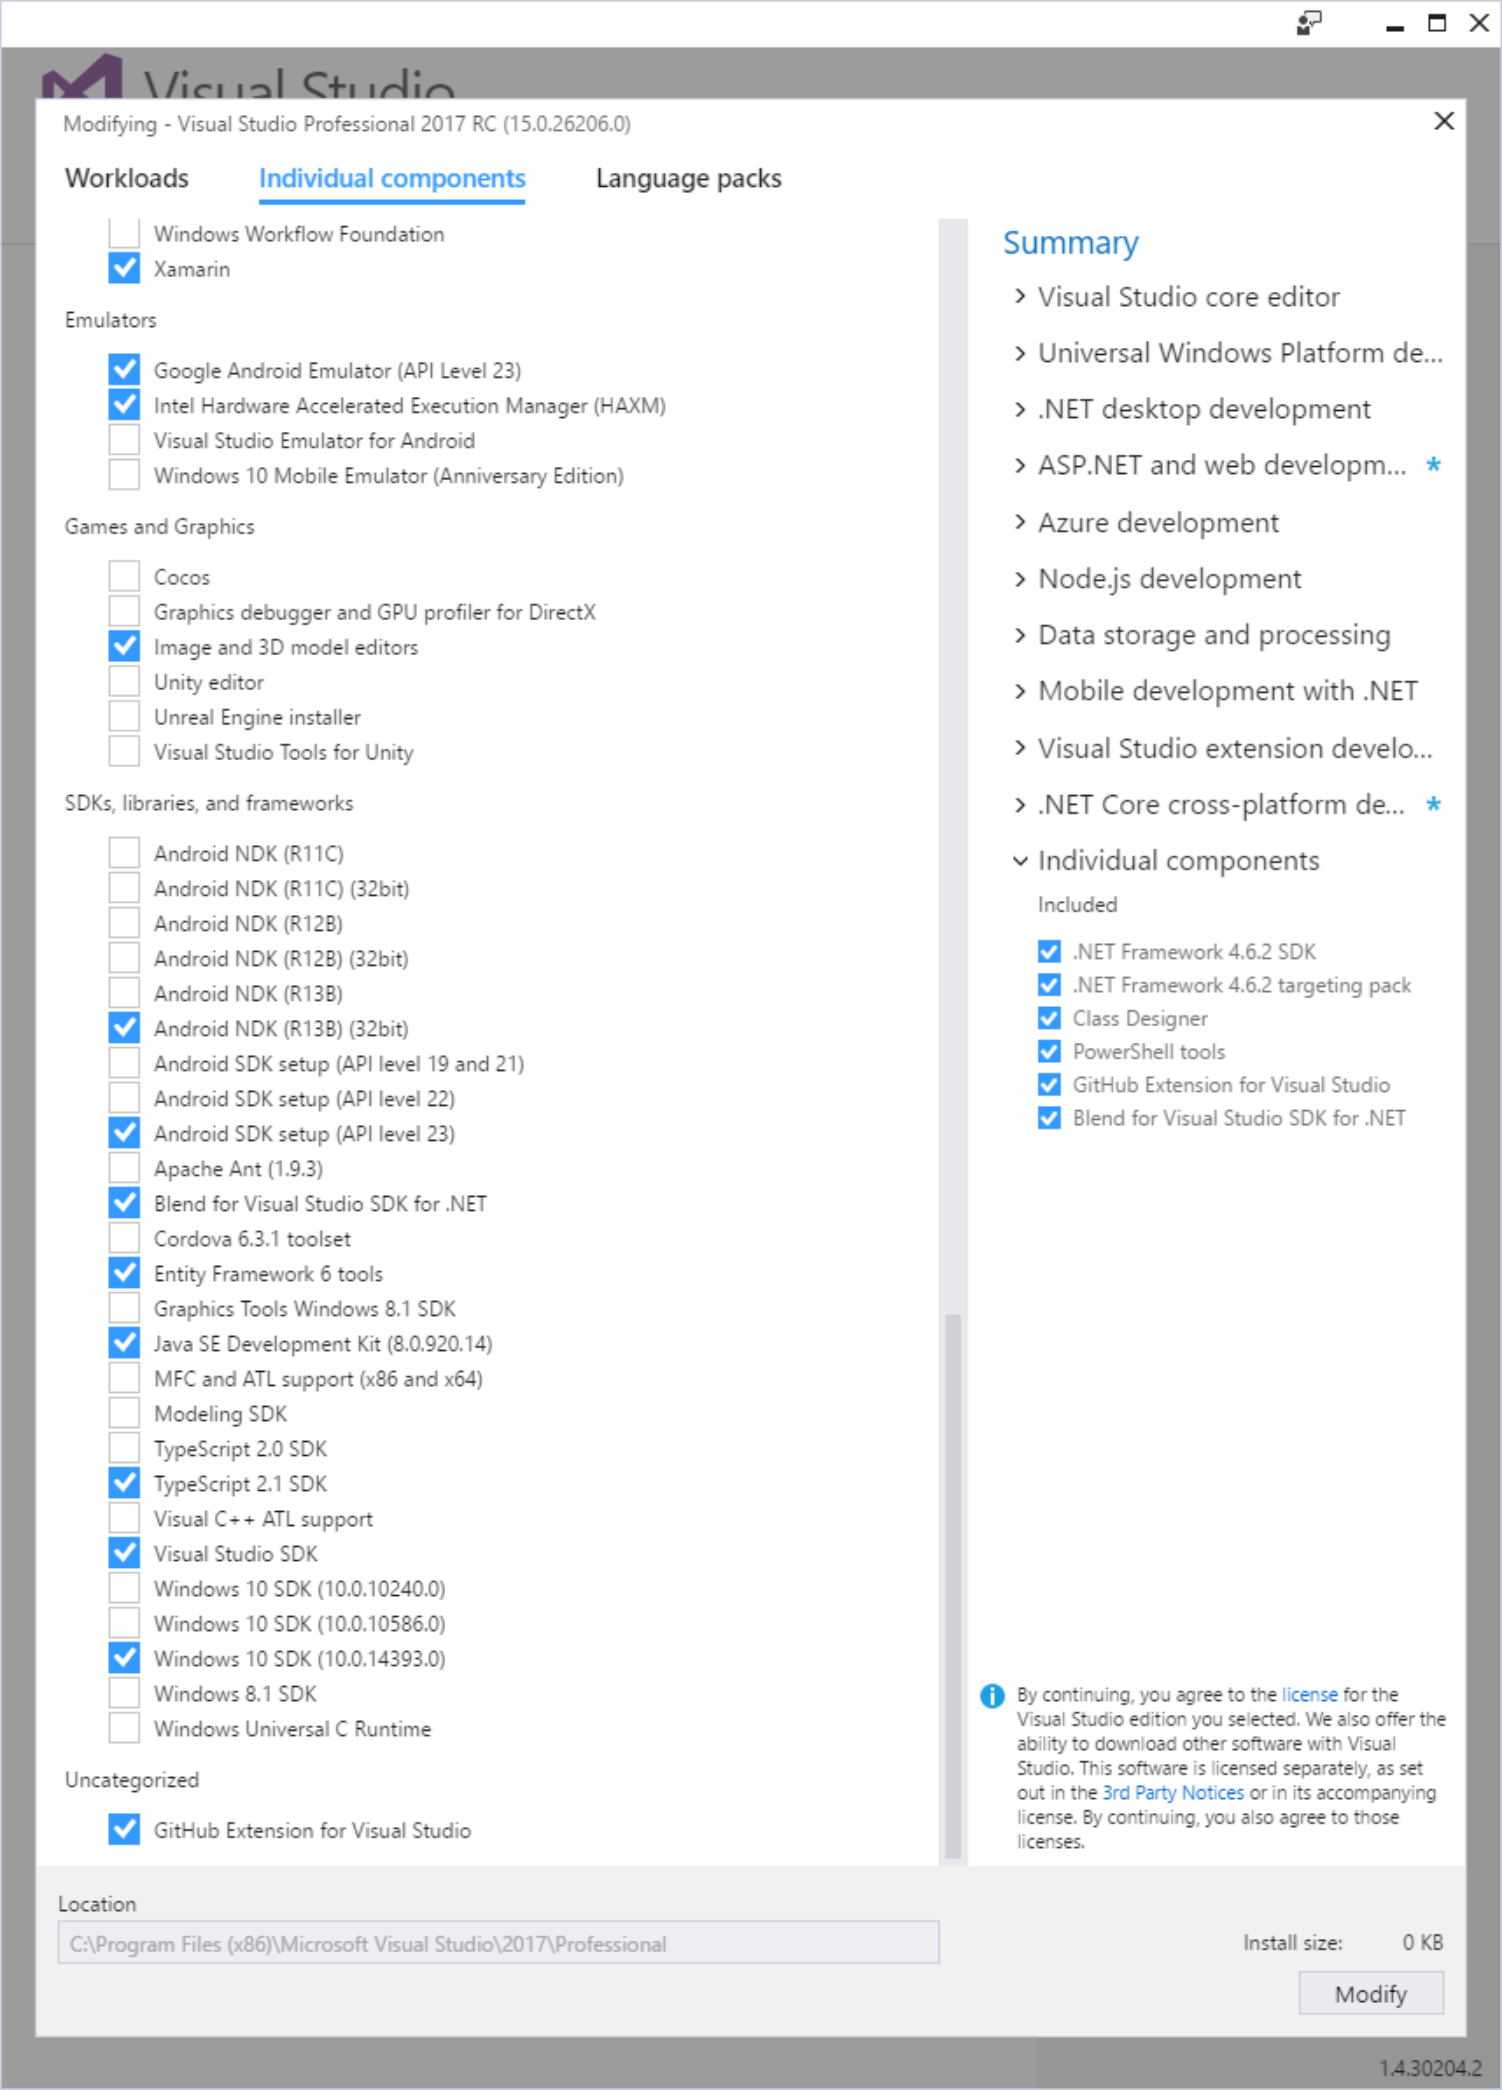
Of course, you can still fine-tune the process and pick very specific features. Figure 2 shows an example of what that looks like. As you can see in Figure 2 (and even more so if you explore the acquisition experience yourself on your computer), not only does this provide fine-grained control over the features you'd like to install, but there are also significantly more options available than in older versions, including support for things you wouldn't have previously associated with Visual Studio or Microsoft at all, such as Android features, or languages other than Microsoft's own.
Performance and Projects
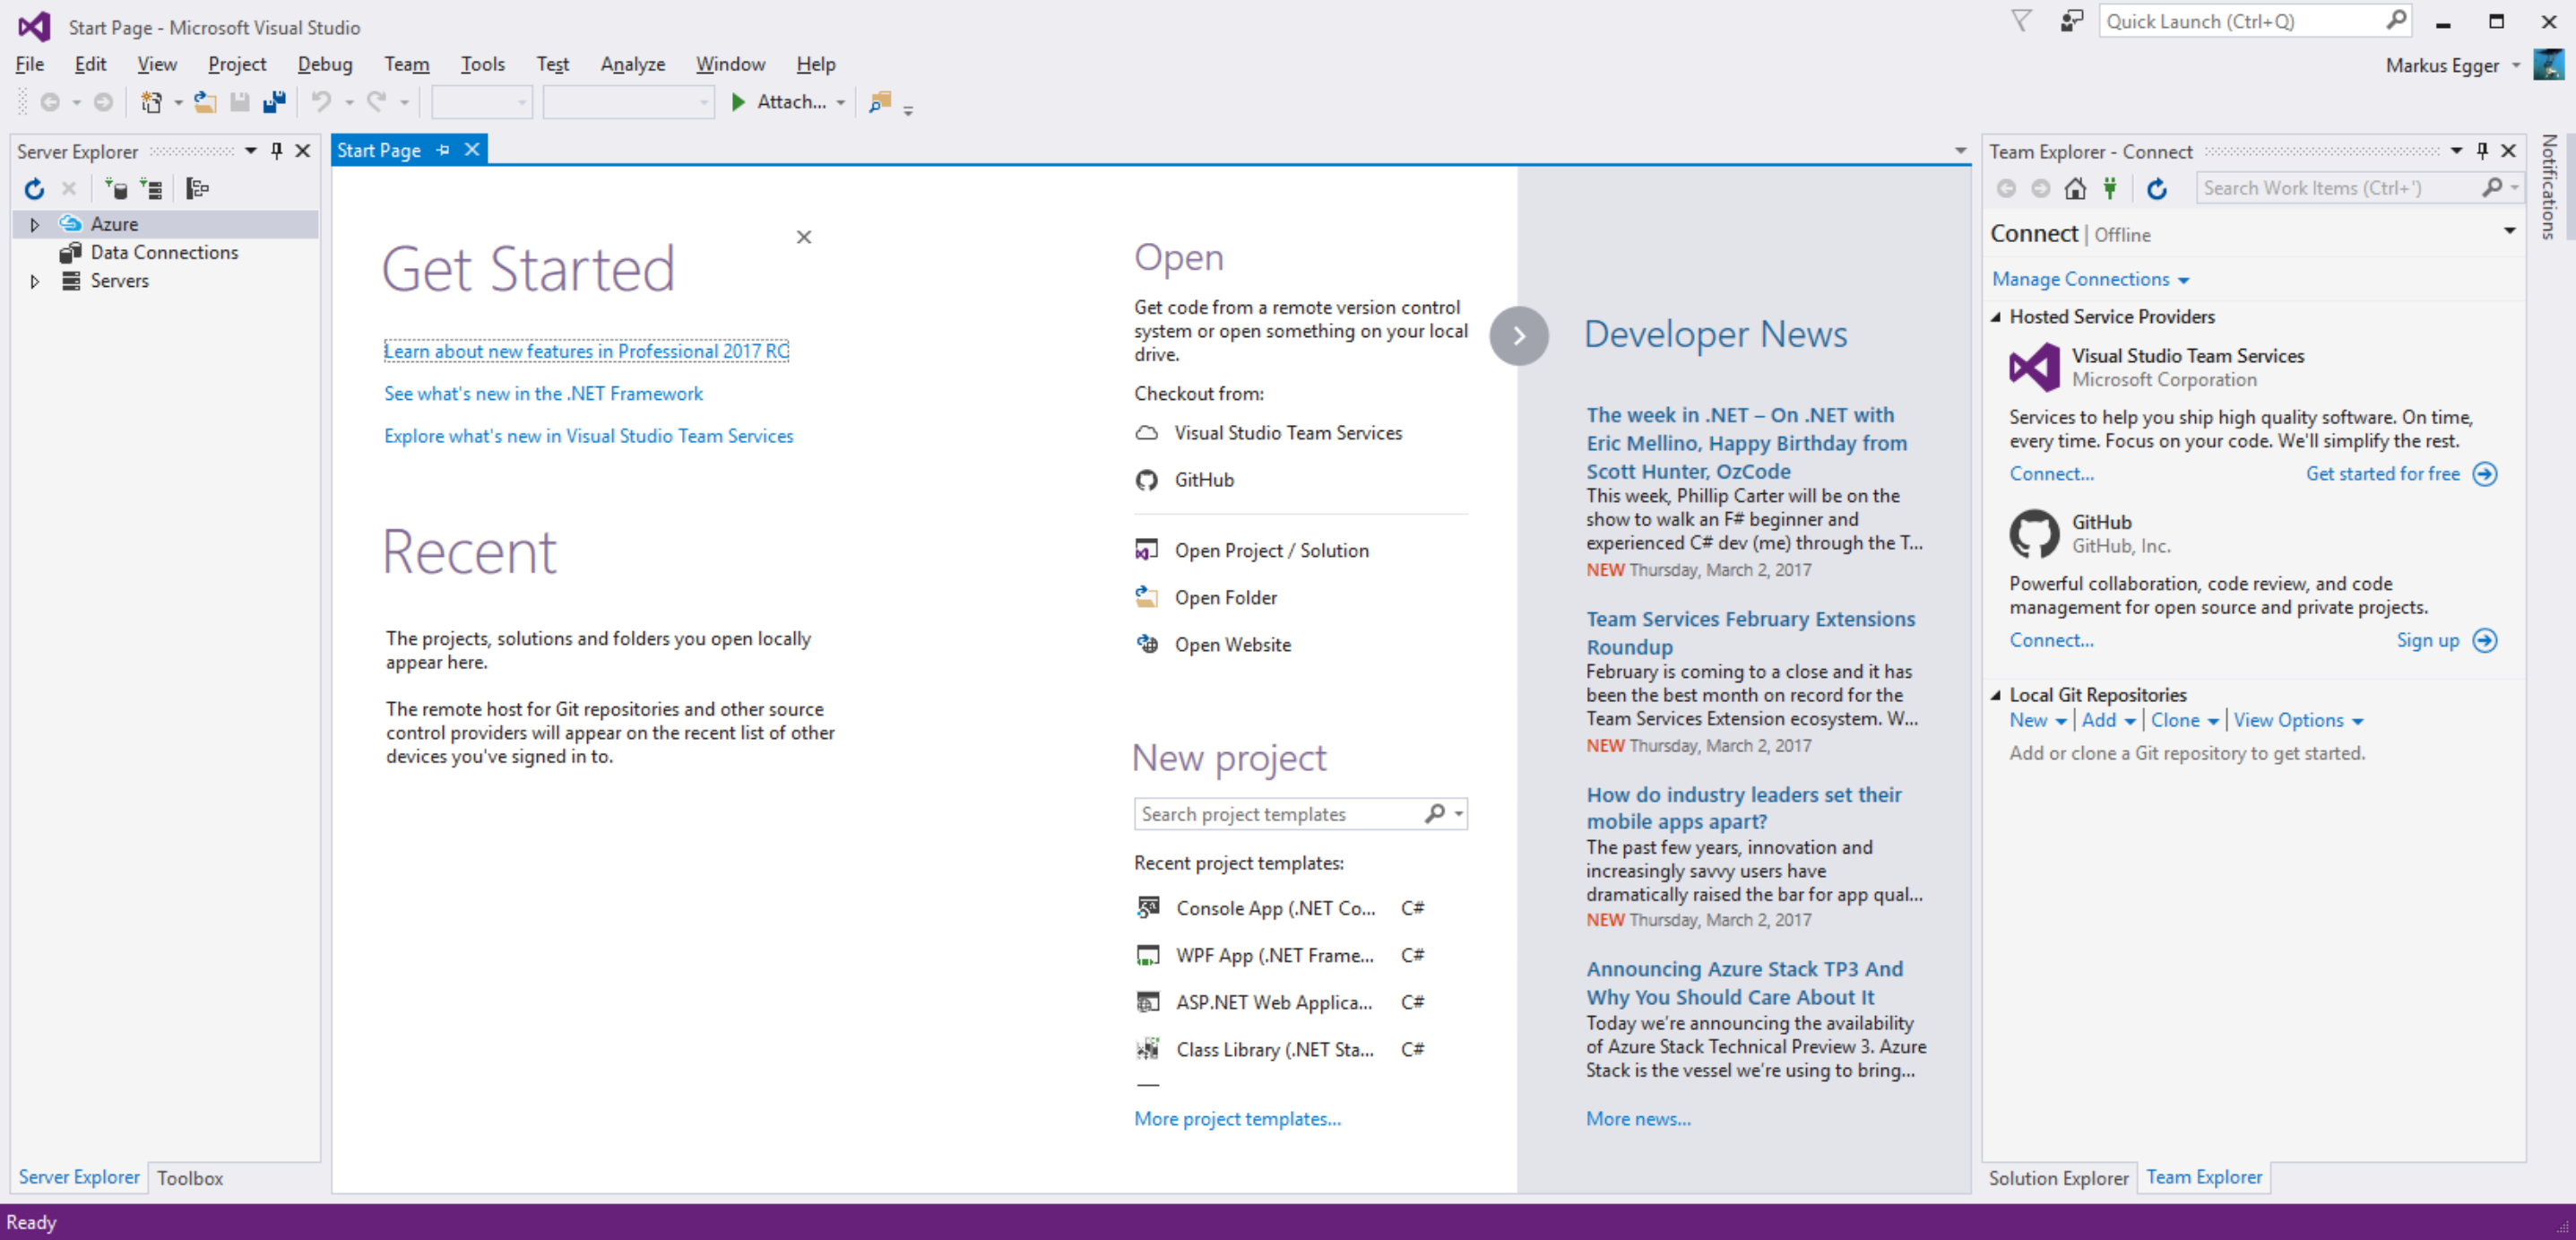
Once you're done with your install...em...I mean “acquisition,” and you start Visual Studio 2017 for the first time, you'll be treated to the improved and much “cleaner” Start Screen (Figure 3). What may not be so obvious the first time around is that Visual Studio now starts up a lot faster. Microsoft claims that Visual Studio 2017 starts about twice as fast as Visual Studio 2015. I suppose individual mileage may vary, depending on which workloads and extensions you have installed (among other things), but based on my own experience, I see the sort of improvement that the Visual Studio team claims on all my installations. The perceived performance on startup is certainly much improved.
Performance improvements don't stop there. Microsoft has spent a lot of time improving performance of various parts of Visual Studio. Besides startup performance, one of the areas you'll likely notice the most is project-load performance. This is mainly due to an approach called “lightweight solution load,” which can be enabled globally or on a project-by-project basis. When active, this approach essentially allows deferred loading of parts of solutions. Visual Studio handles all of the details. Note, however, that this isn't a silver bullet. Some specific features (especially some third-party extensions) may not be fully compatible, and thus some features may not be available until all projects are fully loaded. But then again, the trade-off is well worth it; even in scenarios that require you to wait for full solution load, you're no worse off than before.
Talking about loading projects: Visual Studio can now open entire folders, rather than requiring a solution or project files. In that case, rather than showing the contents of a solution in the Solution Explorer, Visual Studio simply shows the entire folder hierarchy. There are several scenarios where that's useful. One such scenario is when you want to edit any set of files that aren't part of a solution. This could be a set of markdown files, or perhaps a set of HTML or JavaScript files that are unceremoniously dumped into a folder. Although there are quite a few different reasons to want to do that, I suspect that Web developers are the ones who'll get the most out of this approach.
Performance improvements don't stop there, either. In many cases, Visual Studio now builds faster and consumes less memory (this depends on your “workload,” of course). Visual Studio can now load extensions on-demand. Visual Studio can be installed with a much smaller hard-drive footprint. I'll spare you all the details (and frankly, I probably don't know even half of the features the Visual Studio team has performance-optimized), but I can confidently say that Visual Studio 2017 feels like a more responsive and performant tool.
Roaming
Users of Visual Studio 2015 are already used to the fact that Visual Studio Settings “roam.” Change settings such as the theme color or fonts or many others, and then log in on a different computer, and you'll see your same settings show up there, assuming that you're logged on and have the “Synchronize Settings” option enabled.
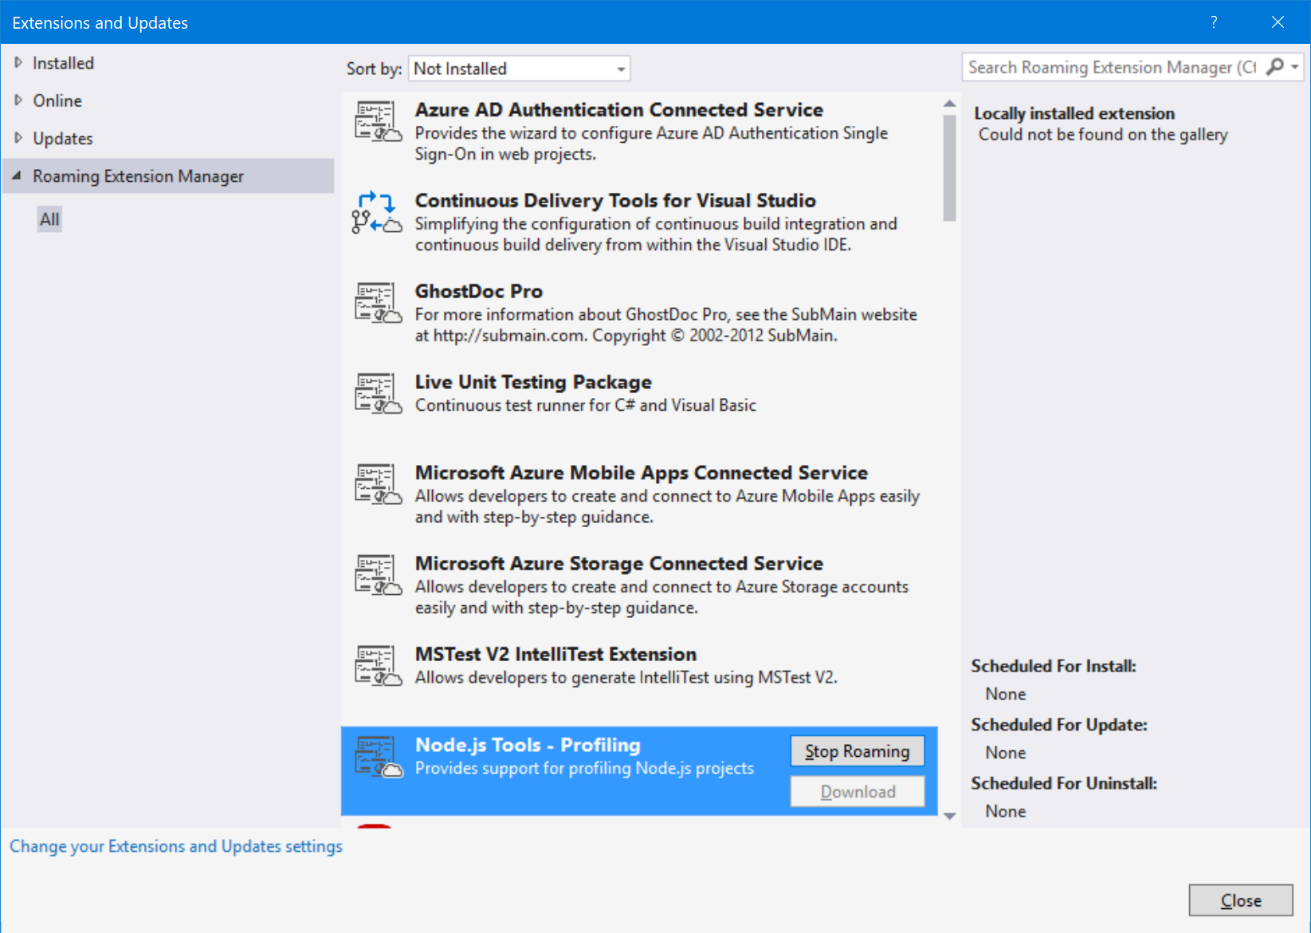
Visual Studio 2017 takes this idea a step further and introduces “Roaming Extensions.” This feature allows you to easily keep your extensions synchronized between different workstations. What I really like about this feature is that it offers a lot more control than the synchronization of settings (which is an all-or-nothing affair). Roaming Extensions can be enabled and disabled for each Extension individually. Figure 4 shows the interface to this new feature.
The Code Editing Experience
All of these new features are very nice, but for any IDE, the rubber really hits the road when it comes to writing code. Visual Studio 2017 doesn't disappoint in this area.
Visual Studio now supports many new file types and provides features such as Syntax Coloring and IntelliSense for those file formats. As I write this article, the exact list of newly added file types still appears to be somewhat in flux, but the documentation shows the following formats added: Bat, Clojure, CoffeeScript, CSS, Docker, F#, Groovy, INI, Jade, Javadoc, JSON, LESS, LUA, Make, Markdown ++, Objective-C, Perl, PowerShell, Python, Rust, ShaderLab, SQL, Visual Basic .NET, YAML. All in all, there now are well over 20 languages supported out-of-the-box by the Visual Studio editor. Not just that, but the feature-set around previously supported file types (such as TypeScript) has been improved.
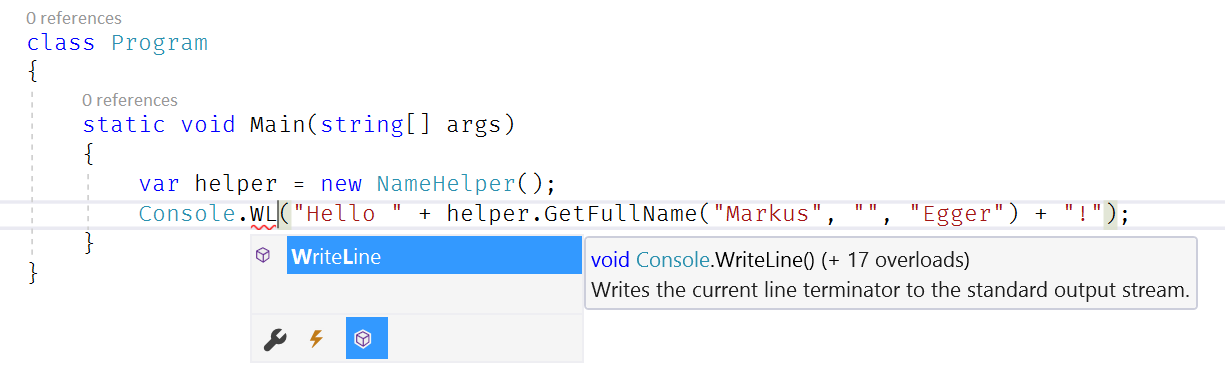
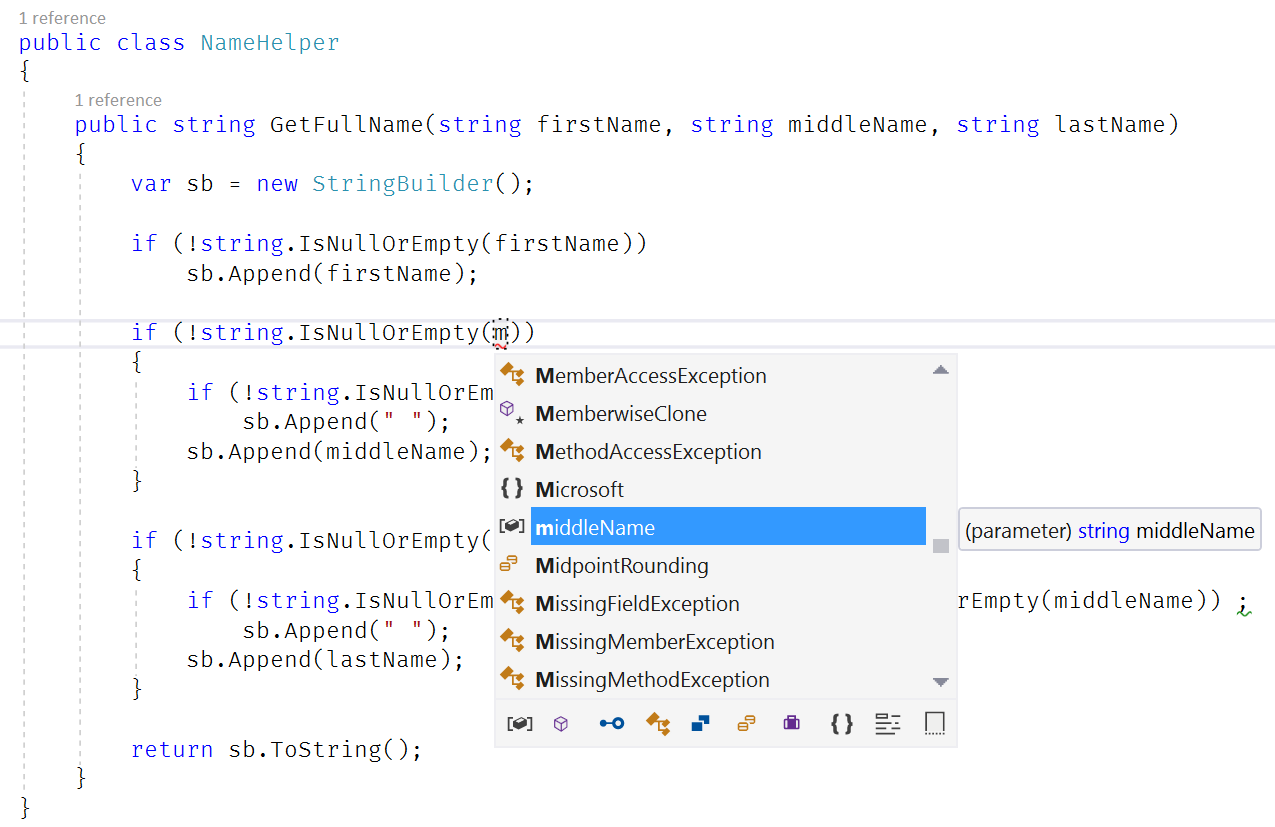
IntelliSense has also been improved. It now does a much more thorough job figuring out what developers were likely looking for (Figure 5). IntelliSense also supports filtering the list of options by types. For instance, if all you're interested in is methods, you can filter the drop-down to only show methods (Figure 6). It also does a much better job in predicting the most likely text that you're about to type (Figure 7).

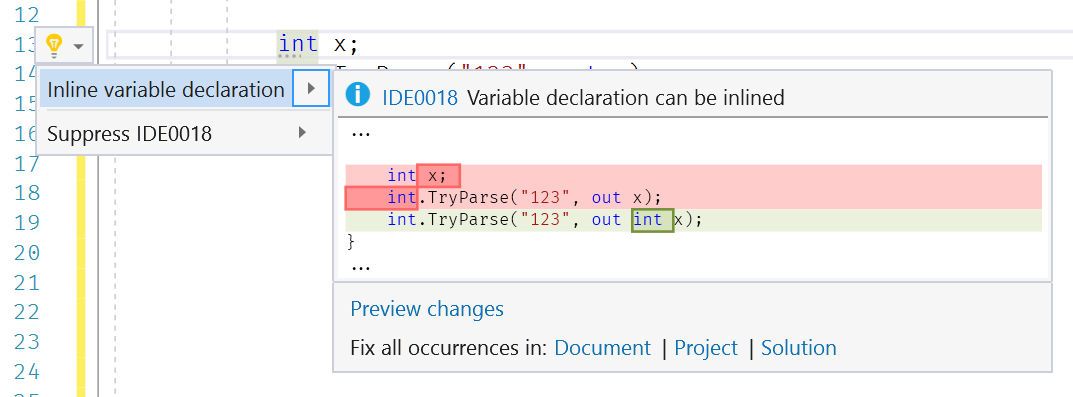
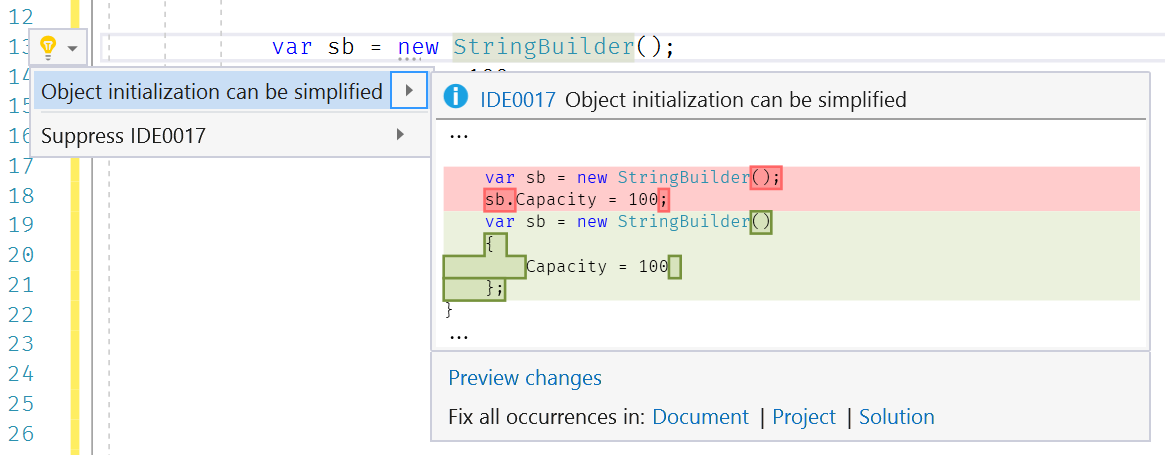
As you would probably expect, refactoring has received another set of improvements in Visual Studio 2017. Some of that's due to supporting new language features. Figure 8 shows a new refactoring that leverages the latest C# syntax enhancements. Others are refactorings that make sense but weren't supported out-of-the-box previously (Figure 9).
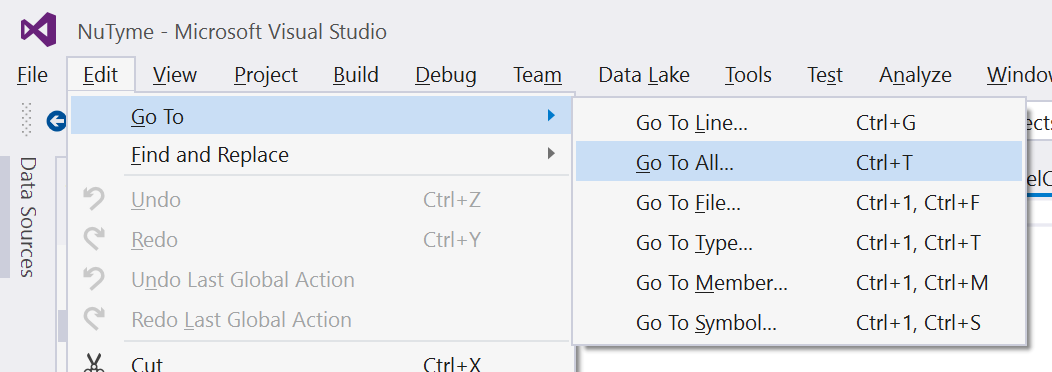
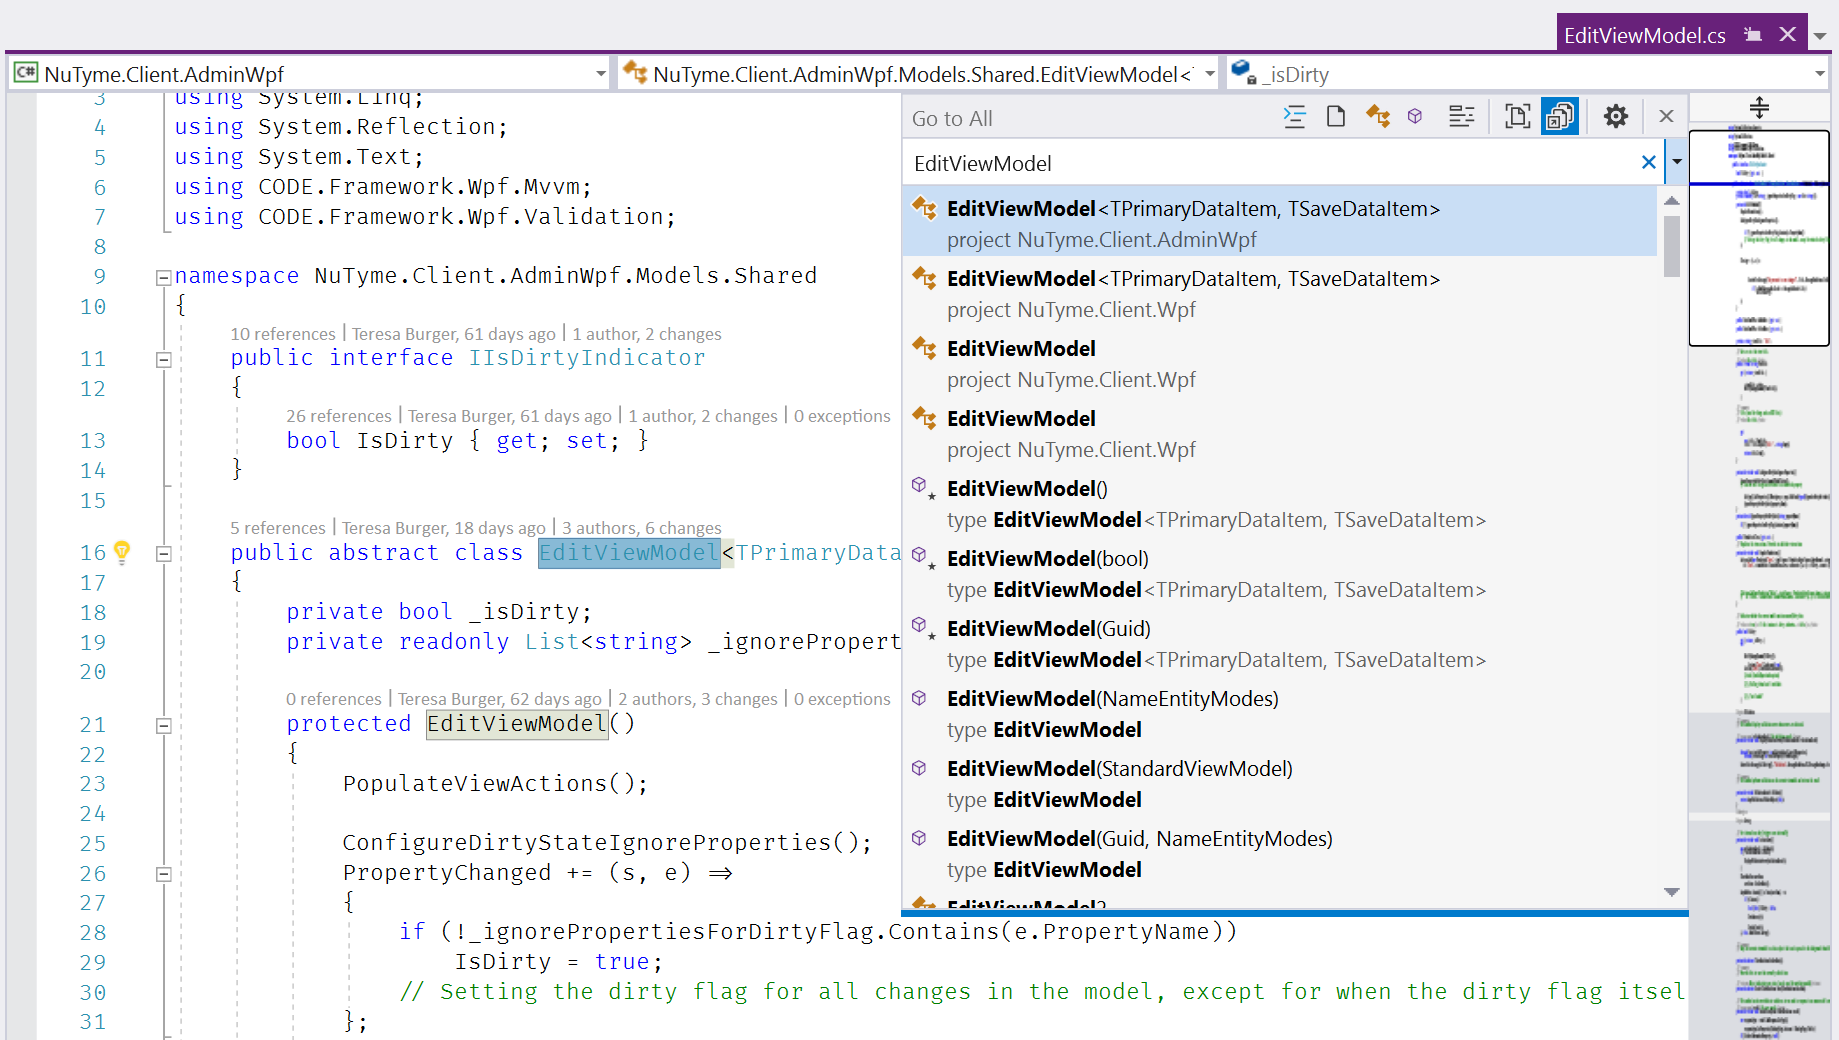
Another whole set of new features has been summed up under the “Go To” moniker. Previously, “go to” referred to jumping to a certain line number. That is still avaliable but now called the “Go To Line”. In addition, you have a whole set of new ways to go to different places in the code (“navigate” to code) that are all rolled up into the “Go To” menu (Figure 10). The most powerful version is called “Go To All” and can be seen in Figure 11. (The other options are similar to Go To All, except that they're pre-filtered to certain types.) As the user starts typing, a results list is displayed. In addition, when you select one of the entries in the list (keyboard up/down), Visual Studio opens the file “temporarily” (with the file tab on the right-hand side, as seen in Figure 11). When a new entry is selected, Visual Studio closes the previous temporary file and shows the new one. To permanently open the file, you can simply hit ENTER.
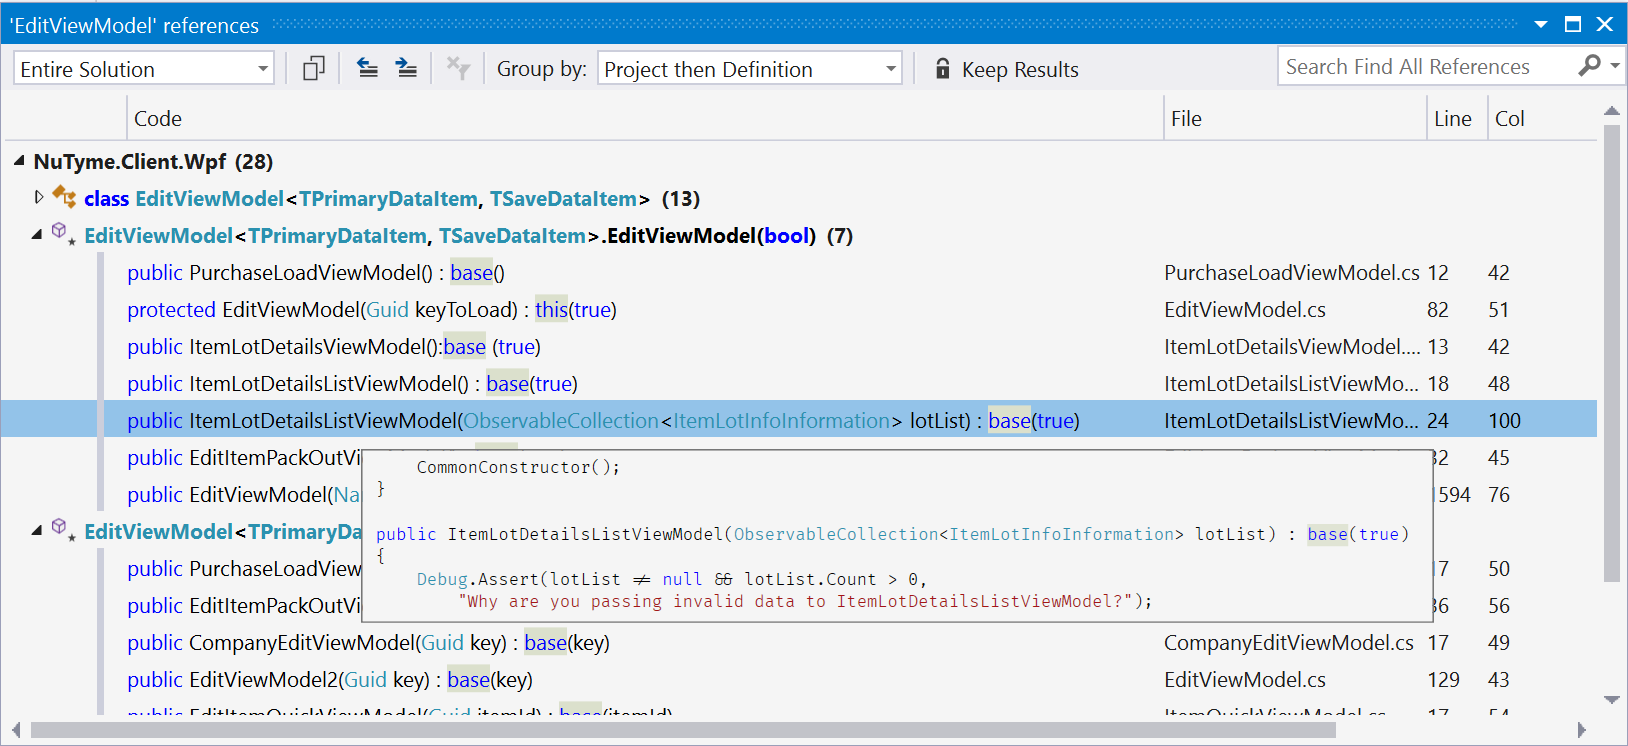
A similar feature is “Find All References.” Right-click on any type in the editor to pick the feature (or hit Shift+F12) to see the dialog seen in Figure 12. The resulting list provides a lot more control and it's formatted in a way that makes it much easier to absorb the presented information (such as color and customizable groupings). When selecting items from the list, Visual Studio opens the containing file as a temporary file (similar to the behavior described above for the Go To feature). When the mouse is hovered over one of the entries, Visual Studio displays a quick preview of where the type was referenced (also shown in Figure 12).
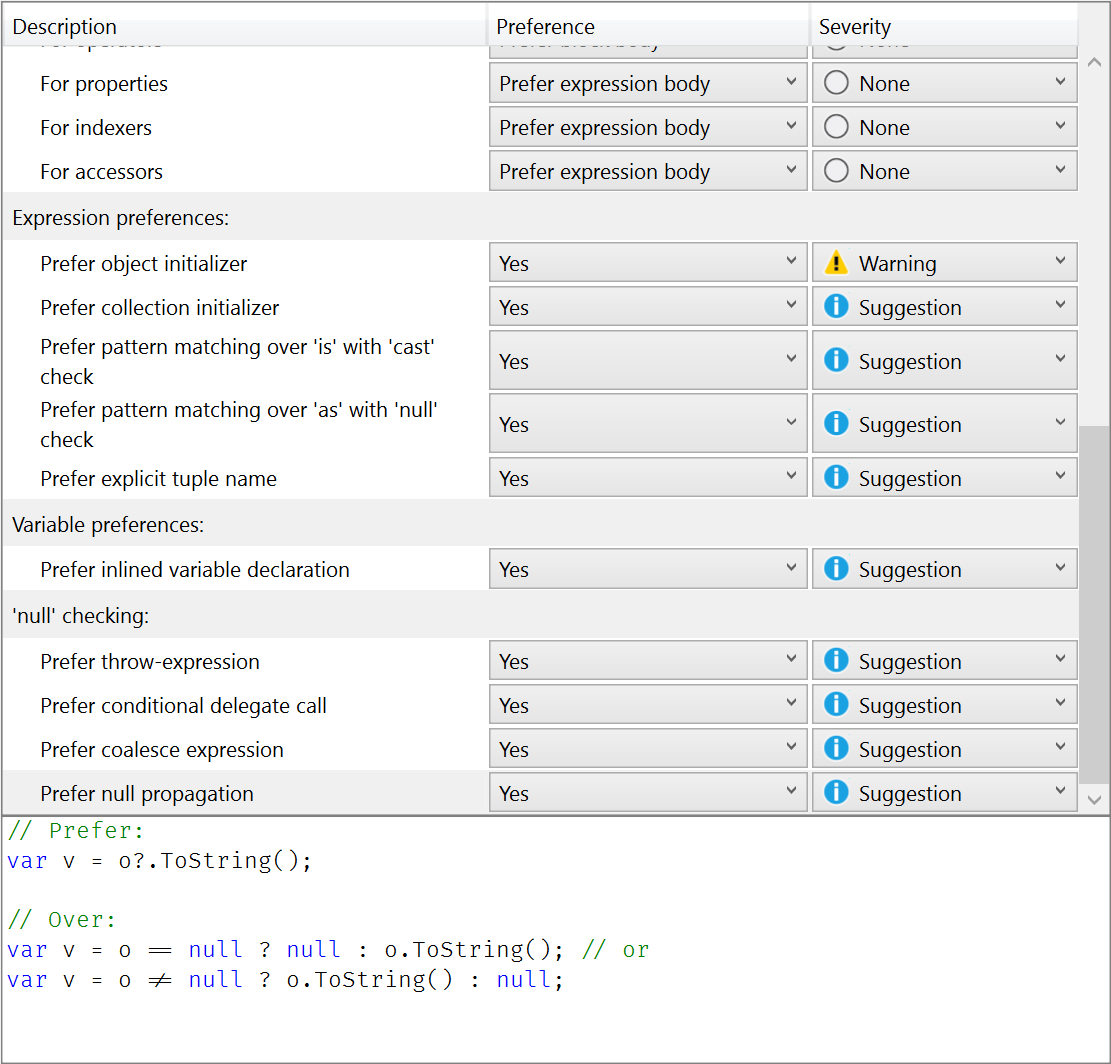
One of my favorite code editing features is the improved ability to define code style rules (see Figure 13). Not only is it possible to define rules within Visual Studio, but developers can now create .editorconfig files to define code style rules on a project-by-project basis. These files aren't specific to Visual Studio, but they're supported by many IDEs and code editors, allowing for sharing of coding style rules across a large set of environments.
This is just a small sampling of the code edit enhancements. Users of third-party tools are probably familiar with some of the things described in this section, but now they're part of Visual Studio itself without the added tools needed.
Note that there also are many features specific to certain technologies or “workloads.” For instance, if you're a C++ developer, you'll find many new and tweaked features. Similarly, if you're a XAML developer, there are new features for you. A comprehensive exploration of all these “workload specific” features is beyond the scope of this article.
Unit Testing and Debugging
The Visual Studio Debugger has been improved in some subtle but very significant ways. Figure 14 shows some of those features in action. One of my favorites is “Run to Click.” When in debug mode, you can simply move the mouse over a line of code, which causes a small icon/glyph to show up to the left of the line. Simply click that glyph to continue execution to that line. Another feature I really like is the perf tip that shows up in those scenarios. The perf tip can be clicked to bring up performance analysis tools.

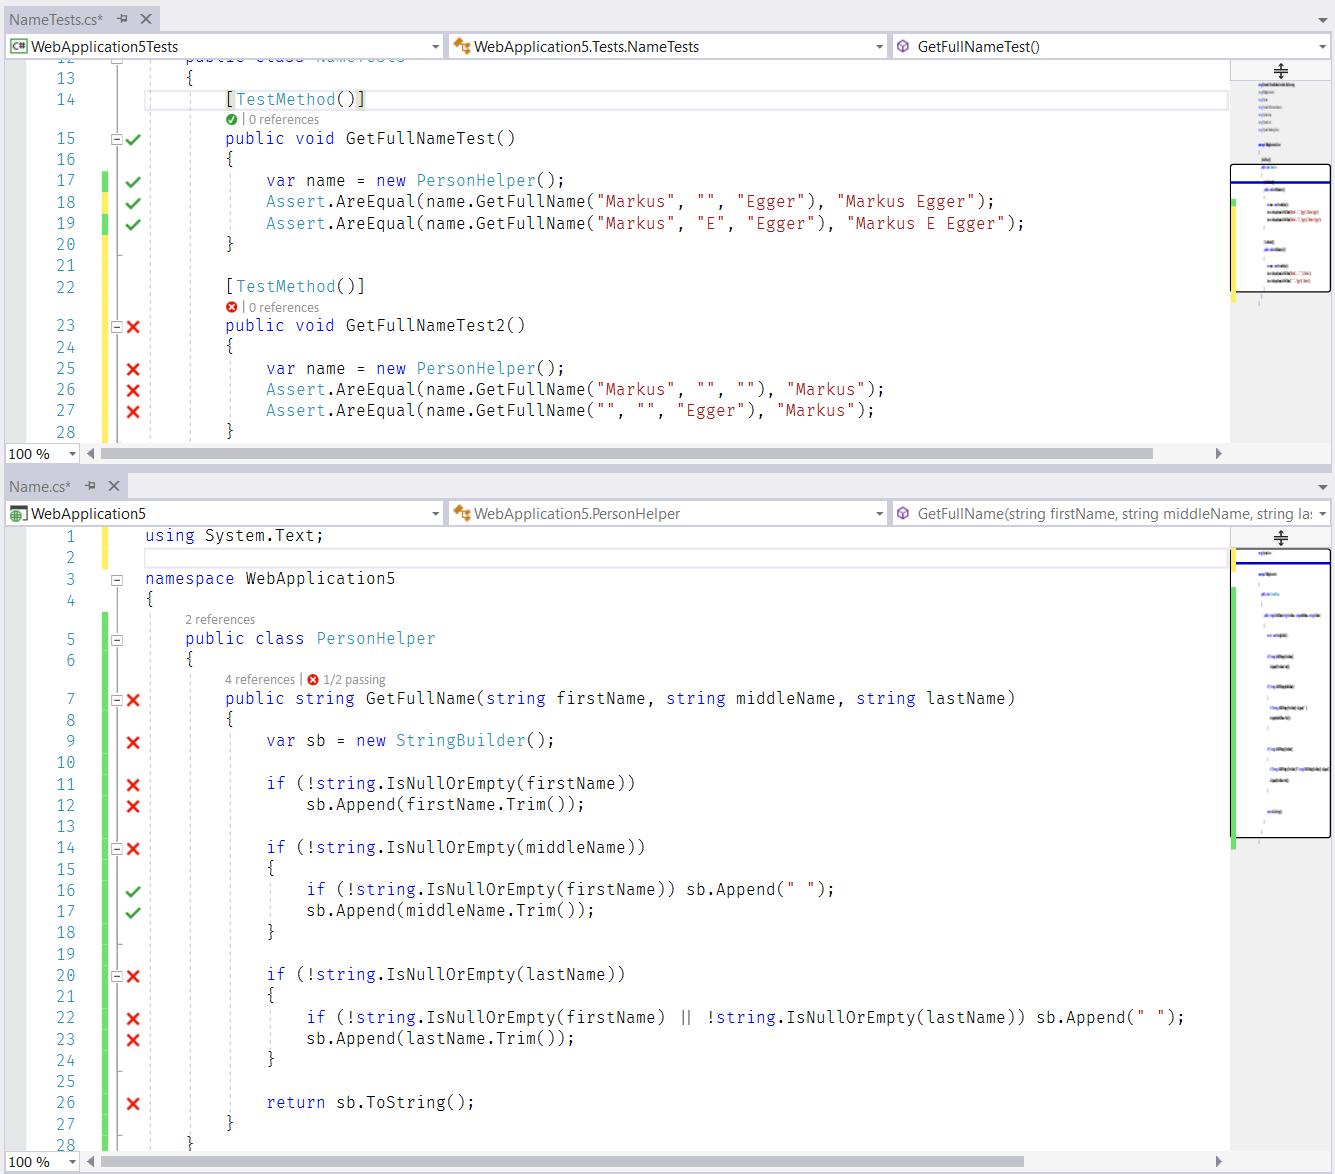
Debugging is one side of the coin, but you don't always just want to run pieces of code in a trial and error fashion. Instead, it's often important to create Unit Tests. I'm happy to report that Visual Studio 2017 improves Unit Testing through a feature called “Live Unit Tests.”
Live Unit Testing turns the unit testing process into a completely different development experience. You really have to see it in action to appreciate how cool it is.
When you enable the feature (through the Test menu), the editor shows flags indicating whether or not tests for the line of code are succeeding (or whether the line is covered by a test in the first place). When you then modify either the code or the test that goes with it, Visual Studio automatically executes the test in the background and you receive immediate feedback (while modifying code) whether the tests pass without ever explicitly running the test. This turns unit testing into a whole different experience.
To give this new feature a spin, try it on any of your .NET projects (it currently targets the standard framework and doesn't yet work on .NET Core). If you don't have unit tests, right-click a method in the source editor and add a new test. Then, go into the Test menu, pick the Live Unit Testing option, and click Start. This triggers a behind-the-scenes test runner that exercises your code while you type. Figure 15 gives you an idea of the experience. A visual indicator to the left of the code shows whether a test passed or not. As you edit your source code (you don't even have to save!), the tests are executed again, and your indicators update accordingly while you change your code. I encourage you to give this a spin, because you really have to see Live Unit Testing in action to appreciate how cool it is.
The .NET Core, Cloud, and Docker
The development landscape for Visual Studio developers has evolved drastically over the last few years. We now have to deal with cloud and mobile scenarios, in addition to desktop and Web. For instance, Microsoft has provided a completely new version of .NET, called “.NET Core.” The list of such large-scale changes goes on and on and it's no surprise that Visual Studio 2017 aims to support all these scenarios.
Support for .NET Core is one of those features that most developers exposed to the technology expect as a baseline, and they won't be disappointed. Visual Studio 2017 supports .NET Core and provides project templates for it. It also supports the new (or returned) approach of using csproj files to create .NET Core projects. (Note that those types of .NET Core projects are not compatible with Visual Studio 2015, because those used project.json.)
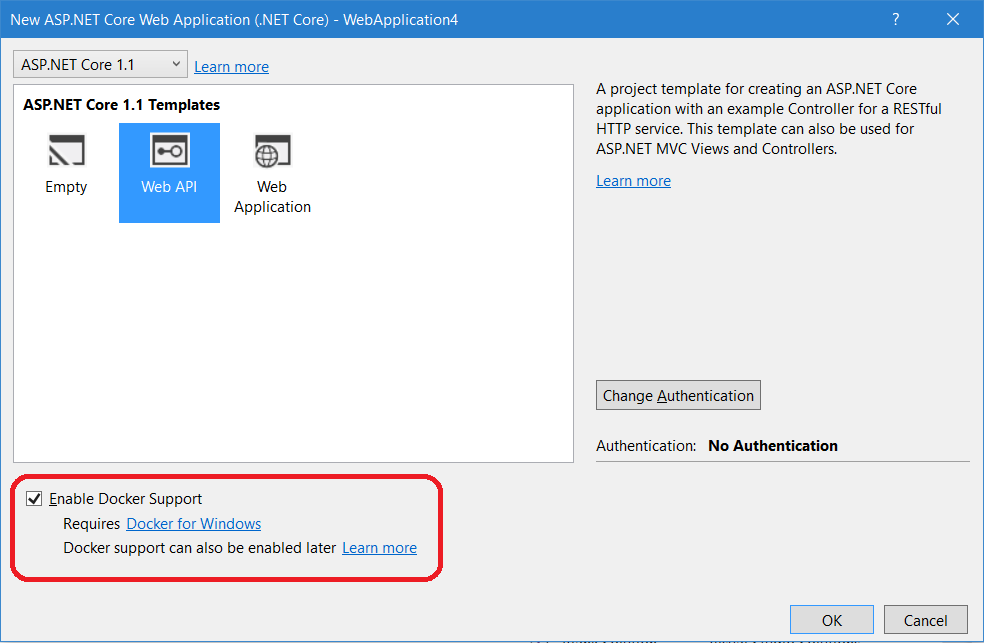
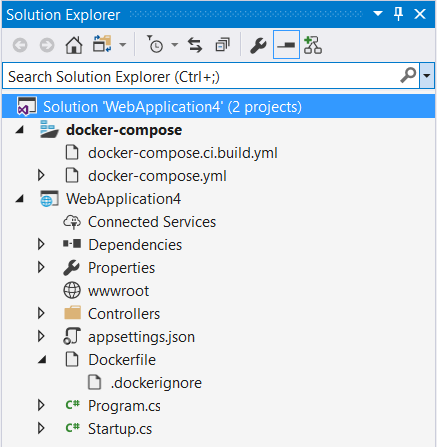
Built-in support for Docker is perhaps more surprising and another one of my favorite features in Visual Studio 2017. (For those not familiar with Docker, see the sidebar.) To create a new project with Docker support, simply create a new .NET Core project (such as a Web API project) and pick the “Enable Docker” option (see Figure 16). This creates a project that contains and maintains all of the required files and build-steps for Docker (Figure 17). You can, of course, tweak them manually if you want.
When you build a project with Docker support, the .NET Core application gets built, and then a new Docker container is created based on the information specified in the compose files. This pulls in all of the files required to run .NET Core. You can then fire up the application as usual. You can hit your app from a Web browser, you can put breakpoints in your code, and so forth. In short, you may not notice much of a difference if you didn't know what's going on behind the scenes.
Frankly, Docker Support is one of the most significant new features in Visual Studio 2017.
That “behind the scenes” part is the interesting bit. What's really happening (depending on how you compose your container of course), is that the .NET Core app is deployed as a Docker container that's based on an Ubuntu Linux build, which executes right on your Windows computer. Yes, you read that right! You're running a Linux container right on Windows, yet it all works as always, down to putting breakpoints into your code and debugging it in Visual Studio. The fact that this works so seamlessly almost takes away from the significance of the setup. To me, Docker Support is one of the most significant new features in Visual Studio 2017!
The beauty of running Docker containers is that the resulting container becomes your “deployment unit.” It's how you can deploy a .NET Core app. Visual Studio, of course, supports publishing that container straight into Azure in a very seamless fashion, but you can also deploy these containers into other Clouds or even to your own servers.
Talking about Azure: Clearly, Microsoft's Azure Cloud is very important to both Microsoft and Developers in general (as is evident based on the success Azure enjoys). With that, it comes as no surprise that Visual Studio 2017 has a large number of improvements and additions specific to Azure. In fact, one of the “workloads” that can be selected in the installer (see Figure 1) is specific to Azure. A detailed discussion of all the new features is beyond the scope of this article.
Mobile
Visual Studio 2017 supports quite the range of Mobile development options. Microsoft is embracing all kinds of non-Microsoft technologies as well as Windows Mobile. This includes native development options for iOS and Android (especially through Xamarin, which is now part of Visual Studio) as well as hybrid solutions, powered by technologies such as Cordova and Ionic.
Xamarin is clearly one of the biggest additions to Visual Studio 2017.
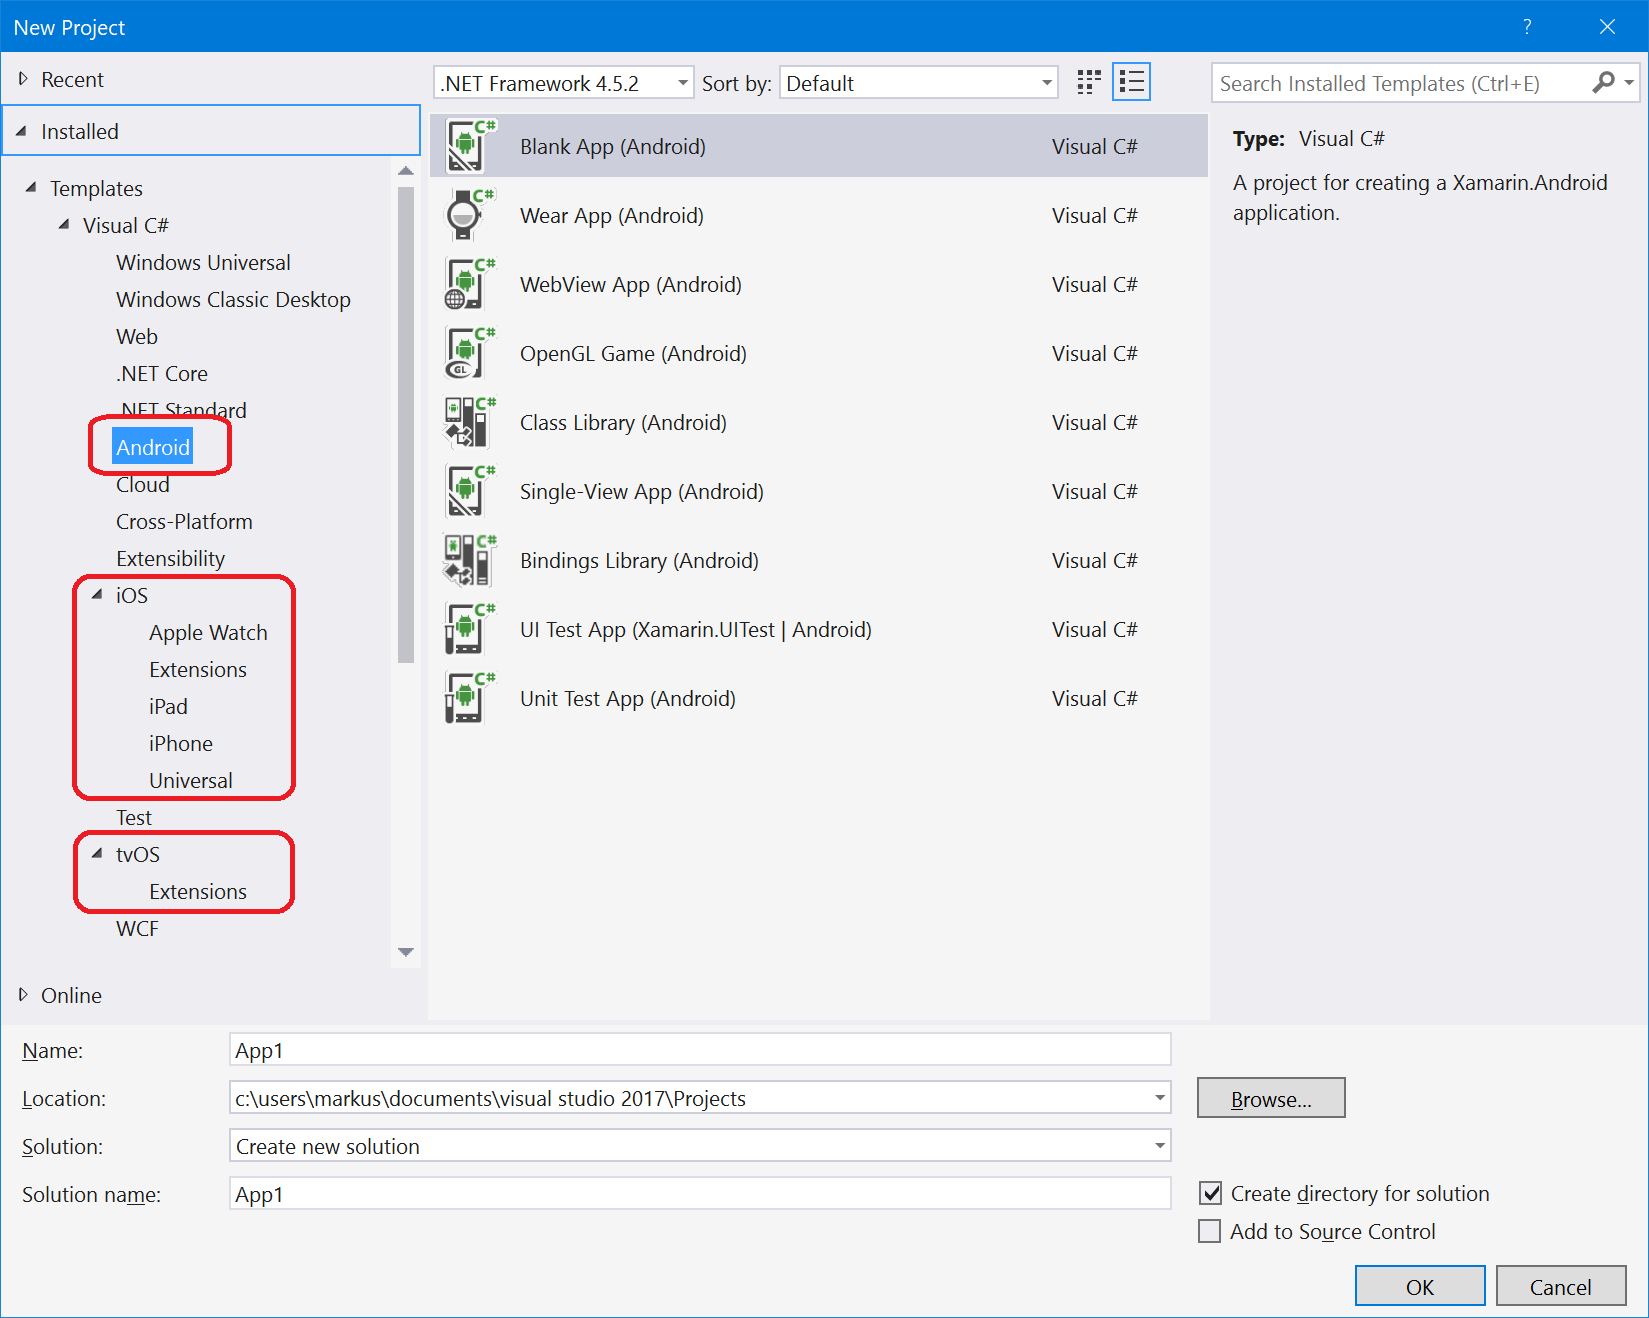
Xamarin is clearly one of the biggest additions to Visual Studio 2017. Since Microsoft acquired Xamarin, they've been busy integrating the Xamarin features right into Visual Studio, and in the 2017 version, this really shows (Figure 19). There are now numerous standard project templates for various mobile flavors (as well as cross-platform options). You may be surprised by the variety. Not only can you create iPhone and Android apps, but there are many variations on the theme, such as Android Wear apps (Android Watches) as well as Apple Watch apps. You can even create applications for Apple's tvOS (Apple TV apps). Figure 18 provides a glimpse of the available options.
One of the most problematic challenges when creating mobile apps is testing. If you were to have one of every model of the more recent generation of iPhones, it would result in considerable expense. Add to that all the different Android devices, and you have an insurmountable problem. However, Xamarin Test Cloud provides a solution. You can test your mobile app in the Cloud on thousands of devices. For serious mobile developers, the value of that service can't be overstated.
I have to keep an eye on the length of this article! A complete discussion of the different Mobile development options now supported by Visual Studio wouldn't just use up this entire magazine, but it would require several books. CODE Magazine has already published a number of articles on these topics, and will continue to do so in the future.
Conclusion
Visual Studio 2017 is a solid update. It improves on just about every existing aspect, and it addresses many new scenarios that are important for today's development landscape. This includes non-Microsoft technologies. It aims to please desktop, Web, mobile, and cloud developers. It has great support for Azure. The addition of the Xamarin technologies open up a whole new world for many developers.
Best of all, there is very little friction when moving to Visual Studio 2017. Most types of projects can be opened in 2017 without eliminating the ability to open them in older versions of Visual Studio. Thus, it's hard to think of a reason to stay with older versions of the tool. I recommend that you install it today!
