


In my previous article in CODE-Magazine, I illustrated how you can write a JavaScript single page application (SPA) using Angular 2 that authenticates with AzureAD and successfully calls the Microsoft Graph. Also, in a previous article, I talked about building cross-platform desktop applications using a platform called Electron.
It's time to mix the two. Since I wrote both articles, Angular 2 has moved forward quite a bit. It has gone from Beta17 to RC4. Electron has also improved quite a bit. So in this article, I'm going to demonstrate how you can write desktop applications that call the Microsoft Graph, and I'll write this desktop application using Electron. Not only will I write this application, I'll also talk about bundling and minifying your code for distribution purposes, and I'll end this article by copying the application to Windows, Mac and Linux computers to prove that this cross-platform app actually works, without rewrite, on all major platforms.
It's incredibly exciting, isn't it? Let me start by puncturing your excitement a bit. There's way too much code in this application for me to write every single line in this article and explain every single line. Sorry! Take heart; all the code is available on github, and I'll be explaining the major portions of the code in this article. There are a few repositories I'd like you to get familiar with.
- https://github.com/maliksahil/Angular2AzureADAuthLib: This repository is a substitution of ADAL.js that I wrote. If you remember, ADAL.js was written by Microsoft, it used AngularJS1, and although it got us started, it had some shortcomings. I can't call my library “ADAL” because I'm not Microsoft and don't wish to pretend to be, but the purpose of my library is quite similar to ADAL. Think of this as the unofficial ADAL, not written or supported by Microsoft.
- https://github.com/maliksahil/Angular2AzureAD: This repository is the code for my last issue's article. However, this code has been significantly updated and refactored since I last wrote it. For one thing, it's been updated to use AngularJS RC4. For another thing, it makes use of some interesting Typescript concepts that allow me to enhance the same application to work within Cordova for mobile apps, or even target on-premises scenarios or generic auth scenarios without rewriting my applications. This is going to be very exciting, stay tuned!
- https://github.com/maliksahil/AngularJS2ElectronOffice365App: This repository is the code for this article. Everything I describe here is in that repository.
Setting Up Code for This Article
Setting up the code for this article is quite simple. You're going to need GIT, though.
First, clone the GIT repository by running the command below in a directory of your choice:
git clone
Next, go into that directory and install all the prerequisites:
npm install && jspm install
The code is already set up. You only need to do two more things:
- Register this app as a native application in your Office365 tenancy. The instructions are exactly the same as in my last issues article. (That's here: http://www.codemag.com/Article/1607031)
- Update the
www\app\app.component.tsline #13 with your tenancy and your application ID. The application ID is GUID.
At this point, you can run npm start and the application should start for development/debugging purposes. And if you wish to ship the application to mac/linux/windows, just run npm run electron:package and it creates executables in a directory called built.
That was easy, wasn't it? It's easy because there's a lot of sweat that went into setting up this project. Next, let's examine how this all works behind the scenes.
Package.json
This new-fangled node package manager-based development is here to stay. Any time I run into such a project, the best place to start understanding it is package.json. There are some interesting things to notice in the package.json file. It references Angular 2 as expected. In fact, this is identical to the quickstart you'll find on angular.io. So there's nothing scary there!
You'll also note that I have an element called jspm. This is https://jspm.org/, or as they call it, Frictionless browser package management. I'm using this for bundling the application, which I'll describe later in the article.
Next up, the most interesting part of package.json: the scripts area. Let's go through the most important and noteworthy scripts one by one.
The first interesting script you'll see is when you're firing up Electron.
"electron": "electron www/index.js --debug"
This script is looking for the index.js file, which is where you provide hints to the Electron app to load up index.html as the main entry point for the application. The reason I named this index.js and not anything else is because it makes my packaging job easier. You can examine the code for index.js in Listing 1. In short, it creates the MainWindow and loads index.html into it. Additionally, it ensures Mac-specific behavior by seeing that the application doesn't exit when you hit the X button. On a Mac, the application doesn't exit, unless you right-click/quit from the dock. This is standard Electron boilerplate code, so again, there's nothing scary here.
Listing 1: The index.js electron loader file
const electron = require('electron')
const app = electron.app
const BrowserWindow = electron.BrowserWindow

let mainWindow;

function createWindow() {
    mainWindow = new BrowserWindow({ width: 800, height: 600 })
    mainWindow.loadURL(`file://${__dirname}/index.html`)
    mainWindow.on('closed', function () {
        mainWindow = null
    })
}

app.on('ready', createWindow)

// Quit when all windows are closed.
app.on('window-all-closed', function () {
    if (process.platform !== 'darwin') {
        app.quit()
    }
})

app.on('activate', function () {
    if (mainWindow === null) {
        createWindow()
    }
})
Bundling
The next interesting script you see in package.json is this one:
"bundle": "jspm bundle-sfx www/app/main www/dist/bundle.js",
This single line of code is amazing! It takes all your node_modules, understanding dependencies, and your custom code, which is spread across many Typescript and Javascript files, and turns them into a single bundle.js file. In fact, it doesn't even have any dependency on systemjs at runtime. It does all this magic using jspm, or JavaScript package manager.
The thing is, when you write Typescript, you're constantly transpiling your Typescript code into JavaScript. But deep inside the tsconfig.json, there's an element at compilerOptions\module that signifies how the modules get loaded. In my project, I've specified that I want modules to be loaded like Node.JS load them. That's all fine and dandy until you're ready to ship the application.
Imagine that you had to load a specific part of Angular 2 at runtime, except in your final built app, you didn't include that file. Your application simply fails. And you can't just take the approach of bundling everything either. The full library, even minified, would be around 1.6MB, which may not be a huge issue for desktop apps, but it's a big problem on mobile apps being downloaded on 3G cellular connections, or trying to fit within a phone's memory. Rightfully so, Angular 2 is also modular. But being modular is an enemy of runtime execution, where it may not have the opportunity to “request on demand”. A good example includes pre-packaged apps, such as Cordova or Electron. You need to fit everything you'll ever need into a bundle. Therefore we need bundling.
Bundling is essential, but there are many ways to bundle. Because you're using systemjs as the module loader, the logical choice for bundling is jspm, which very easily leverages the same systemjs.config.js that your app uses at debug time to create a runtime version of the JavaScript file that doesn't even rely on systemjs.
All of this magic doesn't come for free. You need to provide enough information to jspm so it can do its job. The first bit is all the dependencies and configuration jspm needs. These are defined in package.json; the relevant snippet can be seen in Listing 2.
Listing 2: jspm configuration
"jspm": {
    "configFile": "jspm.config.js",
    "dependencies": {
        "angular/angular": "github:angular/angular@^2.0.0-rc.4",
        "angular2-in-memory-web-api": "npm:angular2-in-memory-web-api@0.0.4",
        "es6-shim": "npm:es6-shim@0.35.0",
        "reflect-metadata": "npm:reflect-metadata@0.1.3",
        "rxjs": "npm:rxjs@5.0.0-beta.6",
        "systemjs": "npm:systemjs@^0.19.29",
        "zone.js": "npm:zone.js@0.6.12"
    },
    "devDependencies": {},
    "overrides": {
        "npm:reflect-metadata@0.1.3": {
            "map": {},
            "jspmNodeConversion": true
        }
    }
}
This means that when you run jspm install, jspm knows where to get its dependencies from, and stores them in a folder called jspm_packages. It references another file called jspm.config.js. This file is extremely similar to systemjs.config.js; both configure the System.config object. In fact, in many circumstances, it's possible to reuse them. This informs both your index.html during runtime in dev mode, and jspm during bundling time, where to get all the dependencies.
As the original script for bundling in package.json indicates, the output of all this churning is a single file, which will be dropped into a file called www/dist/bundle.js.
Index.html
You have a full bundle.js for your entire application. As long as you don't minify and mangle it, you can even do Typescript debugging using it. In dev mode, I like to skip bundling. It simply takes too long not to be annoying. Of course, everything still works with just Typescript transpiling files on the fly.
Because you're bundling in this project, let's next examine how the index.html references it. You can see index.html in Listing 3.
Listing 3: Index.html
<html>

<head>
    <title>Angular2 Electron AzureAD Office365</title>
    <meta charset="UTF-8">
    <meta name="viewport" content="width=device-width, initial-scale=1">
    <link rel="stylesheet" href="styles.css">
    <script src="dist/lib/zone.js/dist/zone.min.js"></script>
    <script src="dist/lib/reflect-metadata/Reflect.js"></script>
    <script>
        window.electron = require('electron');
    </script>
    <script src="dist/bundle.js"></script>
    <base href=".">
</head>

<body>
    <app>Loading...</app>
</body>

</html>
The index.html references the bundle.js file. Okay, it also references a couple of other libraries that I didn't include in the bundle. But there are three other interesting artifacts in my index.html.
The first is the following line of code:
window.electron = require('electron');
Because I'm using systemjs for my module loading, and because electron likes requirejs, I've created a global “electron” variable that makes it easy for me to get hold of the Electron object anywhere in my application within Typescript without having a Typescript dependency on requirejs. There are, of course, alternate ways of solving this problem, but this is by far the most convenient. And I do need a reference to the Electron object, globally, within my application.
The second interesting artifact is the following snippet:
<base href=".">
This is an Angular 2 requirement. My application uses routing, and I need to specify this line for my routing to work.
And finally, the third interesting artifact, is bootstrapping my app, as shown in the next snippet:
<app>Loading...</app>
At this point, I can start talking about the actual application. I still haven't talked about the packaging of the application, but I'll get to that at the end of the article.
The Application
As is evident from the bundling portion, the starting point of my app is going to be a file called app\main.ts. This file can be seen in Listing 4.
Listing 4: The main.ts file, bootstrapping our app
import { bind } from '@angular/core';
import { provideRouter, RouterConfig } from '@angular/router';
import {bootstrap} from '@angular/platform-browser-dynamic';

import {AppComponent} from './app.component'
import {FilesComponent} from './files.component';
import {HomeComponent} from './home.component';

export const CustomAppRoutes: RouterConfig = [
    { path: '', terminal: true, component: HomeComponent},
    { path: 'files', terminal: true, component: FilesComponent}
];

bootstrap(AppComponent, [provideRouter(CustomAppRoutes)]);
Listing 4 is the bootstrap code for the application. It bootstraps the routes and the main entry point. There are three main components involved: the AppComponent where you set up the providers for authentication, the HomeComponent that illustrates the usage of those providers to show signed in/signed out status, and the FilesComponent that uses those providers to make an authenticated call to Microsoft Graph. Let's examine each one of these one by one.
The AppComponent
The AppComponent leverages the https://github.com/maliksahil/Angular2AzureADAuthLib project for authentication. The details are identical to my last issue's article. In short, it provides an instance of the Authenticator service. This instance is injected into the AppComponent and is therefore automatically made available to all child components, such as HomeComponent or FilesComponent. Once you've provided an instance of this provider, its usage becomes extremely simple, as can be seen from Listing 5.
Listing 5: The app.component.ts file
@Component({
    selector: 'app',
    templateUrl: './app/app.component.html',
    directives: [ROUTER_DIRECTIVES],
    precompile:[FilesComponent],
    providers: [Http, HTTP_PROVIDERS, AuthenticatedHttpService,
        provide(Authenticator,
        { useFactory: authenticatorFactory })],
})

export class AppComponent {
    private isUserAuthenticated: boolean = false;

    constructor(
        private _authenticator: Authenticator,
        private _authenticatedHttpService: AuthenticatedHttpService)
    {
        this.isUserAuthenticated = _authenticator.isUserAuthenticated();
    }

    logIn() {
        this._authenticator.logIn(window.location.href);
    }

    logOut() {
        this._authenticator.logOut("/");
    }

    get userName() {
        return this._authenticator.userName;
    }
}
The HTML template for AppComponent can be seen in Listing 6.
Listing 6: The app.component.html file
<h1>Sample app</h1>
<br/> This is a very simple app that authenticates,
    and lets you run a command...
<div *ngIf="!isUserAuthenticated">
    User is not authenticated
    <button (click)="logIn()">Sign In</button>
</div>
<div *ngIf="isUserAuthenticated">
    User is authenticated
    <br/> Username: {{userName}} <br/>
    <button (click)="logOut()">Sign Out</button>
    <nav>
        <a [routerLink]="['']">Home</a> |
        <a [routerLink]="['/files']">Files</a>
    </nav>
</div>
<router-outlet></router-outlet>
As can be seen from Listing 5 and Listing 6, you're changing the UI depending upon the user's signed-in status. The user's signed-in status can be checked easily from the authenticator service instance. So if the user is signed in, you show the user a logout button and route links to navigate to the functionality of the application. If the user isn't signed in, you show the user a sign in button.
I encourage you to check out the authentication library and how the authenticator instance is provided from the associated code for this article.
The HomeComponent
Now that the user is signed in, you can check the status of the user's signed-in status by accessing the same service instance that was passed into AppComponent. This can be seen in Listing 7.
Listing 7: The home.component.ts file
export class HomeComponent {
    private isUserAuthenticated: boolean = false;
    constructor(
        private _authenticator:Authenticator,
        private _http:AuthenticatedHttpService) {
        this.isUserAuthenticated = _authenticator.isUserAuthenticated();
        }
}
Although you could write more complex logic based on this, I've simply used the user's signed-in status to show an appropriately helpful message to the user. This can be seen in the home.component.html file, as shown here:
<div *ngIf="!isUserAuthenticated">
    Click login to continue.
</div>
<div *ngIf="isUserAuthenticated">
    Choose from the menu above.
</div>
The FilesComponent
The files component is where you write the actual logic of the application, which is to query your OneDrive for the files you have in there. In the AppComponent component, I passed in two custom providers. One was the authenticator service, which allows you to do login, logout, get username, get current signed in status, etc. A second service, the AuthenticatedHttpService, allows you to make authenticated HTTP calls to the backend. The idea is that this AuthenticatedHttpService is exactly like the out-of-the-box HttpService, but it automatically sticks the access token for authorization purposes onto any request. Additionally, it takes care of renewing the token, or it routes you to the login page if the user isn't signed in. The FilesComponent can be seen in Listing 8.
Listing 8: The files.component.ts file
export class FilesComponent {
    private files = [];
    constructor(private _authenticator:Authenticator,
    private _http:AuthenticatedHttpService) {
    }

    getFiles() {
        this._http.get("https://graph.microsoft.com/v1.0/me/drive/recent";)
        .then((files:any) => {
            this.files = files.value;
        })
    }
}
The template for the files.component.ts file can be seen here:
<button (click)="getFiles()">Get Files</button>
<ul>
    <li *ngFor="let file of files">
        <span>Name: {{file.remoteItem.name}}</span>
        <span>Size: {{file.size}}</span>
    </li>
</ul>
As can be seen, you have a button that calls the getFiles function, and once the data is hydrated, you simply databind it to the UI.
The application is intentionally extremely simple. You could take it further very easily and build a very rich Angular 2-based application that offers functionality from Office365 or more. With these basics behind us, let's focus on running and packaging the application.
Running the Application
Running the application is a matter of going to terminal and typing npm start. The script for npm start can be seen here:
"start":
    "tsc &&
    npm run bundle &&
    npm run electron"
In short, it first runs tsc to compile your typescript code, it then bundles it, and if those two operations succeed, it runs Electron. Running Electron fires up the Electron executable while pointing it to the www\index.js file. This code is optimized for release. For iterative development, I like to change the above bit of code to typescript watch mode, and skip the bundling.
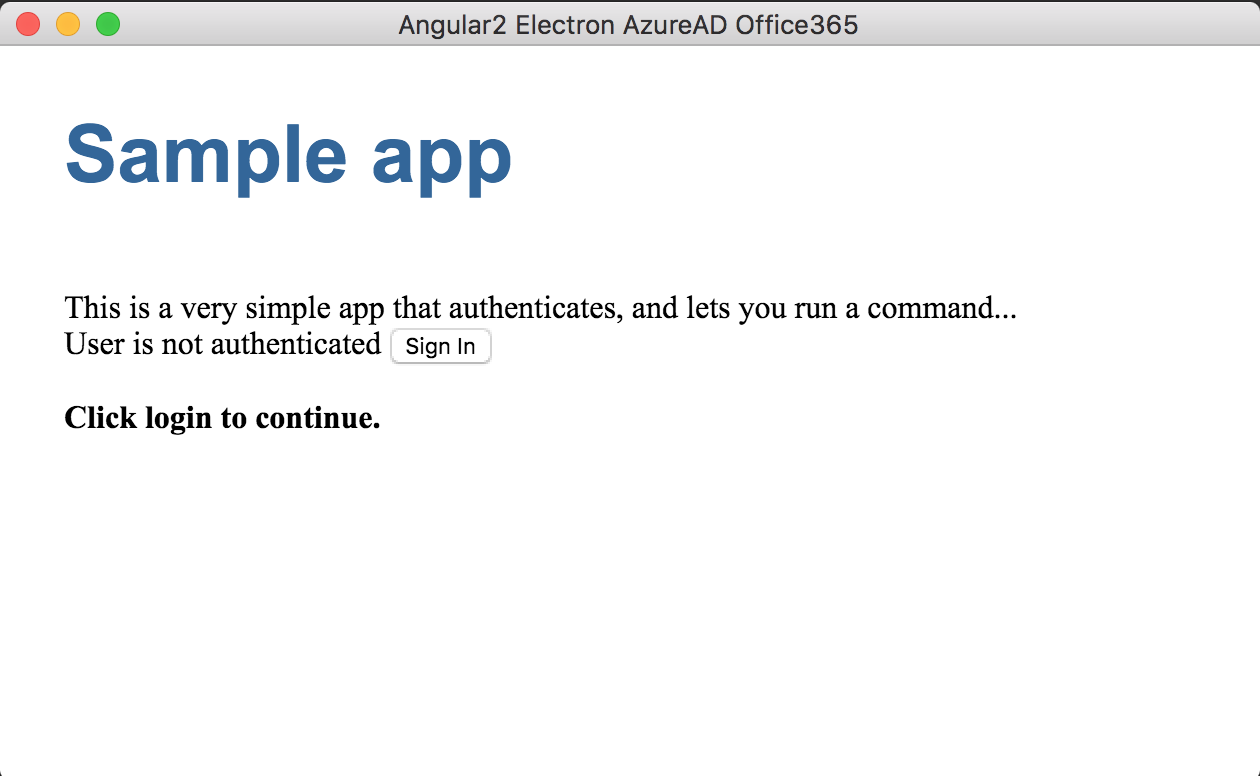
Running this should fire up the application, as shown in Figure 1.
Go ahead and click on the Sign in button. This should pop up the AzureAD sign-in dialog, as can be seen in Figure 2.
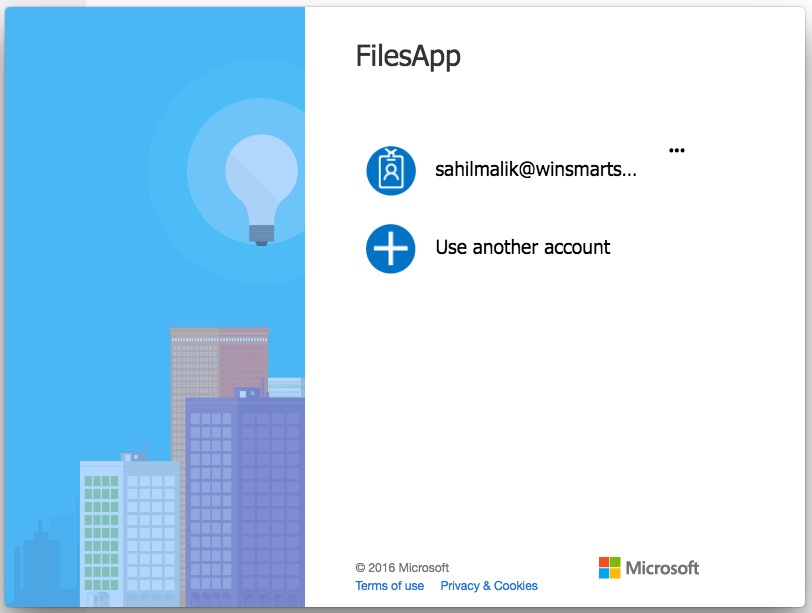
It's worth noting that in the authenticator library, I have explicitly asked Electron to disable node integration for this popup window. This popup window likes to load libraries from HTTPS URLs hosted by Microsoft, and for security reasons, they really dislike local applications to have access to those libraries, or worse, the ability to tamper with those libraries. If I hadn't disabled node integration for this popup window, the authentication wouldn't work. I'm free to use node integration for the rest of my application once the authentication is done!
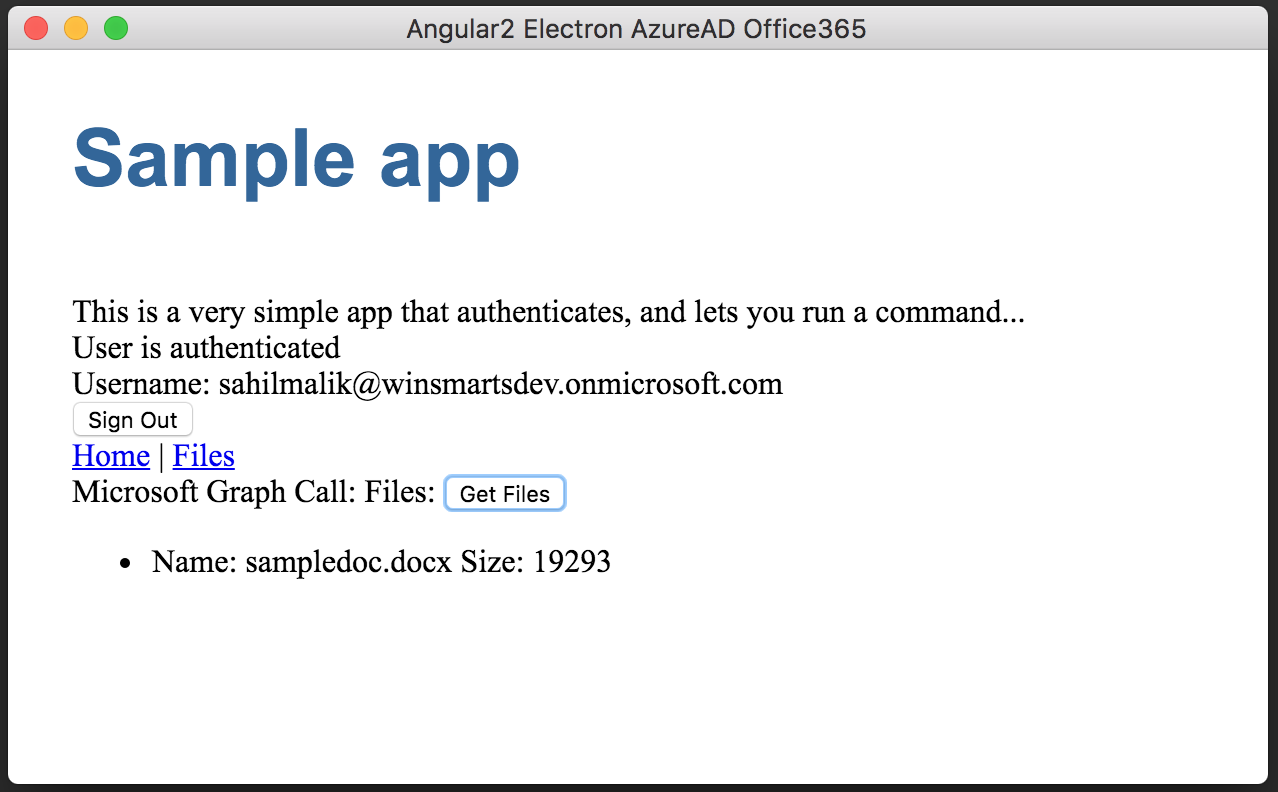
And, once you're signed in, you can see the application running in its full glory, as shown in Figure 3.
Packaging the Application
You've just written a very compelling application, a desktop application that can talk to Office365. You ran it using npm start and Visual Studio code. That's hardly how you'd like your end user's experience to be. Ideally, your app should be downloaded from the Internet, or better, from app stores. Maybe users could pay you for it, or at the very least, be able to distribute it as an exe that they could just double-click and run.
There are two distinct concepts to learn here:
- Packaging: The process of turning your code into an executable for three platforms: Mac, Linux, and Windows.
- Signing and releasing: The process of signing your app and putting it on an app store. Signing and releasing isn't discussed in this article, but it's certainly possible with Electron apps.
To understand packaging, I'd like to draw your attention to package.json again. Specifically, in the scripts section, examine the portion shown in Listing 9.
Listing 9: Electron packaging
"electron:package":
    "npm run electron:pack-mac &&
    npm run electron:pack-win &&
    npm run electron:pack-linux",
"electron:pack-mac":
    "electron-packager www --asar --overwrite
    --platform=darwin --arch=x64 --out=built",
"electron:pack-win":
    "electron-packager www --asar --overwrite
    --platform=win32 --arch=ia32 --out=built",
"electron:pack-linux":
    "electron-packager www --asar --overwrite
    --platform=linux --arch=x64 --out=built"
These commands allow you to package your application as executables for three platforms. You can pass in a number of other parameters that also allow you to brand and sign your executables. In order to create the executables, run the following command in terminal:
npm run electron:package
Running this command creates executables in the built folder, as shown in Figure 4.

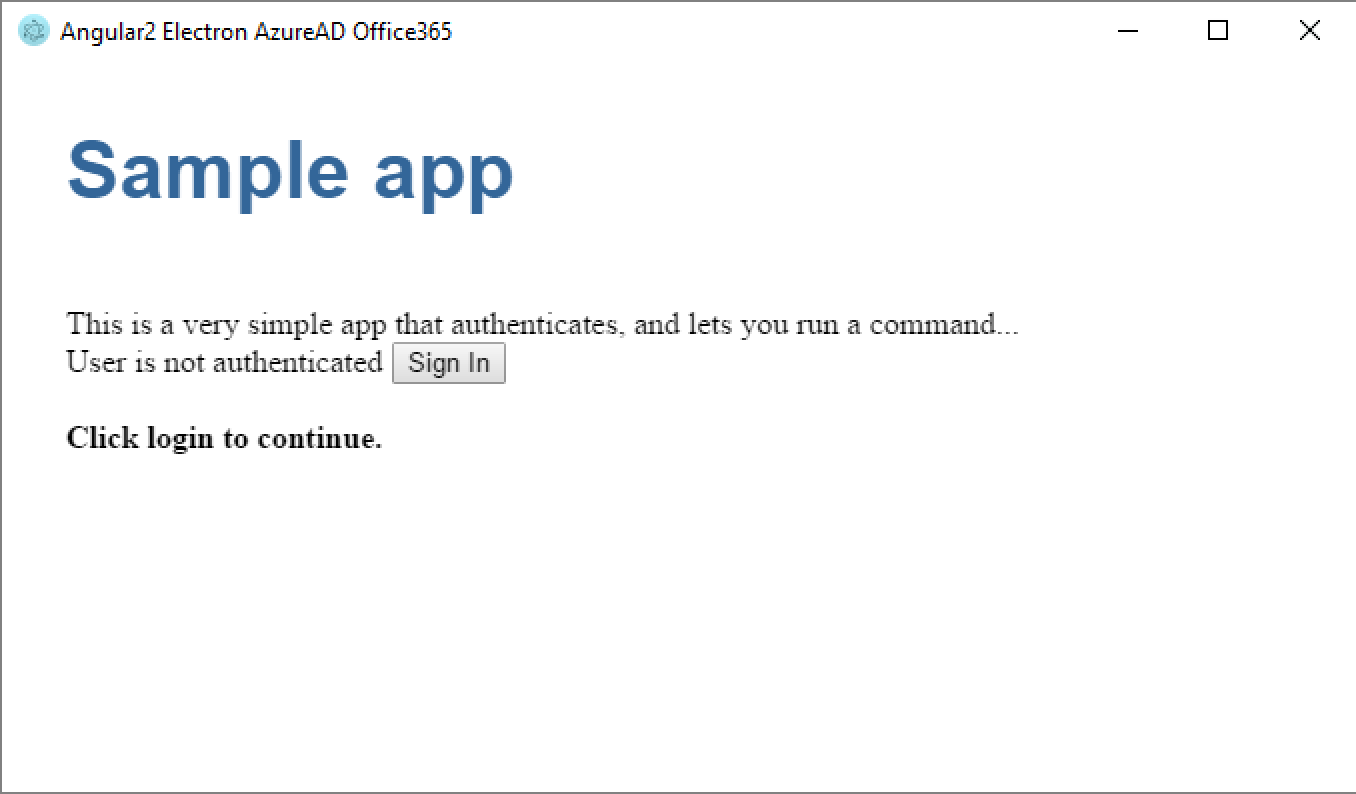
You can simply xcopy these, and then double-click on the executable and run them. For instance, Figure 5 shows the executable running on a Windows computer. Yes, that's right, the same code, without any rewrite, is running and fully functional, on a Windows computer, a Mac computer, and a Linux computer. You could take it to the next step and sign these executables and submit them to appstores, but I'll leave that for another day.
Before I end, try resizing the application a bit. You'll see that it's still HTML and flows like HTML. This means that you can use concepts such as bootstrap to create a responsive UX. The application can morph itself very easily, whether it's running in the menu bar (Mac), or notification tray (Windows), or as a full screen window. Or, how about this: as a Cordova app running on your iPhone or Android device, without any rewrite! I don't mean to be snarky, but try doing that in WPF!
For Cordova, there must be some rewrite; after all, Cordova authentication to Azure AD uses a plugin. All of that can be abstracted away with some good Typescript code. There will be more on that in a future article, so stay tuned!
Summary
Times have changed. We no longer live in a Microsoft Windows-only world. Cloud, App stores, and cross-platform are important considerations in the applications that we write today. Open Web technologies with the impetus of countless developers, open source, and large corporations are here to stay. What's more, it's incredibly productive to target these technologies with better tools, such as VSCode, TypeScript, SASS, Angular 2, etc. Sure, there's a learning curve, but when has our line of work not presented a learning curve? I'm just glad that the curve, or, let's say the path forward, is so clear.
In this article, I took that path and demonstrated how you can write a cross-platform desktop application for Mac, Windows, and Linux that targets Office 365 via Azure AD authentication, all using Angular 2 and Typescript. There's so much else I want to talk about, I can barely hold back my excitement. In my future articles, I'll continue this theme, write a few more interesting applications, and keep open sourcing that code. You can keep following my progress on github.com/maliksahil.
