


NodeJS is a powerful framework for building IOcentric applications with JavaScript. Although it hasn't yet reached a major version number (as of this writing, the latest build is 0.10.28), the level of developer, community, and industry support for NodeJS is nothing short of astounding. From Walmart to LinkedIn, NodeJS is powering more and more of the experiences with which you interact every day.
NodeJS is a powerful framework for building IO-centric applications with JavaScript.
Although there are many options for hosting NodeJS applications, Microsoft has been an early supporter of NodeJS from the beginning by making direct investments in the framework and demonstrating a commitment to making NodeJS a first class citizen on Windows, both on-premises and on Microsoft Azure.
In this article, I'm going to provide a lap around NodeJS and Microsoft Azure Websites by showing you a simple but functional API that I recently developed from the ground up. I'll start by discussing the design of the API, go on to reviewing implementation details, and then proceed to pushing the API live on Microsoft Azure Websites.
Learning New Technology as the Mother of Invention
When I started thinking about a good problem domain to justify learning NodeJS, I wanted to focus on something that wasn't so simple that it didn't matter or something so cliche, like a chat app, that has been done over and over again in talks, articles, blogs, etc. Now, the fact that a chat app has kind of become the canonical “Hello World” for NodeJS speaks volumes about the productivity that NodeJS provides, but I wanted to feel like I was building something simple enough that I didn't spend all of my time overthinking the problem, but interesting enough that it would provide some value and serve as a foundation for iteratively honing my skills.
I toyed with a few ideas and cut my teeth playing with the Socket.IO and WebSocket.IO modules (because I am, and always will be, a messaging wonk) learned how to use NodeJS to connect to the Twitter streaming API (which made for some cool analytics and media streaming demos) and after a few weeks, I was pretty comfortable within the NodeJS ecosystem and felt like I was becoming somewhat productive.
It was about this time that I was working on pushing out some content at work and when I went to grab the URL for the content to paste into my internal feed it hit me: I knew exactly what I wanted to use NodeJS to build!
The Problem with Long URLs
How many times have you come across a URL in a document, email, or text message that looks something like this?
http://mysadsite/not/rest/ful/Foo.aspx?RootFolder=%2Fpractice%2FConnected%5FSystems%2FDocuments%2F5%2E%20Training%20Resources&FolderCTID=0x0120006C1E110A70E85644A26E2C21A71B0D82&View={8F82FE4D-9398-4892-B6E6-C2D9C2AB2BE8}
From a usability perspective, this is a terrible user experience at best, but worse, it's a missed opportunity.
Think about how much we all interact with URLs. If I had to guess, I'd say I easily touch 100+ URLs a day. Whether I'm clicking a message in my Twitter feed, or opening a link received via email, or doing research on the Web, URLs are a highly immersive and ambient part of our lives (this is one of the big reasons that the REST architectural style and hypermedia APIs have gotten so much traction over the last few years; URLs are everywhere and a fundamental part of everyday life).
It seems shameful, then, that we would pollute our friend's inboxes, feeds, etc. with long and ugly URLs like the one in the last example, when we can instead provide small, beautiful and elegant URLs like this instead:
http://neurl.it/pewUGm
Thus was the birth of Neurl: a simple, yet highly extensible API built on NodeJS.
But wait! This is nothing new. Dozens-if not hundreds-of URL-shortening services exist with the most common ones including bit.ly, tinyurl, ow.ly, etc. The idea is simple: Take a long, (sometimes ugly) URL, submit it to an API (either directly or via a Web form), and get back a shorter URL that's prettier, simpler, and easier to remember.
As they say, imitation is the greatest form of flattery, so let's take a look at some key features that my little Neurl API supports and how you might implement them with NodeJS.
Designing a URL-Shortening API
Fundamentally, speaking, all of the URL shortening services I mentioned previously support (at least) three core features.
- Create
- Submit
- Hits
Let's take a look at them.
Create
When I submit a long URL to the Create API, I should get back a shortened URL. This feature could be implemented in any Web programming framework on any Web stack. Regardless of your preference, you need to take the long URL and create a resource that can be accessed as a key-value pair with a unique key pointing to the original URL:
Key: A unique string
Value: The original long, ugly URL.
The Key needs to be unique and some kind of backing store is required to store the resource for later look up using the Key. Because these are URLs you're dealing with, clearly HTTP is the right application protocol, and the Create API is therefore modeled off the HTTP request that resembles something very similar to this response:
POST http://neurl.it/create HTTP/1.1
User-Agent: Fiddler
Host: neurl.it
Content-Type: application/json; charset=utf-8
Content-Length: 36
{"Url" : "http://rickgaribay.net"}
As you can see, a request using the POST HTTP verb is issued because the goal is to create a new resource and a “/create” path is appended to the request URI.
The modular architecture of NodeJS enables the ability to easily write tests that exercise your code in an incremental manner. Listing 1 provides a test suite with three tests that assert three assumptions that I wrote to guide the implementation of the Create feature.
Listing 1: Create API Tests
var assert = require("assert");
var should = require("should");
var app = require("../lib/create");


describe('Creating a new neurl', function () {

    it('should require an initial URL', function (done) {

        app.getNeurl(null, function (error, result) {
            should.exist(error);
            done();

        })
    });

    it('should return a neurl', function (done) {

        app.getNeurl("http://rickgaribay.net", function(error, result) {
            should.exist(result);
            done();
        })
    });

    it('should not return an error', function (done) {

        app.getNeurl("http://rickgaribay.net", function(error, result) {
            assert.equal(null, error);
            should.not.exist(error);
            done();
        })
    });

});
In NodeJS, you create, expose and consume libraries known as modules. There are thousands of NodeJS modules available completely free within the very vibrant NodeJS community ecosystem. (See the sidebar for a listing of modules used in this article along with a link to the Node Package Manager that provides a vast repository of modules available for free.)
The first test ensures that that the consumer of the “Create” module always provides a URL as a parameter. The second test verifies that the Create module returns a new and shortened version of the URL, and if everything is working as expected, the third test verifies that no errors are returned by the module under test.
These tests are written in a specification style enabled by a popular library called “jasmine-node,” which makes them easy to write and read. In addition, the tests make use of two modules, Should and Assert. The latter ships as a part of the NodeJS distribution and the former is available via NPM or GitHub. To install Should or any other NodeJS module, open a shell prompt (such as Windows Command Prompt or Bash in OS X, Linux, etc.) and type:
npm i should
This downloads and installs the Should module and places it in the modules directory of your application (to install it globally, add the g parameter and it will be installed in the global NodeJS directory and become available to all projects).
In addition, the tests depend on a module called Create. I'll review the implementation of this module along with the modules I wrote to support the other two APIs in the sections that follow.
There are a number of test runners available for executing and reporting test results, and my current favorite is called Mocha. Mocha allows me to run a test suite individually or all tests in a folder. I'll take a closer look at Mocha as I progress into implementation.
Submit
When I submit the shortened URL to the submit API, my request should be automatically redirected to the resource referenced by the initial URL. As the name suggests, the Submit API allows you to take a new shortened URL, submit it to the API via HTTP GET, and get redirected to the original URL.
This feature represents the core functionality of the API and the HTTP request that you're after, which is depicted here:
GET http://neurl.it/pewUGm HTTP/1.1
User-Agent: Fiddler
Host: neurl.it
Content-Type: application/json; charset=utf-8
Content-Length: 0
There's no expectation that a payload will be returned from the API itself but instead, expect to be redirected to the actual resource that must be retrieved from the repository by querying for the key provided in the GET request (i.e., pewUGm) and redirecting the user/agent to the value stored in the resource repository.
Listing 2 shows the tests for validating this design. After specifying that an error should not be returned from the yet-to-be-implemented require module, the second test verifies that the submit module's redirect function returned the original URL. As with the Create API, I'll use these tests to review the implementation shortly.
Listing 2: Submit API Tests
var assert = require("assert");
var should = require("should");
var app = require("../lib/redirect");

var neurlPrefix = "http://neurl.it/"

describe("Submitting a neurl", function () {
    it("should require a properly formatted URL", function () {
        app.redirect("I14MiU", function (error, result) {
            should.not.exist(error);
        });
    });

    it("should return a redirect URL as originally provided", function () {
        app.redirect("I14MiU", function (error, result) {
            var neurl = result;
            should.exist(neurl.url);
        });

    })

});
Before I move on to the Hits API, it's interesting to note that the Neurl (the shortened URL) returned by the Create API is actually a virtual endpoint to the original resource. This is fundamental to all URL shortening services and opens up lots of options, just as moving from a point-to-point messaging pattern to a brokered or virtual messaging pattern does for any service or API. I'll explore what opportunities this extensibility introduces near the end of this article.
Hits
When I submit the shortened URL to the hits API, I should get back the number of hits/redirects for that shortened URL. Aside from a better user experience, another main benefit of virtualizing the actual resource URL (among many other possibilities) is the ability to track how many times the Neurl (virtual, shortened URL) has been clicked/consumed. As I mentioned before, this capability is born of the extensibility that endpoint virtualization provides.
As you can see, the HTTP request for this API is similar to the Submit API in that you issue a GET request on the shortened URL and add a /hits path to the end of it:
GET http://neurl.it/pewUGm/hits HTTP/1.1
User-Agent: Fiddler
Host: neurl.it
Content-Type: application/json; charset=utf-8
Content-Length: 0
The tests for fulfilling this API are shown in Listing 3. As with the previous test suites, I ensure that a shortened URL was provided and verify that a value is returned. In this test, you'll notice that a module called model is required and that a function called submitNeurl is called right before the call to the getHits function. The former call is simply to ensure that the hit count for the shortened URL is greater than zero.
Listing 3: Hits API Tests
var assert = require("assert");
var should = require("should");
var create = require("../lib/create");
var app = require("../lib/hits");
var model = require("../model/model")

describe('Requesting the hits for a neurl', function () {

    it('should require an initial URL', function () {

        create.getNeurl(null, function (error, result) {
            should.exist(error);
        })
    });

    it('should return the total hits', function (done) {

        // Make sure a neurl exists
        model.submitNeurl("xyz123",function(error,result){

        });

        app.getHits("xyz123", function (error, result) {
            should.exist(result);
            done();

        })
    });

    it('should not return an error', function (done) {

        app.getHits("xyz123", function (error, result) {
            assert.equal(null, error);
            should.not.exist(error);
            done();
        })
    });

});
With the specifications in place for the three core APIs, let's move on to implementation, but before you do that, let's briefly consider why you would use NodeJS to implement this API.
Why NodeJS?
NodeJS is not all unicorns and rainbows. As the internets will tell you, there are entirely bad uses of NodeJS and it's easy to get yourself into trouble quickly. Like any tool, learn its uses and limitations and optimize its usage accordingly.
However, there are many types of applications and scenarios for which NodeJS is excellently suited, particularly when they involve IO-intensive operations that are relatively short-lived, as with the Neurl API.
NodeJS is not all unicorns and rainbows
Built on Google's V8 engine, which is the same core that makes JavaScript run smoking fast in Google Chrome, NodeJS provides an alternative to traditional server-side/back-end programming by enabling developers to use the same JavaScript programming skills that they apply in the UI. This is appealing to a very broad base of developers, especially since JavaScript's popularity almost guarantees that if you write code for a living as a Web developer, it's highly unlikely that you're not already using JavaScript in one form or another.
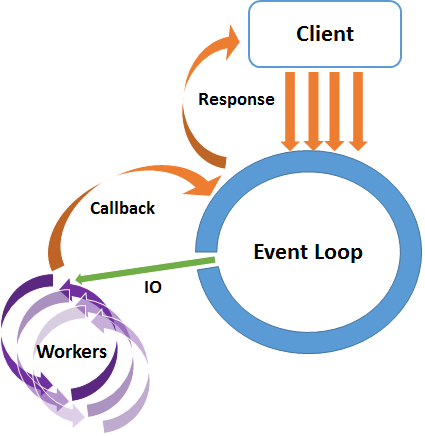
Another reason NodeJS has become very popular is due to its asynchronous programming model. As shown in Figure 1, NodeJS uses a single thread to handle incoming requests and hands the work off to be executed asynchronously. Although it's possible to write synchronous code in NodeJS, the convention is to leverage the strength of the framework by taking advantage of anonymous functions and callbacks to ensure that the event loop never blocks.
Taken together, the ubiquity of JavaScript coupled with the NodeJS bias for asynchrony without the tedium of thread management makes it a compelling tool for building back-end applications, be they Web apps, APIs, services, etc.
The ubiquity of JavaScript coupled with the NodeJS bias for asynchrony without the tedium of thread management makes it a compelling tool for building back-end applications.
All of this said, my main motivation for using NodeJS here was as an excuse to use it to build something marginally useful. As a result, there's nothing that I'll show you in this article that could not be easily implemented in other languages, like PHP, Python, C#, Java and/or frameworks like ASP.NET (the .NET Framework has come a long way in making asynchronous programming much easier via aysnc and await “sugar,” and I encourage you to experiment with other languages and frameworks to determine which is right for you).
Implementing the API
Because NodeJS applications are written in JavaScript, all you really need to write NodeJS apps is a text editor, the NodeJS runtime, and an internet connection to download modules using NPM, the Node Package Manager.
My favorite NodeJS IDE is WebStorm by JetBrains because this is the IDE that I used when I first started learning NodeJS. I was especially drawn to its small learning curve, lack of ceremony and critical NodeJS/JavaScript debugging capabilities. There are several alternatives, ranging from simple editors like Notepad, VIM and SublimeText, to sophisticated IDEs like WebMatrix and Cloud 9 IDE. Microsoft also has a beta of the “NodeJS Tools for Visual Studio” aimed at making NodeJS a great programming experience in Visual Studio.
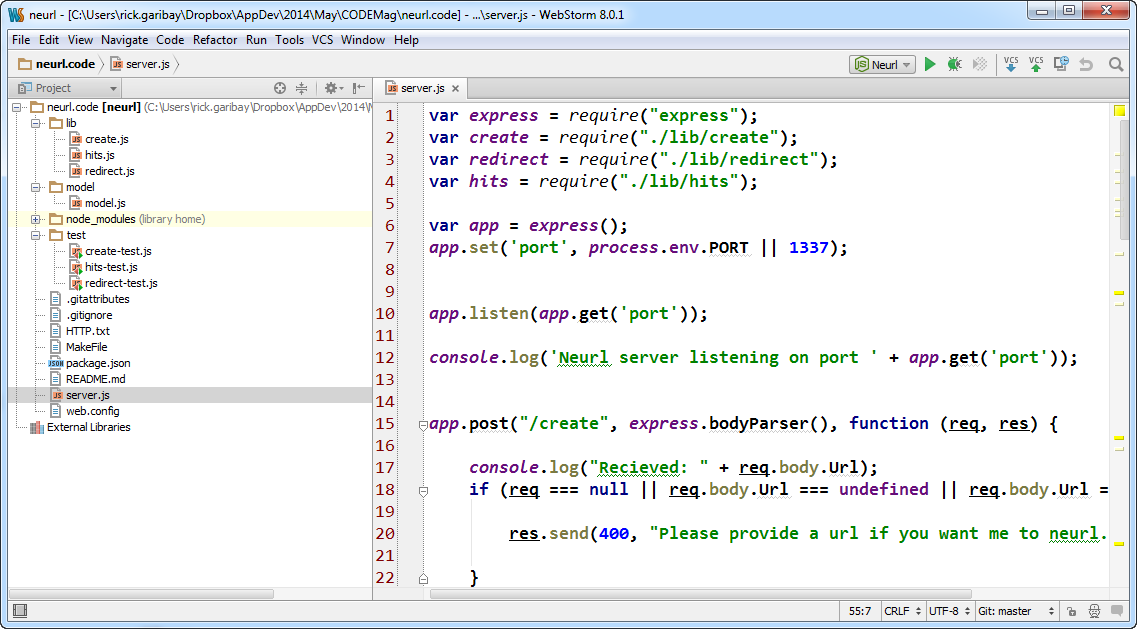
Whatever IDE you choose, as with the Neurl application (available as a download and on GitHub) a typical NodeJS application consists of a simple folder hierarchy that resembles the following:
/Application Root
        /lib
        /model
        /node_modules
        /test
Custom modules (which I'll cover as I review the implementation of the Neurl API) are typically placed in the lib or library directory with the exception of database access code, which is commonly placed in the model folder.
Modules that you download using NPM are placed in the node_modules folder unless you use the global switch, in which case, the modules are installed in the NodeJS directory you selected when you installed NodeJS (that is, Program Files in Windows).
Last but not least, unit/integration tests go in the test folder, although the name of the folder may vary depending on what test runner you use. For example, Mocha looks for a folder called test if you run it from the command line with no parameters and run each test.js file it finds. Otherwise, you must specifically tell Mocha which test file to run.
You can see the file structure for Neurl in WebStorm in Figure 2.
Although the tests I reviewed earlier are not exhaustive, they provide an adequate number of assumptions that can be asserted until the assumptions are proven correct.
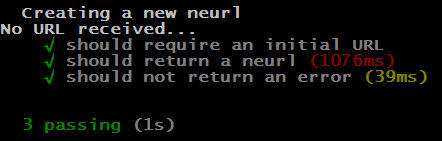
To run the tests for the Create API in Listing 1, you can run the following command using Mocha from within the test folder to determine the result of the create tests:
mocha create-test.js
Figure 3 shows the output of running the command above with all tests passing (the numbers in parenthesis report test execution latency).
Listing 4 provides the implementation of the Create API. As you can see, the getNeurl function validates that a URL was passed in and then calls the getNeurlSuffix (of course these functions are specific to my API, which is a play on words, but you can refactor them to whatever you like). From there, the create method of the model module, shown in Listing 5, is called.
Listing 4: Create API Implementation
var neurlPrefix = "http:localhost/"
var model = require("../model/model");

exports.getNeurl = function (url, callback) {

    if (url == null) {
        console.log("No URL received...")
        callback(new Error("URL is required."));
    }
    else {
        var neurlSuffix = genNeurlSuffix();
        var neurl = {url: url, neurl: neurlSuffix};
        model.create(neurl, function (error, result) {

            if (error == null) {
                callback(null, neurlPrefix + result.neurl);
            }
            else {
                callback(error, null);
            }

        });

    }

    // Credit: Chris Myers, Neudesic
    function genNeurlSuffix() {
        var characterStr = "[mask]"; // len = 24 + 24 + 10 = 58
        var characters = characterStr.split('');
        var uuid = "";
        for (var i = 0; i < 6; i++) {
            var rand = Math.round(Math.random() * 58);
            uuid = uuid + characters[rand];
        }

        return uuid;
    }


}
Let's take a look at each significant line of code in the Create.js module in closer detail.
The first line of code assigns a variable to the URL prefix that will be used in this version of the API:
var neurlPrefix = "http://localhost/"
This neurlPrefix is concatenated with the unique key that will be created and stored in the database with the original URL.
Next, you use the require keyword to reference the model.js file that's the implementation of the data access module for talking to MongoDb:
var model = require("../model/model");
Details about MongoDb and the Model module are beyond the scope of this article, however the full implementation of the model is shown in Listing 5 and is available in the model.js file that ships with this article (and also on GitHub).
The work happens in the getNeurl function. which has a special exports keyword attached to it. This makes the function visible outside of the create.js file:
exports.getNeurl = function (url, callback) {
Notice that the signature of the getNeurl function takes the original URL passed in along with a reference to the anonymous function passed in as a parameter of the it function of the test in Listing 1.
Within the getNeurl function implementation, a variable is assigned to the result of genNeurlSuffix function, which returns a unique six-digit alpha numeric string:
var neurlSuffix = genNeurlSuffix();
An object literal called neurl is then created with a key value pair for holding the original URL and one for holding the generated suffix:
var neurl = {url: url, neurl: neurlSuffix};
From here, the work of storing the variable to MongoDB is delegated to the create method of the model module, which takes the neurl variable as a parameter along with an anonymous function that the model will call back on once its work is complete:
model.create(neurl, function (error, result) {

    if (error == null) {
        callback(null, neurlPrefix + result.neurl);
    }
    else {
        callback(error, null);
    }

});
You can see in the rest of the implementation that the validation requirements of the test are fulfilled and, if the call to the model is a success, the prefix and generated suffix are concatenated and returned to the caller.
The implementation of the model is shown in Listing 5.
Listing 5: Model Implementation
var mongoose = require('mongoose');

console.log("Ready to connect to Mongo...");
var cx = process.env.NEURL_MONGOLABSCX;
mongoose.connect(cx);

var db = mongoose.connection;

db.on('error', console.error.bind(console, 'connection error:'));
db.once('open', function callback() {
    console.log("Connected to MongoDB");
});

var schema = mongoose.Schema({ url: String, neurl: String, hits: Number });
var Neurl = mongoose.model('neurl', schema);

exports.create = function (neurl, callback) {

    var currentNeurl = new Neurl({url: neurl.url, neurl: neurl.neurl, hits: 0});

    currentNeurl.save(function (err) {callback(err, neurl);});

};

exports.submitNeurl = function (neurl, callback) {

    Neurl.findOneAndUpdate(
        {neurl: neurl}, { $inc: { hits: 1 }}, {upsert: true},
        function (error, theNeurl) {
            callback(error, theNeurl);
        })
};

exports.getHits = function (neurl, callback) {

    Neurl.findOne({neurl: neurl}, function (error, theNeurl) {
        callback(error, theNeurl.hits);

    })
}
The model uses the mongoose module written by Guillermo Rauch (an incredibly talented programmer who has made tremendous contributions to the NodeJS ecosystem including mongoose, socket.io, websocket.io and many more modules that have fueled NodeJS' popularity). The mongoose module provides a driver for talking to MongoDB. The implementation details that follow in Listing 5 are standard CRUD boilerplate and can be reference in the Mongoose reference documentation: https://github.com/LearnBoost/mongoose
With the tests passing, the Create API's HTTP response resembles the following:
HTTP/1.1 200 OK
X-Powered-By: Express
Content-Type: application/json; charset=utf-8
Content-Length: 57
Date: Fri, 08 Mar 2013 05:00:21 GMT
Connection: keep-alive
{
    "http://neurl.it/pewUGm"
}
Putting It All Together
The Submit and Hits APIs all follow a similar test design and implementation. The full implementation for each is provided in Listing 6 and Listing 7 respectively.
Listing 6: Submit API Implementation
var model = require("../model/model");

var neurlPrefix = "http://neurl.it"

exports.redirect = function (neurl, callback) {

    if (neurl == null) {
        console.log("No neurl received...")
        callback(new Error("Neurl suffix is required."), null);
        return;
    }

    // Get the original URL from the db

    model.submitNeurl(neurl, function (error, result) {
        callback(null, result)

    })

}
Listing 7: Hits API Implementation
var model = require("../model/model");

var neurlPrefix = "http://neurl.it/"

exports.getHits = function (neurl, callback) {

    if (neurl == null) {
        console.log("No neurl received...")
        callback(new Error("Neurl suffix is required."), null);
        return;
    }

    // Get the original URL from the db

    model.getHits(neurl, function (error, result) {
        callback(null, result)
    })

}
The HTTP response for Submit/Redirect:
HTTP/1.1 302 Moved Temporarily
X-Powered-By: Express
Location: http://rickgaribay.net
Vary: Accept
Content-Type: text/plain
Content-Length: 56
Date: Fri, 08 Mar 2013 05:16:45 GMT
Connection: keep-alive
Moved Temporarily. Redirecting to http://rickgaribay.net
The HTTP response for Hits:
HTTP/1.1 200 OK
X-Powered-By: Express
Content-Type: text/html; charset=utf-8
Content-Length: 2
Date: Fri, 08 Mar 2013 05:21:37 GMT
Connection: keep-alive
42
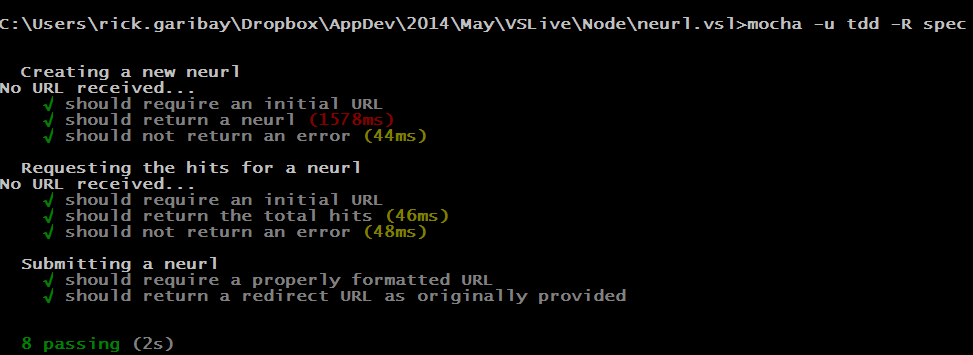
To exercise all tests, change to the root directory (one level up from the “test” folder) and run the following command:
mocha -u tdd -R spec
Figure 4 shows the output from the console summarizing the results of executing all eight tests including test execution latency.
The Create, Submit, and Hits APIs (and corresponding custom modules) are then composed into the core HTTP API that exposes the APIs in accordance to the design. To do this, I use Express, a module that provides a high-level Web application framework for building Web APIs on NodeJs.
The full implementation is provided in Listing 8 (server.js in the code sample) and as you can see, the code predominantly does two things:
- It provides a controller that defines the templates for routing the Create, Submit, and Hits APIs to the modules responsible for doing the work.
- It provides the appropriate HTTP response and payload, if required for each API.
Each route and corresponding wiring is pretty self-explanatory and should look very familiar to anyone coming from an ASP.NET MVC or Web API background.
The /create route is bound to the POST HTTP verb and, when activated, delegates the work to the Create module returning the new, shortened URL:
app.post("/create", express.bodyParser(), function (req, res) {
The /submit route is bound to the GET HTTP verb and when a request comes in, the suffix is extracted from the uuid path variable before being handed off to the Submit module and redirecting the agent to the original URL:
app.get("/:uuid", function (req, res) {
Last, the /hits route is also bound to the GET HTTP verb and looks for the prefix followed by /hits to activate, sending the query request to the Hits module and returning the number of hits:
app.get("/:uuid/hits", function (req, res) {
As with the custom modules implemented previously, you will notice that the signature of each function follows the same interface for dispatching the work to the corresponding module expecting a call back when the work is complete.
The /create route is bound to the POST HTTP verb and when activated, delegates the work to the Create module returning the new, shortened URL.
Exercising the API Locally with Fiddler
Fiddler is an HTTP proxy that is very useful for inspecting HTTP traffic on your computer as well as serving as a very simple test harness for exercising HTTP applications and APIs. I'll use Fiddler to move beyond theory and code and show you how this simple API works in action.
First, you must start the Node app by referencing the entry point to the API (server.js reviewed in Listing 8) issuing the following command at the command line:
node server.js
Listing 8: The Full Express Implementation
var express = require("express");
var create = require("./lib/create");
var redirect = require("./lib/redirect");
var hits = require("./lib/hits");

var app = express();
app.set('port', process.env.PORT || 1337);


app.listen(app.get('port'));

console.log('Neurl server listening on port ' + app.get('port'));


app.post("/create", express.bodyParser(), function (req, res) {

    console.log("Recieved: " + req.body.Url);
    if (req === null
|| req.body.Url === undefined
|| req.body.Url === null) {

        res.send(400,
        "Please provide a url if you want me to neurl.it.");

    }
    else {

        create.getNeurl(req.body.Url, function (error, result) {
            console.log("Sent: " + result);
            res.send(201,result);
        })

    }

})

app.get("/:uuid", function (req, res) {

    var neurl = req.params.uuid;

    if(neurl == null)
    {
        res.send(400,
        "The neurl you submitted appears to be incomplete.")
    }

    redirect.redirect(neurl, function (error, result) {

        if(!error)
        {
            res.redirect(result.url);
        }
        else
        {
            res.send(404,
            "Oops. We can't seem to find the neurl you submitted.");

        }

    })


})

app.get("/:uuid/hits", function (req, res) {

    var neurl = req.params.uuid;

    hits.getHits(neurl,function(error,result){

        console.log("In Neurl hits returned " + result);

        res.send(result.toString());

        //res.send("42");


    })

})
The console should display the following text, which I am emitting by using console.log to provide some visual feedback that the application started correctly:
Neurl server listening on port 1337
Open Fiddler, and on the composer tab, enter the following URL to test the Create API as shown in Figure 5 (ensure that the HTTP verb is set to POST and use localhost or the host name, and the IP address of the computer you are working on):
http ://localhost:1337/create
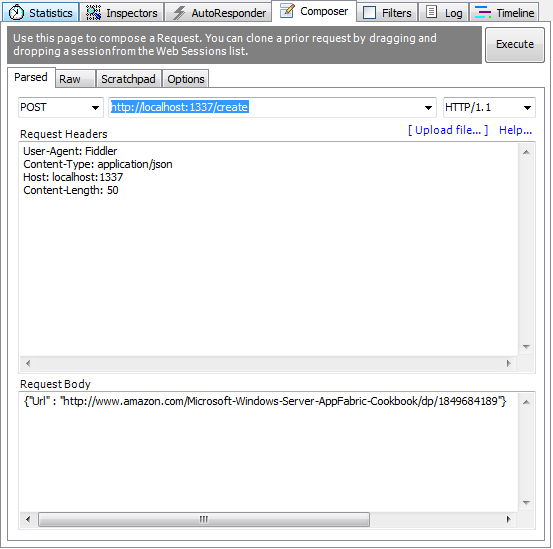
Notice in Figure 5 that I've specified a Content-Type of “application/json” in the HTTP request header and provided a JSON payload for a URL to be submitted for shortening. Within a second or so, the response should come back with the new, shortened URL, as shown in Figure 6:
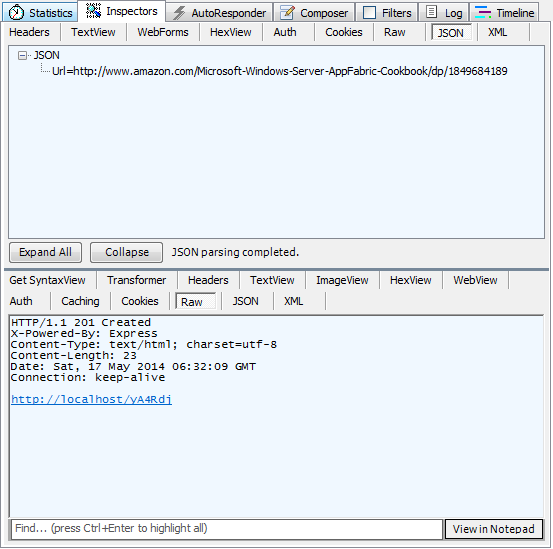
If you copy and paste the result (http://localhost:1337/yA4Rdj) back into Fiddler or your browser, you'll get a response similar to what follows (coupled with a redirection to the original URL provided):
HTTP/1.1 302 Moved Temporarily
X-Powered-By: Express
Location: http://rickgaribay.net
Vary: Accept
Content-Type: text/plain
Content-Length: 56
Date: Fri, 08 Mar 2013 05:16:45 GMT
Connection: keep-alive
Moved Temporarily. Redirecting to http://rickgaribay.net
Clicking the new URL a few times increments the hit count stored in the MongoDB database accordingly and the number of hits is returned via the Hits API by appending /hits to the new, short URL as follows:
http ://localhost:1337/yA4Rdj
After running the unit/integration tests and verifying functionality with Fiddler (or an HTTP testing tool of your choice), let's bring the Neurl API to life.
Deploying to Azure Websites
There are many options for hosting NodeJS applications, including the self-hosted approach I just used for conducting the functional testing with Fiddler. However, when moving any application to production, there are a number of considerations that must be addressed in addition to hosting, not the least of which are management, monitoring, and scalability.
When moving any application to production, there are a number of considerations that must be addressed in addition to hosting, not the least of which are management, monitoring, and scalability
In the rest of this article, I'm going to show you how Microsoft Azure Websites addresses these requirements beginning with how simple it is to create and deploy your application to the cloud.
If you don't have an active Azure subscription, you can sign up for a free trial here: https://azure.microsoft.com/en-us/free/ .
Create an Azure Website
There are a number of ways you can create your website on Microsoft Azure. For the command line, Microsoft ships a set of powerful PowerShell commandlets as well as the cross-platform Azure CLI tool. You can also use Visual Studio to deploy as long as you've installed Azure Tools for Visual Studio. Lastly, you can create a website in the Azure Management Portal and this is the approach I'll use in this article.
Microsoft ships a set of powerful PowerShell commandlets as well as the cross-platform Azure CLI tool
From anywhere in the Azure Management Portal, click New in the lower left-hand column (note that these steps refer to the current production portal as opposed to the upcoming portal experience announced at Build 2014, currently in Preview), select Compute and select Web Site. From here, you can choose Custom or Quick Create. The latter is the easiest option and creates a free website for you. It requires that you specify a unique name for your website along with the data center region location on which you'd like Azure to host your website, as shown in Figure 7.
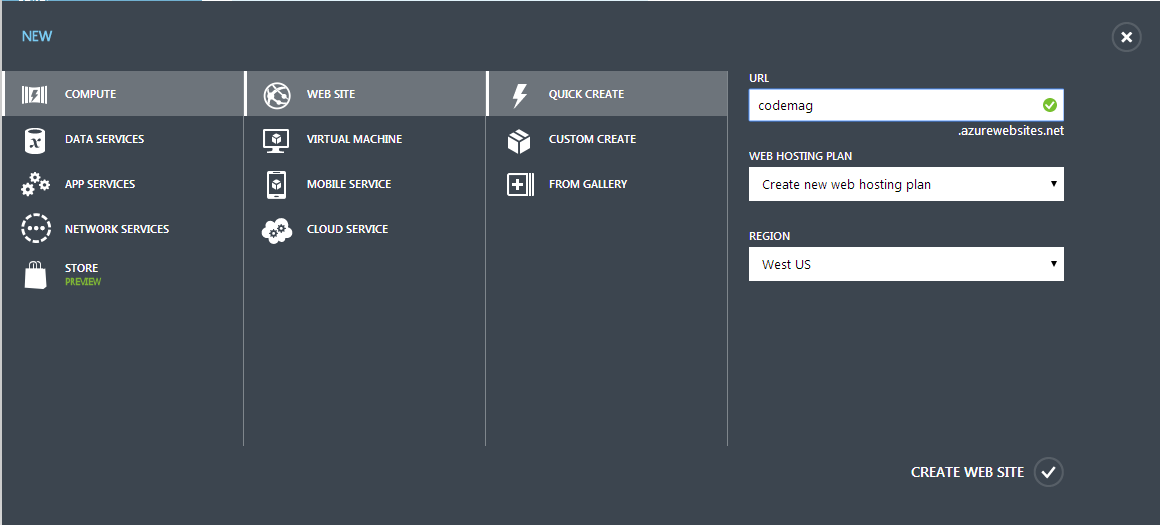
Microsoft Azure has data centers around the globe, making its deployment footprint the largest and broadest of any commercial cloud provider. When you create a website for the first time and select your preferred data center region, you also opt for a hosting plan that groups subsequent websites you create into the same hosting region and scale level. At the Free level (the default when using Quick Create), your application is limited to a single scale unit. I'll look at scalability options shortly.
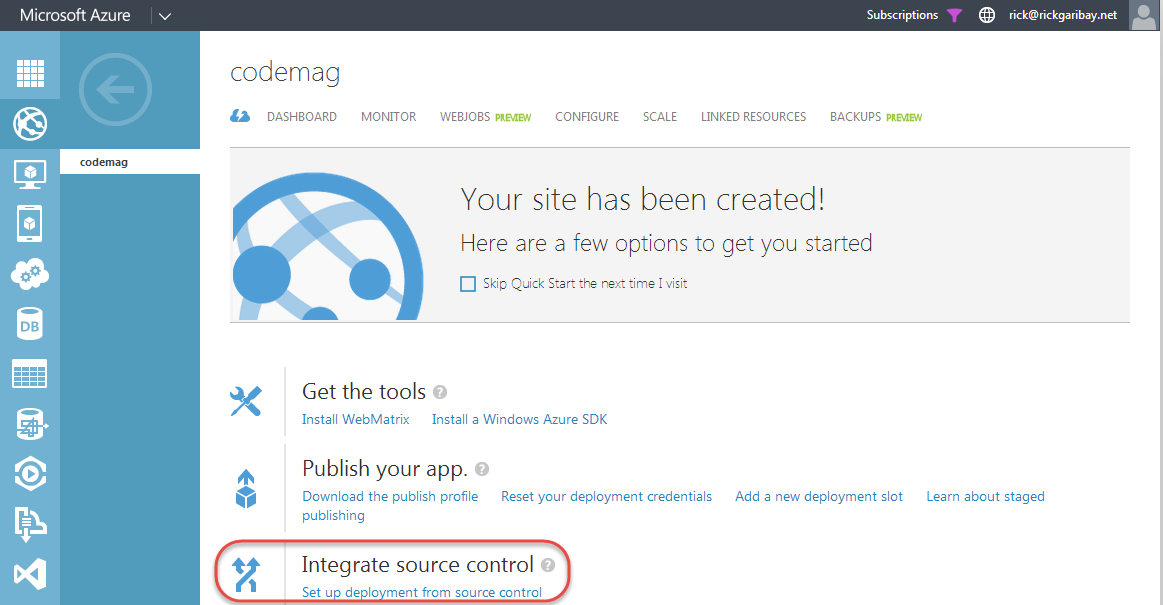
In just a few seconds, your website is available and ready to be configured. The first thing to do is choose a deployment option for pushing the API to Azure.
Configure Git Integration
Azure Websites supports a variety of options for integrating with your development environment in a cross-platform manner. If you're using Microsoft tools, you can configure your website to support WebDeploy or TFS/Visual Studio Online. In addition, GitHub, BitBucket, DropBox, and local Git repositories are supported.
For options like GitHub and DropBox, you can configure your website for continuous integration by pushing changes to your website any time you either push code to your GitHub repository, or copy your code to a specified DropBox folder and sync. This is enabled via a feature called Web Hooks, which exposes a secure endpoint that listens for publish events and then fetches your code via the underlying service APIs using the trust relationship you established when you configured these options.
In this article, I'll show you how simple it is to configure Git deployment so that you can push your local Git branches to your websites using completely native Git bash commands just as you would to any remote (Git Server, GitHub, etc.).
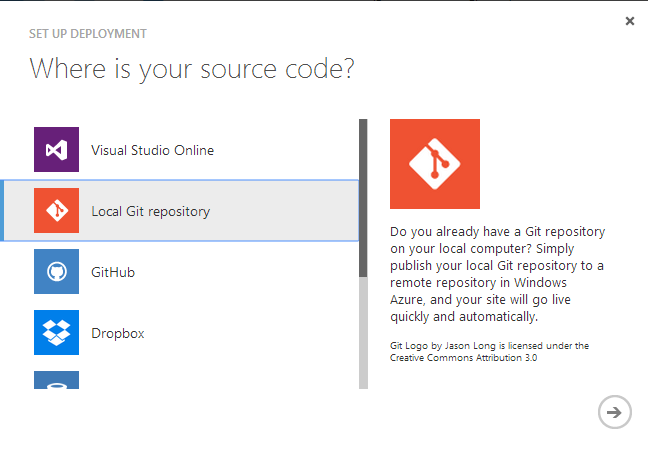
To configure Git Deployment, click on your website and choose “Set up deployment from source control” from “Integrate Source Control,” as shown in Figure 8.
A list of options appears, as previously discussed. Choose “Local Git repository” and click the arrow, as shown in Figure 9. Azure gets to work setting up a dedicated Git repository for you and automatically redirects you to a page that displays the details you'll need to push your API to your website. I'll do that next.
Push to Azure Websites
As I stated earlier, Azure Websites offers full support for cross platform development supporting Windows, Mac OS, and Linux. This means that you can write your apps on any platform, as well as across several languages/frameworks including NodeJS, ASP.NET, Classic ASP, PHP, and Java. In each case, excluding Java (which provisions an Apache Tomcat image), IIS provides the Web hosting infrastructure for running your apps. For NodeJS applications, an IIS Module called IISNode enables IIS to serve as a great NodeJS host bringing many benefits to your NodeJS applications that you won't get with self-hosting, including process lifecycle management, scaling the NodeJS process across CPU cores, automatic processing recycling when a script changes (i.e. Server.js), and of course, an integrated management and monitoring experience that you expect from IIS.
You can install IISNode on Windows workstation or server editions, which a great way to host NodeJS applications in your data center. As you'll see shortly, Azure Websites builds on the solid foundation of NodeJS and IISNode and delivers much, much more.
When hosting a NodeJS application on Microsoft Azure, to tell your website to enable the IISNode, you add a web.config to your root directory that includes the XML shown in Listing 9.
Listing 9: Web.config Configuration for IISNode
<?xml version="1.0" encoding="utf-8"?>
<configuration>
<system.webServer>
    <webSocket enabled="false" />
    <handlers>
        <add name="iisnode"
             path="server.js"
             verb="*"
             modules="iisnode"/>
    </handlers>
    <rewrite>
        <rules>
            <rule name="NodeInspector"
                  patternSyntax="ECMAScript"
                  stopProcessing="true">
                <match url="^server.js\/debug[\/]?" />
        </rule>
        <rule name="StaticContent">
            <action type="Rewrite" url="public{REQUEST_URI}"/>
        </rule>
        <rule name="DynamicContent">
            <conditions>
                <add input="{REQUEST_FILENAME}"
                     matchType="IsFile"
                     negate="True"/>
            </conditions>
            <action type="Rewrite" url="server.js"/>
            </rule>
        </rules>
    </rewrite>
</system.webServer>
</configuration>
The most important element in the handler, which tells IIS to route any requests to your entry point JavaScript file to IISNode:
<add name="iisnode"
     path="server.js"
     verb="*"
     modules="iisnode"/>
The presence of this configuration also tells the Azure Websites deployment engine to treat this deployment as a NodeJS application and retrieves all dependencies specified in your Package.json (discussed next) on your behalf!
OK, Let's Git Going
If you haven't already, you'll want to create a local Git repository for your application so that you can check in your code. If you're new to Git, don't worry. The steps that follow are very simple and only require that you've downloaded and installed Git for your operating system.
With Git installed, open a command line and navigate to the root directory for your application (in the download/GitHub bits, this is a folder called neurl) and issue the following commands from the Git bash shell or command line of your choice (note that the former assumes that you've added the Git executable to your PATH variable in Windows):
git init
When the command completes, you'll see a new folder in the root of your application called .git. Next, type the following two commands separately:
git add .
git commit -m "initial commit"
The add command tells Git to start tracking all files and folders in your root directory and the commit command checks your code into the local repository's master branch along with a comment to remind you about the check in later.
It's customary to provide both a README.md and .gitignore file to your application. The README file tells other developers a little bit about your project and the .gitignore file lists files and folders that should not be tracked when issuing the add command. In addition, the use of a Package.json file is recommended in lieu of pushing the contents of the node_modules directory (Azure Websites automatically inspects the Package.json file and retrieves all dependencies on your behalf).
At this point, all that's left is to register your Azure Website Git repository as a remote repository so that you can push to it. To do so, issue the git remote command, providing a friendly name for the remote, and copy and paste the Git URL that's provided on the Deployments page and appears after Azure has finished setting up your repository (as previously discussed):
git remote add [remote name] https ://[u@name</a>].<a href="http://scm.azurewebsites.net:443/";>scm.azurewebsites.net:443/[name].
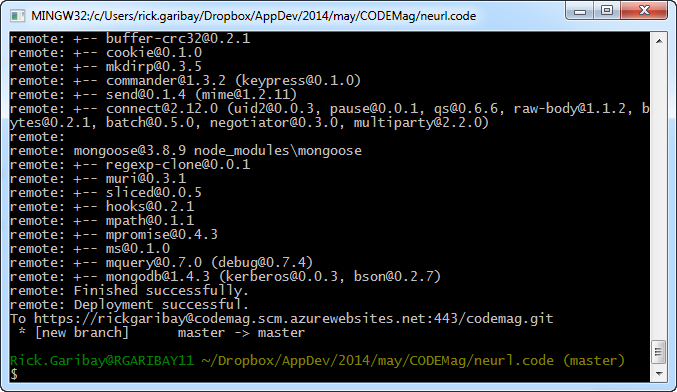
Finally, push the code to your Azure Website by issuing the git push command, providing your friendly remote name and branch name of master (or whatever branch you want to push):
git push [remote name] [branch name]
After running this command, Git gets to work deploying your application to your website, as shown in Figure 10. As this is happening, keep an eye on the Deployments page that you grabbed the Git URL from. In just a few moments, it will transition to show you the current status of your deployment and provide updates as the deployment completes. Cool!
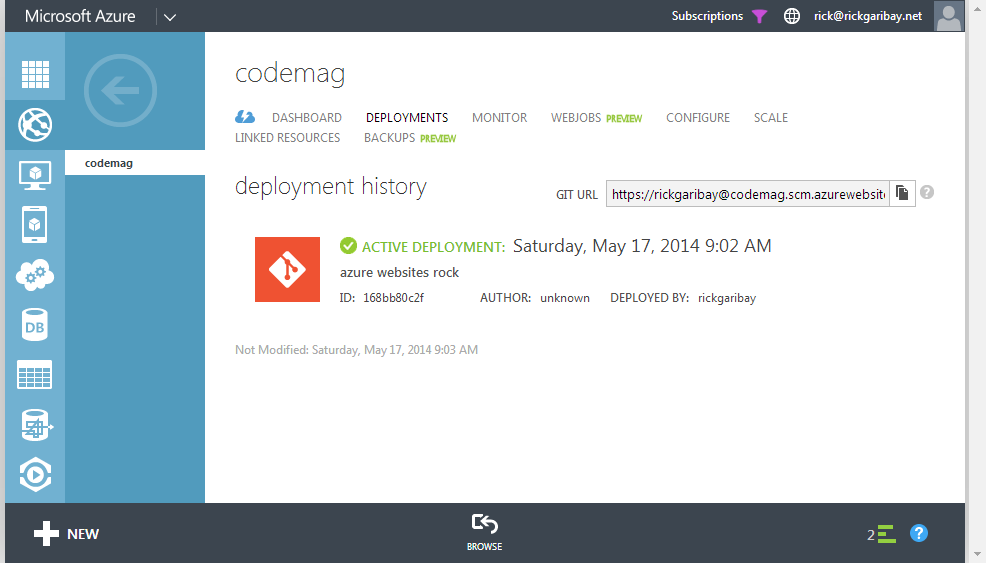
When the deployment is complete, you'll see the deployment marked as active, as shown in Figure 11. As you update your app and deploy new releases, the latest release will be marked as active automatically, but you'll always have the ability to roll back to a previous deployment, which is very helpful when you inadvertently push code prematurely or introduce a bug.
To ensure that everything is still working as expected, let's run a quick smoke test. Recall that when you created the Neurl in Fiddler, the Neurl suffix was rvMySt. Because you're using a centralized MongoDb database hosted on MongoLabs, all that has changed is where the API is hosted. To ensure that everything still works, paste the following URL in your browser:
http ://codemag.azurewebsites.net/rvMySt
As you can see, all I've done is grab the URL of the website I created and deployed the API to (i.e., the Neurl Prefix) and added the Neurl suffix I got back from the Create API. The browser should redirect you to the original URL, confirming that everything is working as expected.
Testing and Scaling the API
With deployment and smoke testing complete, let's exercise the API a bit. There are tons of options for doing so, ranging from manual to sophisticated automated test rigs. A simple tool that works great is Apache Bench, commonly called “AB” for short. Apache Bench is open source and available under the Apache 2.0 license.
With Apache Bench installed, open a command line and type the following command:
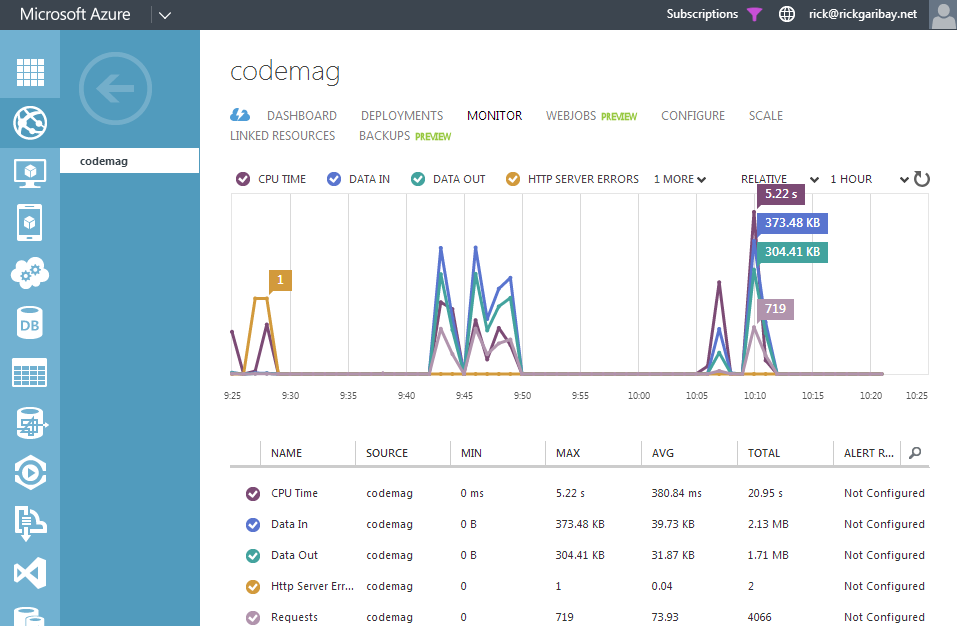
ab -n 1000 -c 10 http://codemag.azurewebsites.net/rvMySt/hits
This exercises the Hits API for the Neurl concurrently 100 times across 10 threads. While AB reports its progress, head over to your website on the Azure Management Portal and click Monitor. As you can see in Figure 12, the Neurl API is getting quite a workout. In addition to the default metrics you see here, you can add metrics to provide the visibility you need to monitor the health of your application. You can also enable Endpoint Monitoring to configure email notifications when something goes wrong.
When AB completes, you'll see a report similar to this:
Concurrency Level:      10
Time taken for tests:   44.536 seconds
Complete requests:      1000
..
Requests per second:    22.45 [#/sec] (mean)
..
As you can see, you're getting about 22 messages per second, which is quite good for this level of concurrency and load.
As adoption of this marvel of software engineering grows (yes, that is your author's attempt at humor and self-deprecation all in one) it's important that you maintain this level of response at best, and at worst, ensure that if consumption of the API spikes dramatically, you can adjust and adapt the scale strategy accordingly.
There are a number of options for scaling your Azure website deployments:
- Free: Up to 10 websites (unique applications) on a single node
- Shared: Up to 100 sites across up to six multi-tenant scale units
- Basic: Unlimited websites across up to three dedicated scale units
- Standard: Unlimited websites across up to 10 dedicated scale units
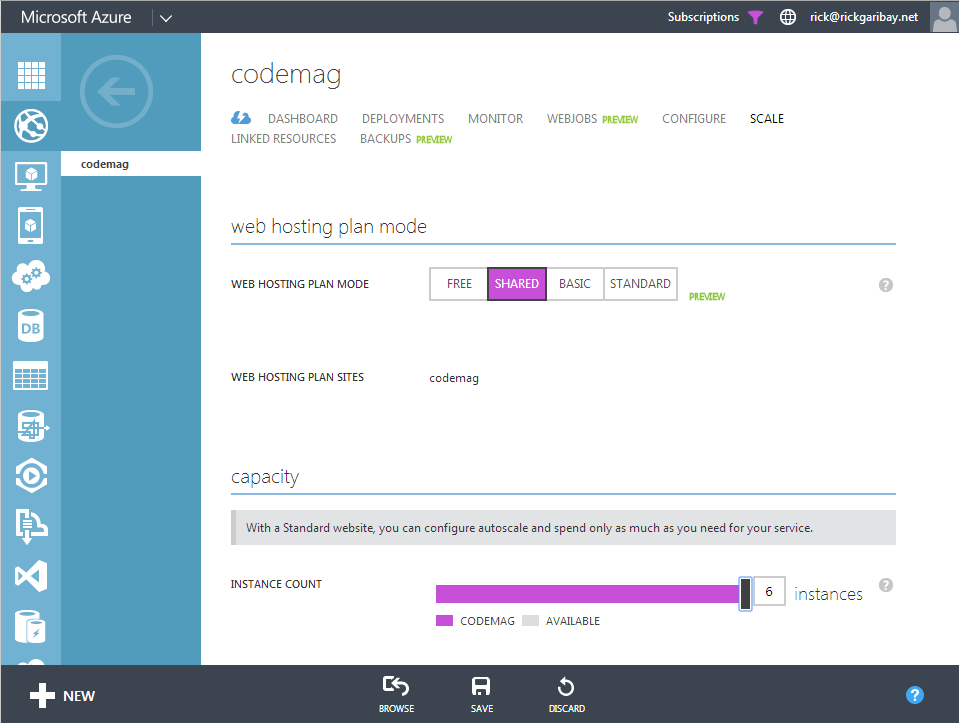
To configure your scale level, click on the Scale link for your website and choose the scale option. As shown in Figure 13, this page allows you to easily change from Free to Shared, Basic, or Standard, and to specify the number of nodes you'd like for Azure to scale your application to.
Managing Your Website with Kudu
So far, I've deployed the API to the Azure Website, smoke-tested the API, and even performed some load testing, and fortunately, everything has worked just fine. But what happens when everything isn't happy?
This is where Project Kudu comes in. In addition to working hard invisibly in the background deploying the API (Kudu powers the deployment engine you worked with earlier), Kudu also provides a great set of tools for managing and debugging your application, including the Debug Console shown in Figure 14.
Kudu provides a great set of tools for managing and debugging your application
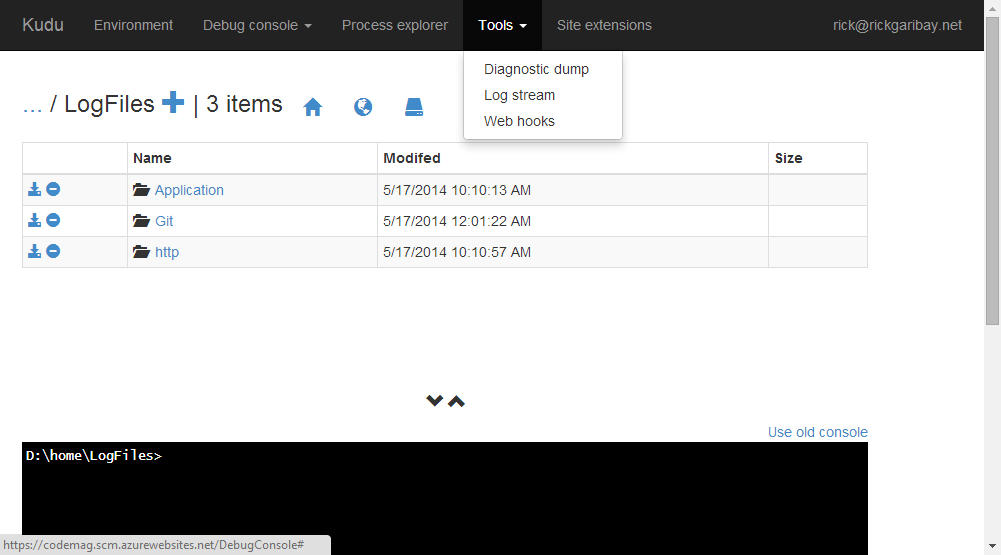
The Debug Console is a fully interactive command line tool that gives you shell access to your IIS root along with detailed logs (you enable diagnostics in the Configuration page for your website). You can type commands in the console to move up and down the folder structure and to issue various commands or use the Web interface above, both of which automatically stay in sync.
To access Kudu for your website, add “scm” between your website name and “azurewebsites” as follows:
https ://codemag.scm.azurewebsites.net
Kudu provides additional must-have capabilities for managing your website, including a look at your environment variables, information about your process health, the ability to download diagnostic log dumps (it will kindly zip the contents of your /LogFiles folder and download it for you). In addition, you can use tools like Curl (https://curl.se/) to attach to a live log and stream logging details in real time.
Wrapping Up
As you can see, NodeJS is both simple and powerful as well as very fun to work with, making it a great tool for building Web applications and APIs. NodeJS is still very new (even in Internet time) and I still have much to learn, but I hope you've enjoyed this article as much as I've enjoyed writing it. If I've sufficiently piqued your interest, as a next step, I highly recommend the book “Building Hypermedia APIs with HTML5 and Node,” by Mike Amudsen. While it's a little bit outdated due to the speed at which NodeJS has evolved, it still serves as an excellent starting point for anyone who wants to learn more about Web API development. Another book I'd recommend is “Designing Evolvable Web APIs with ASP.NET” by Block, Cibaro, Felix, Dierking and Miller. With examples in ASP.NET, the content on API design (roughly half of the book) applies equally to NodeJS and any other language/framework and serves as an excellent foundation for learning more about Web API development.
As with any technology, it's important to remember that NodeJS is only one tool in your development tool box and it's important to consider the right tools for the job at hand. For applications that are IO-centric and complete their work in a quick and disciplined manner, NodeJS is definitely worth considering.
Regardless of languages or frameworks, service virtualization is a very powerful pattern that opens up many opportunities. Coupled with the modular architecture of NodeJS and the simplicity, flexibility, and agility of Azure Websites, there is a ton of potential for additional functionality of this simple little API.
As with any technology, it's important to remember NodeJS is only one tool in your development tool box.
Neurl.it v.Next?
As the Neurl API continues to evolve, it will support the concept of optional campaigns and schedules which, building on the extensibility of the design, enables tenants of the API to inject assets that provide impressions to the consumer of the Neurls throughout their journey to the ultimate destination. I see this as valuable with internal communications such as heads of HR promoting benefits, open enrollment, and ice cream socials, Chief Marketing Officers (promoting upcoming events or product launches via tracked Neurl impressions), and facilitating A/B testing of surveys, landing pages, etc. The code for the Neurl API is available as part of this article on https://www.codemag.com/ as well as GitHub: https://github.com/rickggaribay/neurl, and I highly encourage you to share your ideas and contribute.
Regardless of whether this API grows to provide these features or remains nothing more than a fun learning tool, I can rest assured knowing that Azure Websites has my back. And who knows, if this API ever does go viral, I know I can scale it with just a few clicks.
