


Office 365 is an ideal business app platform that provides a core set of services that's expected in today's business apps, like collaboration, presence, and integrated workflows, and a central location for installing, discovering, and managing the apps. Office 365 makes these business apps available where users already spend their time: in SharePoint and Office. Visual Studio 2013 streamlines the way developers build business applications for Office 365 and SharePoint 2013 with the Cloud Business App project template. This template provides a set of tools and designers for building apps that are all about data and collaboration around that data. Cloud Business Apps are particularly well suited for building business apps for a variety of modern mobile and tablet devices because the UI is based on HTML5 and jQuery Mobile and automatically adjusts to multiple device form factors.
The types of apps you build using the Visual Studio Cloud Business App project need to consume and aggregate multiple data sources as well as enable collaboration around that data easily. With Cloud Business Apps, a developer doesn't have to write all the plumbing code associated with data-centric services, authorization, or UI. Instead you can focus on what makes your application unique through multiple customization points. In this article, you'll see how to build and deploy social, touch-centric, cross-platform Office 365 business applications that run well on all modern browsers and devices.
With Cloud Business Apps, a developer doesn't have to write all the plumbing code associated with data-centric services, authorization, or UI. Instead you can focus on what makes your application unique through multiple customization points.
Getting Started
In order to build apps for Office 365 and SharePoint 2013, you'll first need a developer site. There are a variety of ways you can obtain an Office 365 developer site. In fact, you may already have access to one. If you're a Visual Studio Ultimate or Premium MSDN subscriber, you receive an Office 365 developer subscription as a benefit. Head to your MSDN subscriptions page to redeem it. If you have a midsize business or enterprise plan (E1 or E3), you can provision a developer site from the Office 365 admin center. Otherwise, you can start with a free trial. Alternatively, if you already have SharePoint 2013 deployed on-premises, you can set up a developer site by enabling the side-loading of apps onto a site.
You'll also want to install the latest Office Developer Tools update for Visual Studio 2013 in order to get all the features discussed in this article. This is a free update for users of Visual Studio 2013 Professional or later. If you didn't see a notification in Visual Studio to install the tools, you can download them here: http://aka.ms/officedevtoolsforvs2013 (Editor's note: This version is no longer available on Microsoft's website.)
Now that you're ready, you can find the Cloud Business App project template under Office/SharePoint > Apps node when you create a new project in Visual Studio 2013. Specify the location of the developer site and your project is created. A Cloud Business App solution is a Web application that contains an HTML/JavaScript client project, a .NET middle-tier server project, and a SharePoint project that packages your app.
Defining the Data Model
Cloud Business Apps are all about data, and not just a single list or database, but multiple data sources in an enterprise. The data designer lets you model data from many types of data sources from relational databases, OData sources, and custom services. In addition, the data designer also understands the details of other data sources common in enterprises like SharePoint and SAP. The tools help you discover related entities and view their properties. You can create tables and model data from multiple sources and relate them together in the same data model.
For instance, let's say that you are a food distributor and want to build an application that's used by your employees in the field to track how your products are doing on the shelves of your supermarket customers. You already have your customers and products stored in SharePoint, but you want to provide a mobile survey app to the field and they need a way to access this data. You also want to allow collaboration around those surveys by integrating document libraries and showing the presence of people. You need an app that is mobile-first, but also works well on the desktop.
The first thing to do is define the data model. This app needs to pull in data from SharePoint but you'll also need to create a table to store the surveys. In the Solution Explorer, select the server project and right-click on the Data Sources node and choose Add Table. Using the data designer, you can define a new Survey table that will be stored in the internal application database. This database is deployed with the app.
When you define properties of a table, you can select from a variety of types like integer, string, Boolean, etc., but you can also select from a set of business types that provide built-in validation and screen controls. Things like Email Address, Phone Number, Web Address, even Person, are first-class types in Cloud Business Apps, speeding up the process of data modeling and validation. For the Survey, create properties and specify their types as shown in Table 1.
The survey properties DisplayCleanliness and ShelfPlacement are stored as integers in the table, but you want to provide the users with a drop-down list of static selections. To do this, define a choice list by clicking on the “Choice List” link in the properties window for these. You also want to make sure the SurveyName is unique, so check “Include in Unique Index” for that property.
Also notice that in the properties window for the Survey table, there are options for enabling created/modified properties automatically on the table. This is on by default for all new tables that you create with the designer. This adds fields to track when and who created or modified a record, stored as a Person type. The Person type is a powerful type that you can use in code to get details about the authenticated SharePoint user. This is how the SalesRep property is also stored on the Survey. Users who are signed into Lync see presence indicators that allow them to immediately collaborate on data, as you will see when you design screens later in this article.
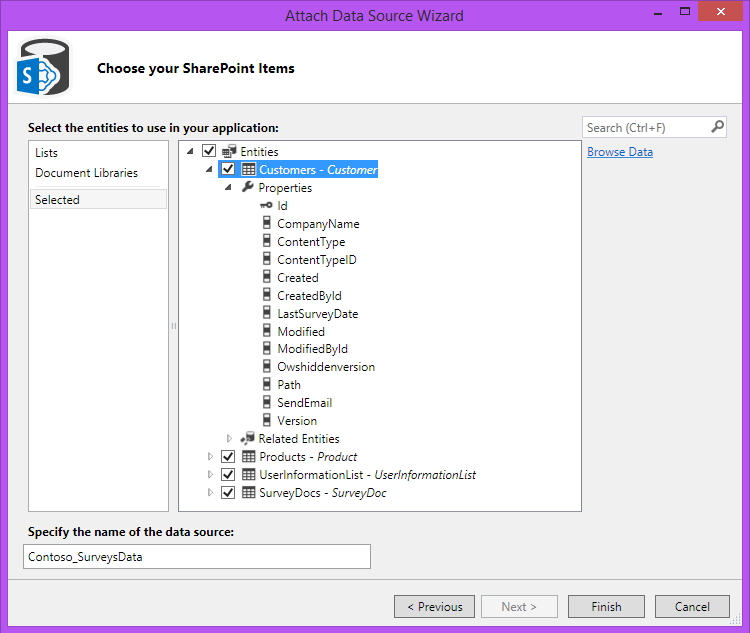
You also need to add external data from SharePoint, the Products and Customers lists, as well as the document library that stores your survey documents, called SurveyDocs. In the Solution Explorer, select the server project and right-click on the Data Sources node again, but this time choose Add Data Source. Select the SharePoint data source and the location of the host Web page where the lists are stored. Select the lists and document libraries that you want to bring into the data model. Figure 1 shows the Attach Data Source Wizard with the SharePoint entities selected that will relate to the Survey.
When you bring external data into the data model, you can make some modifications to how the data is displayed, like changing properties to compatible business types, however, you cannot change the underlying schema of the external data source. This prevents you from breaking other applications that may be using that data. Only the Cloud Business App model can be changed.
Now you can relate these lists from SharePoint to the Survey. With the Survey selected in the data designer, click Relationship… on the designer toolbar and specify a one-to-many relationship from Customer to Survey, as shown in Figure 2. Do the same for relating Product to Survey in a one-to-many relationship.
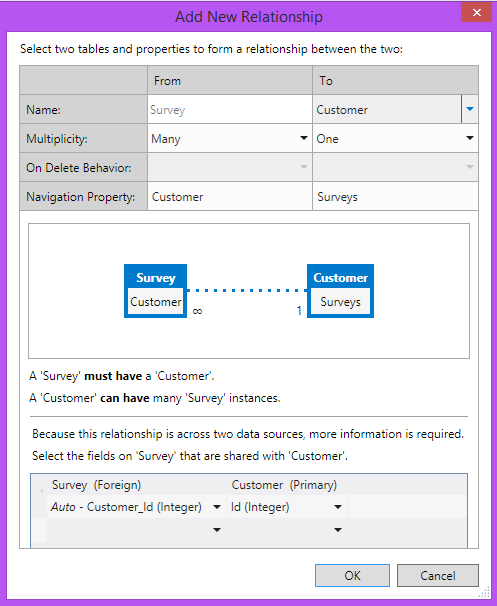
When relating data from multiple sources, you need to select shared fields that compose the relationship. In the case of the Survey app, the foreign keys are automatically created in the Survey table and will be populated with the primary keys from Customer and Product.
In the case of the SurveyDocs document library, you want to relate one Survey to many SurveyDocs. So you need to select a common field. The easiest thing to do is to create a string field on the document library to hold the foreign key you specify. In this example, the SurveyDocs document library has a column called SurveyName. Because you indicated on the Survey table that the SurveyName should be included in the unique index, this field can be used. Alternatively, you could create an integer field on the document library to store the key; it's up to you how you want to store the relationship. Keep in mind though, if the library already has documents in it, then picking a common field will associate those existing documents as well. Once you select the shared fields, the app automatically handles populating the keys for you on new records.
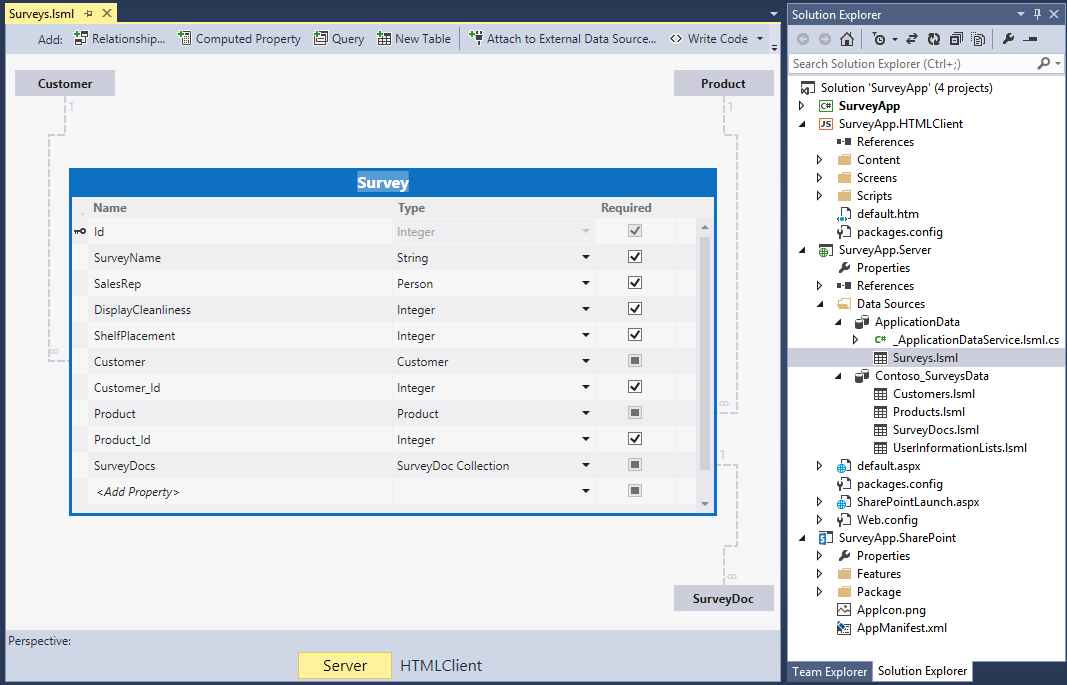
Now the data model is complete for the example, as shown in Figure 3. The better you are at defining your data model and validation rules, the better your screens will look and behave when you design them. The data designer allows you to not only visually design the data model and specify properties, it also allows you to write code to control property validation, entity set rules, default values, authorization and access control, etc. You have complete control of the update and query pipelines through a bunch of method hooks on the server. Drop down the Write Code button at the top of the Data Designer to view all the methods. You can also expose your own service methods and utilize the server application context in order to return and process data according to your data model and business rules that you write in Visual Basic or C#. For this example I'll keep it simple, but know that you have complete control of the business logic. Now that you have the data model defined, it's time to create the user interface.
Designing Screens
The Visual Studio Cloud Business App project provides screen templates to get you going quickly. Gone are the days of tediously laying out fields on a design surface. Instead, the designer lays out controls in a flow layout. All screen templates and controls are HTML5-based, mobile-first, touch aware, and use responsive design principles so you can create great-looking apps for all modern devices and browsers quickly. You can customize the screens exactly how you want, but the templates provide great starting points.
All screen templates and controls are HTML5-based, mobile-first, touch aware, and use responsive design principles so you can create great looking apps for all modern devices and browsers quickly.
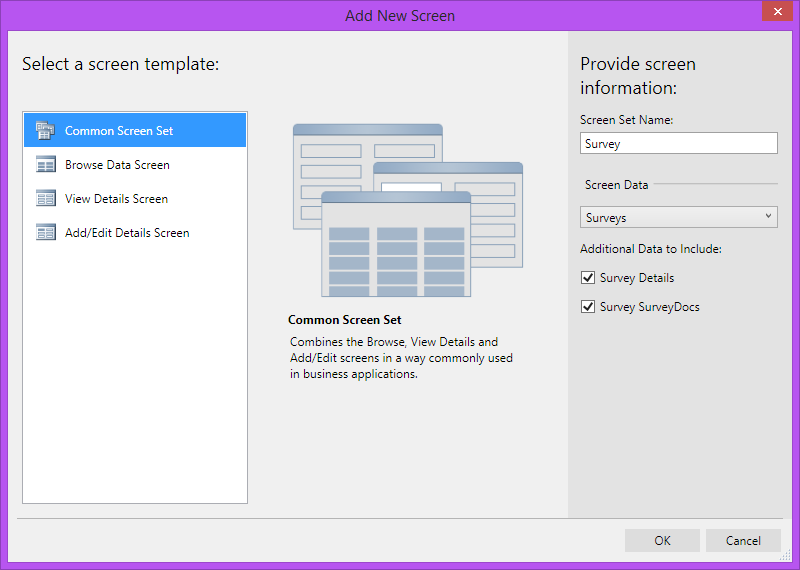
In particular, the Common Screen Set template is fantastic for creating and hooking up all the screens necessary to browse, search, view, edit, and add data; all are common data-centric patterns in business applications. Right-click on the screen's node on the Client project in the Solution Explorer and select Add Screen. For this example, set the Screen Data to “Surveys,” as shown in Figure 4. Notice that the children are automatically listed in the “Additional Data to Include” section; in this case, the document library SurveyDocs is listed.
This sets up three screens, BrowseSurvey, AddEditSurvey, and ViewSurvey, and hooks up buttons and tap actions to navigate to the appropriate screen. For instance, the BrowseSurvey screen displays a tile list of Survey items. The list tap action is set to take you to the ViewSurvey screen. The ViewSurvey screen shows the details of the Survey and also has controls to work with the document library, SurveyDocs. Tap actions provide a powerful set of navigation and data-related actions you can specify on each of the data items on the screen. In the case of the SurveyDocs, you know this is a document library and so methods appropriate for a document library are displayed, as shown in Figure 5.
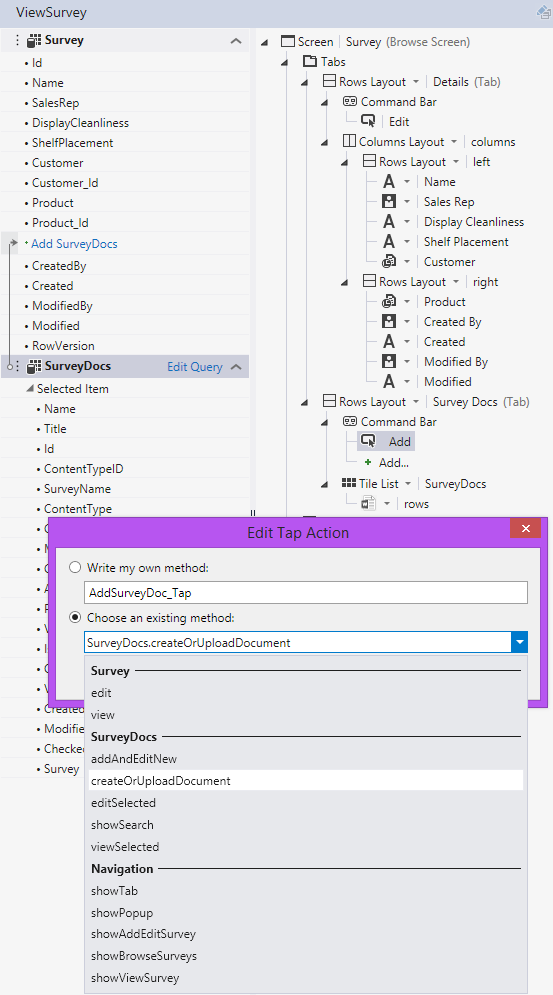
Tap actions provide a powerful set of navigation and data-related actions that you can specify on each of the data items on the screen.
To modify the screen layout, simply drag data items from the left-hand side of the screen to the content tree in the middle. Then click the drop-down box to select from different controls. The controls presented are always compatible with the data type of the field. You can also choose “Custom Control” and completely take over the rendering yourself in JavaScript. Additionally, you can design screens and write client code while the app is running in debug and quickly refresh your browser to see the changes visually.
When you run the Survey App, the BrowseSurvey screen is displayed first. You can set the Home Screen by right-clicking on any Browse screen in the Solution Explorer and selecting “Set as Home Screen.” You can also define a navigation menu by selecting the screen's node and choosing “Edit Screen Navigation.” Notice that in this example, the SalesRep as a Person viewer displays, which picks up the Lync presence information if the user is signed into Lync, as shown in Figure 6. Users can add a new survey and search for surveys from this screen.

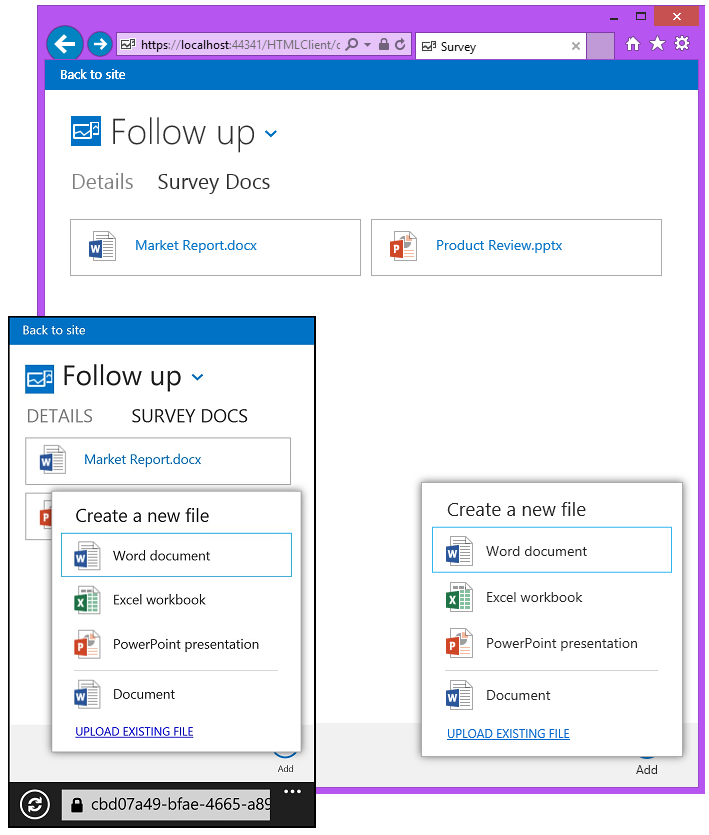
When a user taps on a tile, they are brought to the ViewSurvey screen where they can edit the details of the survey as well as upload or create documents, as shown in Figure 7. If a document library defines templates, those will be listed as well. When a new document is created, it displays in Microsoft Office Online so the user doesn't have to have the Microsoft Office clients installed to work with documents. This is a powerful feature of Office 365. As you can see, the controls work on multiple devices and form factors right out of the box.
Screens work hand-in-hand with the data model. When you are initially designing an app, the tool keeps changes you make to the data model in sync with any screens you have already defined. So if you change the name of or remove a field in the data model, those changes are automatically reflected on the screens so that you're never chasing down data binding errors. As you can see, the designers help you build these business apps fast. There is also a Query Designer that you can use to define specific queries for filtering and sorting data. However not everything can be done through a designer, that's why there are many places you can customize with code.
Customizing with Code
Both the server and client have powerful runtimes and APIs that you can customize through many code customization points. All business apps have special requirements like validation, screen workflows, and custom controls, just to name a few. As I mentioned, on the server, you use Visual Basic or C# to write code to perform validation, define entity set rules, set default values, check access, and a whole lot more. On the client, you can completely take over the rendering of controls, or you can simply modify the existing controls with JavaScript and CSS. There are a plethora of JavaScript libraries, controls, and widgets on the Web that you can use to create powerful visualizations and controls that aren't in the box.
For instance, say you want to personalize this app by only displaying surveys in which the logged-in user is the SalesRep. You also want to automatically set the SalesRep field to the logged-in users when they add surveys. This means you need to add code to the data service on the server. From the Data Designer, select the Server perspective and drop down the Write Code button. In this case, you can simply write one line of code in the body of the Surveys_Inserting and Surveys_Filter methods. In the Inserting method, you're passed the entity, so set the SalesRep property to the logged in user's PersonId. Then in the Filter method, specify a lambda expression that filters the SalesRep on that PersonId.
public partial class ApplicationDataService
{
    partial void Surveys_Inserting(Survey entity)
    {
        entity.SalesRep = this.Application.User.PersonId;
    }
    partial void Surveys_Filter(
        ref Expression<Func<Survey, bool>> filter)
    {
        filter = s => s.SalesRep == this.Application.User.PersonId;
    }
}
Let's say you also want to display any of the surveys with low marks with a different color and font in the tiles on the user's home screen. In this case, open the Screen Designer for the BrowseSurvey screen. Select the TileList's RowLayout control and drop down the Write Code button, choose the rows_postRender and specify the JavaScript code to add a style to the DOM element. Here, you're passed the element, which corresponds to the DOM element, and the contentItem, which corresponds to what is selected in the content tree in the Screen Designer. Use the contentItem.dataBind() method to specify a callback function to execute anytime a value changes. Use the jQuery selector on the DOM element to add and remove a CSS class that you define.
myapp.BrowseSurveys.rows_postRender = function (element, contentItem) {

    contentItem.dataBind("value.DisplayCleanliness", function () {
        if (contentItem.value.DisplayCleanliness < 2) {
            ($(element).addClass("attention"))
        } else {
            ($(element).removeClass("attention"))
        }
    });
};
You can define your own CSS in the user-customization.css file located in the client's Content folder. You can also replace the stock app logos in the Content\Images folder to quickly brand your app. You can also completely control the look and feel of the app with CSS. Even if you're not a CSS whiz, there are a couple of default themes provided for you, as well as easy hooks to customize the fonts and images. Additionally, you can use ThemeRoller for jQuery Mobile and paste in the default CSS that is provided and modify it from there using a visual designer. Head to http://themeroller.jquerymobile.com to get started.
Making Your App Available to Users
Now that you're ready to deploy the application, there are a couple of hosting and deployment options that you need to consider first. Office and SharePoint 2013 introduced a new app model that allows developers to build apps for Office and SharePoint using Web standards. These apps are also isolated and secure by design, bringing the power of Web technologies in Office and SharePoint to a secure execution sandbox. Apps make it easy for developers to extend and personalize end-users' experience without impacting performance because the apps are hosted outside of Office and SharePoint.
You can publish your app to the Office Store to make the app publically available, so that it can be acquired by users of any SharePoint deployment, or you can publish your apps to an internal corporate catalog, hosted on your SharePoint deployment, to make them available to users with access to that SharePoint deployment.
Cloud Business Apps are Web apps that have a database, service layer (middle-tier), and HTML client. You can host these apps just like you would any Web application, like in IIS or in Windows Azure. An app for SharePoint also contains a manifest that tells SharePoint where the Web app is and how to authenticate. You can choose to host the app where ever you like; this type of hosting is called provider-hosted. Provider hosting has the most flexibility because you have complete control over the hosting and the application data. However, you may need to design for multi-tenancy, particularly if you are deploying to the public Office store.
For the Survey App example, this is an internal business app and it should be deployed to the corporate catalog so that only users in your enterprise can install the app on their site. You're already filtering the data based on the logged-in user so you can provider-host this app. Right-click on the main project in Solution Explorer and select Publish when you are ready to deploy the app and choose the type of hosting. The Publish Wizard will walk you through deploying the app to Azure or your own IIS box, as shown in Figure 8.
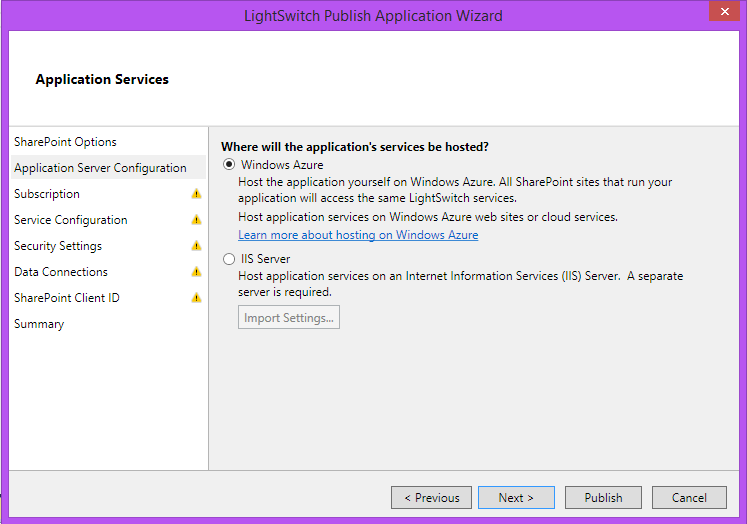
Select the Azure website (or cloud service) that you want to deploy to from the Subscription and Service Configuration tabs and then set the Security settings by indicating whether you want SSL or not. Azure websites are already configured for SSL. It's a good idea to use SSL when sending sensitive data, like the data in an internal business app, across the wire. The Publish Wizard will walk you through these options with links on how to set up the supporting infrastructure.
Next, set the SharePoint client ID. To obtain a client ID head to your SharePoint site and request a new ID. For instance if your deployment site is https://mysharepointsite.com, then head to https://mysharepointsite.com/_layouts/15/appregnew.aspx to generate an ID and secret. On this screen, set the App domain to the Azure site you created (without the http), and set the site redirect URL to the Azure site you created using https (for instance https://surveyapp.azurewebsites.net. Click
Create and then copy the ID and secret into the Publish Wizard.
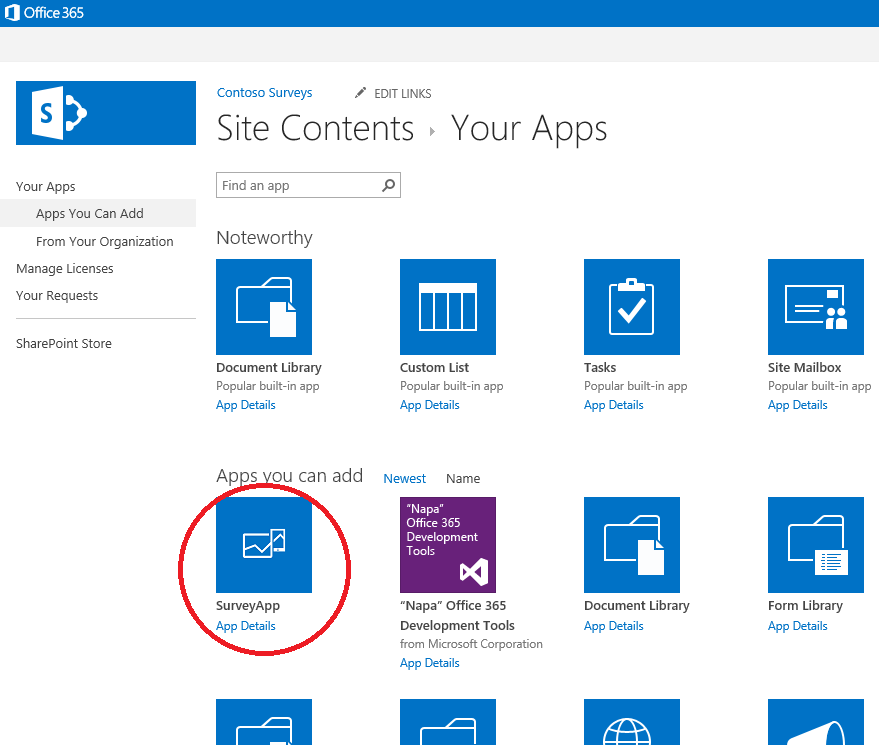
Once the Web application is deployed, a SharePoint .app package is created. You can take that package and deploy it to the corporate store to make that app available. You can access your App Catalog from the SharePoint 2013 admin center. Select Distribute apps for SharePoint, and upload the app package. Users can now install the app on their sites, as shown in Figure 9. An administrator can also automatically add the app to any site using PowerShell. For more information, head to https://dev.office.com.
Wrapping Up
The Cloud Business App project in Visual Studio 2013 provides a set of tools and designers for helping you quickly build modern, touch-centric, business apps for Office 365. When you need to consume and aggregate multiple data sources as well as enable collaboration around that data easily, Visual Studio 2013 can help you get there quickly. Because you don't have to write all the plumbing code associated with business apps today, you can focus on what makes your application unique.
This article showed you how to build and deploy social, touch-centric, cross-platform Office 365 business applications that run well on all the latest browsers and devices. For more information on building Cloud Business Apps, see this video series on Channel 9: https://channel9.msdn.com/series/cba
Table 1: Survey Properties
| Property | Type | Required? |
| SurveyName | String | Yes |
| SalesRep | Person | Yes |
| DisplayCleanliness | Integer � Choice List (0:Poor, 1:Fair, 2:Good, 3:Excellent) | Yes |
| ShelfPlacement | Integer � Choice List (0:Bottom, 1:Middle, 2:Top, 3:End cap) | Yes |
