


In this article, we take a look at what’s involved with building a simple Twitter Search client for Windows Phone. We will cover what tools you need, where to download them, how to design, build and test the app and finally, how to publish it to the Windows Phone Marketplace.
About a month ago, Rod Paddock (CODE Magazine’s Editor Extraordinaire) hit me up via Google Talk about an idea for a mobile app development feature he was working on for CODE Magazine (I’m guessing you’ve heard of it, since you’re reading it.)
Simply put, Rod provided the same basic UI design and spec to three mobile developers (specializing in Android, iPhone and Windows Phone) and we would go away and build the app for our respective platforms.
This article documents the development of the Windows Phone app.
The Right Tools for the Job
Before you can get started developing apps (or games) for Windows Phone, you’ll need to download the free Windows Phone Developer Tools from the App Hub site, located at http://create.msdn.com.
Running the installer gets you the Windows Phone project types for Visual Studio 2010, the Windows Phone Emulator, Silverlight 4 SDK, XNA Game Studio 4 and the Expression Blend SDK.
If you already have Visual Studio 2010 Professional (or higher) installed, then the Windows Phone Developer Tools plugin will be installed and you can keep on using Visual Studio 2010. Otherwise, you will also get Visual Studio 2010 Express for Windows Phone.
The Design
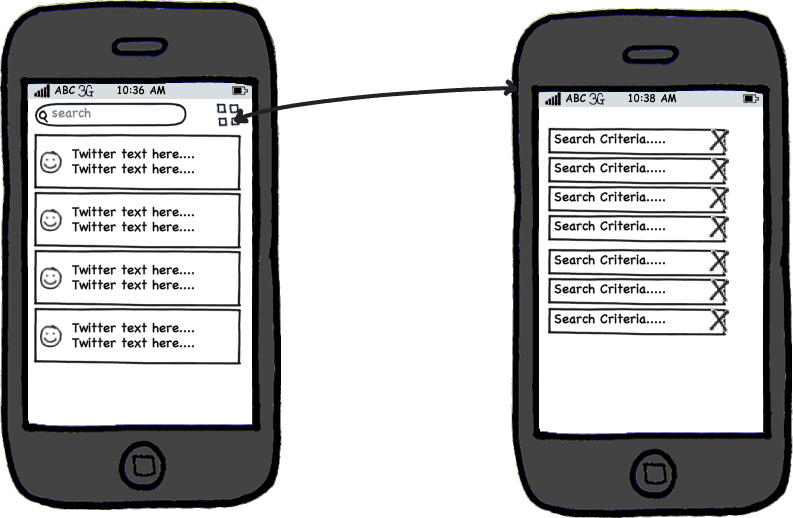
The specs for this project were somewhat generic:
- Create a UI for searching Twitter.
- Display the results (author image included).
- Store the search criteria on the phone.
- Create a simple page to remove the criteria.
We were also provided with a simple UI mockup, shown in Figure 1.
After looking at the spec and mockup, I fired up Visual Studio 2010 and considered my options for Windows Phone projects. I had the following four choices:
- Windows Phone Game (XNA)
- Windows Phone App (Silverlight)
- Windows Phone Panorama App (Silverlight)
- Windows Phone Pivot App (Silverlight)
The first choice, Windows Phone Game, sounded like a lot of fun but didn’t make much sense given the requirements at hand. XNA is great for high-performance graphics and making fun games, but our app doesn’t fall into either category.
Of the three Silverlight project types, any of them would have met my needs, but the Windows Phone Panorama App has the coolest UI features, so I chose that one.
Building CodeTweet
We’ll start off by creating a new Windows Phone Panorama App project and name it CodeTweetWP7.
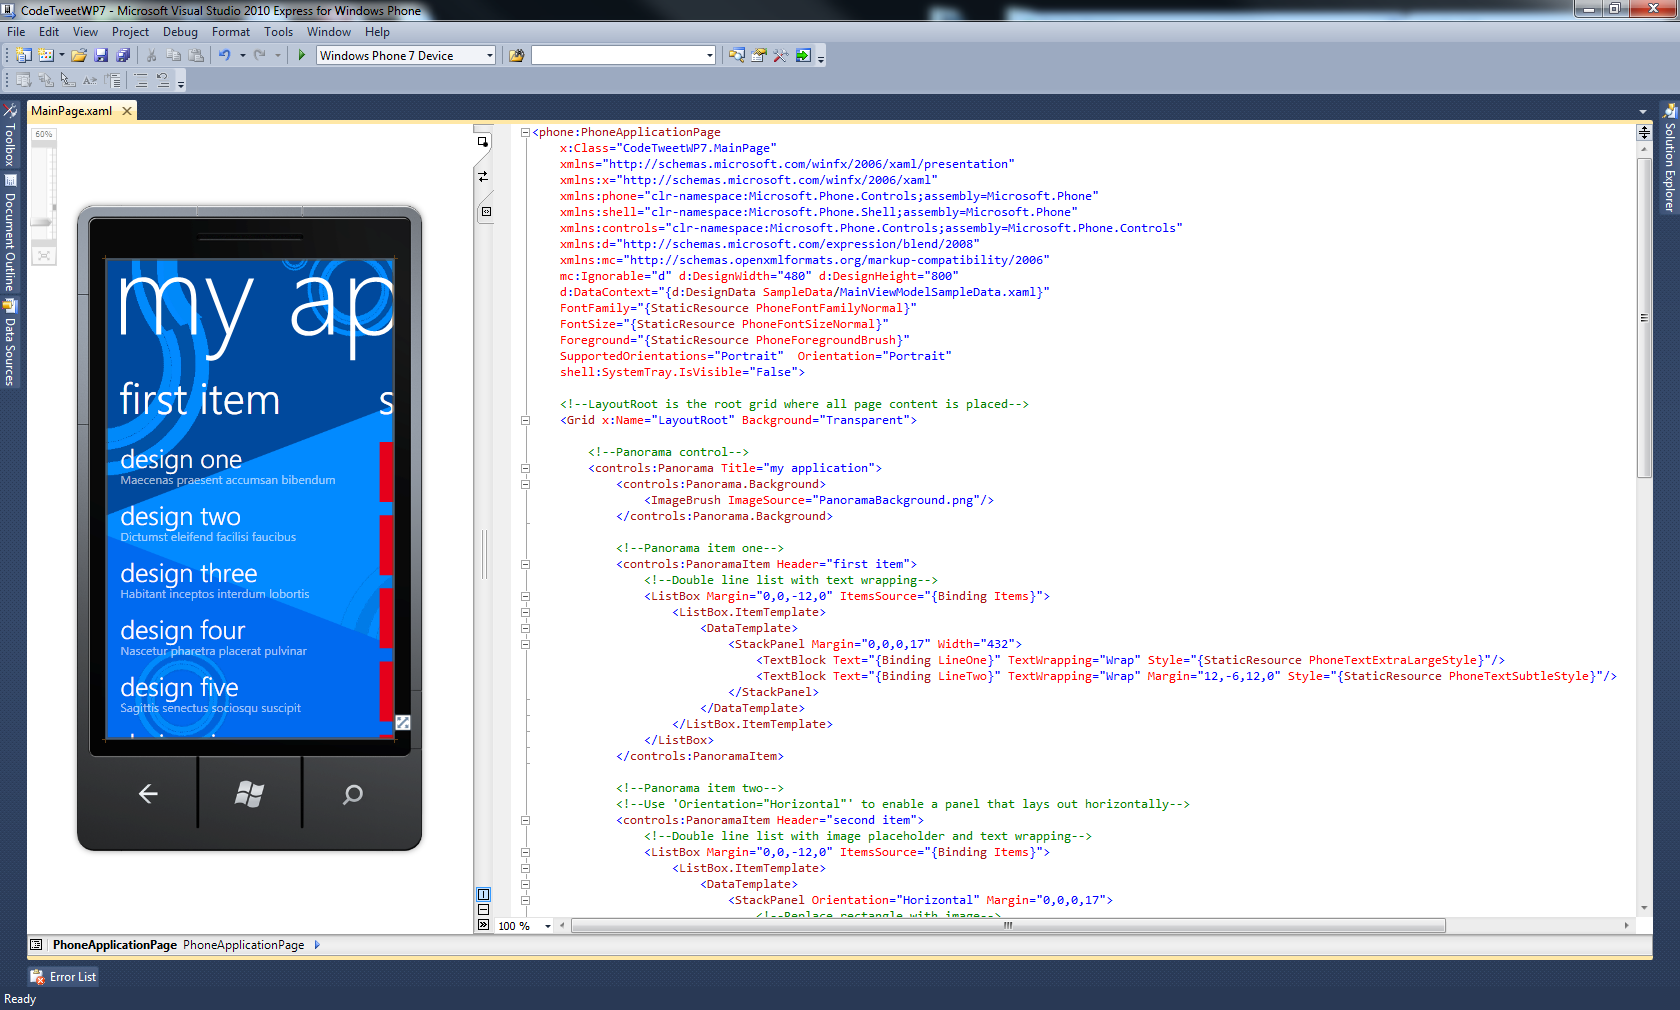
After your project is created, you should be looking at the MainPage.xaml Design and XAMLs view, like in Figure 2.
At the top of Visual Studio, set the Deployment Target dropdown list to Windows Phone 7 Emulator and hit F5. Take a moment and play with the app, scrolling up/down and left/right. Once you get bored with the app, and it shouldn’t take long, hit Shift+F5 to stop the debugger. Leave the emulator running for now.
Take a look at the XAML and find the section marked Panorama control. Change the Title property to CODETweet, add a Name property and set it to Panorama as shown below.
<!--Panorama control-->
<controls:Panorama Title="CODETweet"
                   Name="Panorama">
Nested within the markup for the Panorama are two PanoramaItems. These will be the two screens for our application.
Edit the markup for the first PanoramaItem by changing the Header property and adding a Name property, like this:
<!--Panorama item one-->
<controls:PanoramaItem Header="Tweets"
                       Name="Tweets">
Do the same for the second PanoramaItem, changing the Header and Name as shown.
<!--Panorama item two-->
<controls:PanoramaItem Header="Searches"
                       Name="Searches">
There are more changes to make in the XAML later, but first we need to build out some of the supporting code.
Accessing Twitter
You can find the Twitter Search API documentation at http://dev.twitter.com/doc/get/search.
The Search API doesn’t require us to log in since we aren’t posting tweets or pulling our own timeline or friends list. We also don’t need to get an API key or register our application. This makes things really simple.
You can see the Twitter Search API call in action by opening a browser and entering the following URL:
http://search.twitter.com/search?q=codemagazine
You can put pretty much whatever you want after the equal sign, since that is your actual search criteria.
The API call we will be using is only slightly different than the URL you just saw. The Search API only supports two return types: JSON and ATOM. In this article, we will use JSON (JavaScript Object Notation) to receive our search results. It’s not quite as “human readable” as XML, but it’s very easy to work with.
In the Solution Explorer, add a new class to your project and call it Twitter. This will contain the code we use to access the Twitter Search API.
Once the Twitter class is created and open in your editor, add the static keyword to your class definition, like so:
public static class Twitter
{

}
Just inside the class definition, add this constant:
private const string SearchURL =
"http://search.twitter.com/search.json?q={0}";
Next, you will add the static Search method to your class. Start by creating the signature:
public static void Search(string searchText,
Action<IEnumerable<Status>> onSearchCompleted =
null, Action onFinally = null)
{
}
At this point, Visual Studio should be complaining a little because you’re telling it to use things and it doesn’t know what they are.
Add the following using statement to the top of your class file:
using System.Collections.Generic;
That will fix one of the problems. The other requires adding a new class called Status to your project. Go ahead and do that now.
Once the class is created, go ahead and get rid of all but the first two using statements, so your new class looks like this:
using System.Net;
using System;

namespace CodeTweetWP7
{
    public class Status
    {

    }
}
This class will contain properties that represent the various parts of a Twitter status (also known as a tweet.)
Add these properties to your class:
public string text { get; set; }
public string from_user { get; set; }
public string profile_image_url { get; set; }

public string DecodedText
{
    get { return HttpUtility.HtmlDecode(
          string.Format("{0}: {1}",
                 from_user.ToUpper(), text)); }
}
These properties will contain, in order, the text of the Twitter status, the Twitter username, a URL pointing to the Twitter icon of the user and a formatted combination of username and tweet.
The names of the first three properties are pretty important since they must match the field names found in the JSON you get back from Twitter.
Save this class and go back to your Twitter class. Visual Studio shouldn’t be complaining anymore, so let’s continue on.
In the Search method you are going to create a new instance of the WebClient class and use it to open a connection to the Twitter Search API, and pass it the URL you created earlier. Once you get a JSON response from Twitter, you will deserialize it and pass it back to the calling code as an Enumerable collection of type Status, which you just created.
Add the code in Listing 1 to the body of your Search method, in your Twitter class:
At this point, Visual Studio is going to be complaining again. In the Solution Explorer, right-click the References section and add a reference to System.Servicemodel.Web and then add this using statement:
using System.Runtime.Serialization.Json;
That will get rid of one of your problems. For the other one, you need to go back to the Status class file and add this class, below the Status class, within the same namespace:
public class StatusList
{
    public Status[] results { get; set; }
}
This will be used to store the collection of Twitter statuses that are returned by the search query.
Now if you go back to your Twitter class, you should be error free.
Building the UI
Switch back to MainPage.xaml and take a look at the Tweets panorama item. Remove everything between the start and end tags so it looks like this:
<!--Panorama item one-->
<controls:PanoramaItem Header="Tweets"
                       Name="Tweets">

</controls:PanoramaItem>
You’re going to add a ListBox control to display the statuses returned by the Twitter.Search() method you created earlier.
Add the code in Listing 2 inside the XAML for the PanoramaItem you just edited.
There are a few things going on here. The ItemTemplate and DataTemplate work together to describe the appearance of each item in the list. Inside the DataTemplate, we’re using some nested StackPanels to control the layout of the Twitter status message. Figure 3 shows a sample tweet as displayed in our app.

The outermost StackPanel is vertically oriented and contains another StackPanel above a TextBlock to provide some padding between items.
The next StackPanel contains an Image control which is bound to the profile_image_url field of the Twitter status (as seen in our Status class) and yet another StackPanel.
The innermost StackPanel contains a small TextBlock for padding next to the Image and another TextBlock which is bound to the DecodedText property of your Status class. Remember, this property isn’t part of the JSON returned by the Twitter.Search() method, but was created to return a string containing the combined from_user and text fields of the Twitter status.
That’s it for the Tweets panorama item. Next is the Searches panorama item, which is a bit more involved.
Start by deleting everything between the Searches panorama item tags, just like you did for Tweets earlier. The code should look like this:
<!--Panorama item two-->
<controls:PanoramaItem Header="Searches"
                       Name="Searches">

</controls:PanoramaItem>
In this panorama item you will be adding a TextBox, a Button and a ListBox. The TextBox and Button will be used to submit search criteria to Twitter.
The ListBox will be used to display a list of previously entered search criteria and a button for deleting them from the list.
First, add a vertical StackPanel inside the Searches PanoramaItem. Inside that, you will add a horizontal StackPanel which will contain your search box and search button.
Next, add a TextBox control named txtSearch and give it a Width of 330. Your code for the Searches PanoramaItem should look like this:
<controls:PanoramaItem Header="Searches"
                       Name="Searches">
    <StackPanel Orientation="Vertical">
        <StackPanel Orientation="Horizontal" >
            <TextBox Name="txtSearch"
                     Width="330"
                     Text="" />

        </StackPanel>
    </StackPanel>
</controls:PanoramaItem>
Right after the TextBox, you’re going to add a Button. Instead of a traditional rectangular button, you’re going to use the icon shown in Figure 4.

Once you have the search.png image, add it to your project (right-click, add existing item, browse to the image.)
When adding the button, you will also be creating an event handler to be called when the user clicks the image.
As you are typing, you will be given the choice of selecting an existing event handler or selecting a <New Event Handler>.
HINT: If you pick the <New Event Handler> it will automatically create the matching method in the code behind file for you. If you type in a new name instead, you’re on your own.
Inside the Button markup, you need to add a template to include the image, as shown here:
<Button ClickMode="Press" Click="Button_Click">
    <Button.Template>
        <ControlTemplate>
            <Image Source="search.png"></Image>
        </ControlTemplate>
    </Button.Template>
</Button>
Make sure you put this code inside the StackPanel, immediately after the Textbox, or it won’t look right.
In addition to the search box and button, we also need to display a list of previous search criteria and give our users the ability to delete them.
To do this, we will use another ListBox similar to what we did in the Tweets Panorama Item.
Just after the horizontal StackPanel, but still inside the vertical StackPanel, add a ListBox and name it SearchList and set the Margin to 0,0,0,0.
Just like the previous ListBox, you’ll be using a template to define how things appear in your list. Inside the template, add a horizontal StackPanel with a Height of 60, a Width of 420 and set the VerticalAlignment to Center.
At this point, your ListBox code should look like this:
<ListBox Name="SearchList" Margin="0,0,0,0">
   <ListBox.ItemTemplate>
      <DataTemplate>
         <StackPanel Orientation="Horizontal"
                     Height="60" Width="420"
                     VerticalAlignment="Center" >

         </StackPanel>
      </DataTemplate>
   </ListBox.ItemTemplate>
</ListBox>
Inside the StackPanel you will be creating two buttons. One button will delete the saved search criteria and the other will re-query Twitter with the selected criteria.
The first button you will create is the Delete button. You will be using another image, as shown in Figure 5. Just like the Search button image, you’ll need to download delete.png and add it to your project.

Add a Button (inside the StackPanel) and set the ClickMode to Press, the Click event to Delete_Click and the VerticalAlignment to Center.
There’s one more property you need to set, and that’s the Tag. You’re going to bind it directly to the source. (Confused? Don’t worry, it will be clear shortly.)
Add a template to your Button and add the Delete image inside it with a Width and Height of 40. At this point, your Button markup should look like the following:
<Button ClickMode="Press"
        Click="Delete_Click"
        Tag="{Binding BindsDirectlyToSource=True}"
        VerticalAlignment="Center">
    <Button.Template>
        <ControlTemplate>
            <Image Source="delete.png"
                   Width="40"
                   Height="40" ></Image>
        </ControlTemplate>
    </Button.Template>
</Button>
You may have noticed that, unlike the search box, nothing is showing up in the design view when you add items to the ListBox template. That’s ok; they will show up at runtime when you actually put something in the list.
The next button doesn’t show an image, but instead uses a TextBlock to display some clickable text (your search criteria.)
Right after the first Button in this StackPanel, add a second Button. Set the ClickMode to Press, the Click event to Line_Click, the VerticalAlignment to Center and (once again) set the Tag property to {Binding BindsDirectlyToSource=True}.
Inside the Button, add a template containing a TextBlock (not to be confused with a TextBox) and bind the Text to SearchItem. (You haven’t created this yet, but you’re about to. I’ll also explain the binding directly to source, as promised.)
Set the TextWrapping to wrap so it doesn’t truncate in your list and style it as PhoneTextExtraLargeStyle.
The markup for the second Button in your ListBox template should look like this:
<Button ClickMode="Press"
        Click="Line_Click"
        Tag="{Binding BindsDirectlyToSource=True}"
        VerticalAlignment="Center">
   <Button.Template>
      <ControlTemplate>
         <TextBlock Text="{Binding SearchItem}"
                    TextWrapping="Wrap"
                    Style="{StaticResource
                      PhoneTextExtraLargeStyle}"/>
      </ControlTemplate>
   </Button.Template>
</Button>
The good news is you’re done with the XAML. The UI is complete. We just need to wire a few things up in the code.
Making it Work
Switch back over to MainPage.xaml.cs and you should see the constructor, the MainPage_Loaded event handler and the Button_Click event handler.
Currently, your MainPage_Loaded method doesn’t do very much. You’re about to make it do even less.
Go ahead and delete the code inside the body of the MainPage_Loaded method. It was relevant for the sample “data” in the default XAML you got when the project was created, but you don’t need it for what we’re doing here.
While you’re trimming out unnecessary code, go ahead and remove the DataContext line from the MainPage constructor. You don’t need it either.
Now the constructor and MainPage_Loaded methods should look like this:
public MainPage()
{
    InitializeComponent();
    Loaded += MainPage_Loaded;
}

private void MainPage_Loaded(object sender,
RoutedEventArgs e)
{

}
In order to store a list of search criteria, we need something to store it in, and that something will be our CriteriaList. Add a new class to your project and call it Criteria.
The Criteria class is rather simple, as seen below:
public class Criteria
{
    public string SearchItem { get; set; }
}
The SearchItem will contain the actual string typed into the Search box. This is also what gets passed to the Twitter Search API when you make a request.
In the same file (and namespace), add a second class called CriteriaList. This one needs to inherit from ObservableCollection<Criteria>.
In the constructor for your CriteriaList class, you will add some default search criteria for your users. The class should look like this when you are done:
public class CriteriaList :
ObservableCollection<Criteria>
{
   public CriteriaList()
   {
      Add(new Criteria { SearchItem = "WP7" });
      Add(new Criteria { SearchItem =
                        "chrisgwilliams" });
      Add(new Criteria { SearchItem =
                        "CODEmagazine" });
   }
}
Feel free to substitute whatever criteria you want in the SearchItems above.
Right now, Visual Studio should be complaining a little about the ObservableCollection and the Add methods in the constructor. You can fix this by adding the following using statement to the top of the class file:
using System.Collections.ObjectModel;
Right about now you may be wondering why we’re using an ObservableCollection to store what is obviously little more than a list of strings. (If you already know the answer, consider sending me your resume.)
We’re going to be setting the ItemsSource property of our SearchList (ListBox) to the CriteriaList.
The reason we’re using an ObservableCollection is because it provides notifications whenever items get added or removed, and also when the whole list is refreshed. As luck would have it, our SearchList can listen for the notifications and automagically update whenever they happen. This also has to do with why we used the BindsDirectlyToSource in our search criteria buttons (specifically the delete and text buttons).
We will use the value associated with each line item in our SearchList to update our CriteriaList, which you will see shortly.
That’s it for the Criteria and CriteriaList classes, so switch back to MainPage.xaml.cs and get ready to write some more code. We’re in the home stretch now… almost done.
Now that you have created the CriteriaList class, add the following class level variable in MainPage:
CriteriaList criteriaList = new CriteriaList();
Next, in the MainPage_Loaded method, add this code to grab anything we have in isolated storage:
var savedSearchList =
IsolatedStorageSettings.ApplicationSettings;
If Visual Studio complains about the above line, add this using statement to the top of your file and you should be fine:
using System.IO.IsolatedStorage;
The first time you run the app, isolated storage will be empty, but that’s fine. You’ll have stuff in there soon enough.
After you create and populate your savedSearchList, you’ll want to check and make sure it isn’t empty before doing any operations against it.
You’re going to loop through all the items you got from isolated storage (now conveniently located in the savedSearchList), turn each of them into Criteria objects and add them to the criteriaList (which, if you remember, is your ObservableCollection).
Finally, you’ll set the ItemsSource property of your SearchList (the ListBox you created in the XAML) to your criteriaList.
Listing 3 shows the MainPage_Loaded method when you are done:
Did you notice I snuck in a little extra code to prevent duplicate entries? It’s not absolutely necessary, but it does keep your list nice and neat.
Next, you’re going to work on the Button_Click method, which gets fired by the Search button you set up in the XAML.
But wait… notice anything missing? You still need two more event handlers for the buttons in your search list.
Before adding anything to Button_Click, copy the still empty method and paste it twice, renaming the copies to Line_Click and Delete_Click, respectively.
Now, with those out of the way, it’s time to focus on the Button_Click method.
First, add this code to grab anything we have in isolated storage:
var savedSearchList =
IsolatedStorageSettings.ApplicationSettings;
Next, check to see if the Search TextBox (txtSearch) has anything in it. If it does, pass that search criteria to the Search method of the Twitter class we created.
Thanks to the magic of LINQ, we will take the resulting IEnumerable<Status> and assign it to the ItemsSource property of the ListBox that displays our Twitter Search results.
Now see if the search criteria just submitted is in the list and add it if it’s not already there. Do the same thing with the list in isolated storage as well.
That’s a lot of stuff to do, and Listing 4 shows the code to do it:
Finally, set the ItemsSource property of the SearchList to the criteriaList (which may or may not have been updated), clear out the Search TextBox and flip the Panorama view back to the Tweets PanoramaItem, as shown below:
SearchList.ItemsSource = criteriaList;
txtSearch.Text = "";
Panorama.DefaultItem = Tweets;
SearchList.ItemsSource = criteriaList;
txtSearch.Text = "";
Panorama.DefaultItem = Tweets;
Make sure this goes after your “if” clause, but inside the Button_Click method.
Two methods left and you’ll be ready to give it a spin. Fortunately, they are both pretty short.
The Line_Click method gets fired when your user clicks (taps) on one of the search criteria in your list, just below the Search TextBox.
To do this, take the line item that was clicked, cast it to a Button so you can grab the Tag property, then cast that to a Criteria object that matches the item. That will allow you to access the SearchItem property which you will then assign to the Text property of the Search TextBox.
Wow! That sounds like a lot, but it’s actually only one line of code:
txtSearch.Text =
((Criteria)((Button)sender).Tag).SearchItem;
After that, call the Button_Click method which will take what you just put in the Search TextBox, submit it to Twitter and return a set of results.
You’ll need to pass your sender object and your RoutedEventArgs (e) into the Button_Click method, like this:
Button_Click(sender, e);
Your entire Line_Click method should look like this:
private void Line_Click(object sender,
RoutedEventArgs e)
{
    txtSearch.Text =
     ((Criteria)((Button)sender).Tag).SearchItem;
    Button_Click(sender, e);
}
I told you it was short.
The final method is Delete_Click. This is what gets fired when your user clicks on the Delete icon next to one of the search criteria in your list.
In this method, you’ll cast the Button as a Criteria object and use that to remove the matching line item from the list. Then you’ll update the ItemsSource property of the SearchList.
Finally, the same search criteria item will be removed from the list being maintained in isolated storage.
Once that is done, your Delete_Click method should match this:
private void Delete_Click(object sender,
RoutedEventArgs e)
{
    var item = (Criteria) (sender as Button).Tag;
    criteriaList.Remove(item);
    SearchList.ItemsSource = criteriaList;

    var savedSearchList =
      IsolatedStorageSettings.ApplicationSettings;
    savedSearchList.Remove(item.SearchItem);
}
Congratulations! That’s the last bit of code for this project. Now it’s time to try it out.
Testing CodeTweet
If you don’t have a Windows Phone, you’ll need to test the app in the emulator, so make sure the Deployment Target dropdown list in Visual Studio is set to Windows Phone 7 Emulator. To start up the CodeTweetWP7 app, just hit F5. After a couple seconds, the emulator will start up and then your app will appear.
Try swiping left and right to navigate between the two panels. You should see some predefined search criteria in the list on the Search screen.
Tap on one of them and you’ll be taken to the Tweets screen and after a moment, your search results will appear.
Switch back to the Search screen and type in some new search criteria in the text box. Try something like XNA or Silverlight and check out the results.
When you flip back over to the Search screen again, you should notice your new search criteria have been added to the list.
Now stop your app in Visual Studio, but LEAVE THE EMULATOR RUNNING. (If you close the emulator, isolated storage gets wiped out. Every time you launch the emulator, it’s like getting a brand new phone.)
Once your app is stopped, hit F5 again to re-launch it. After it loads, switch over to the Search screen and you will see the search criteria you added, in addition to the hardcoded criteria you added in the CriteriaList class.
Now hit the delete button next to one of the criteria and it will disappear. If you stop and restart the app, you will see it’s no longer in isolated storage either.
This app meets all the specified criteria, and I bet you’re already thinking of ways you can enhance it.
Submitting Your Own Apps
Once you start creating Windows Phone apps, you’re going to eventually want to submit them to the Windows Phone Marketplace.
To do this, you’ll need to go over to the App Hub which is located at http://create.msdn.com. If you don’t already have a membership, you’ll need to create one before you can submit your app or game.
When you sign up for the App Hub membership, you’ll pay a $99 fee which is good for one year and grants you the ability to submit unlimited paid games as well as up to 100 free app submissions.
Free apps are exactly what they sound like. These are apps that you do not charge for. Paid apps are apps that your users have to purchase prior to downloading. You can also have advertising supported apps, but these are still considered free apps (assuming you don’t charge for them.)
Submitting your app is a fairly easy process that involves going to your dashboard in the App Hub, uploading the XAP generated when you build your app or game and providing some information about your game.
Once you submit it, Microsoft will run tests to make sure it is compliant with the Marketplace Certification Guidelines and will notify you once it has passed or failed certification.
If your app fails certification, you can fix it and resubmit. If it passes certification, within a few days your app will be available in the Windows Phone Marketplace.
Good luck! I look forward to seeing what you come up with.
