


In the Fall of 2002, Microsoft introduced Tablet PCs based on the popular Windows XP operating system.
By default, this new platform includes applications with special Tablet PC features enabled, such as Ink Input and Pen-based operation. In order for this platform to become truly popular, third-party vendors will also have to ink-enable their applications. Luckily, this is a pretty straightforward task.
Before getting started with the details of developing ink-enabled applications, let's look at the Tablet PC platform for a few paragraphs. After all, tablet-like devices aren't exactly new. You probably already own another tablet-like device, such as a Pocket PC or a palmtop device. Even before these handheld computers gained widespread popularity, there were other efforts, going back to the Apple Newton and devices such as the GRiDPad. Microsoft also made an early attempt at this platform with Windows for Pen Computing, an operating system based on Windows 3.x.
Many of the early attempts to create tablet-like devices failed, mostly due to poor hardware performance. Devices were too heavy and, at the same time, not powerful enough to run sophisticated handwriting recognition programs. Battery-life, display quality, and brightness were major hurdles no one seemed able to overcome.
What most people do not realize is that Tablet PCs are regular PCs with extra functionality. They run all your regular applications, just like any other PC.
The only tablet-like devices that enjoyed significant success in the market place were (and are) Palm devices and Pocket PCs. These devices differ significantly from Tablet PCs, as they are specialized, small devices designed to be carried around in your pocket. Tablet PCs, on the other hand, are general-purpose computers. They run on the same processors as a laptop, they have large hard drives, and they have as much memory as any other computer. In short, they are pretty much regular computers with a bit of extra functionality.
What Is a Tablet PC?
The most striking feature of Tablet PCs is that the device is flat (simulating a pad of paper) and is operated using a pen. The pen is a rather sophisticated input device that can be used as you would normally use a mouse. The pen also enables handwriting and gestures, which can in turn be recognized as regular input by the Tablet PC OS. Windows XP Tablet PC Edition, a superset of regular Windows XP, supports all of this extra functionality. Hardware manufacturers have to support this functionality by providing technology that can sense the position of the pen on the display, such as integrated digitizers.
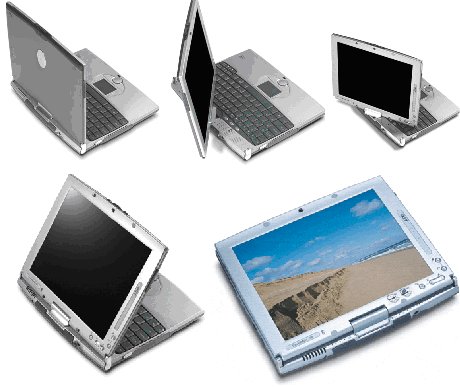
What most people do not realize is that Tablet PCs are general purpose PCs. Most people think of Tablet PCs pretty much as they do palmtop devices. Most Tablet PCs are convertibles: they are both Tablet PC and laptop PC in one device. This means that they look and behave like regular notebook computers in most scenarios, but whenever Tablet PC functionality is required, the display can be swiveled around and folded down to transform the device's physical appearance into the typical tablet form. Figure 1 shows the transformation in action. Of course there also are Tablet PCs that do not also act as a regular notebook computer, but those devices are specialty devices, rather than general-purpose computers. For this reason, the vast majority of Tablet PCs sold are convertible.
Most people also do not realize that the Tablet PC OS is a superset of Windows XP. This means that you can do anything with the Tablet PC OS that you can do with a regular PC. You can run all your regular applications, from MS Office to the applications you write yourself. This is a drastically different approach than the one taken by handheld devices such as the Pocket PC, where a brand new OS (Windows CE) powers the device, and applications have to be developed especially for the device.
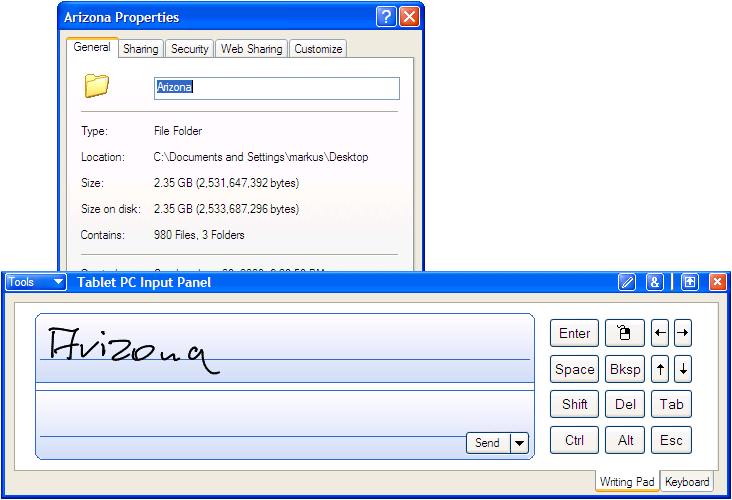
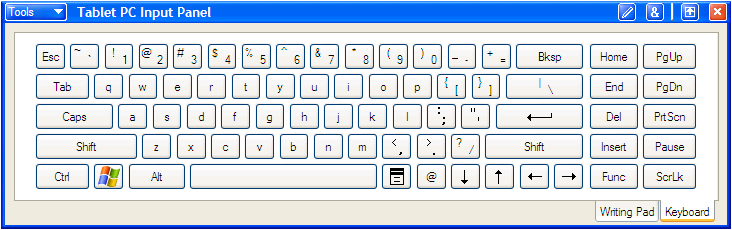
Windows XP Tablet PC Edition not only supports ink input and recognition, but it also provides a number of additional applications. Among the more useful ones is Windows Journal, a note-taking and document-creating application specifically designed for handwriting and drawing. Microsoft sells many add-ons to their more popular applications (such as Word and Excel), to natively enable handwriting and inking. In order to support pen-based operations for practically all Windows applications, the OS ships with the Tablet PC Input Panel to simulate a keyboard for applications not natively aware of ink. The Input Panel provides a handwriting surface. When you write on it, the OS automatically tries to recognize the handwriting, and sends the result to the active control (such as a textbox), as if it came from the keyboard (Figure 2). The textbox itself does not have to be aware of the Input Panel at all. The Input Panel also provides a "soft keyboard" (Figure 3) that can be used whenever ink recognition is not adequate or fails to recognize what's written.
Unfortunately, the Input Panel does not provide a great user experience compared to applications that support ink natively. For this reason, let's take a closer look at ink-enabling applications natively in this article.
The Hardware
Some of the biggest differences between regular PCs and Tablet PCs are to be found in the hardware. Microsoft has an entire catalog of criteria that needs to be fulfilled in order for a Tablet PC to be considered a "true" Tablet PC. Many requirements have to do with device sizes, screen resolution, power management, and the like. Many requirements are based on requirements for regular PCs (such as docking and undocking without reboot), and some of the requirements are stricter than those for regular PCs (waking up from sleep mode in a certain amount of time for instance?less than five seconds in this case). Also, there are a number of "shall" requirements, such as device weight and the like.
The most important hardware difference between regular PCs and Tablet PCs is the addition of a digitizer. This is the device that senses the position of the pen on the display. Unlike Pocket PC digitizers, the digitizer technology utilized by Tablet PCs is not touch sensitive. This means that scratching the display with your fingernail will not move the mouse pointer around (as it does on Pocket PCs). Instead, the Tablet PC platform utilizes electromagnetic digitizers. The pen emits a weak electromagnetic field that is sensed by the digitizer. This approach has a number of advantages over touch technology. For one, the digitizer can be mounted behind the display, resulting in a clearer and brighter image. Also, the digitizer can sense the pen before it even touches the display. Many digitizers can even sense the angle and rotation of the pen. Some applications that produce three-dimensional images (CAD, for instance) can utilize such information in interesting ways. Many digitizers are also pressure sensitive. This may seem to contradict the fact that the digitizer is not touch sensitive. In fact, pressure information is picked up by the pen. In most Tablet PC applications, the harder you hold the pen down, the thicker the drawn line is (although applications are free to use the pressure information for other purposes).
Developing for Tablet PCs
In order to develop for Tablet PCs, you mainly need the Tablet PC Platform SDK (which you can download for free from www.Microsoft.com/TabletPC), as well as a development tool that supports either Win32 APIs (C++), COM (VB6, VFP, etc.), or managed code. (Because this article is about writing Tablet PC applications with Visual Studio .NET, I'll focus on the managed code parts of the SDK.) On top of that, you also need a computer that runs either Windows XP, or Windows XP Tablet PC Edition. That's right: a Tablet PC is not required to develop Tablet PC applications. You can do most development on a regular PC, simulating pen input with the mouse, although this is not really comparable to real pen input. For this reason, I would recommend that if you cannot get a Tablet PC, try to at least get a digitizer pad for your regular PC. It is cheaper than a Tablet PC and much better than using the mouse for pen operations. But of course, it is not quite the same as writing on the actual display.
Tablet PCs will benefit all those users who need a full-featured computer, but do not have the luxury to sit down while operating it. One-handed input will be crucial.
If you have a Tablet PC, you have two options: you can develop on the actual Tablet PC, or you can develop on your desktop PC, deploy the application to the Tablet PC, and debug remotely. Although Tablet PCs are regular PCs that can even have external keyboards and monitors hooked up, you will probably only want to do development on Tablet PCs if you have a top-of-the-line model. Right now, I am not aware of P4 Tablet PCs (although I am sure they are just around the corner). My model only has 256MB of RAM (although the best model I am currently aware of supports up to 2GB). This means that the system will have trouble running Visual Studio .NET and possibly even SQL Server and launching a debug session. I am writing this article on a Tablet PC, and I am also writing the sample code on this device. (It works OK as long as I compile in release mode).
The Managed SDK
The Managed SDK provides a number of classes and controls that can be used to implement ink functionality. The controls can be added to your Visual Studio toolbox and dropped on any Windows form. There are two different controls. One is called the InkEdit control. It replaces the regular TextBox control with a control that supports ink either by recognizing whatever a user writes, or by storing the ink as an image. The InkEdit control is derived from the RichTextBox control. This means that the control also supports text with rich formatting.
The Tablet PC API makes handwriting recognition amazingly easy.
The InkEdit control provides a quick way to add ink functionality to your applications. Unfortunately, there are a few issues with this approach. For one, ink-enabled textboxes need to be larger in dimension than regular textboxes to give the user enough room to handwrite text. You'll find that 21 vertical pixels simply isn't enough. The other problem is that the control provides rudimentary quality. Ink recognition works reasonably well (and is the default behavior for all written text), but when the control runs in ink-collection mode (where the ink gets stored as handwriting, rather than actual text), things do not work as well. The rendering quality of the ink is poor. Also, the control tries to match ink dimensions to the point size of the control. This means that ink written 2/3 of an inch tall will be shrunk down to be 8 points tall at its tallest point (assuming that the point size of the control is set to 8pt). You can easily experiment with this control on your own, but in this article, I'll show you how to develop different approaches to ink-enabling applications that work much better than this quick and dirty implementation.
The other control provided by the SDK is the InkPicture control. This control has been designed to load a bitmap as a background image and then perform ink annotations. The InkPicture control is very similar to the InkOverlay class, discussed later in great detail. In general, as a .NET developer you are likely to be more interested in the SDK classes than the controls, as they provide a lot more control over their behavior and are only slightly more time consuming to use. The class that is of most interest is the InkOverlay, providing the most functionality of all the provided classes. (The InkOverlay is very similar to the InkCollector, but with some added functionality such as integrated delete and select capabilities.)
The InkOverlay Class
The InkOverlay class is very straightforward to use. Simply create a new Visual Studio .NET Windows Forms project, and add the Microsoft.Ink assembly to your project references (this assembly is installed in the GAC once you install the Ink SDK). Then, open the Code window form, the automatically created Form1 class, and add a reference for the ink collector on the form level:
Private Microsoft.Ink.InkOverlay oInk;
This is the C# version. If you created your project in VB.NET, use the following line:
Private oInk As _
   Microsoft.Ink.InkOverlay
Now, add code to the form's constructor to enable the ink collector. The object operates by attaching itself to the handle of any control on a Windows form. You can use the form's handle and assign it to the ink collector before you enable the collector for pen input:
public Form1()
{
   InitializeComponent();

   // We load and initiate the
   // InkOverlay object
   this.oInk = new
      Microsoft.Ink.InkOverlay();
   this.oInk.Handle = this.Handle;
   this.oInk.Enabled = true;
}
Note that I am using fully qualified names (like Microsoft.Ink.InkOverlay, rather than just InkOverlay). You can avoid having to do that by adding a generic reference to the namespace at the top of your program or in your project settings.
Once again, the Visual Basic .NET version is very similar:
Public Sub New()
   MyBase.New()

   InitializeComponent()

   ' We load and initiate the
   ' InkOverlay object
   Me.oInk = new _
      Microsoft.Ink.InkOverlay()
   Me.oInk.Handle = Me.Handle
   Me.oInk.Enabled = True
End Sub
As you can see, the difference between the C# and the Visual Basic .NET version is minimal. Therefore, I will focus on the C# version unless there is a significant difference. You won't have a hard time converting the samples to VB .NET if that is the language of your choice. Also, you can download the samples in a VB.NET version from the CoDe Magazine Web site (www.code-magazine.com).
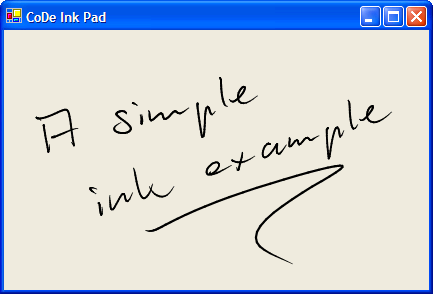
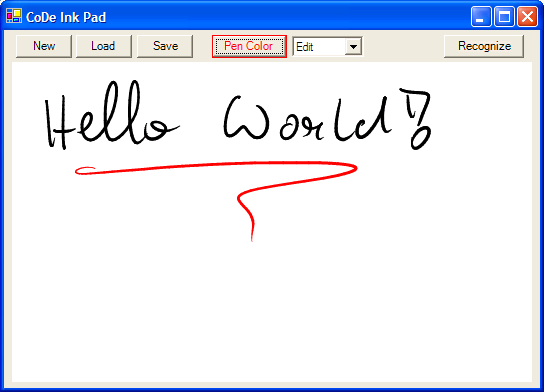
OK, this is it! You just created your first ink-enabled application. When you launch this form, the form is immediately ready to collect ink input (Figure 4). Of course in many scenarios, you may not want the entire form to be ink enabled. For instance, if you were to write a simple ink notepad application, you may want the majority of the form to be ink enabled, but you may have other controls on the form, such as toolbar buttons, and a status bar. For this reason, it is often better to add a control (such as a Panel) to the form for the specific purpose of collecting ink. Figure 5 shows the same form with an added panel. To make it look a bit more like a sheet of paper that ink can be applied to, I also set the background of the panel to white. Attaching the InkOverlay to the panel only is just as easy as attaching it to the entire form:
public Form1()
{
   InitializeComponent();

   // We load and initiate the
   // InkOverlay object
   this.oInk = new
      Microsoft.Ink.InkOverlay();
   this.oInk.Handle =
      this.panel1.Handle;
   this.oInk.Enabled = true;
}
At this point, you have a simple ink notepad that can be used to take simple handwritten notes. However, the application is not very sophisticated. For instance, you may want to change the color of the ink you write with. Setting this characteristic (as well as a number of other attributes) can be achieved easily using the DefaultDrawingAttributes object on the InkOverlay. The following code shows how I attached a color-picker button:
private void btnColor_Click(object
   sender, System.EventArgs e)
{
   // We use a color dialog to let the
   // user select the pen color
   ColorDialog oDlg =
      new ColorDialog();
   oDlg.Color =
  oInk.DefaultDrawingAttributes.Color;
   oDlg.ShowDialog(this);

   oInk.DefaultDrawingAttributes.Color
      = oDlg.Color;
}
In this example, you use the native .NET Framework Color Picker dialog box, assign it the current drawing color as the initially selected color, let the user pick a different color, and then re-assign the new color as the new drawing attribute.
Interacting with the Ink
At this point, you have a fully functional ink notepad that can collect ink in different colors. Users also expect to be able to interact with the ink as they can with any other type of data in Windows. This includes selecting and modifying ink, as well as erasing ink. The InkOverlay class supports all these operations natively by supporting three main modes of interaction: Ink, Select, and Delete. The current interaction mode is set through the EditingMode property. You can simply add a drop-down list to the form that allows the user to switch between the three different modes. To do this, I dropped a ComboBox on the form, changed its DropDownStyle to DropDownList, and added three entries to its Items collection called Edit, Select, and Erase. Whenever the user picks one of those items, switch the mode using the following code:
private void lstEditMode_SelectedIndexChanged( object sender, System.EventArgs e)
{
  switch (lstEditMode.SelectedIndex)
  {
    case 0:
      this.oInk.EditingMode =
        InkOverlayEditingMode.Ink;
      break;
    case 1:
      this.oInk.EditingMode =
        InkOverlayEditingMode.Select;
      break;
    case 2:
      this.oInk.EditingMode =
        InkOverlayEditingMode.Delete;
      break;
   }
}
At this point, you have run into one of those tablet-specific ways of interaction: many pens feature an end-of-pen eraser. This allows the user to turn the pen around and use the end to erase ink. This is what the user expects to happen, and it is quite straightforward to implement; but it doesn't come for free. Basically, your application needs to listen for pen-related events fired by the InkOverlay, and whenever you notice that the pen is inverted (turned around), your application must automatically switch the controls' edit mode to delete. The key to implementing this lies in the CursorInRangeEvent. This event fires every time the cursor (pen) moves into the range of the digitizer. The event provides a number of parameters, one of which is a Cursor object. This object contains all kinds of information about the pen, including whether or not it is inverted.
The combination of great handwriting recognition and a fault-tolerant interface design generate amazingly good user experiences, even in database applications.
The first step in the implementation process is to hook up an event handler right after you instantiate the InkOverlay object. Here is the code that does that:
this.oInk.CursorInRange += new ;
   InkCollectorCursorInRangeEventHandler (
   this.oInk_CursorInRange )
This wires the CursorInRange event to an event handler method called oInk_CursorInRange. The code in this event handler method is straightforward:
private void oInk_CursorInRange (
 object sender,
 InkCollectorCursorInRangeEventArgs e)
{
  if (e.Cursor.Inverted == true)
  {
    if (oInk.EditingMode !=
      InkOverlayEditingMode.Delete)
    {
      oInk.EditingMode =
        InkOverlayEditingMode.Delete;
    }
  }
  else
  {
    if (oInk.EditingMode ==
      InkOverlayEditingMode.Delete)
    {
      oInk.EditingMode =
        InkOverlayEditingMode.Ink;
    }
  }
}
The code inspects the Inverted property of the Cursor object. If the pen is inverted and the InkOverlay is not in delete mode, switch it. The opposite is true as well. If the pen is not inverted, but the InkOverlay is in delete mode, set it back to ink (edit) mode. This solution is not entirely perfect. The user could start out in selection mode, then, turn the pen around to erase ink, and then turn it around again to continue selecting ink. This would not work as written because it switches to edit mode instead. This problem can be fixed easily by memorizing the previous state in a field on the form.
This works slightly differently in Visual Basic .NET. There are two options to consider here. One is to hook up an event handler manually, similar to how it is done in C#. The other option is to declare the reference to the InkCollector object "with events." This allows you to define a method that handles the fired event without having to worry about the underlying plumbing. To do so, you have to change the definition of the reference to the InkOverlay object:
Private WithEvents oInk _ As Microsoft.Ink.InkOverlay
Now, you can simply define a method than handles this event:
Private Sub oInk_CursorInRange( _
 ByVal sender As Object, _
 ByVal e As _
 InkCollectorCursorInRangeEventArgs) _
 Handles oInk.CursorInRange

   ' Event code goes here

End Sub
This demonstrates the mechanics of hooking up the event handler code. The actual implementation of the end-of-pen erasing algorithm is nearly identical to the C# version (and you can download the complete VB.NET code sample from the CoDe Magazine Web site).
There is one more little detail about erasing ink that is interesting to know. By default, deletion occurs on a stroke-by-stroke basis. This means that if the user writes a whole word in one stroke, the whole world will be deleted as soon as it is touched by an eraser anywhere. This may or may not be what the user expects. Certainly, in the simulation of real pen and paper, one could argue that only the sections (pixels) of ink that are touched by the eraser should be removed, and the rest of the stroke should stay intact.
The Ink SDK supports both ways of erasing. The behavior you desire is set using the EraserMode property, using InkOverlayEraserMode.PointErase and InkOverlayEraserMode.StrokeErase respectively. The mode you choose may depend on the needs of your application. In the ink notepad example, setting it to PointErase may be the better idea, but other needs (such as in the inventory management application described below) may be better off with the default StrokeErase. In some applications, the decision may be hard to make and should be left to the user.
Ink Management
So far you have learned how to enable forms and controls for inking. You have also seen how to manipulate the ink interactively. Now, it is time to explore how to access the ink programmatically for purposes such as storing the ink and reloading it.
Every ink-enabled control and class, such as the InkPicture control and the InkOverlay class, grant access to the native ink information through an Ink object. This object encapsulates the actual ink data and ways to manipulate the ink. One of the most commonly used members of the ink object is the Strokes collection. This collection contains one item for each stroke the ink object contains. Generally, every time the user touches the pen to the display, draws something, and lifts the pen back up, a new stroke is added to the collection. (There are other ways to generate strokes, such as programmatic adding or generation of new strokes by splitting existing strokes in half, as it might happen during a point-erase operation.) Each stroke in turn is composed of smaller pieces of information, such as the individual points that were sampled by the digitizer. But strokes can also be defined differently, such as through cusps. A cusp is defined as a "significant sub-section of a stroke." A triangle drawn in a single stroke, for instance, has three cusps. The ink object allows the developer to retrieve all kinds of detailed information about strokes. This is useful for advanced operations, such as low-level ink recognition. These techniques are beyond the scope of this article, but it is interesting to know that these techniques are available through the standard SDK.
For now, let's stick to exploring the Ink object and the default Strokes collection. There are many incarnations of the Strokes collection, such as the selected strokes or all the strokes that lie within the boundaries of a certain rectangle. Many of the methods used by the Ink object require stroke collections as a parameter or return stroke collections. Once a stroke collection is retrieved, it is identical in functionality to the default Strokes collection.
Probably one of the most commonly performed operations that involve the Strokes collection is loading and saving ink. Saving the ink is very simple. The Ink object has a method called Save(), capable of returning a serialized version of all the ink information contained in the Strokes collection. Here is the code that stores the current "document" to a file:
oInk.Enabled = false;

SaveFileDialog dlg = new
   SaveFileDialog();
dlg.DefaultExt = "isf";
dlg.Filter =
   "ISF binary files (*.isf)|*.isf";

if (dlg.ShowDialog(this) ==
   DialogResult.OK)
{
   Stream s = dlg.OpenFile();
   byte [] buf = oInk.Ink.Save();
   s.Write(buf, 0, buf.Length);
}

oInk.Enabled = true;
This creates a file with binary ink information on the hard drive. The Save() method is capable of serializing the ink in different formats. By default, binary ink is created, but you could also choose to store a GIF picture of the document. Additionally, you could choose to base64-encode either format, and even specify the compression rate.
I took the extra step of disabling the InkOverlay object before I started the save process, and re-enabled it after I finished. This is important, as it keeps the user from interacting with the inkable area while the save operation is in progress, which could lead to critical errors.
Loading ink is similarly easy. The only difficulty is that ink can only be loaded if the Ink object doesn't have any current ink information. Once strokes are stored in an Ink object, you cannot reload other ink data. For this reason, many ink applications can only load data once, which certainly isn't the desired result. The secret lies in re-creating the Ink object from scratch, loading the existing ink into that new object, and then attaching that new Ink object to the existing InkOverlay object. (Remember that the Ink object and the InkCollector are different objects and each InkCollector stores its data in an Ink object.)
Beyond that, things couldn't be easier. Simply call the Load() method, and pass along the ink that is to be loaded. The method is even smart enough to figure out the format of the passed information, and loads it accordingly. Here's the code that loads existing ink:
oInk.Enabled = false;

OpenFileDialog dlg =
   new OpenFileDialog();
dlg.DefaultExt = "isf";
dlg.Filter =
   "ISF binary files (*.isf)|*.isf";

if (dlg.ShowDialog(this) ==
   DialogResult.OK)
{
   Stream s = dlg.OpenFile();
   byte [] buf = new byte[s.Length];
   s.Read(buf, 0, buf.Length);
   Ink newInk = new Ink();
   newInk.Load(buf);
   oInk.Ink = newInk;
}

this.panel1.Invalidate();
oInk.Enabled = true;
The only line of code that is left to explain is the call to the Invalidate() method of the Panel object. This instructs the Panel to redraw itself, ensuring that the loaded ink is displayed properly.
Of course, another solution is to store the ink in places other than files. An example might be ink stored in a SQL Server database. Also, ink can easily be serialized over distributed networks using Web services, as the Ink object can intrinsically handle base64-encoded formats.
One final ink management technique I would like to demonstrate is manual stroke deletion. This can be useful to delete specific strokes (such as the current selection). It can also be used to clear all ink from the input area. Stroke deletion is facilitated through the DeleteStrokes() method on the Ink object. It expects a Strokes collection as a parameter. If you want to delete all strokes, you can simply pass the default Strokes collection, like so:
oInk.Enabled = false;
oInk.Ink.DeleteStrokes(oInk.Ink.Strokes);
panel1.Invalidate();
oInk.Enabled = true;
Ink Recognition
Of course, ink is not always useful as ink. Often, you will be interested in a textual representation of the user's handwriting. Or perhaps you would like to interpret the ink as graphical shapes such as rectangles and circles. Other uses may call for the ink to be recognized as symbols, mathematical formulae, or even musical notes. And beyond that, certain scribbles may need to be interpreted as gestures that instruct the operating system or the application to perform certain tasks.
The Tablet PC operating system ships with a number of recognizers. The most frequently used recognizer (the default recognizer) recognizes text in the Tablet PC's native language, such as English. Another recognizer that ships with all Tablet PCs is the gesture recognizer. More sophisticated or more specialized recognizers must be installed manually. (Developing handwriting recognizers is certainly beyond the scope of this article.)
Ink recognition (also known as "ink reco") is surprisingly easy using the Tablet PC SDK. In fact, retrieving the most likely recognition result using the default recognizer is simple. For instance, if you wanted to recognize all the text written, you could simply call the ToString() method on the Strokes collection:
MessageBox.Show(oInk.Ink.Strokes.ToString());
That's it! You can wire this code to a button on the ink notepad form, and try it out every so often. You'll be surprised how well it works.
There are, of course, more sophisticated scenarios. Perhaps you are interested in alternate recognition results or just different spacing options (is it "Visual Studio.NET" or "Visual Studio .NET"?). Or perhaps you would like to use a recognizer other than the default. Either way, you would have to manually obtain a recognizer context that grants access to many more details. Here's how that's done:
Recognizers oRecognizers =
   new Recognizers();
Recognizer oReco =
   Recognizers.GetDefaultRecognizer();
RecognizerContext oRC =
   oReco.CreateRecognizerContext();
In this case, you obtain a manual reference to the default recognizer, but you could have also selected a specific recognizer instead. Once you pick a recognizer, you start a new recognizer context, and are ready to go.
Once again, the recognizer context works based on a Strokes collection. The first step in manual recognition is to attach a Strokes collection to the context, and then indicate that no more input is to be expected. Note that recognizers have the ability to recognize text asynchronously, a few words (or strokes) at a time. In this case, you could add Strokes collections to the context until you are finished. In the example, you will only recognize relatively small amounts of text, and you'll do so all at once. For this reason, you call the EndInkInput() method right after you assign the Strokes collection:
oRC.Strokes = oInk.Ink.Strokes;
oRS.EndInkInput();
Now, you can retrieve recognition results using the context's Recognize() method, which also takes one parameter by reference and tells us whether the recognition works as expected:
RecognitionStatus iStat =
   RecognitionStatus.NoError;
RecognitionResult oResult =
   oRC.Recognize(iStat);
At this point, you have a Result object that contains all types of information about the text recognition attempt. The most useful information (which is the same as the information retrieved by the ToString() method above) is known as the TopAlternate. But this time, not only do you have access to the result string, but also additional information such as the recognition confidence level. Here is an example that uses this information:
if (oResult.TopAlternate.Confidence ==
   RecognitionConfidence.Strong)
{
   MessageBox.Show(
      Result.TopAlternate.ToString());
}
Similarly, you could access alternate recognition results and retrieve their text and additional attributes. Using manual recognition is not only useful because you have access to more information about the results, but also because you can provide the recognizer with additional hints about the text you are attempting to recognize. For instance, you may want to recognize only numbers. In this case, you can set a recognition factoid:
oRC.Factoid = "Number";
This drastically limits the number of possible results and will therefore improve recognition quality considerably. The provided recognizers support a large number of factoids (such as "date" and "phone number"), and they can be combined at will.
A Real-World Application
The ink notepad application created so far (the complete code can be seen in Listing 1) demonstrates many of the features supported by the Tablet PC API. However, I also realize that many readers need to develop business applications and not notepads. For this reason, I decided to create a simple sample application that shows how to use many of the features already discussed and use them in a typical data-oriented application.
The sample application is made for a knowledge worker who spends most of the time in a warehouse, checking on inventory, adjusting amounts, and ordering additional merchandise. Figure 6 shows this application. The user can search for products by writing the name of the product into the top ink-panel (the area with the blue gradient background). The application then recognizes the handwriting and uses the result to query SQL Server. If the user is not happy with the result, more can be written to increase recognition accuracy and reduce the size of the result set. The user can also delete individual strokes using the end-of-pen eraser, or even the scratch-out gesture, which allows scratching out some of the written words to trigger an erase operation on the strokes covered up by the scratch out operation. If it all still fails, the user can start over by clearing out the entire input area with the click of a button.
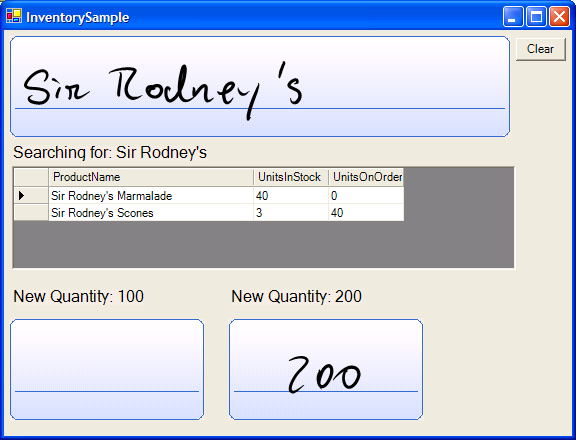
Once a reasonable list of products is retrieved from the server, the user can pick the desired product from the list, specify the quantity currently in stock, and make adjustments. The user can also specify a new order amount. The two ink input areas at the bottom are similar to the one on top except that they are optimized toward recognizing numbers. Also, their behavior is slightly different. Once the user writes a number, the application attempts to recognize the number and immediately clears out the ink area. If the recognition fails, the user can rewrite the number without having to first clear out the input area. This provides a good experience for short numeric input.
Although this application is simple, it is also very amazing, as it provides a very good user experience that relies entirely on handwriting recognition. This is a combination of the operating system doing a very good job at recognizing handwriting and an interface designed to fix recognition problems quickly without causing frustrating moments for the user.
This application uses mostly techniques already discussed. The "inkable areas" are simple image controls with attached ink overlays. Note that there are no UI standards for ink-enabled controls. I thought the blue gradient provided a somewhat intuitive ink input control, as it looks very similar to the inkable areas provided by the Ink Input Panel.
All ink input panels use timers to initiate automatic recognition. The timer responsible for recognizing the ink in the top-most input panel operates on a 500 millisecond interval. However, the timer is disabled by default and is only enabled when the InkOverlay fires a Stroke event. This event occurs every time the user lifts the pen off the display after writing a stroke. The timer triggers ink recognition half a second after a stroke's completion (the timer fires only once by immediately disabling itself) unless another Stroke event occurs within that time and resets the timer. This triggers smooth recognition after the user is finished writing, and does not interfere with the writing operation itself. Also, this allows writing more text at any point, as this simply retriggers the recognition.
The two ink areas at the bottom of the panel work very similarly except for the fact that you clear out the ink areas after the recognition takes place. For this reason, the timers are on a slower interval, firing the recognition two seconds after the last stroke has been completed. It is important to give the user a bit more time in this case, as you wouldn't want to recognize text (and clear the input area) while the user is attempting to write more digits. Note that the two numeric input panels use recognizer factoids to limit the recognition results to numbers. This enhances recognition results and makes it almost impossible to trigger incorrect results unless it is done on purpose.
A more detailed description of this sample application is beyond the scope of this article. You can download the complete source code (C# and VB .NET versions) as well as a more detailed description of this application from the CoDe Magazine Web site (www.code-magazine.com).
Conclusion
With Visual Studio .NET, developing Tablet PC applications is quite straightforward. In fact, if you have architected your applications properly, you will be able to incorporate ink functionality at a level that makes it available throughout your applications, without having to use cumbersome input aids such as the Input Panel. In this article, I can only scratch the surface of what is possible, and explain the very basics, but with what you have learned here, you can already create sophisticated Tablet PC applications. For instance, you could attach an InkCollector class to a special TextBox class used throughout an application. That InkCollector class could be used to recognize the pen when it moves over the textbox and open up a larger "inkable" input area that stays "open" as long as the pen hovers within its range. Then, when the pen moves away, the control could automatically recognize the written text and paste it into the textbox before the inkable area fades away. This way, an application could support advanced inking and regular keyboard interaction, without having to provide different versions (most textboxes that support ink have to be larger in dimension to provide enough room for the user to write). But retrofitting existing applications with ink functionality may be the topic of a future article.
The big question that remains is whether or not Tablet PCs will be as successful in the market as Microsoft hopes. Will computing be revolutionized by this technology within a few years? My personal opinion is that it will not replace the way we use computers today. However, when you consider that all it takes for a Notebook computer to become a Tablet PC is a swivel display with an integrated digitizer, I wonder why it would make sense to build another notebook computer that does not support this functionality. This way, Tablet PC functionality will always be available when needed, but will not interfere with regular, keyboard-driven computing when pen input is not adequate. Furthermore, I believe that there are a lot of people that can benefit from Tablet PC functionality no matter what. Knowledge workers could benefit from using a full-featured computer with capabilities beyond those of Pocket PCs, without the luxury of sitting down to use a notebook computer.
Markus Egger
