


Some time ago, a client called me and asked me to tell him when someone had logged in and out of the network. It was a reasonable request but it presented a challenge for which I had to develop a quick solution.
In developing the application, I made use of a PHP language framework, called CodeIgniter, that I have been using successfully for my development project.
The purpose of this article is to show you how I solved the problem and, at the same time, introduce you to CodeIgniter, a lightweight, easy to use PHP framework that you can use to build high quality, robust, PHP web sites and applications.
The Problem
On its face, the problem does not seem to be that difficult. After all, all you should have to do is check the security event log on the server to retrieve the requested information. There are, unfortunately, two problems with that approach:
- The security event log has way too many events in it. Even filtering the list down to login events is useless because login events are generated for users, devices, and who knows what else. What's worse, they all have the same event number and you cannot easily filter by user name.
- The information in the security event log is not user friendly and also not something you can ask a business user to do. Working with and interpreting event logs do take some technical expertise. I also happen to believe that it is not usually a good idea for clients to poke around in their servers unless they are technically adept. After all, who knows what they may accidentally touch and break. Since the client wanted this information on a regular basis, using the event log did not seem to me to be the right approach.
The Approach
Given the nature of the problem, the solution seemed to be to write something simple. I wanted the client to be able to access the records from any computer and for the report to be user friendly. Accordingly, a database with a Web app front end seemed just the ticket.
The Technology
I decided that the easiest combination of tools would be a PHP-based Web app that reads data from a MySQL database. There were several reasons for the choice:
- The client was already running MySQL as the back end for a database application that I had written for him several years before.
- The MySQL was running as part of a WAMP (Windows, Apache, MySQL, PHP) stack that I had put together for him at the time.
- PHP carries a low overhead, as does MySQL.
I happen to be a fan of PHP and MySQL for many reasons. First of all, they are ubiquitous. According to w3techs.com, 78.8% of all websites on the Web whose server-side languages can be determined are using PHP.
Secondly, many of my clients are small businesses and can't afford hosting their own site on their own server. The hardware and security costs are beyond their means. PHP and MySQL are cross-platform which means that using them as the basis for my Web programming does not limit my options and gives me the ability to write robust Web apps without adding significant costs for hosting, hardware, operating systems, and/or databases.
There was one cost to this approach, but I will get to that in a minute.
The Database
The database, called “userlogs,” consists of one table, called Hlogs," with the following structure:
CREATE TABLE `logs` (
  `idlogs` int(11) NOT NULL AUTO_INCREMENT,
  `cusername` varchar(45) DEFAULT NULL,
  `tevent` timestamp NULL
      DEFAULT CURRENT_TIMESTAMP,
  `cevent` enum('login','logout')
DEFAULT NULL,
  `ccomputer` varchar(45) DEFAULT NULL,
  PRIMARY KEY (`idlogs`),
  KEY `idx_logs_cusername` (`cusername`),
  KEY `idx_logs_tevent` (`tevent`),
  KEY `idx_logs_cevent` (`cevent`)
) ENGINE=MyISAM AUTO_INCREMENT=1049
      DEFAULT CHARSET=latin1
Getting the Information In
Once I had the database constructed, the next step was to come up with a way to record every login and logout event on the network. I wrote a simple Visual Basic script and called it a Group Policy login and logout script. The script was called with a string parameter depicting the event as either “login” or “logout”. The code for the script is in Listing 1.
Listing 1: LogActions.vbs
' logactions.vbs
' Get the name of the computer they logged in to.

Set loS = WScript.CreateObject( "WScript.Shell" )

strComputerName = _
loS.ExpandEnvironmentStrings("%COMPUTERNAME%")

' The specific event is passed through by the Group Policy
strEvent = WScript.Arguments.Item(0)

' The user name
Set loNW = WScript.CreateObject( "WScript.Network" )
strUserName = loNW.UserName

' The connection string
strConn = "Driver={MySQL ODBC 5.2a Driver}; " _
          & "Server=localhost; Database=userlogs; " & _
          "UID=root; PWD="

strQuery = "INSERT INTO logs " & _
         "(cusername, cevent, ccomputer) " _
         VALUES ('" & strUserName & "', '" _
         & strEvent & "', '" & _
         strComputerName & "')"

' Book the event in the database
Set loConn = CreateObject("ADODB.Connection")
loConn.Open strConn
loConn.Execute strQuery
loConn.close
How It Operates
The beauty of this approach to logging the data is that it is quick, silent, and effective. The data is recorded without any detectable delay or any notice to the user.
The Fly in the Ointment
I mentioned earlier that there was one cost to this approach: You have to install the MySQL ODBC driver on every workstation. If you don't, users get error messages when they login with no idea what is causing it.
Showing the Data
At this point you have all the parts in place to gather and store the data. All you have left is to display the data and that is where the PHP comes in.
An Approach to Development
There are two ways to approach development with any language, PHP included. Any development project requires essentially two types of code: the generic code that you will use over and over again and the code that is specific to the particular application. Beginning developers frequently take the approach of trying to build everything themselves. However, in many cases, this is not the most efficient way to go about it.
Another name for the body of generic code that is the foundation on which you build your application is the “framework.” Most mature languages have a slew of frameworks to choose from. Choose one you like and go from there.
This is not to say that building your own framework is always a bad idea. Back in my Visual FoxPro programming days, I went searching for a framework I liked and could not find one, so I built my own. It served me very well for over a decade.
Building a framework, however, is a costly, time-extensive exercise. If you can find one that you like for your development environment, that is probably your best bet.
A Framework for PHP
If you are looking for a framework for PHP, you certainly have many to choose from. It can, however, be quite difficult to choose when you haven't worked with one before. Your best bet is to start by reading some blogs or articles from people who have been there before.
I stumbled onto a framework for PHP totally by accident. I inherited a project from a developer who refused to finish it and I had to make it work. I had no information regarding what had been used to develop it and had to figure it out step by step. I eventually figured out that the framework used was CodeIgniter (https://www.codeigniter.com) and, over the course of two rather strenuous weeks, I learned and came to really like it.
I found that CodeIgniter insulated me from the bulk of the work I had to do for the application. It provides a wealth of built-in resources at a very low performance overhead. As it turns out, it was also very easy to learn. So easy, in fact, that I learned it as a relative newbie to PHP and, as my knowledge and experience with PHP grew, the power of the framework never lagged behind. After two weeks, I was sold and I stopped looking for a PHP framework.
A Note About the PHP Development Environment
Before I go any further, I would like to make a quick note about my development environment. I normally write my PHP code using a Windows 7 computer. My Apache server is part of a WAMP stack called XAMPP which I like because it is absurdly simple to work with. It installs itself, by default, in the root folder of the C: drive (you can change that) and the Web root is \xampp\htdocs.
Getting Started with CodeIgniter
If you're developing with CodeIgniter, setup takes about 10 minutes. Here's what you need to do:
- Download the latest version of CodeIgniter from the developer site.
- Create a folder off your Web root folder for your application. In this case, I called it userlogs.
- Unzip the CodeIgniter files into that folder.
- Set up a virtual host.
- Set up your resource folders.
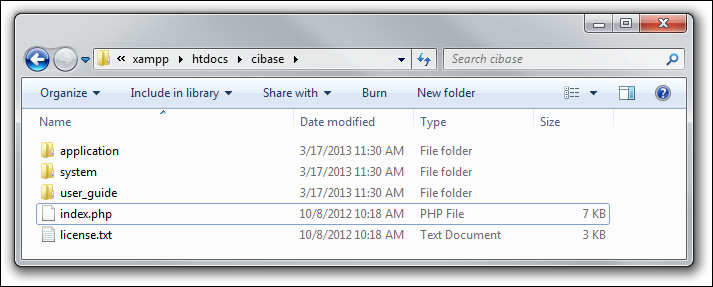
When you are done, you should have a folder structure that looks like Figure 1.
Setting Up a Virtual Host
If you are doing local development, and I assume you are, you will need to setup a virtual host on your machine. It is a three step approach:
- Add a virtual host to Apache.
- Add your domain name to your hosts file.
- Restart the Apache service.
Adding a Virtual Host to Apache
Using XAMPP, the process is straightforward. You need to edit httpd-vhosts.conf, which is located in \xampp\apache\conf\extra. By default, the XAMPP Apache installation does not use virtual hosts but you will want to use them. First, look for the line: #NameVirtualHost *:80.
The hash mark indicates a comment, so remove the hash mark. Then, look at the next section in the conf file. It begins with ##<VirtualHost *:80> and ends with ##</VirtualHost>. This is a commented section with a sample virtual host setup. Uncomment the block and fill in the dummy values with the ones you want. That's all there is to it.
One thing to note is that once you go to named virtual hosting, you have to include a named virtual host for localhost.
My configuration file looks like Listing 2.
Listing 2: httpd-vhosts.conf
NameVirtualHost *:80

<VirtualHost *:80>
    ServerAdmin menachem@baziancentral.com
    DocumentRoot "C:/xampp/htdocs/"
    ServerName localhost
    ServerAlias localhost
    ErrorLog "logs/localhost-error.log"
    CustomLog "logs/localhost-access.log" combined
</VirtualHost>

<VirtualHost *:80>
    ServerAdmin menachem@baziancentral.com
    DocumentRoot "C:/xampp/htdocs/cibase"
    ServerName cibase.local
    ServerAlias www.cibase.local
    ErrorLog "logs/cibase.local-error.log"
    CustomLog "logs/cibase.local-access.log" combined
</VirtualHost>

<VirtualHost *:80>
    ServerAdmin menachem@baziancentral.com
    DocumentRoot "C:/xampp/htdocs/userlogs"
    ServerName userlogs.local
    ServerAlias www.userlogs.local
    ErrorLog "logs/userlogs.local-error.log"
    CustomLog "logs/userlogs.local-access.log" combined
</VirtualHost>
Adding the Domain to the Hosts File
Your Windows hosts file is located in c:\windows\system32\drivers\etc. On installation (in Windows 7), it has no entries. All you have to do is edit the file (running your editor as administrator) and add two lines:
127.0.0.1       cibase.local
127.0.0.1       userlogs.local
Save the file and you're ready to restart your Apache service.
Please note that I set up two domains for this article. I will use the cibase.local domain for generic discussions of CodeIgniter and userlogs.local is for the actual solution.
Setting Up Your Resource Folders
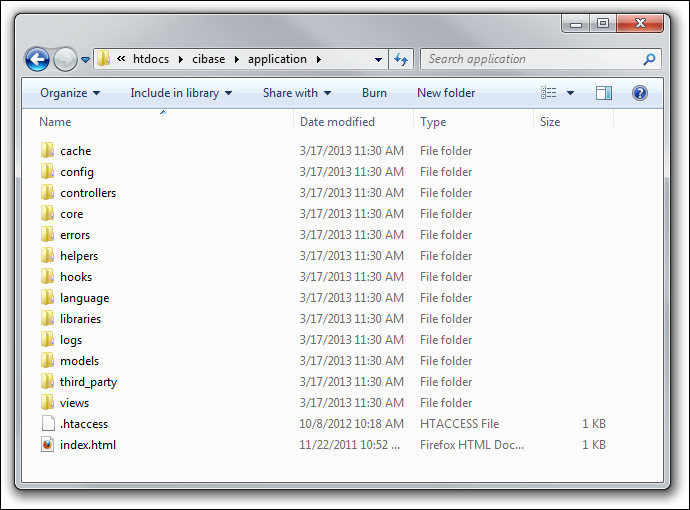
The default installation has three folders:
ApplicationThis is the folder that will contain all the code you write.SystemThis folder contains the generic code of the framework.User_GuideThis folder has the documentation for quick access. The documentation is in HTML.
In addition to these folders, you will probably need to add a few resource folders for JavaScript code, CSS files, and images. I call these js/, css/, and img/ respectively. Add these directly off of the application root folder.
An Overview of CodeIgniter
CodeIgniter is a PHP framework. It gives you a few things up front:
- CodeIgniter has a ton of pre-written functionality for you to use in your application. For example, database access, working with URLs, sessions, security, cookies and much more are all there for your use. This is a huge timesaver.
- CodeIgniter imposes a structure on development. For example, files of a particular type are placed in specific places. Some naming conventions are imposed too. Having some of these decisions made for you gives you the ability to focus on the things that really matter: your application's functionality.
- If you are new to PHP, CodeIgniter gives you an additional benefit: by imposing a structure and giving you tons of prewritten functionality, you need a much lower knowledge base to be effective.
CodeIgniter Concepts
Before you get into working with CodeIgniter, it is important to review some of the concepts CodeIgniter uses.
CodeIgniter works on the MVC model. MVC stands for model, view, controller. Models are classes that have data-handling code for your application, views generate the HTML/Javascript, etc., that make up the visual portion of your application, and controllers are the traffic cops that put it all together.
Beyond models, views, and controllers, CodeIgniter also recognizes a few other types of files: helpers and libraries. Helpers are function libraries. They can be application-specific or generic, which you can reuse from application to application. Libraries are classes that you use to enhance your application.
There are more than these five types of files in CodeIgniter. However, models, views, controller, helpers and libraries represent the files you will be working on 98% of the time.
The Application Folder
Now that you have an idea of how CodeIgniter is structured, let's take a quick look at the application folder.
The structure itself is fairly intuitive. Config holds the configuration files for your application (more about that in a minute) and your controllers, models, views, helpers and libraries all go into their respective folders.
It is absolutely crucial that you place files in the correct directory portion of the structure. When you try to load a view, for example, CodeIgniter automatically looks in the Views folder. You can also create a subfolder of views for additional files and load them by specifying the subfolder before the view name. For example, if you created the folder views/modules and placed a view file there called myviewfile.php, you could load it into a controller with this code:
$this->load->view('modules/myviewfile');
Running a CodeIgniter Application
To run a CodeIgniter application, just point your browser at the root of the application. It is important that the Web server be set to choose index.php before index.html in the order of preference for default files. Without this setting, your application will not run if your ISP puts an index.html file in the folder and you forget to remove it.
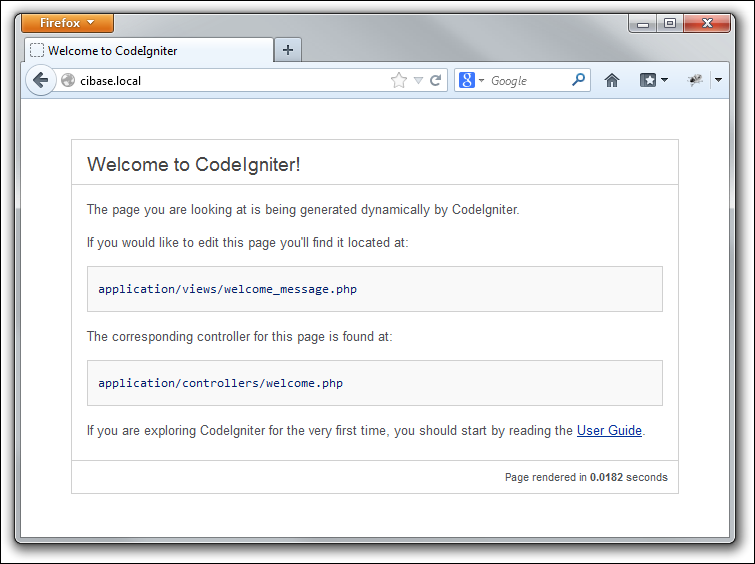
When running an application on your development computer, you can run it with the URL http://<local_domain_name>. The index.php file kicks in and loads the default controller which, right after installation, is welcome.php.
Calling Another Controller
Figure 3 shows the results of running the Welcome controller. If Welcome were not the default controller, you could call it using the following syntax:
http://cibase.local/index.php/welcome/
Index.php captures the URL, parses it, and loads the controller identified in the URL's next segment.
Many developers, myself included, hate having to constantly deal with the index.php. Since this file is always called, it is possible to capture the URL and “insert” index.php silently. This can be accomplished with a .htaccess file (assuming you are using Apache, of course).
Here's the .htaccess file I use to accomplish this silent call. For the record, I wish I could claim credit for it but it is based on a .htaccess file I downloaded from the Internet. I just searched for “CodeIgniter .htaccess” and there were quite a number to choose from. I chose one and pared it down to what you see here.
RewriteEngine on
RewriteCond $1
   !^(index\.php|images|css|js|robots\.txt)
RewriteCond %{REQUEST_FILENAME} !-f
RewriteCond %{REQUEST_FILENAME} !-d
RewriteRule ^(.*)$ /index.php?$1 [L,QSA]
For the remainder of this article, I will assume the existence of this .htaccess and omit index.php from the Web URLs.
I will discuss more about CodeIgniter URLs later on.
The Welcome Page
Before you can get into development of the solution, it will be helpful to take a quick look at the welcome controller. It doesn't really do anything much, but it will give you a basic idea of how CodeIgniter is structured.
Remember that any CodeIgniter page has at least two components to it: the controller and the view. If you are using data, you will likely need a model and it would not be unusual to need a helper or library too.
The welcome controller is located in controllers/welcome.php, as shown in Listing 3.
Listing 3: Controller/welcome.php
<?php if ( ! defined('BASEPATH'))
exit('No direct script access allowed');

class Welcome extends CI_Controller {

   public function index()
   {
     $this->load->view('welcome_message');
   }
}
All this controller does is load the view called welcome_message. The view is an HTML shell with PHP information plugged in where necessary. In this particular case, no information is retrieved from a database so the view is almost all static HTML. Still, as you will see soon, you can easily retrieve data from a database and pass it through to the view.
There are a few things to know about controllers:
- The name of the file must be lower case (welcome.php).
- The name of the controller class has to be proper case (Welcome).
- Each method within the controller can be called separately with an additional segment on the URL. For example, this could have been called with
http://cibase.local/welcome/index/. You don't have to do this for the index method because it is the default method run when a controller class is invoked. - Note the syntax for loading the view. The syntax of
$this->load->view()is a standard syntax for loading components in CodeIgniter. For example, if you want to load a model, you use$this->load->model().
Passing Data to the View
I didn't show the HTML of the Welcome view because it is straight HTML and not really much to see. I am, however, going to show you a view now, with one added wrinkle: I am going to pass data to the view.
CodeIgniter makes it absurdly easy to pass data to a view. You gather the data in your controller and then pass it through to the view in an array as a parameter on the Load() call.
Let take a quick look at a new controller method I added to the welcome controller. I called it “withdata.”
public function withdata()
{
   $now = date('Y-m-d H:i:s');
   $data['currenttime'] = $now;
   $data['anotherdatabit'] = 'Now is the' .
      'time for all good men to come to '.
      'the aid of their country.';
  $this->load->view('withdataview', $data);
}
This creates two elements of information and adds them to an array called $data. I then pass it through on the load call to the view as the second parameter in the call.
Now let's look at the view and discuss that.
<!DOCTYPE html>
<html lang="en">
<head>
   <title>With Data View</title>
</head>
<body>
   <h1>It is now <?=$currenttime?>.</h1>
   <h2><?=$anotherdatabit?></h2>
</body>
Notice the names of the variables that are stuck in the view. They are the indices I have to the two elements I added to $data. When passing an array of information to the view, CodeIgniter explodes the array into individual data variables named with the array element index names.
This new controller is called with the URL: http://cibase.local/welcome/withdata/
The result looks like Figure 4.

Configuring CodeIgniter
Now that you have taken a look at the basic structure of working with CodeIgniter, you can get down to working on the solution.
The first step in developing with CodeIgniter is to configure it. This is accomplished by modifying the appropriate configuration file located in the config/ folder.
Configuring CodeIgniter calls for at least two modifications:
- The default controller
- The database parameters
- Autoloads
- The Index Page
Specifying the Default Controller
As I mentioned, CodeIgniter starts out with Welcome as the default controller. Chances are that you would not want that to be your application's default controller, so it is a good idea to change it. You can accomplish this by modifying one value in config/routes.php:
$route ['default_controller'] = "logview";
Specifying the Database Parameters
One of the nicer features of any framework worth its salt is that the framework handles all the communications folderol with the database. To do this, you have to configure the database connection parameters.
I have never worked with anything other than MySQL when working on a CodeIgniter-based application, but the framework does support more than just MySQL. You can find more information in the comments at the top of config/database.php. If you use MySQL, like I do, you only really have to change four lines of code in your database configuration file:
$db['default']['hostname'] = 'localhost';
$db['default']['username'] = 'root';
$db['default']['password'] = '';
$db['default']['database'] = 'userlogs';
The code above is not actual code from an application. It should be taken as a matter of course that one should never connect to a MySQL database using the root user and the password should never, ever, be blank. I did it solely for the purposes of an article.
Normally, I consider what the configuration of the database will be in production and try to make the database connection parameters the same on the development computer. This can prevent mistakes when installing or updating your application on the Web host.
Configuring Autoloads
There is a file called config/autoload.php. It is not uncommon to have a series of helpers, libraries, and the like that you will want to use throughout your application. Rather than loading them each time you want to use them, you can have CodeIgniter load them automatically. By default, CodeIgniter loads as little as possible in order to keep the footprint of the framework as small as possible.
You can autoload a list of libraries, for example, by editing autoload.php and modifying that autoload line. For example, to autoload the database and session libraries, you would make the following change to your autoload.php:
$autoload['libraries'] = array('database', 'session');
This autoload loads the database and session libraries automatically, two libraries that you are going to need in your application. CodeIgniter doesn't make that decision for you; you get to choose. This way, if you have an application that does not use sessions, you would not have to load the session library. The same is true for database access.
Configuring the Index Page
Earlier, you eliminated the need to reference index.php by placing a .htaccess file in the application root folder. You have to tell the framework not to include the index.php reference when you redirect() to a controller on the site.
This setting is in config/config.php. Look for this line:
$config['index_page'] = 'index.php';
And change it to:
$config['index_page'] = '';
Other Potential Configurations
CodeIgniter includes support for sessions, encryption, and a great deal more. Many of these functions have configuration parameters that you may need to modify. For example, if you are using sessions, you will have to set up an encryption key (you would set that in config/config.php). This is just one example.
The Log Page
Now that CodeIgniter is configured, the next step is to write the code. There are many approaches to writing code in CodeIgniter. I know some people who like to get the view done first and then work around it in the other portions of the page. I like to get my data done first, so I work on the model first. Once I have that, I can work the controller and the view.
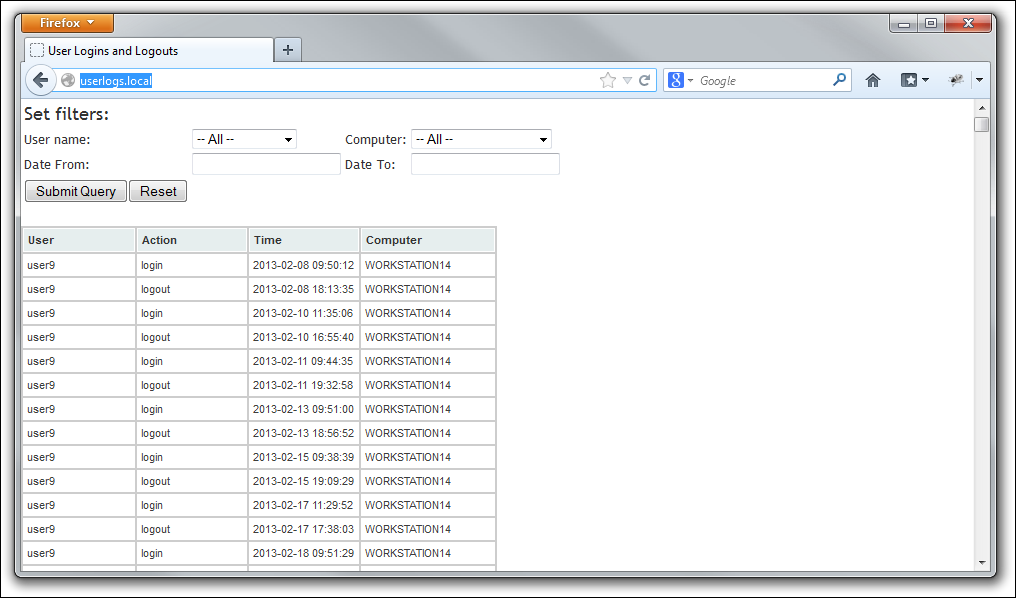
Before I go into that, take a quick look at Figure 5 to see the finished product. This might help you focus when you see the code.
A Quick Tour
- The user enters any filtering criteria into the top section.
- The user name and computer drop-downs show lists of users and computers in the system.
- The date criteria textboxes are datetextboxes created with jQuery. When the user clicks on a textbox, a calendar pops up for them to select the date.
The Model
My model for the userlogs doesn't have to do much on the face of it. All it has to do is load the event records from the logs table. The SQL SELECT for that is simple: SELECT * FROM logs;
The interesting part is when it comes to filtering the data. It makes sense that a user will not want to necessarily see all the data at once. In fact, although this version of the application does show all the data by default, I plan to modify it to only the last two weeks of information at some time in the future.
In any event, let's take a look at the controller I built, called logusers_model.php, located in the applications/models folder. It's shown in Listing 4.
Listing 4: Logusers_model.php
<?php
   if ( ! defined('BASEPATH'))
      exit('No direct script access allowed');

class Logusers_model extends CI_Model {
   function GetLog($tcusername = "",
      $tccomputer = "",
      $tcdatefrom = "",
      $tcdateto = "")
   {
      $this->db->select('cusername, cevent, ' .
         'tevent, ccomputer');
      $this->db->from('logs');
      if(strlen($tcusername)<>0)
         $this->db->where('cusername',
            $tcusername);
      if(strlen($tccomputer)<>0)
         $this->db->where('ccomputer',
            $tccomputer);
      if(strlen($tcdatefrom)<>0){
         $lcwhere = "tevent between " .
            "'$tcdatefrom' and '$tcdateto'";
         $this->db->where($lcwhere);
      }
      $this->db->order_by('cusername desc,' .
            'tevent');
      $query = $this->db->get();

      return $query->result_array();
   }

   function get_user_list(){
      $this->db->select('cusername');
      $this->db->from('logs');
      $this->db->order_by('cusername');
      $this->db->distinct();
      $query = $this->db->get();
      return $query->result_array();
   }

   function get_computer_list(){
      $this->db->select('ccomputer');
      $this->db->from('logs');
      $this->db->order_by('ccomputer');
      $this->db->distinct();
      $query = $this->db->get();
      return $query->result_array();
   }
}
?>
Thre is a lot to discuss here, so I will take this one step at a time.
if ( ! defined('BASEPATH'))
  exit('No direct script access allowed');
This command keeps trollers from trying to run anything in the file from outside the application.
The rules for creating and naming a model class follow the same rules as those for controllers: the name of the class is the same as the name of the .php file except that the .php file is all lower case and the first letter of the class name is capitalized.
You can have as many methods as you want (and properties, too). In this case, I needed three, all of which are shown in Listing 4.
The first method, called GetLog() is responsible for getting the list of events to show. The parameters that affect filtering are sent through to the method so they can be included in the SQL statement as required. The parameters, in this case, are all optional because filtering is optional.
Both get_user_list() and get_computer_list() retrieve the list of computers and users from the logs table so they can be shown in a drop-down list for filtering purposes.
Working with SQL in CodeIgniter Using ActiveRecord
CodeIgniter has a feature called ActiveRecord that is a way of dealing with database SQL commands. It is fairly robust, although there are some things that you cannot do with it (most notably, a UNION). The benefits of working with ActiveRecord can be seen in the GetLog() method.
When working with ActiveRecord, you can build a SQL statement by specifying the clauses in individual method calls. If you are not totally comfortable with SQL, this can insulate you from some of the complexities of the language.
Having worked with SQL for almost 20 years, SQL queries do not frighten me. I honestly started using the ActiveRecord individual method calls because I was interested in seeing how they worked and what I could get from it. I found that the methods work very well and can also help you structure very readable code.
Look at the following snippet:
if(strlen($tcusername)<>0) $this->db->where('cusername', $tcusername);
if(strlen($tccomputer)<>0) $this->db->where('ccomputer', $tccomputer);
if(strlen($tcdatefrom)<>0){
   $lcwhere = "tevent between ".
      "'$tcdatefrom' and '$tcdateto'";
   $this->db->where($lcwhere);
}
I think adding Where conditions in this fashion is much cleaner than building a Where clause as a string mainly because you do not have to worry abuot the syntax of the where so much. Note the two different calls to the where() method.
where('cusername', $tcusername)
And then look at this one:
$lcwhere = "tevent between ".
    "'$tcdatefrom' and '$tcdateto'";
$this->db->where($lcwhere);
The where() method allows you to use the first syntax, which generates "cusername = 'value'" in the Where clause. In the second syntax, you can write out the Where condition yourself. This is how you add more complex Where conditions. The basic syntax accommodates the bulk, but by no means all, of your Where condition needs. Multiple calls to the where() method causes the various conditions to be chained together with and clauses in between.
CodeIgniter's ActiveRecord has a host of methods to build your SQL SELECT, INSERT, and DELETE statements. In fact, ActiveRecord shines most when you are dealing with INSERT and DELETE statements. Those are topics for another day.
In building a SELECT statement, you can break the statement down to calls for the individual SELECT components:
- SELECT is the list of columns you want to select.
- FROM is the table you wish to select from.
- JOIN adds joins to the statement. You can do both inner and outer joins.
- WHERE adds where conditions.
- ORDER_BY adds sorting conditions.
- DISTINCT adds a DISTINCT clause to the SELECT to prevent retrieving duplicates.
- GROUP_BY adds a grouping condition.
A query is run with the get() method, which returns a recordset containing the query results. The results can then be converted to an array using the result_array() method.
One of the things I particularly like about ActiveRecord is that you can also do things the old-fashioned way.
When I need to write a complex SQL command, I work it out in my SQL query tool (I use MySQL Workbench). When I have it the way I like, I do not always want to rework it into ActiveRecord syntax. In that case, I just build the command as a string and push it off to a method called query(). The query method returns the result set.
For example, you could write code that looks like this:
function get_user_list(){
   $lcSQL = "SELECT distinct cusername " .
      "FROM logs ORDER BY cusername";
   $query = $this->db->query($lcSQL);
   return $query->result_array();
}
This is a rewrite of the get_user_list method from the model shown in Listing 4.
You will especially need to pass through literal SQL commands (as opposed to letting ActiveRecord build it for you) if you are trying to do something, like a UNION, that CodeIgniter does not support.
Creating the Controller
Now that I have the model done, the next step is to create the controller. Since I mostly think in terms of data and process, putting in the controller next helps me map out the entire process for the page. The layout usually comes last.
Listing 5 contains the controller code.
Listing 5: logview.php
<?php if ( ! defined('BASEPATH'))
exit('No direct script access allowed');

class Logview extends CI_Controller {
   public function index()
   {
      $this->load->model('logusers_model');
      $this->load->helper('common_helper');
      $this->output->enable_profiler(false);

      $cusername = "";
      $ccomputer = "";
      $cdatefrom = "";
      $cdateto = "";
      $ddatefrom = "";
      $ddateto = "";
      IF (isset($_POST['cusername'])){
         $cusername = $_POST['cusername'];
      }

      IF (isset($_POST['ccomputer'])){
         $ccomputer = $_POST['ccomputer'];
      }

      IF (isset($_POST['ddatefrom'])){
         $cdatefrom = datetimeforquery(
            $_POST['ddatefrom'], true);
         $ddatefrom = $_POST['ddatefrom'];
      }

      IF (isset($_POST['ddateto'])){
         $cdateto = datetimeforquery(
            $_POST['ddateto'], false);
         $ddateto = $_POST['ddateto'];
      }

      $data['logs'] =
         $this->logusers_model->GetLog(
              $cusername,
              $ccomputer,
              $cdatefrom,
              $cdateto);
      $data['users'] =
         $this->logusers_model->get_user_list();
      $data['computers'] =
          $this->logusers_model->
              get_computer_list();
      $data['cusername'] = $cusername;
      $data['ccomputer'] = $ccomputer;
      $data['ddatefrom'] = $ddatefrom;
      $data['ddateto'] = $ddateto;
      $this->load->view('logusers_view',$data);
   }
}
Notice that this controller does a few things:
$this->load->model('logusers_model');
$this->load->helper('common_helper');
$this->output->enable_profiler(false);
First the controller loads the model and a helper. Then it executes a statement called enable_profiler(). This is a great feature of CodeIgniter that I will discuss at the end of this section, so don't go away.
When the model is loaded, it becomes a member object of the controller class. You can have access to all of its methods and properties with the syntax $this-><modelname>. A helper does not become a member object; it is a function library and its functions become available. There will be more on this in a minute.
The main purpose for this controller is to use the model's functions to get the information needed to display and pass it through to the view. That's the purpose of the next section of code.
$data['logs'] =
   $this->logusers_model->GetLog(
      $cusername, $ccomputer,
      $cdatefrom, $cdateto);
$data['users'] =
   $this->logusers_model->get_user_list();
$data['computers'] =
   $this->logusers_model->get_computer_list();
$data['cusername'] = $cusername;
$data['ccomputer'] = $ccomputer;
$data['ddatefrom'] = $ddatefrom;
$data['ddateto'] = $ddateto;
$this->load->view('logusers_view',$data);
Remember that each element of the $data array gets exploded into a variable all its own. The logs, users, and computers elements are arrays holding the results retrieved by the model.
One thing to bear in mind here is that the controller has to support two different “modes.” The first is when the user first loads the application. When the user does that, no filter criteria are applied. The second, once the page has loaded, the user can specify filter criteria and call the controller again.
The basic idea is to test to see if there are certain defined $_POST[] elements. Remember, when HTML submits information from a form using the post method, each control's data is added to the $_POST[] array with the element index as the NAME of the control. (Here's a quick tip. If you are using a checkbox control, the control is added to the _POST[] array only when it is checked. You should be careful with that one. It bit me once.)
The code first initializes variables that hold any data passed through:
$cusername = "";
$ccomputer = "";
$cdatefrom = "";
$cdateto = "";
$ddatefrom = "";
$ddateto = "";
After the variables have been initialized, the code tests for data and retrieves it when available:
IF (isset($_POST['cusername'])) {
    $cusername = $_POST['cusername'];
}
IF (isset($_POST['ccomputer'])) {
    $ccomputer = $_POST['ccomputer'];
}
Dates represent a different kind of challenge. The user enters a date in the format of mm/dd/yyyy but MySQL needs it in the format of yyyy-mm-dd. Furthermore, because I am filtering not only based on date but on time as well, I have to know if the date I am formatting should be considered the beginning or end of the day so I can tack on the right time notation. Note how I handled the date processing in this next bit of code.
IF (isset($_POST['ddatefrom'])) {
    $cdatefrom = datetimeforquery($_POST['ddatefrom'], true);
    $ddatefrom = $_POST['ddatefrom'];
}
IF (isset($_POST['ddateto'])) {
    $cdateto = datetimeforquery($_POST['ddateto'], false);
    $ddateto = $_POST['ddateto'];
}
The datetimeforquery() is a function in my helper, common_helper. The code for this helper is in Listing 6.
Listing 6: common_helper.php
<?php
if (!function_exists('datetimeforquery')) {
   function datetimeforquery($cdate, $lbeginning)
   {
      if (strlen($cdate)==0){
         return $cdate;
      }else{
         if ($lbeginning){
            $cdate = $cdate . ' 00:00:00';
         }else{
            $cdate = $cdate . ' 23:59:59';
         }
      }

      $cdate = date('Y-m-d H:i:s',
         strtotime($cdate));
      return $cdate;
   }
}
?>
Because a helper is not a class, loading the helper more than once (which can easily happen in a complex application) can cause an error because PHP does not allow you to define a function with a name if it has already been defined. That's why the !function_exists() is called before defining the function.
DateTimeForQuery formats a date so that it may be included in a query. It accepts two parameters, the first is the date string and the second is a Boolean, to determine whether or not the date is the beginning or end of the day. It then compiles a date string from that, converts it to a PHP datetime, and formats it in MySQL format.
The Profiler
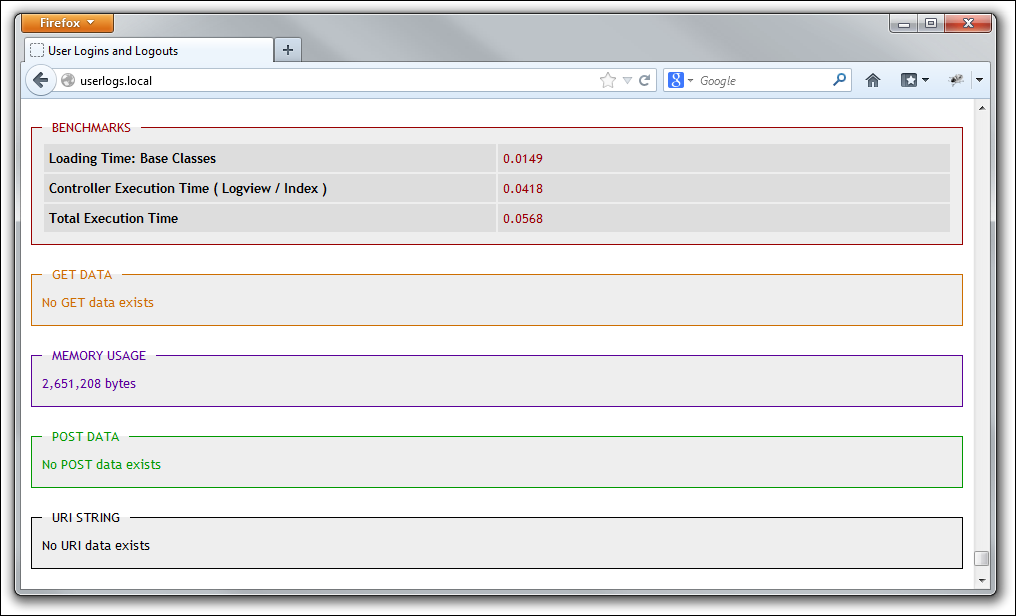
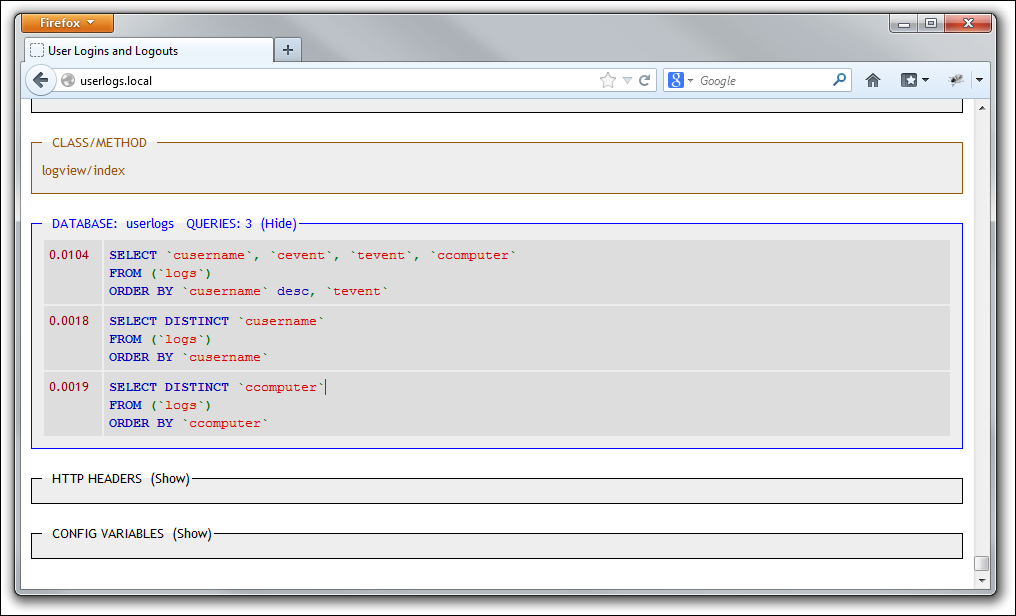
Now, about the profiler. This is one of those gems in CodeIgniter. I was having a problem with a SQL statement that was not running correctly. I needed to know what was going on, so I started looking for ways to get more debugging type of information out of CodeIgniter. I was searching about and found a message on the CodeIgniter forums that referenced the existence of the profiler. I used it and it gave me everything I wanted to know about my controller and was afraid to ask.
Here's how it works and what it does.
By default, the profiler is off. You can turn it on with the following statement anywhere in a controller:
$this->output->enable_profiler(true);
The statement turning it to false in the Logview controller was there because I originally turned it on to check something out. I left it in the code so I could show it to you.
When the profiler is turned on, CodeIgniter first loads your view and then appends an additional section with debugging information. Figure 6 and Figure 7 show the story:
Let's move on to the view.
The View
The first thing to know about a View is that loading one causes the HTML it generates to be inserted at that location. This is important because, as you will see, it is possible, and frequently desirable, not to put all your display code in one file.
Why Break Apart a View?
There are two reasons I have found, so far, to break a View into multiple parts. The first deals with complexity. If you have a complex view with many sections, you can break each section into its own View file and deal with each separately. This makes your code more manageable than putting it all in a single file. The second reason is reusability. There are many sections of your HTML code that are repeated throughout your application. For example, HTML HEAD section and the menu, will be consistent throughout your application. Rather than repeating the code, it is better to create a View for it and call it when needed. This way you do not have to repeat the code in each view. In addition, if you need to change one of these standard code sections, you only have to change it one place.
If you have sections of your HTML that are almost exactly repeated, but not totally, you can still segregate the code into its own view. For example, many developers like to change the color of the menu option that refers to the currently displayed page. You can do this by passing a data element to the view and writing some conditional PHP code to insert the custom code where you want it.
It is also possible to create controls using Views and reuse them. A good example can be seen in this application. Theoretically, the drop-downs for users and computers should be consistent throughout the application. Rather than write the code to generate those elements within the main View, I segregated them. The View code is in Listing 7.
Listing 7: Logview.php
<!DOCTYPE html>
<html>
<head>
   <title>User Logins and Logouts</title>

   <link rel="stylesheet" href="css/main.css"
      type="text/css"
      media="print, projection, screen" />
    <link rel="stylesheet" href =
        "http://code.jquery.com/ui/1.9.2/themes/base/jquery-ui.css"; />

   <script type="text/javascript"
      src="js/jquery-1.8.3.min.js">
   </script>
   <script type="text/javascript"
      src="js/jquery.tablesorter.min.js">
   </script>
   <script type="text/javascript"
      src="js/jquery-ui-1.9.2.custom.min.js">
   </script>

   <script type="text/javascript">
   $(document).ready(function()
      {
         $("#tbluserlogs").tablesorter();
      }
   );
   $(document).ready(function()
      {
         $("#ddatefrom").datepicker();
      }
   );
   $(document).ready(function()
         {
            $("#ddateto").datepicker();
         }
      );
   </script>
</head>
<body>
<form id="frmfilter" method="post" action="">
<table id="filteroptions">
<tr><td><h1>Set filters:</h1></td></tr>
<tr><td>User name:</td>
<td>
<?php
   $data['users'] = $users;
   $data['objectname'] = 'cusername';
   $data['objectvalue'] = $cusername;
   $data['lall'] = true;
   $this->load->view('controls/usercombo',$data);
?>
</td>

<td>Computer:</td>
<td>
<?php
   $data['computers'] = $computers;
   $data['objectname'] = 'ccomputer';
   $data['objectvalue'] = $ccomputer;
   $data['lall'] = true;
   $this->load->view('controls/computercombo',
      $data);
?>
</td>
</tr><tr>

<td>Date From:</td><td>

<?php
   echo "<input type=\"text\"" .
      "name=\"ddatefrom\" id=\"ddatefrom\" ";
   if (isset($ddatefrom)){
      echo  " value=\"$ddatefrom\"";
   }
   echo "></td>";
?>

<td>Date To:</td><td>

<?php
   echo "<input type=\"text\"".
      name=\"ddateto\" id=\"ddateto\"";
   if (isset($ddateto)){
      echo  " value=\"" . $ddateto. "\"";
   }
   echo "></td>";
?>

</tr>
<tr><td><center><input type="submit">
   <input type="reset"></center></td></tr>
</table>
</form>

<table id="tbluserlogs"
class="tablesorter" style="width:50%">
<thead>
<tr>
   <th style="width:15%">User</th>
   <th style="width:15%">Action</th>
   <th style="width:15%">Time</th>
   <th style="width:15%">Computer</th>
   </tr>
</thead>
<tbody>
<?php
   foreach($logs as $row)
   {
      echo '<tr><td style="width:15%">'
         . $row['cusername'] . '</td>'
         . '<td style="width:15%">'
         . $row['cevent'] . '</td>'
         . '<td style="width:15%">'
         . $row['tevent'] . '</td>'
         . '<td style="width:15%">'
         . $row['ccomputer'] . '</td>'
         . "</tr>\n";
   }
?>
</tbody>
</table>
</body>
</html>
Let's look at the code by sections.
The HTML HEAD Section
The <head> section is pure HTML and JavaScript. It sets up the page and loads two JQuery and two plugins: tablesorter and datepicker. Tablesorter is applied to the result set table to make it easier to navigate the data, and datepicker is used to allow the users to enter dates in a consistent fashion.
Loading the Dropdowns
Once the form is declared and the table initially set up, the View loads the two drop-downs for the user to enter a computer and/or username to filter by.
Here's the first:
<?php
   $data['users'] = $users;
   $data['objectname'] = 'cusername';
   $data['objectvalue'] = $cusername;
   $data['lall'] = true;
   $this->load->view('controls/usercombo', $data);
?>
</td>
And here's the second:
<?php
   $data['computers'] = $computers;
   $data['objectname'] = 'ccomputer';
   $data['objectvalue'] = $ccomputer;
   $data['lall'] = true;
   $this->load->view('controls/computercombo', $data);
?>
The process of loading the computer and user drop-downs is no different than loading any other view. You set up your data array and pass it off to the View. The HTML generated by the View is inserted in the location that you called it.
Note that, in this case, I am sending four pieces of information to the View. The first is the list that makes up the drop-down. The second is the name to give to the drop-down, and the third is the value of the drop-down that was selected when the form was last submitted. The fourth is a Boolean that allows me to control whether there should be an item added at the top called "-All -".
The code for the computercombo View can be seen in Listing 8. The usercombo is practically identical with just some changed language.
Listing 8 - computercombo.php
<?php
   echo '<select name="' .
      $objectname .
      '" id="' .
      $objectname .  '">' . "\n";

   if (isset($lall) and $lall){
      echo '   <option value="">-- All -' .
         '</option>' . "\n";
   }

   foreach ($computers as $computer){
      echo '   <option value="' .
         $computer['ccomputer'] .'"';

      if($computer['ccomputer']==
         $objectvalue) echo " selected";
      echo "> " . $computer['ccomputer'] .
         "</option>\n";
   }
   echo "</select>\n";
?>
The Date Textboxes and Buttons
The end of the form is completed with the addition of the textboxes for the dates. These objects are turned into datepicker text boxes in the <head> section of the page.
The Data
Once the form for filtering has been created, all that is necessary is to load the data. This is fairly straightforward and can be seen in Listing 9:
Listing 9: Loading the data into the form
<table id="tbluserlogs"
   class="tablesorter" style="width:50%">
<thead>
<tr>
   <th style="width:15%">User</th>
   <th style="width:15%">Action</th>
   <th style="width:15%">Time</th>
   <th style="width:15%">Computer</th>
   </tr>
</thead>
<tbody>
<?php
   foreach($logs as $row)
   {
      echo '<tr><td style="width:15%">'
         . $row['cusername'] . '</td>'
         . '<td style="width:15%">'
         . $row['cevent'] . '</td>'
         . '<td style="width:15%">'
         . $row['tevent'] . '</td>'
         . '<td style="width:15%">'
         . $row['ccomputer'] . '</td>'
         . "</tr>\n";
   }
?>
</tbody>
</table>
</body>
</html>
Conclusion
CodeIgniter is a lean and powerful framework for PHP development. It brings a great deal to the table and allows you to focus on your application rather than the plumbing.
In this article, I presented a simple application created using PHP and CodeIgniter. I showed how the CodeIgniter MVC model comes together and allows you to create applications in logical segments. I also discussed how CodeIgniter Views can be used to create reusable code.
This article has only scratched the surface of CodeIgniter but, it is hoped, gives the reader a leg up to getting started. The best way to get into CodeIgniter is to do it. Create a project for yourself and get cracking. I'm willing to bet you'll enjoy it as much as I do.
