


In my last CODE Magazine article, I professed my love for SharePoint 2013 style workflows. I must say, having been spurned by SharePoint 2010 style workflows, falling in love with a technology with the same name was not easy. In that article, I talked about how workflows can now finally scale and perform; I talked about how to setup workflows and how to use them in SharePoint Designer. Microsoft introduced numerous enhancements in SharePoint Designer 2013 surrounding workflows, but in this article, I wish to switch gears a bit and talk about the Visual Studio side of things.
However, before I dive into Visual Studio and workflows, you as the architect need to know of a few shortcomings of SharePoint 2013 style workflows.
SharePoint 2013 Style Workflows Gotchas
Do not be misled-I still love SharePoint 2013 style workflows, but as nice as this technology is, it does come with a few things you must consider:
- Licensing: SharePoint 2013 style workflows can be considered as SharePoint Designer and SharePoint itself as a client to workflow manager. You can write your own clients as well. For instance, a client that can run purely through the browser and allow the user to author workflows from an HTML-based user interface. Yes, it is possible to do that, and I anticipate some smart third-party company to jump on such an opportunity. However, out of the box, SharePoint 2013 Foundation has no story around SharePoint 2013 style workflows. You must use a paid version of SharePoint to create SharePoint Designer workflows that leverage SharePoint 2013 style workflows.
- Yet another Windows server: Yet another set of passwords to maintain, yet another server to patch, yet another SSL cert, yet another thing to configure, yet another hardware and software cost. You get my point.
- No tie in with content types: For the longest time we've created reusable workflows by tying them to a content type. SharePoint 2013 style workflows work at the item content type level. This is not such a bad thing, but it is a fundamental shift in how we think of content types. Associating workflows with content types and mostly re-associating those associations has always been problematic. We can effectively achieve the same thing by checking the characteristics of the item the workflow is running upon, and when a workflow is a part of an app, perhaps tying it to a specific content type is not very logical anyway.
- No upgrade path from SharePoint 2010 workflows: Other than a lame workflow bridge that lets you invoke the other workflow, there is no way you can migrate SharePoint 2010 workflows into SharePoint 2013 style workflows unless you rewrite them. This will probably annoy customers that have serious investments in SharePoint 2010 style workflows. It is worth noting that SharePoint 2010 style workflows will still work, as-is, in SharePoint 2013. They just won't run as the much improved SharePoint 2013 style workflows.
Great! With the basics behind us, now let us dive into Visual Studio.
SharePoint 2013 Workflows using Visual Studio 2012
Visual Studio 2012 introduces a definite shift in how developers author workflows. SharePoint 2013 style workflows emphasize declarative style workflows that are easier to debug, and you can add further functionality using custom activities. Therefore, there is no code activity anymore. That is not such a bad thing since writing new custom activities is a matter of using a Visual Studio project template now-it's a lot easier and straightforward.
The best way to explain Visual Studio 2012-based workflows is to write one, so I'll walk you through that now.
In this exercise, I'll author a workflow to read a JSON feed from the Internet, extract an arbitrary element out of it and write it in the workflow history list. Specifically, I will use the JSON feed for all the pictures I have uploaded on Twitter. The URL for the feed is:
http://odata.twitpic.com/Users('sahilmalik')/Images()?$format=json
Start by creating a SharePoint hosted app targeting a site that you have set up to use SharePoint 2013 style workflows. In my case, I'll use a site at http://sp/sites/wfs named WFApp. You can also use a sandbox solution. In contrast, SharePoint 2010 style workflows always required you to author farm solutions, so this is already a big improvement.
Next, in this app, right-click and add a new Workflow called ReadJSON.
As soon as you create the workflow, Visual Studio will ask you to choose whether it is a list workflow or a site workflow; you should choose Site workflow.
Next, it will ask you which lists you wish to associate this workflow with. This workflow will run within the SharePoint hosted app, so you will need to create new lists. Click Next to go to the screen that allows you to pick how the workflow is started.
On the subsequent screen, choose to have the workflow be started manually by the user.
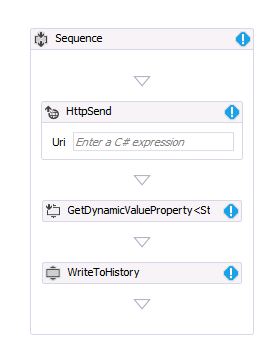
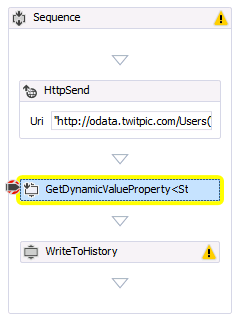
Great! At this point, you should see an empty canvas on to which you can drag and drop activities. Go ahead and drag drop three activities:
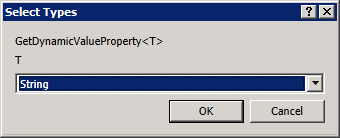
HttpSend.GetDynamicValueProperty<T>and make it of type string (see Figure 1).- A
WriteToHistoryactivity.
Click OK after you select each activity. Your workflow should look like Figure 2.
The workflow now uses .xaml files to store the workflow details.
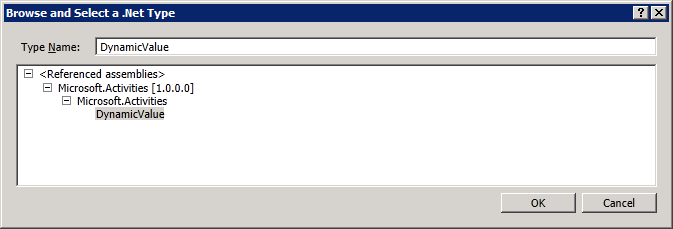
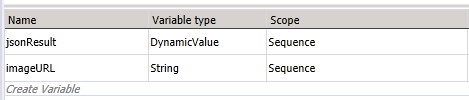
Next, we need to configure each of these activities. The idea is that the HttpSend activity will execute a GET request on the specified URL and fetch a JSON feed. From that JSON feed, we will extract a specific node and populate it inside the history list. The problem is, JSON can be very dynamic, and it can have no predefined structure. To get around that problem, Microsoft introduced the concept of DynamicValue. Go ahead and create a variable at the Sequence level of type DynamicValue and call it jsonResult. Visual Studio will ask you to pick a data type as shown in Figure 3.
Go ahead and create another variable called imageURL of type string. Figure 4 shows what your variables should look like.
Note that you can also add workflows for a scope within the workflow if you need it.
With our variables all setup, next let us configure the activities.
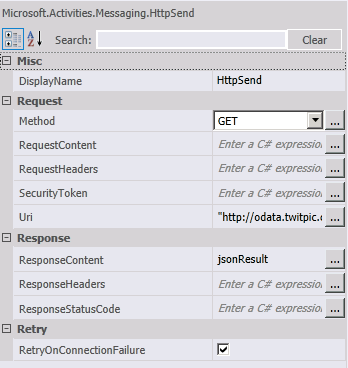
First, we'll configure the HttpSend activity. The idea here is that this activity will make a query to:
http://odata.twitpic.com/Users('sahilmalik')/Images()?$format=json
and put the response in the jsonResult variable. Select the HttpSend activity and configure it as shown in Figure 5.
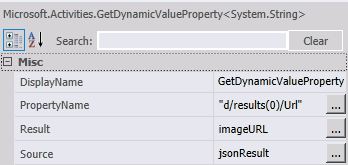
Next, using the GetDynamicValueProperty<string> activity, we will extract the node d/results(0)/Url and put it in the imageURL variable. Select the GetDynamicValueProperty<string> activity and configure its properties as shown in Figure 6.
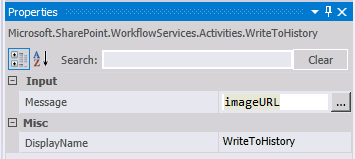
Finally, the simplest part is to write the imageURL variable to the history list. You do this by configuring the WriteToHistory activity as shown in Figure 7.
Finally, we need some UI magic to make it easier for the user to access and run this workflow. Remember this workflow will run in the AppWeb of the SharePoint hosted app. So open the Pages\Default.aspx in your app and add a URL to /_layouts/15/workflow.aspx anywhere inside PlaceHolderMain. I added it as follows:
<p><a href="/_layouts/15/workflow.aspx">
Site Workflows</a></p>
Well that was easy, wasn't it? Now before you press F5 to deploy and run the app, select the GetDynamicValueProperty<string> activity, and press F9 to set a breakpoint there. Now press F5.
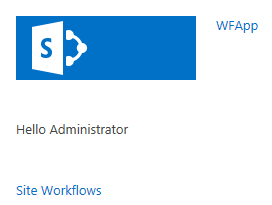
The app will install and the browser will launch as shown in Figure 8.
A console window opens up with title, “Microsoft.Workflow.TestServiceHost.exe”. This is a helper application that lets you see the back and forth traffic between your workflow and your SharePoint installation. You can also examine much further lower level details using Fiddler. This exe is incredibly helpful if you try to deploy this workflow in Office 365 and run the workflows in Windows Azure.
With the app launched, click on the “Site Workflows” link to access the page that shows you the site workflows (Figure 9).
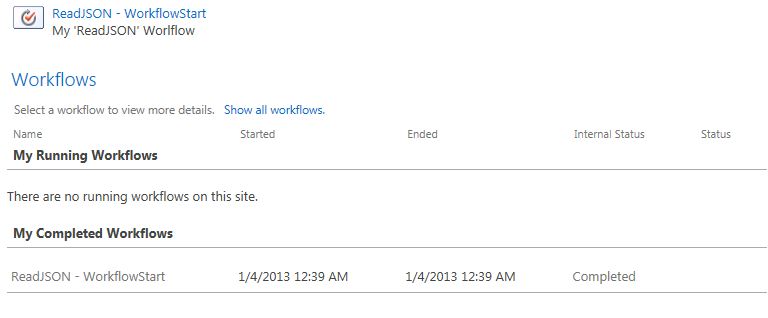
Go ahead and click the “ReadJSON - WorkflowStart” link. Note that an HttpRequest is executed successfully and Visual Studio hits the breakpoint you inserted in the workflow. You can also examine all the variables, just as if you were running plain .NET code (Figure 10).
Go ahead and complete the workflow execution by pressing F5 and examine the history list to see the link to twitpic appear.
Congratulations, you just wrote a simple SharePoint 2013 style workflow using Visual Studio 2012. Note that there was no code involved; it was all declarative, almost like writing it in SharePoint Designer. That is certainly the push here - more declarative style workflows.
Summary
SharePoint 2013 style workflows are fantastic. They scale, they perform, they can be deployed with apps, and they can be deployed with sandbox solutions.
Additionally, they are easy to write. Since they are mostly declarative, they blur the boundary between SharePoint Designer and Visual Studio. SharePoint Designer workflows can now easily extend themselves with activities written in Visual Studio that are easier to write, package and deploy. Authoring Visual Studio workflows almost feels like drawing a flow chart in Visio.
Sounds like we have a winner of a technology here. I encourage you to try out more SharePoint 2013 style workflows, especially those with input forms.
Until then, happy SharePointing.
