


Microsoft recently released the ASP.NET MVC 4.0 beta and along with it, the brand spanking new ASP.NET Web API. Web API is an exciting new addition to the ASP.NET stack that provides a new, well-designed HTTP framework for creating REST and AJAX APIs (API is Microsoft’s new jargon for a service, in case you’re wondering). Although Web API currently ships and installs with ASP.NET MVC 4, you can use Web API functionality in any ASP.NET project, including WebForms, WebPages and MVC or none of the above. You can also self-host Web API in your own applications.
Please note that this article is based on pre-release bits of ASP.NET Web API (pre-RC) and the API is still changing. The samples are built against the latest snapshot of the CodePlex ASP.NET Web Stack Source and some of the syntax and functions might change by the time Web API releases. Overall concepts apply, and I’ve been told that functionality is mostly feature complete, but things are still changing as I write this. Please refer to the latest code samples on GitHub for the final syntax of the examples.
What’s a Web API and Why Do We Need It?
HTTP APIs become increasingly important with the proliferation of devices that we use today. Most mobile devices, like phones and tablets, run apps that use data retrieved from the Web over HTTP. Desktop applications are also moving in this direction with more and more online content and synching and Windows 8 promising an app-like experience. Likewise, many Web applications rely on rich client functionality to create and manipulate the browser user interface, using AJAX rather than server-generated HTML data to load up the user interface with data. Results returned from these remote HTTP services are data rather than HTML markup. This data tends to be in XML or - more commonly today - in JSON (JavaScript Object Notation) format. Web API provides an easy way to build the backend code to handle these remote API calls using a flexible framework that is based very specifically around the semantics of the HTTP protocol.
Most mobile devices, like phones and tablets, run apps that use data retrieved from the Web over HTTP.
The .NET stack already includes a number of tools that provide the ability to create HTTP service backends. There’s WCF REST for REST and AJAX, ASP.NET AJAX Services purely for AJAX and JSON, and you can always use plain HTTP Handlers for any sort of response but with minimal plumbing. You can also use plain MVC Controller Methods or even ASP.NET WebForms pages to generate arbitrary HTTP output.
Although all of these can accomplish the task of returning HTTP responses, none of them are optimized for the repeated tasks that an HTTP service has to deal with. If you are building sophisticated Web APIs on top of these solutions, you’re likely to either repeat a lot of code or write significant plumbing code yourself to handle various API requirements consistently across requests.
A Better HTTP Experience
ASP.NET Web API differentiates itself from these other solutions in that it was built from the ground up around the HTTP protocol and its messaging semantics. Unlike WCF REST or ASP.NET AJAX with ASMX, it’s a brand new platform rather than bolted-on technology that is supposed to work in the context of an existing framework.
Web API is meant to handle any kind of HTTP input and produce output and status codes using the full spectrum of HTTP functionality available. There’s much-improved support for content negotiation based on HTTP Accept headers, with the framework capable of detecting content that the client sends and requests and automatically serving the appropriate data format in return. Many of the features favor convention over configuration, making it much easier to do the right thing without having to explicitly configure specific functionality.
Although previous solutions accomplished this using a variety of WCF and ASP.NET features, Web API combines all this functionality into a single server-side HTTP framework that intrinsically understands the HTTP semantics and subtly drives you in the right direction for most operations. And when you need to customize or do something that isn’t automatic, there are overrides for most behaviors, and even many low-level hook points that allow you to plug-in custom functionality with relatively little effort.
ASP.NET Web API differentiates itself from existing Microsoft solutions in that it was built from the ground up around the HTTP protocol and its messaging semantics.
Web API also requires very little in the way of configuration so it’s very quick and unambiguous to get started. To top it all off, you can also host the Web API in your own applications or services.
- Above all, Web API makes it extremely easy to create arbitrary HTTP endpoints in an application without the overhead of a full framework like WebForms or ASP.NET MVC. Because Web API works on top of the core ASP.NET stack, you can plug Web APIs into any ASP.NET application.
Getting Started
I’ll create a new empty ASP.NET application to demonstrate that Web API can work with any kind of ASP.NET project.
Make Sure ASP.NET MVC4 (Pre-Release) Is Installed
The first step is to make sure you have ASP.NET MVC 4 installed on your machine in order to get the required Web API libraries. If it isn’t installed, you can download it from http://www.asp.net/web-api. Alternately, you can also download the latest ASP.NET MVC/Web API source code from the CodePlex site (aspnetwebstack.codeplex.com). Because the API is still in flux, I used CodePlex code for my samples. The samples include the current binaries, so to run them you don’t actually need to download anything.
Create a New ASP.NET Empty Project
Although you can create a new project based on the ASP.NET MVC/Web API template to quickly get up and running, I’ll take you through the manual setup process, because one common use case is to add Web API functionality to an existing ASP.NET application. This process describes the steps needed to hook up Web API to any ASP.NET 4.0 application.
Start by creating an ASP.NET Empty Project. Then create a new folder in the project called Controllers.
Add a Web API Controller Class
Once you have any kind of ASP.NET project open, you can add a Web API Controller class to it. Web API Controllers are very similar to MVC Controller classes, but they work in any kind of project.
Add a new item to this folder by using the Add New Item option in Visual Studio and choose Web API Controller Class, as shown in Figure 1.
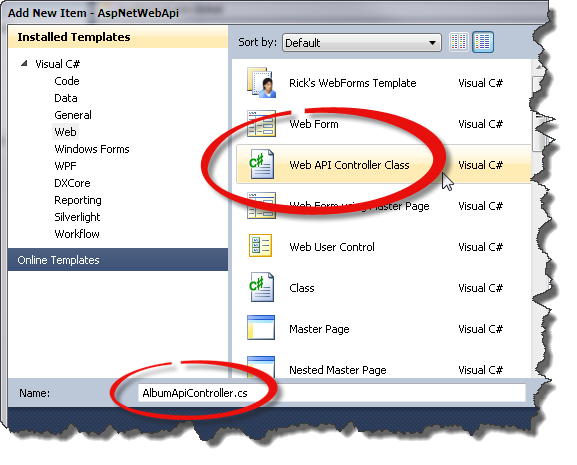
Make sure that the name of the controller class includes Controller at the end of it, which is required in order for Web API routing to find it. Here, the name for the class is AlbumApiController.
For this example, I’ll use a Music Album model to demonstrate basic behavior of Web API. The model consists of albums and related songs where an album has properties like Name, Artist and YearReleased and a list of songs with a SongName and SongLength as well as an AlbumId that links it to the album. You can find the code for the model (and the rest of these samples) on GitHub at: http://goo.gl/rA0cx. To add the file manually, create a new folder called Model, and add a new class Album.cs and copy the code into it. There’s a static AlbumData class with a static CreateSampleAlbumData() method that creates a short list of albums on a static .Current that I’ll use for the examples.
Before we look at what goes into the controller class though, let’s hook up routing so we can access this new controller.
Hooking up Routing in Global.asax
To start, I need to perform the one required configuration task in order for Web API to work: I need to configure routing to the controller. Like MVC, Web API uses routing to provide clean, extension-less URLs to controller methods.
Using an extension method to ASP.NET’s static RouteTable class, you can use the MapHttpRoute() (in the System.Web.Http namespace) method to hook-up the routing during Application_Start in global.asax.cs shown in Listing 1.
This method configures Web API to direct URLs that start with an albums folder to the AlbumApiController class. Routing in ASP.NET is used to create extension-less URLs and allows you to map segments of the URL to specific Route Value parameters. A route parameter, with a name inside curly brackets {name}, is mapped to parameters on the controller methods. Route parameters can be optional, and there are two special route parameters - controller and action - that determine the controller to call and the method to activate respectively.
HTTP Verb Routing
Routing in Web API can route requests by HTTP Verb in addition to standard {controller},{action} routing. For the first examples, I use HTTP Verb routing, as shown Listing 1. Notice that the route I’ve defined doesn’t include an {action} route value or action value in the defaults. Rather, Web API can use the HTTP Verb in this route to determine the method to call the controller, and a GET request maps to any method that starts with Get. So methods called Get() or GetAlbums() are matched by a GET request and a POST request maps to a Post() or PostAlbum(). Web API matches a method by name and parameter signature to match a route, query string or POST values. In lieu of the method name, the [HttpGet,HttpPost,HttpPut,HttpDelete, etc.] attributes can also be used to designate the accepted verbs explicitly if you don’t want to follow the verb naming conventions.
Routing in Web API works the way routing works in ASP.NET MVC, but adds the ability to route by HTTP Verb in lieu of specifying a controller action.
Although HTTP Verb routing is a good practice for REST style resource APIs, it’s not required and you can still use more traditional routes with an explicit {action} route parameter. When {action} is supplied, the HTTP verb routing is ignored. I’ll talk more about alternate routes later.
When you’re finished with initial creation of files, your project should look like Figure 2.
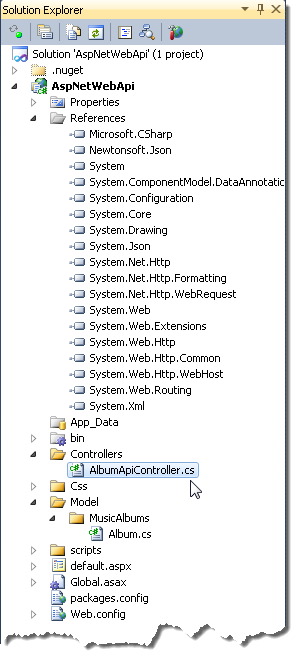
Notice that adding a Web API controller to your project adds a long string of new assemblies to your project; Web API is designed in a very modular fashion. Web API (and MVC 4.0) is shipped as an add-on library and deploys the assemblies into your site’s bin folder and can be xcopy deployed - no explicit installation is required.
Creating Your First Controller
Now it’s time to create some controller methods to serve data. For these examples, I’ll use a very simple Album and Songs model to play with, as shown in Listing 2.
Web API shares many concepts of ASP.NET MVC, and the implementation of your API logic is done by implementing a subclass of the System.Web.Http.ApiController class. Each public method in the implemented controller is a potential endpoint for the HTTP API, as long as a matching route can be found to invoke it. The class name you create should end in Controller, which is how Web API matches the controller route value to figure out which class to invoke.
Inside the controller you can implement methods that take standard .NET input parameters and return .NET values as results. Web API’s binding tries to match POST data, route values, form values or query string values to your parameters. Because the controller is configured for HTTP Verb based routing (no {action} parameter in the route), any methods that start with Getxxxx() are called by an HTTP GET operation. You can have multiple methods that match each HTTP Verb as long as the parameter signatures are different and can be matched by Web API.
In Listing 3, I create an AlbumApiController with two methods to retrieve a list of albums and a single album by its title.
To access the first two requests, you can use the following URLs in your browser:
http://localhost/aspnetWebApi/albums
http://localhost/aspnetWebApi/albums/Dirty%20Deeds
Note that you’re not specifying the actions of GetAlbum or GetAlbums in these URLs. Instead Web API’s routing uses HTTP GET verb to route to these methods that start with Getxxx().
Content Negotiation
When you access any of the URLs above from a browser, you get either an XML or JSON result returned back. The album list result for Chrome 17 and Internet Explorer 9 is shown Figure 3.
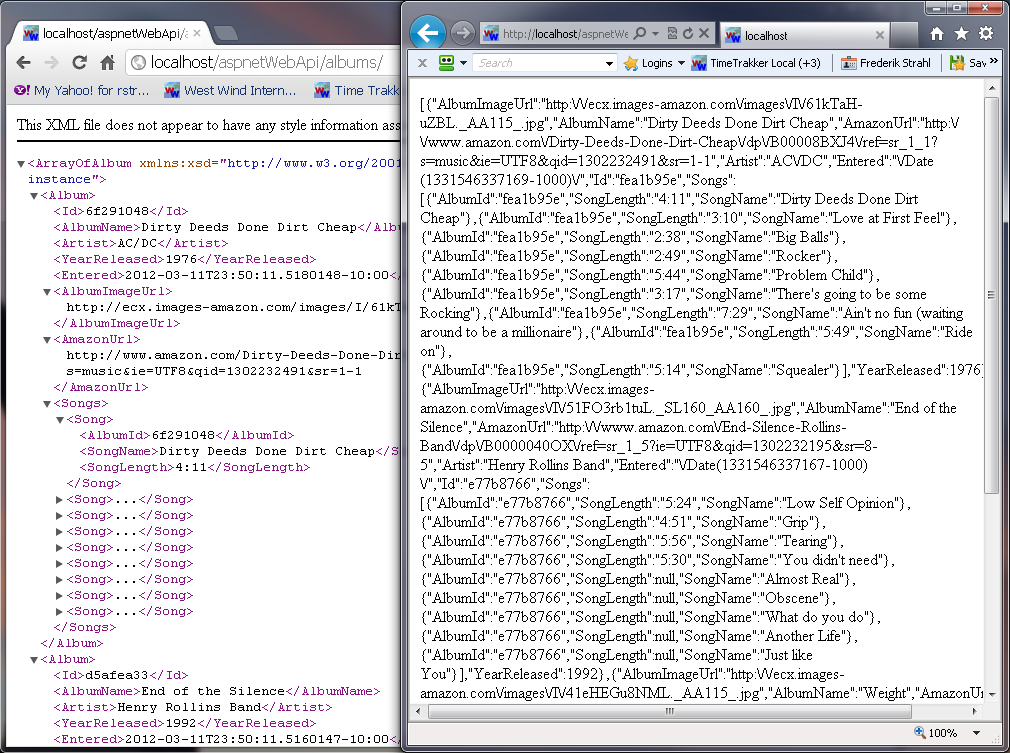
Notice that the results are not the same: Chrome returns an XML response and IE9 returns a JSON response. Whoa, what’s going on here? Shouldn’t we see the same result?
Actually, no. Web API determines what type of content to return based on Accept headers. HTTP clients, like browsers, use Accept headers to specify what kind of content they’d like to see returned. Browsers generally ask for HTML first, followed by a few additional content types. Chrome (and most other major browsers) ask for:
Accept: text/html,
application/xhtml+xml,application/xml;
q=0.9,*/*;q=0.8
IE9 asks for:
Accept: text/html, application/xhtml+xml, */*
Note that Chrome’s Accept header includes application/xml, which Web API finds in its list of supported media types and returns an XML response. IE9 doesn’t include an Accept header type that works on Web API by default, and it returns its default format, which is JSON.
Web API automatically switches output formats based on the HTTP Accept header of the request. The default content type if no matching Accept header is specified is JSON.
This is an important and very useful feature that was missing from any previous Microsoft REST tools: Web API automatically switches output formats based on HTTP Accept headers. Nowhere in the server code above do you have to explicitly specify the output format. Rather, Web API determines what format the client is requesting based on the Accept headers and automatically returns the result based on the available formatters. This means that a single method can handle both XML and JSON results.
Using this simple approach makes it very easy to create a single controller method that can return JSON, XML, ATOM or even OData feeds by providing the appropriate Accept header from the client. By default, you don’t have to worry about the output format in your code.
Note that you can still specify an explicit output format if you choose, either globally by overriding the installed formatters, or individually by returning a lower level HttpResponseMessage instance and setting the formatter explicitly. There will be more on that in a minute.
Along the same lines, any content sent to the server via POST/PUT is parsed by Web API based on the HTTP Content-type of the data sent. The same formats allowed for output are also allowed on input. Again, you don’t have to do anything in your code - Web API automatically performs the deserialization from the content.
Accessing Web API JSON Data with jQuery
A very common scenario for Web API endpoints is to retrieve data for AJAX calls from the Web browser. Because JSON is the default format for Web API, it’s easy to access data from the server using jQuery and its getJSON() method. This example receives the albums array from GetAlbums() and databinds it into the page using knockout.js.
$.getJSON("albums/", function (albums) {
    // make knockout template visible
    $(".album").show();

    // create view object and attach array
    var view = { albums: albums };
    ko.applyBindings(view);
});
Figure 4 shows this and the next example’s HTML output. You can check out the complete HTML and script code at http://goo.gl/Ix33C.
The result from the getJSON() call is a JavaScript object of the server result, which comes back as a JavaScript array. In the code, I use knockout.js to bind this array into the UI, which as you can see, requires very little code, instead using knockout’s data-bind attributes to bind server data to the UI. Of course, this is just one way to use the data - it’s entirely up to you to decide what to do with the data in your client code.
Along the same lines, I can retrieve a single album to display when the user clicks on an album. The response returns the album information and a child array with all the songs. The code to do this is very similar to the last example, where I pulled the albums array:
$(".albumlink").live("click", function () {
    var id = $(this).data("id"); // title
    $.getJSON("albums/" + id, function (album) {
        ko.applyBindings(album,
        $("#divAlbumDialog")[0]);

        $("#divAlbumDialog").show();
    });
});
Here the URL looks like this: /albums/Dirty%20Deeds, where the title is the ID captured from the clicked element’s data ID attribute.
Explicitly Overriding Output Format
When Web API automatically converts output using content negotiation, it does so by matching Accept header media types to the GlobalConfiguration.Configuration.Formatters and the SupportedMediaTypes of each individual formatter. You can add and remove formatters to globally affect what formats are available and it’s easy to create and plug in custom formatters. The example project includes a JSONP formatter that can be plugged in to provide JSONP support for requests that have a callback= querystring parameter. Adding, removing or replacing formatters is a global option you can use to manipulate content. It’s beyond the scope of this introduction to show how it works, but you can review the sample code or check out my blog entry on the subject (http://goo.gl/UAzaR).
If automatic processing is not desirable in a particular Controller method, you can override the response output explicitly by returning an HttpResponseMessage instance. HttpResponseMessage is similar to ActionResult in ASP.NET MVC in that it’s a common way to return an abstract result message that contains content. HttpResponseMessage is parsed by the Web API framework using standard interfaces to retrieve the response data, status code, headers and so on. Web API turns every response - including those Controller methods that return static results - into HttpResponseMessage instances. Explicitly returning an HttpResponseMessage instance gives you full control over the output and lets you bypass WebAPI’s post-processing of the HTTP response on your behalf.
HttpResponseMessage allows you to customize the response in great detail. Web API’s attention to detail in the HTTP spec really shows; many HTTP options are exposed as properties and enumerations with detailed IntelliSense comments. Even if you’re new to building REST-based interfaces, the API guides you in the right direction for returning valid responses and response codes.
For example, assume that I always want to return JSON from the GetAlbums() controller method and ignore the default media type content negotiation. To do this, I can adjust the output format and headers as shown in Listing 4.
This example returns the same IEnumerable<Album> value, but it wraps the response into an HttpResponseMessage so you can control the entire HTTP message result including the headers, formatter and status code. In Listing 4, I explicitly specify the formatter using the JsonMediaTypeFormatter to always force the content to JSON.
If you prefer to use the default content negotiation with HttpResponseMessage results, you can create the Response instance using the Request.CreateResponse method:
var resp = Request.CreateResponse<IEnumerable<Album>>(
                      HttpStatusCode.OK, albums);
This hooks up the appropriate formatter from the active Request based on Content Negotiation.
If you want complete control over your HTTP output and the formatter used, you can return an HttpResponseMessage result rather than raw .NET values.
Non-Serialized Results
The output returned doesn’t have to be a serialized value but can also be raw data, like strings, binary data or streams. You can use the HttpResponseMessage.Content object to set a number of common Content classes. Listing 5 shows how to return a binary image using the ByteArrayContent class from a Controller method.
The image retrieval from Amazon is contrived, but it shows how to return binary data using ByteArrayContent. It also demonstrates that you can easily return multiple types of content from a single controller method, which is actually quite common. If an error occurs - such as a resource can’t be found or a validation error - you can return an error response to the client that’s very specific to the error. In GetAlbumArt(), if the album can’t be found, we want to return a 404 Not Found status (and realistically no error, as it’s an image).
Note that if you are not using HTTP Verb-based routing or not accessing a method that starts with Get/Post etc., you have to specify one or more HTTP Verb attributes on the method explicitly. Here, I used the [HttpGet] attribute to serve the image. Another option to handle the error could be to return a fixed placeholder image if no album can be matched or the album doesn’t have an image.
When returning an error code, you can also return a strongly typed response to the client. For example, you can set the 404 status code and also return a custom error object (ApiMessageError is a class I defined) like this:
return Request.CreateResponse<ApiMessageError>(
             HttpStatusCode.NotFound,
             new ApiMessageError("Album not found")
        );
If the album can be found, the image will be returned. The image is downloaded into a byte[] array, and then assigned to the result’s Content property. I created a new ByteArrayContent instance and assigned the image’s bytes and the content type so that it displays properly in the browser.
There are other xxxContent() objects available: StringContent, StreamContent, ByteArrayContent, MultipartContent, and ObjectContent are at your disposal to return just about any kind of content. You can create your own Content classes if you frequently return custom types and handle the default formatter assignments that should be used to send the data out.
Although HttpResponseMessage results require more code than returning a plain .NET value from a method, it allows much more control over the actual HTTP processing than automatic processing. It also makes it much easier to test your controller methods as you get a response object that you can check for specific status codes and output messages rather than just a result value.
Routing Again
Ok, let’s get back to the image example: In order to return my album art image I’d like to use a URL like this:
http://localhost/aspnetWebApi/albums/Dirty%20Deeds/image
In order for this URL to work, I have to create a new Controller because my earlier routes pointed to the AlbumApiController using HTTP Verb routing. HTTP Verb-based routing is great for representing a single set of resources such as albums. You can map operations like add, delete, update and read easily using HTTP Verbs.
However, the way that WebAPI routes to methods - based on name prefix (isuch as Getxxx() methods or HTTP Verb attribute, it’s easy to use up these HTTP Verbs and end up with overlapping method signatures that result in route conflicts. In fact, I was unable to make the above URL work with any combination of HTTP Verb plus Custom routing using a single controller.
There are number of ways around this, but all involve additional controllers. I think it’s easier to use explicit Action routing and then add custom routes if you need simpler URLs. So in order to accommodate some of the other examples, I created another controller - AlbumRpcApiController - to handle all requests that are explicitly routed via actions (/albums/rpc/AlbumArt) or are custom routed with explicit routes defined in the HttpConfiguration. I added the AlbumArt() method to this new AlbumRpcApiController class.
For the image URL to work, you need a custom route placed before the default route from Listing 1.
RouteTable.Routes.MapHttpRoute(
    name: "AlbumApiActionImage",
    routeTemplate: "albums/{title}/image",
    defaults: new
    {
        title = RouteParameter.Optional,
        controller = "AlbumRpcApi",
        action = "AlbumArt"
    }
);
Now I can use either of the following URLs to access the image:
Custom route: (/albums/rpc/{title}/image)
http://localhost/aspnetWebApi/albums/PowerAge/image
Action route: (/albums/rpc/action/{title})
http://localhost/aspnetWebAPI/albums/rpc/albumart/PowerAge
Sending Data to the Server
To send data to the server and add a new album, you can use an HTTP POST operation. Since I’m using HTTP Verb-based routing in the original AlbumApiController, I can implement a method called PostAlbum() to accept a new album from the client. Listing 6 shows the Web API code to add a new album.
The PostAlbum() method receives an album parameter, which is automatically deserialized from the POST buffer that the client sent. The data passed from the client can be either XML or JSON. Web API automatically figures out what format it needs to deserialize based on the content type and binds the content to the album object. Web API uses model binding to bind the request content to the parameter(s) of controller methods. Like MVC you can check the model by looking at ModelState.IsValid. If it’s not valid, you can run through the ModelState.Values and check each binding for errors.
When a binding error occurs, you’ll want to return an HTTP error response and it’s best to do that with an HttpResponseMessage result. In Listing 6, I used the custom error class that holds a message and an array of detailed error messages for each binding error. I used this object as the content to return to the client along with my Conflict HTTP Status Code response.
If binding succeeds, the example returns a string with the name and date entered to demonstrate that you captured the data. Normally, a method like this should return a Boolean or no response at all (HttpStatusCode.NoConent).
The sample uses a simple static list to hold albums, so once you’ve added the album using the Post operation, you can hit the /albums/ URL to see that the new album was added.
The client jQuery code to call the POST operation from the client with jQuery is shown in Listing 7.
The code in Listing 7 creates an album object in JavaScript to match the structure of the .NET Album class. This object is passed to the $.ajax() function to send to the server as POST. The data is turned into JSON and the content type set to application/json so that the server knows what to convert when de-serializing in the Album instance.
The jQuery code hooks up success and failure events. Success returns the result data, which is a string that’s echoed back with an alert box. If an error occurs, jQuery returns the XHR instance and status code. You can check the XHR to see if a JSON object is embedded and if it is, you can extract it by deserializing it and accessing the .message property.
REST standards suggest that updates to existing resources should use PUT operations. REST standards aside, I’m not a big fan of separating out inserts and updates so I tend to have a single method that handles both.
But if you want to follow REST suggestions, you can create a PUT method that handles updates by forwarding the PUT operation to the POST method:
public HttpResponseMessage PutAlbum(Album album)
{
    return Post(album);
}
To make the corresponding $.ajax() call, all you have to change from Listing 7 is the type: from POST to PUT.
To round out the server code, here’s the DELETE verb controller method:
public HttpResponseMessage DeleteAlbum(string title)
{
    var matched = Albums.Where(alb =>
                               alb.AlbumName == title)
                        .SingleOrDefault();
    if (matchedAlbum == null)
return new
          HttpResponseMessage(HttpStatusCode.NotFound);

    Albums.Remove(matchedAlbum);

    return new
         HttpResponseMessage(HttpStatusCode.NoContent);
}
To call this action method using jQuery, you can use:
$(".removeimage").live("click", function () {
    var $el = $(this).parent(".album");
    var txt = $el.find("a").text();
    $.ajax({
        url: "albums/" + encodeURIComponent(txt),
        type: "DELETE",
        success: function (result) {
            $el.fadeOut(function() { $el.remove(); });
        },
        error: jqError
    });
});
Note the use of the DELETE verb in the $.ajax() call, which routes to DeleteAlbum on the server. DELETE is a non-content operation, so you supply a resource ID (the title) via route value or the querystring.
Routing Conflicts
In all requests with the exception of the AlbumArt example, I used HTTP Verb routing that I set up in Listing 1. HTTP Verb Routing is a recommendation that is in line with typical REST access to HTTP resources. However, it takes quite a bit of effort to create REST-compliant API implementations based only on HTTP Verb routing. You saw one example that didn’t really fit - the return of an image where I created a custom route albums/{title}.image that required creation of a second controller to work. HTTP Verb routing to a controller does not mix with custom or action routing to the same controller because of the limited mapping of HTTP Verbs imposed by HTTP Verb routing.
To understand some of the problems with verb routing, let’s look at another example. Let’s say you create a GetSortableAlbums() method like this and add it to the original AlbumApiController accessed via HTTP Verb routing:
[Queryable]
public IQueryable<Album> GetSortableAlbums()
{
    var albums = Albums.OrderBy(alb => alb.Artist);
    return albums.AsQueryable();
}
If you compile this code and try to now access the /albums/ link, you get an error: Multiple Actions were found that match the request.
HTTP Verb routing only allows access to one GET operation per parameter/route value match. If more than one method exists with the same signature, it doesn’t work. As before, the solution to get this method to work is to throw it into another controller. Because I set up the AlbumRpcApiController I can add the method there.
First, I should rename the method to SortableAlbums() so I’m not using a Get prefix for the method. This also makes the action parameter look cleaner in the URL - it looks less like a method and more like a noun.
I can then create a new route that handles direct-action mapping:
RouteTable.Routes.MapHttpRoute(
    name: "AlbumApiAction",
    routeTemplate: "albums/rpc/{action}/{title}",
    defaults: new
    {
        title = RouteParameter.Optional,
        controller = "AlbumRpcApi"
    }
);
As I am explicitly adding a route segment - rpc - into the route template, I can now reference explicit methods in the Web API controller using URLs like this:
http://localhost/AspNetWebApi/rpc/SortableAlbums
HTTP Verb Routing adds a whole new level of complexity when you’re trying to shoehorn functionality into the handful of available HTTP Verbs. Think carefully if that’s the “route” you want to take.
IQueryable<T> Results
Did you notice that the last example returned IQueryable<Album> as a result? Web API serializes the IQueryable<T> interface just fine as an array, but in addition, it also allows for using OData-style URI conventions (http://goo.gl/9nO3d) in the query string to filter the result if you specify a [Queryable] attribute on the method. You can sort and filter and limit the selection using OData commands that should be familiar from LINQ usage. For example:
http://localhost/AspNetWebApi/albums/rpc/SortableAlbums?$orderby=Artist&$top=2&$skip=1
Even though you get OData-style querying support, the output generated uses Web APIs standard output generation logic so you can create JSON or XML, depending on content negotiation or your explicit output mapping.
Although OData filtering is an interesting feature that gives the client a lot of control over certain operations (like skip and take and possibly sorting, which can be nice for grid displays), I’m not sure if that sort of logic really belongs in client code. More likely, you should expose methods in the API that natively include filtering parameters rather than using a direct querying mechanism like OData. Undoubtedly, some will find this approach appealing for quick and dirty operations where the client drives behavior.
Error Handling
I’ve already done some minimal error handling in the examples. For example in Listing 6, I detected some known-error scenarios like model validation failing or a resource not being found and returning an appropriate HttpResponseMessage result. But what happens if your code just blows up or causes an exception?
If you have a controller method, like this:
public void ThrowError()
{
   throw new InvalidOperationException("Your code…!");
}
You can call it with this:
http://localhost/AspNetWebApi/albums/rpc/ThrowError
The default exception handling displays a 500-status response with the serialized exception on the local computer only. When you connect from a remote computer, Web API throws back an IIS 500 error with no data returned (IIS then adds its HTML error page). The behavior is configurable in the GlobalConfiguration:
GlobalConfiguration
      .Configuration .IncludeErrorDetailPolicy=
  IncludeErrorDetailPolicy.Never;
If you want more control over your error responses sent from code, you can throw explicit error responses yourself using HttpResponseException. When you throw an HttpResponseException the response parameter is used to generate the output for the Controller action.
[HttpGet]
public void ThrowError()
{
    var resp =
         Request.CreateResponse<ApiMessageError>(
           HttpStatusCode.BadRequest,
           new ApiMessageError("Your code stinks!"));
    throw new HttpResponseException(resp);
}
Throwing an HttpResponseException stops the processing of the controller method and immediately returns the response you passed to the exception. Unlike other Exceptions fired inside of WebAPI, HttpResponseException bypasses the Exception Filters installed and instead just outputs the response you provide.
In this case, the serialized ApiMessageError result string is returned in the default serialization format - XML or JSON. You can pass any content to HttpResponseMessage, which includes creating your own exception objects and consistently returning error messages to the client. Here’s a small helper method on the controller that you might use to send exception info back to the client consistently:
private void ThrowSafeException(string message,
                 HttpStatusCode statusCode =
                         HttpStatusCode.BadRequest)
{
    var errResponse =
         Request.CreateResponse<ApiMessageError>(
            statusCode,
            new ApiMessageError() {message = message});

    throw new HttpResponseException(errResponse);
}
You can then use it to output any captured errors from code:
public void ThrowError()
{
    try {
        List<string> list = null;
        list.Add("Rick");
    }
    catch(Exception ex)
    { ThrowSafeException(ex.Message); }
}
Another more global solution is to create an Exception Filter. Filters in Web API provide the ability to pre- and post-process controller method operations. An exception filter looks at all exceptions fired and then optionally creates an HttpResponseMessage result. Listing 8 shows an example of a basic Exception filter implementation.
Filters can be assigned to individual controller methods like this:
[UnhandledExceptionFilter]
public void ThrowError()
Or you can register a filter globally in the HTTP Configuration:
GlobalConfiguration.Configuration.Filters.Add(
                     new UnhandledExceptionFilter());
The latter is a great way to get global error trapping so that all errors (short of hard IIS errors and explicit HttpResponseException errors) return a valid error response that includes error information in the form of a known-error object. Using a filter like this allows you to throw an exception as you normally would and have your filter create the right response. You can even create some custom exceptions so you can differentiate your own exceptions from unhandled system exceptions.
This is just one example of how ASP.NET Web API is configurable and extensible. Exception filters are just one example of how you can plug-in into the Web API request flow to modify output. Many more hooks exist and I’ll take a closer look at extensibility in a future article.
Web API combines the best of previous Microsoft REST and AJAX tools into a single framework that’s highly functional, easy to work with, and extensible to boot!
Summary
Web API is a big improvement over previous Microsoft REST and AJAX toolkits. The key features to its usefulness are its ease of use with simple controller based logic, familiar MVC-style routing, low configuration impact, extensibility at all levels and tight attention to exposing and making HTTP semantics easily accessible. Although none of the concepts used in Web API are new or radical, Web API combines the best of previous platforms into a single framework that’s highly functional, easy to work with, and extensible to boot. I think that Microsoft has hit a home run with Web API.
Web API is currently in beta and getting close to a release candidate. It’s slated to ship later this year, around the same time as Visual Studio 11 Beta and .NET 4.5. In the meantime, you can start using Web API today in its beta form with its Go Live license, or with the current code from aspnetwebstack.codeplex.com, if you’re willing to keep up with the frequent changes.
