


Recently I started working with a client that was interested in using Windows Workflow Foundation (WF) in their application. Having never used WF before, I thought it might be interesting to document the experience and my assumptions as I started learning and implementing the technology in production.
I spent some time talking to the client, as he doodled on a whiteboard and I took lots of notes on the business rules and general idea of how a workflow might make sense in the context of their application.
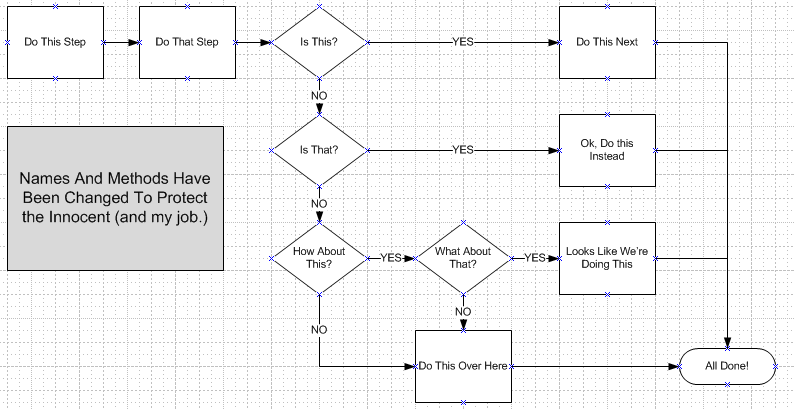
After we were done, I went back to my desk and created some clean, crisp Visio diagrams with processes and decision branches and many lines and arrows. Quite satisfied with myself, I showed this to the client. After we discussed and tweaked the flow of the diagram, we reached an agreement on the details and I went back to my desk, ready to start on my first workflow.
At this point I ran headlong into my first brick wall.
The Workflow Designer Is Not Visio
The sooner you accept this fact, the easier your life will be (or at the very least, you will have slightly more realistic expectations.) No matter how pretty you make your process flowcharts and diagrams in Visio, they will bear little or no resemblance to what you end up with in the Workflow Designer.
In fact, you can do a number of things in Visio that you just can’t do in the Workflow Designer… such as controlling the placement and visual flow of your workflow activities. Take a look at Figure 1 and Figure 2 to see what I mean.
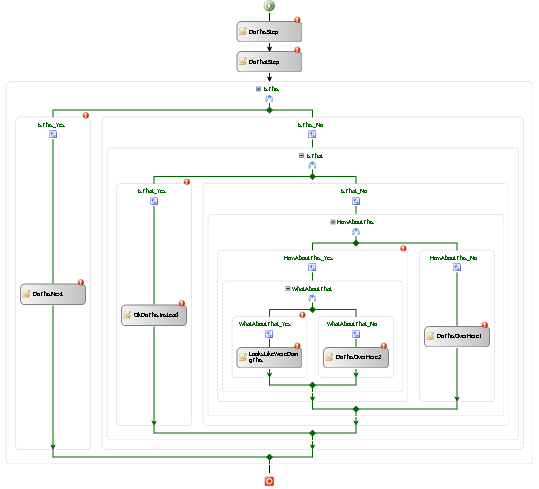
After I got over the initial shock of seeing my beautiful workflow rendered as something less aesthetically pleasing, I went through the diagram one activity at a time and proceeded to start giving everything meaningful names. Some of my activities would have code behind them, while others were merely conditional branches and terminators, so I gave them all easily readable and recognizable names. To make things easy to keep track of, my code activities had the same name as their code behind routines and some of my if/else activities shared a name with another activity (unintentionally.)
Reaching the end of the day, I saved everything and went home, pretty pleased with myself for the progress I had made. I didn’t bother doing a build at this point, since I hadn’t actually written any code and the designer hadn’t complained about anything.
The very next morning, I learned my second Windows Workflow lesson.
What’s in a Name?
As it turns out, quite a bit, apparently. The workflow designer will allow you to use the same name in several different places (activities, properties, methods, etc) without complaining. You’ll get errors at build time, but by then it could be a huge mess to untangle.
One example of where this can really get you in trouble is when you name a Code Activity the same thing as the codebehind method that it executes.
This is a perfect case where naming conventions become VERY handy. For example, consider prefixing your code activities with “ca” to differentiate them from the actual codebehind method they call.
Visual Studio also provides a Generate Handlers link in the property sheet of each activity. Clicking an activity and then clicking this link will result in the most likely event handler being generated in the code behind file. Some of the names it generates are less than elegant, and of course you are free to change them and remap the activity to them, via the property sheet.
Naturally, this is where I got myself in trouble and learned my third Windows Workflow lesson.
Sometimes Your Workflow Design will Vanish
After coming back the next day and reopening my workflow, or rather trying to reopen it, I discovered that when things in the codebehind file don’t make sense, the Workflow Designer can’t and won’t try cleaning up your mess. In fact, you get a nice screen that looks like Figure 3.

If you see that screen, put your scuba gear on, because you’re going code diving. The most likely culprit is that you have a duplicate name somewhere, and you’ll have to dig through the WorkflowName.cs and WorkflowName.Designer.cs files to clean it up.
Occasionally, your workflow might vanish for other reasons, even if you’ve done everything right. There are a few remedies you can try for this as well. First, try cleaning the solution by right-clicking on the solution name in the Solution Explorer window and clicking Clean Solution on the context menu that pops up. Click on a different tab than your workflow diagram, and then click back to the designer. If that fails, restart Visual Studio. Assuming there’s nothing else wrong with your workflow, this will fix the problem most of the time.
While I was untangling my mess, it occurred to me that cleaning it up sure would be easier if I had broken up my workflow into custom activities when I was designing it. I decided that as long as I was cleaning things up, it made sense to go ahead and put the various pieces into separate activities (think Custom Controls in Windows Forms.) Coincidentally, this brings me to the fourth Windows Workflow lesson.
Custom Activities Are Your Friend
(They may not always act like your friend, and sometimes they may borrow your stuff without asking, never bring it back and claim it was theirs all along, but ultimately they are your friend.)
You should create custom activities whenever it makes sense to do so, either because you intend to reuse a certain piece in other workflows, other areas of the same large workflow or just because it helps to break up a much larger workflow (allowing multiple people to work on different areas at once.)
To create a custom activity, right-click in Solution Explorer and select Add, then select Activity. I usually create a folder to store all of my custom activities.
Custom activities really do make maintenance significantly easier and also help to alleviate some naming conflicts between activities that do the same thing in different parts of the workflow.
No surprise, this brings me to the fifth Windows Workflow lesson.
Sometimes You Need to Do the Same Thing in Multiple Areas of Your Workflow
One of the great things about Visio is that you can route your “flow” however you need to, even if it means hitting the same activity from different paths. Unfortunately, in a workflow you can’t hit the same activity from multiple paths, so you have two choices: (1) duplicate activities in your workflow (with different names of course), or (2) create a custom activity with the necessary functionality and add multiple instances of that activity to your workflow.
If you can accomplish this with a custom activity, you should do so unless the item is just too small to warrant it (i.e., having only one step). Again, just make sure to be aware of what you name your activities since having two code activities (for example) with the same name will cause you pain later and depending on how far along you are, you’ll have a fun time untangling which activity is which when the Workflow Designer goes bye-bye.
After I cleaned up my naming mess and broke up my large workflow into smaller logical pieces, it was time to get back to the business of making my workflow actually flow. I took a look at the various conditional branches in my workflow and added some Boolean flags in the code-behind file. Once those were in place, I began writing rules for the If/Else activities. Within a few minutes I had a nice collection of rules that covered every “if” and every “else” in the entire collection of workflows, but something didn’t seem quite right.
Allow me to introduce you to the sixth Windows Workflow lesson.
They Are Called If/Else Activities for a Reason
When working with the If/Else activity, you give it a name and description (optional), and that’s it. All of the real functionality goes into the If/Else branch activities that are created within the parent container.
You can use this activity in a few ways. If all you need is the standard If/Else construct, then add a condition to the first branch. (Typically this is the one on your left, but you won’t have any trouble spotting it, since there will be a red circle with a white exclamation mark in it on the top right corner. By the way, this isn’t optional. Those red and white icons indicate stuff you HAVE to do or your workflow won’t build, so be sure to pay attention to them.)
To add a condition, click the activity and look at the property sheet. You will see a Condition property with the now familiar red and white icon. If you click the drop down, you will see two available options: Code Condition and Declarative Rule Condition.
Selecting the Declarative Rule Condition adds a couple extra properties to the sheet and you’ll notice the error icon has moved down to the next step you need to complete. Clicking the ellipses next to the ConditionName property displays the Rule Condition Editor as shown in Figure 4 below.
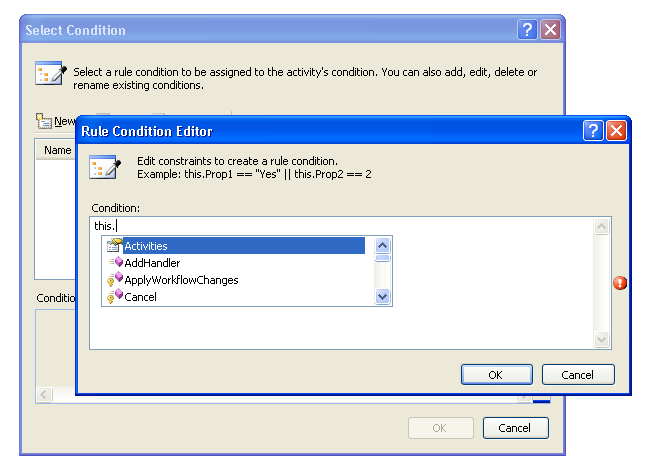
One thing you’ll notice is that the Workflow Rule Editor gives you some nice IntelliSense as you are writing your rules. After writing a rule for the first branch and closing the editor, you’ll notice your error icon has finally disappeared (for that activity).
There is rarely a valid reason to write rules/conditions for the “Else” part of your If/Else activities. If you need multiple branches like a Select Case or Switch statement, you can either add a branch by clicking on the parent If/Else activity and then click Add Branch in the property sheet, or you can drag another If/Else activity into your “Else” branch, depending on which one makes the most sense for the workflow.
You should avoid adding a rule / condition to the “Else” branch. If you look at the designer, you’ll notice there is no error icon on that branch, even though it is empty. It’s not a good practice to put any conditions on this branch because it hides flow logic and could cause problems later on. If you think you need a condition on your “Else” branch, then chances are what you really need is another branch or another If/Else activity in that part of the flow.
Eventually I got my conditional branches all sorted out and realized there were a few different ways out of my workflow. Depending on what happened earlier, certain branches of the workflow might never execute. This brought me to the seventh Windows Workflow lesson.
Use “Terminate” Activities (Even if You Don’t Think You Need Them)
When you’re designing your workflow, it’s easy to think “I don’t need to terminate this section. It just flows right out to the end anyway.”
Maybe it does, but what if your workflow gets incorporated into a different workflow, or modified after you’ve started working on something else?
Terminate activities give you a chance to leave a comment about why you’re terminating the flow in that specific spot, to generate an error message if one is needed and also to prevent the workflow from accidentally continuing forward if someone adds more activities between your de facto termination point and the actual end of the workflow.
*Note: * Using a Terminate activity in your workflow results in a WorkflowTerminated event rather than WorkflowComplete event, so make sure you process it accordingly.
As I wrapped up my design, I decided that instead of having a separate project for my workflow, it would make more sense to just add the workflow files to one of the existing projects. That brings me to the eighth and final (for now) Windows Workflow lesson:
Some Things Are Better Left Alone
I added the existing files to my class library project and did a quick build, no errors. So far so good, so I thought. After the build finished, I continued working and realized that I needed to go back into the workflow designer to make a small change.
Unfortunately, at this point I discovered that the Workflow Designer wouldn’t load. Instead I got a rather cryptic error informing me that “the service ‘System.Workflow.ComponentModel.Design.IIdentifierCreationService’ must be installed for this operation to succeed.”
A quick Live Search for the error led me to the MSDN forums for Windows Workflow Foundation, which in turn revealed that adding workflows and activities to a non-workflow project is not supported. Fortunately, it was a trivial exercise to get everything back in order and in its own project again.
Try It for Yourself
Hopefully these “lessons” will prove useful to you (or at least my mistakes may serve as a warning) as you begin your own personal journey into the world of Windows Workflow Foundation.
