


Windows Live Messenger is one of the central offerings nestled among a suite of products and services under Microsoft’s Windows Live brand.
For years online chat has been progressively and swiftly revolutionizing how you communicate with your friends, family, coworkers, and businesses you deal with. It is the foundation of the original chat room concept and the heart of instant messaging applications. Online chat-also called instant messaging or just “IM”-connects people for one-to-one or group chat, for social networking purposes, or for business directives, such as enabling access to technical support, customer services, or sales. Now, Windows Live Messenger supports a rich set of features for Web applications through the Windows Live Messenger IM Control, the Windows Live Messenger Presence API, and the Windows Live Messenger Library. The collective features of these products go beyond the simplicity of a chat application, making it possible to embrace this new era of social networking by leveraging your built-in Windows Live network within any Web application.
Extending Windows Live Messenger features to the Web makes it possible for personal sites, community sites, and business applications to increase their reach and interactivity with visitors. For community sites such as your blog, or other social networking sites, this could mean sharing your online messenger presence so that visitors can easily contact you. You can also supply fully functional or completely customized Web-driven instant messaging features from your site or Web applications to enhance this interactive experience. You can apply the same ideas to business applications in the form of supplying technical support directly from the corporate site or interacting with other departments or personnel. In either case, an important benefit of Web-enabled Windows Live Messenger is that it allows visitors that don’t use Windows Live Messenger to interact with other Windows Live Messenger users, without installing the Windows Live Messenger Client.
The Windows Live Messenger IM Control provides a quick and easy way for non-developers to enable their presence on the Web and is particularly useful for chatting with anonymous visitors.
The new suite of offerings within the Windows Live Messenger family support these Web-enabled scenarios as follows:
-
Windows Live Messenger IM Control: Enables Web applications to show the online presence of a Windows Live ID account to visitors and allows those visitors to interact with the account through a Web-based instant messaging control. This interaction can be anonymous or the visitor can identify themselves by name or by their Windows Live account. -
Windows Live Messenger Presence API: Enables site visitors to log in to their Windows Live ID account and enable Web applications to access their online presence. This facilitates non-anonymous interactions with the IM Control. -
Windows Live Messenger Library: Makes it possible to build Web applications that integrate with Windows Live Messenger with more granular control over the UI and underlying instant messaging features exposed to visitors.
While the IM control and presence API are the easiest to implement and do not require development experience, the Messenger Library provides a rich set of features that require developers to provide the UI and programmatically control all interactions with Windows Live Messenger. Each has their place in the community depending on the goals of your Web application. This article will explain when and how to incorporate the IM control, presence API, and Messenger Library in your Web applications-while discussing common scenarios where each are distinctly useful.
It’s All About Online Presence! Introducing the Windows Live Messenger IM Control and Presence API
The Windows Live Messenger IM Control was released in November 2007. This control is a fantastic addition to a blog, a Web site, or any other space on the Web where you want to communicate your online presence or allow visitors to communicate with you when you are signed-in to a Windows Live Messenger client. Visitors can communicate with you anonymously, by a specified name, or by first logging in to their Windows Live account and thus making it possible for you to add them to your contact list for future communications. The Windows Live Messenger Presence API compliments the IM control, released in December 2007. It lets you explicitly invite visitors to log in to their account and share their online presence so that your Web application can identify them. Both of these products are very easy for the non-developer to include on a Web page. The coming sections will explain how to work with the IM control, and then show you how to add value with the presence API.
Features of the IM Control
You can host the Windows Live Messenger IM Control on any Web page. This allows visitors to reach you when you are logged in to the Windows Live Messenger client application. Visitors can see your online presence and, when you are online, they can send messages through the IM control while you receive them at your messenger client. What’s particularly compelling about the IM control is that you can let anonymous visitors communicate with you-they don’t have to log in and they don’t have to have a Windows Live ID account. This is unlike the user experience with the messenger client, which requires all users to log in before they can send messages to one another. The IM control is perfect for enabling chat with visitors of your Web application to answer questions or discuss topics, without adding to your contact list. Since the IM control is Web-based, even non-messenger users can interact with you without installing the messenger client application to their machines.
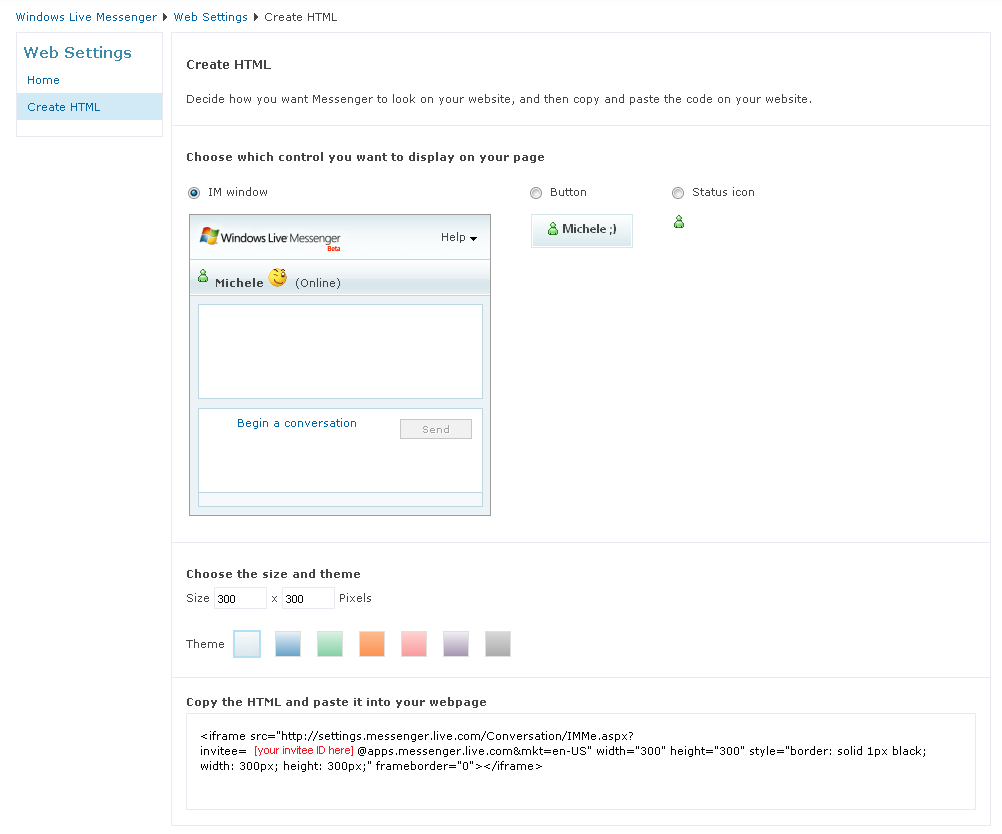
You can share your online presence with the IM control in three different ways: a status icon, a button, or an IM window (see Figure 1). The status icon and button give you the freedom to preserve real estate on your Web page and still supply a way for visitors to chat with you. Visitors are presented with a new browser window when they click the status icon. The new window shows the full IM window ready to begin a chat session. If you are online, the IM window is enabled so that visitors can send messages, otherwise it is disabled. To set up, you will generate the appropriate HTML for the IM control according to the choice of online presence you prefer to share within your Web application.
The IM control is supported by IE 6, IE 7, and Firefox 2.0 on Windows or Mac OS. Aside from deciding how you would like to share your online presence with visitors, you can also personalize the control’s appearance and culture settings. When you generate the HTML for the control, you can choose a template to initialize font and color properties to match your Web application’s appearance. The control is also localized to 32 languages, so by simply setting a property you can adjust language presented to your visitors. This article will talk about the control HTML and related properties next.
Generating HTML to Share Online Presence
It takes just a few minutes to get a Web page up and running with the IM control. The first step is to enable your online presence and generate the HTML according to the type of online presence you want to show. The next step is to copy that HTML to any Web pages where you want to host the control. Then, let the chatting begin!
The Messenger Library does not replace the functionality of the IM control since it does not support anonymous conversations, but it does make it possible to build a rich experience for existing Windows Live users with some very powerful customization possibilities.
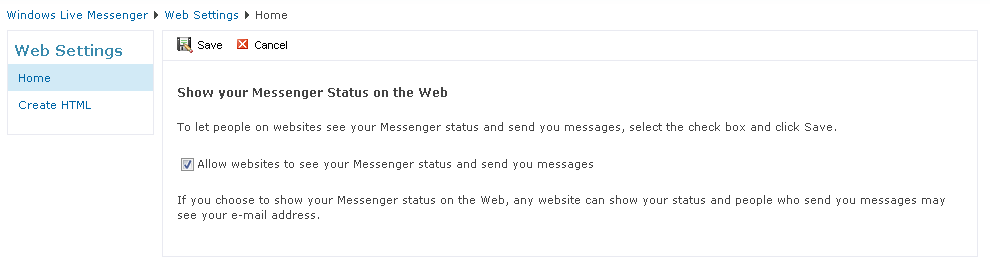
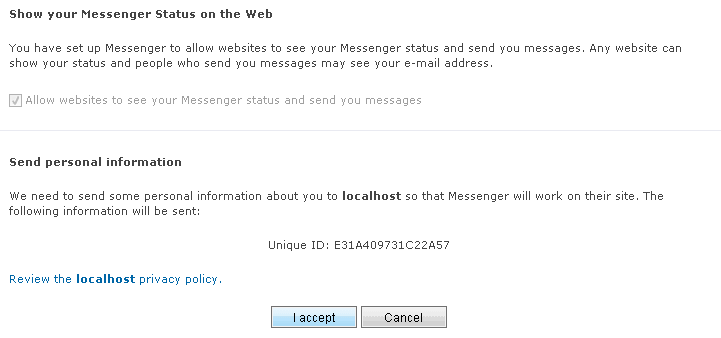
Start by browsing to this URL: http://settings.messenger.live.com/applications/WebSettings.aspx. You will be prompted to sign in to your Windows Live ID account (if you aren’t already signed-in) and presented with the Web Settings page where you can enable others to see your online presence on the Web. Figure 2 illustrates how to enable this. Once enabled, Web applications will be able to host HTML that allows visitors to send you messages.
On the same Web Settings page there is an option to create the HTML that would host the IM control (see Figure 1). This is where you decide which type of online presence you want to share-in the form of status icon, button, or IM window. As you select each option, the page shows the appropriate HTML for the selection so you can review its appearance.
Listing 1 illustrates the HTML generated for each form of online presence, without any themes applied. All three pass parameters to the IMMe.aspx page, including a required invitee parameter which holds your messenger ID in the form:
[unique id]@<a href="http://apps.messenger.live.com">apps.messenger.live.com</a>
The unique ID is a hash that uniquely identifies your messenger account. When visitors initiate a conversation using the IM control, this identity is used to direct messages to your IM account, which you receive in the messenger client application if you are online.
The status icon, button, and IM window all show your messenger status using the presence API, which will be discussed shortly. All three also support the “mkt” property, which defaults to “en-US” but you can set it to any of 32 culture codes specified here: http://msdn2.microsoft.com/en-us/library/bb936685.aspx. When you select an alternate culture code, IM controls show text in the requested language, which is important if you are using the IM control on a localized Web application.
You can also customize the visual appearance of the IM control. Of course the status icon does not support customization since it merely displays your online status icon, but you can select a theme for the button and IM window to fit with your Web page color scheme. By default, the button supports a few properties that control the button’s appearance and supply invitee details to the button script imported by PresenceButton.js in the first <script> statement:
msgr:width="100"
msgr:backColor="#D7E8EC"
msgr:altBackColor="#FFFFFF"
msgr:foreColor="#424542"
msgr:conversationUrl=
<a href="http://settings.messenger.live.com/Conversation/">http://settings.messenger.live.com/Conversation/</a>
IMMe.aspx?invitee=[unique id]@
<a href="http://apps.messenger.live.com">apps.messenger.live.com</a>&mkt=en-US
If you select a theme for the IM control, all forms of online presence will include additional properties to control the color scheme of the IM window when presented. These properties are included in the invitee property setting as shown highlighted here for the IM window <iframe> settings:
<iframe src="<a href="http://settings.messenger.live.com/">http://settings.messenger.live.com/</a>
Conversation/IMMe.aspx?invitee=
[your invitee ID here]@
<a href="http://apps.messenger.live.com">apps.messenger.live.com</a>&mkt=en-US&
useTheme=true&
foreColor=333333&backColor=E8F1F8&
linkColor=333333&borderColor=AFD3EB&
buttonForeColor=333333&buttonBackColor=EEF7FE&
buttonBorderColor=AFD3EB&
buttonDisabledColor=EEF7FE&
headerForeColor=0066A7&headerBackColor=8EBBD8&
menuForeColor=333333&menuBackColor=FFFFFF&
chatForeColor=333333&chatBackColor=FFFFFF&
chatDisabledColor=F6F6F6&chatErrorColor=760502&
chatLabelColor=6E6C6C"
width="300" height="300" style="border: solid 1px
black; width:300px; height:300px;"
frameborder="0"></iframe>
Of course you can customize these values if the canned themes don’t meet your needs. At least the HTML gives you a head start. The point is that with just a few clicks on the Web Settings page you can create working HTML that you can copy and paste to any Web page. Although the examples in this article will be ASP.NET (.aspx pages), the resulting HTML is interoperable-for example it works on plain HTML pages (.htm and .html) or PHP (.php) to name a few alternatives.
Putting the IM Control to Work
After pasting the generated HTML for the status icon, button, or IM window to your Web application, visitors will be able to chat with you when you are online. As mentioned earlier, when visitors click the status icon or button, the control launches a new browser window with the IM window shown in Figure 1 inside. Visitors can click the icon or button even if you are offline, but the IM window is disabled until you are online. Your online status will not update in the icon or button until the visitor refreshes the page.
When you log into your Windows Live Messenger Client, the IM window is dynamically updated with your online status without a browser refresh. To initiate a conversation with you, visitors click the “Begin a conversation” link in the chat window.
Figure 3 illustrates the dialog flow for beginning a new conversation using the IM window. When visitors start a conversation, they have three options for identifying themselves to you:
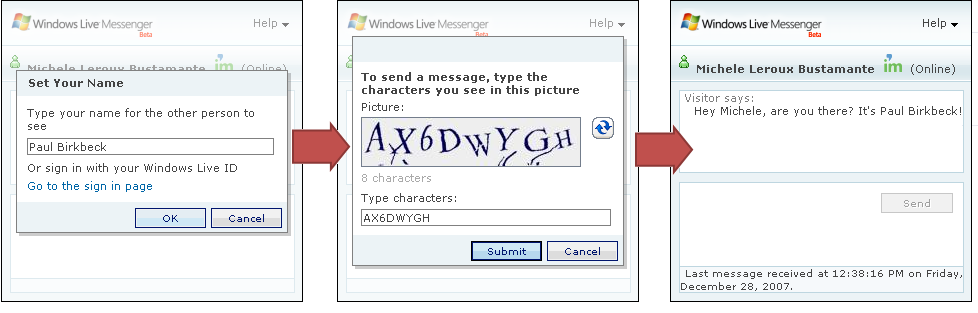
- They can remain anonymous.
- They can provide their real name.
- They can sign in to their Windows Live account and use that identity.
The first dialog in Figure 3 illustrates a visitor typing their real name, but they could as easily use the default “Visitor” or some other anonymous name. Visitors can also sign in to their Windows Live ID account from this dialog, if they aren’t already signed-in. Regardless of the visitor’s identity, the control will always present a HIP-CAPTCHA (Human Interactive Proofs-Completely Automated Public Turing test to tell Computers and Humans Apart) image to prevent IM spamming. Once completed the IM window is ready for chat.
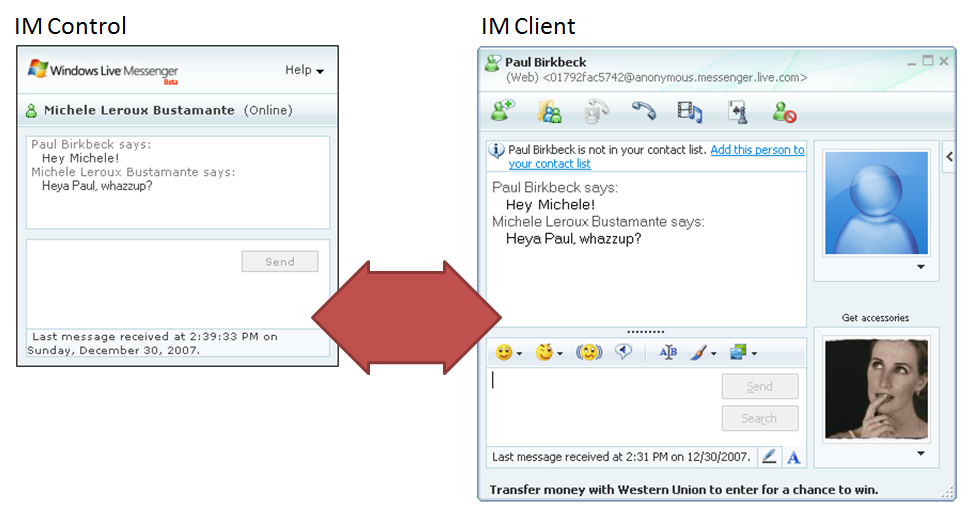
Once the visitor types a message and hits Send-which is only possible if you are online-the control directs the message to your messenger client and you receive a message as you would from any other contact. If the visitor is not signed in to messenger, although the name they presented is in the conversation dialog title, their ID has this format:
[unique id]@<a href="http://anonymous.messenger.live.com">anonymous.messenger.live.com</a>
If the contact, signed-in to Windows Live ID or not, is sending you messages from the Web, their identity includes the (Web) prefix as shown in Figure 4. You have the option to add the contact to your list, but for anonymous visitors this has no real value.
The steps to set this all up are fairly trivial: enable sharing your online presence, generate HTML, host the HTML in your Web application, and wait for visitors to send you messages! What can enhance this experience is the presence API, which you can use to identify visitors to your Web application and to encourage them to log in to their Windows Live ID account before proceeding with chat.
Inviting Visitors to Share Online Presence
When you generate HTML for the IM control, it uses your messenger ID in the invitee address so that the control can gain access to your online presence and do things like display your status icon and name. You can do the same for users that visit your Web application by inviting them to share their online presence via the Web sign-up URL. This makes it possible to identify visitors by their messenger ID and use that to show their online presence information for a personalized experience.
Another important benefit is the instant social network that is available through the Windows Live ID contact list of a signed-in visitor. This simplifies life for the visitor since their existing contacts are immediately available to them-rather than building a new network for the Web application, they have an instant network in their Windows Live ID contacts. This also opens the door to interesting possibilities for the Web application to provide functionality to interact with that network.
The following hyperlink will send the user to the Windows Live ID sign-up page (websignup.aspx) to sign in, supplying a return URL (default.aspx) for the host application, and a privacy policy URL (privacypolicy.aspx) so that users can verify trust:
<asp:HyperLink ID="lnkSharePresence"
runat="server" NavigateUrl=
"<a href="http://settings.messenger.live.com/">http://settings.messenger.live.com/</a>
applications/websignup.aspx?
returnurl=http://…/default.aspx&
privacyurl=http://…/privacypolicy.aspx">
Share Your IM Presence</asp:HyperLink>
The link directs users to http://login.live.com, which is a page where they can sign in to their Windows Live ID account, if they aren’t already signed-in. The next page prompts them to approve sharing their online presence with the requesting host, as shown in Figure 5. If they accept, the page redirects to the return URL passing their messenger ID as a query string parameter named “id”. If they decline, or if there is no privacy policy, the query string indicates this in the “result” parameter. Basically, the return URL is responsible for determining if the user approved sharing their online presence.
The following code illustrates how to gather the query string parameters and process the various possible responses:
if (!this.IsPostBack)
{
  string result = Request.QueryString["result"];
  string id = Request.QueryString["id"];

  if (!String.IsNullOrEmpty(result))
  {
    if ((result == "Accepted") && (id != null))
      this.lblName.Text = "Presence ID: " + id;
    else if (result == "Declined")
      this.lblName.Text = "Presence unavailable.";
    else if (result == "NoPrivacyUrl")
      this.lblName.Text = "No privacy Url.";
  }
}
You can use the messenger ID provided by sharing online presence to personalize the Web application, passing it to the presence API.
Gathering Details through the Presence API
The Windows Live Messenger IM Control leverages the Windows Live Messenger Presence API to display information about the control host (the invitee), such as their online status and name. You can also use the presence API directly from any Web page to identify visitors if they agree to share their presence with the requesting host. Together with the Web sign-up URL, you can use the presence API to encourage visitors to sign in to their Windows Live ID account, share their online presence with the Web application, and allow the application to identify the visitor in order to present personalized information about them, such as their online status and name.
The presence API is a simple, HTTP-based API that exposes two queries about a particular messenger account: one for the status icon, another for a more detailed representation of the user’s presence. The URL syntax for a query is:
<a href="http://messenger.services.live.com/users/">http://messenger.services.live.com/users/</a>
[messenger id]/[resource]/[?queryparameters]
You can pass the messenger ID for any user, including one retrieved from a call to the Web sign-up page discussed earlier. The messenger ID is in the form:
[unique id]@<a href="http://apps.messenger.live.com">apps.messenger.live.com</a>
The resource can be presenceimage or presence. A query for the presence image returns a URL for the status icon of the messenger account. You can use this to present a graphic representing if a user is online or not as follows:
<img id="imgStatusIcon"
src="<a href="http://messenger.services.live.com/users/">http://messenger.services.live.com/users/</a>
[unique id]@<a href="http://apps.messenger.live.com/">apps.messenger.live.com/</a>
presenceimage" />
A query for the presence details returns a JSON result, which includes the account’s messenger ID, the display name, and the status name and icon. The format of the JSON response is:
{
   "status": "[messenger status]",
   "icon": {
   "height": 16,
   "url":
"<a href="http://settings.messenger.live.com/static/w13r2">http://settings.messenger.live.com/static/w13r2</a>
/Conversation/img/[status icon filename].gif",
   "width": 16
   },
   "statusText": "[localized messenger status]",
   "id": "[messenger id]@<a href="http://apps.messenger.live.com">apps.messenger.live.com</a>",
   "displayName": "[messenger display name]"
}
The best way to work with the JSON response is to provide a callback script function that can process the presence details. Listing 2 shows an example of this.
Why display the status of a user visiting your site? A perfect example is a social networking site that uses Web signup to register users for their own personal space, and then subsequently stores their messenger ID to provide a personalized experience for the user. When they log in to their personal space on the Web, the application can show their messenger status (using the presence API) and provide a link to the IM window (using the IM control). This allows others visiting their personalized page to chat with them! In fact, Listing 1 shows this in the HTML for the button representation of the IM control.
Kick it up a Notch with the Windows Live Messenger Library
Based on the discussion thus far, you should gather that the Windows Live Messenger IM Control provides a quick and easy way for non-developers to enable their presence on the Web and is particularly useful for chatting with anonymous visitors. The Windows Live Messenger Presence API provides a way for visitors to log into their Windows Live ID account and identify themselves to the IM control and to the host application for personalization. Together these products enable interaction with a particular messenger account, specified by the invitee, and allow non-Windows Live users to send messages without installing the Windows Live Messenger Client.
The Windows Live Messenger Library extends this functionality by providing a rich SDK to build a customized messenger client on the Web. Messenger LibraryThe features supported by the Messenger Library include:
- A simple sign-in control for authenticating messenger accounts.
- Access to the signed-in user’s online presence for personalization.
- Access to the signed-in user’s contact list and groups to replicate Messenger client functionality on the Web.
- A rich API for programmatically interacting with the signed-in user’s contact list and groups; for sending and receiving messages; and for interacting with conversations.
NOTE: At the time of this writing, the Messenger Library was still in beta and not yet released. For the latest status and SDK updates please go to dev.live.com/messenger.
Using this SDK you can reproduce the messaging functionality of Windows Live Messenger on the Web or customize it to fit the business drivers of the hosting Web application. The Messenger Library does not replace the functionality of the IM control since it does not support anonymous conversations, but it does make it possible to build a rich experience for existing Windows Live users with some very powerful customization possibilities.
Why would you want to replicate messenger (customized or not) on the Web? First and foremost it definitely increases the stickiness of your Web application if visitors can interact with their social network without navigating away from the Web page to open the messenger client. In particular for full-screen experiences such as online videos or games, accessing the chat window in place is also a huge convenience. Another important benefit is the instant social network that is available through the Windows Live ID contact list of a signed-in visitor. This simplifies life for the visitor since their existing contacts are immediately available to them-rather than building a new network for the Web application, they have an instant network in their Windows Live ID contacts. This also opens the door to interesting possibilities for the Web application to provide functionality to interact with that network.
The coming sections will explore the richness of this SDK, explain how to get set up to use it, and show you how to use the key features available to your Web applications that employ it.
Developing with the Messenger Library
The Windows Live Messenger Library is a client-side library written in JavaScript. Thus, any page in your Web application that leverages the Messenger Library must import messenger.js as follows:
<script src="<a href="http://settings.messenger.live.com/">http://settings.messenger.live.com/</a>
api/1.0/messenger.js" type="text/javascript"
language="javascript"></script>
From here, your job is to write code in JavaScript to access the features and functionality of the library. For example, to add the SignInControl from the Messenger Library to a Web page, you would include both the Messenger Library script and another script containing a function to load the control. In the following example, when the page loads, it calls AuthenticateUser() from the custom JavaScript library, MyMessengerScriptLibrary.js:
<body onload="AuthenticateUser()">
<script src="<a href="http://settings.messenger.live.com/">http://settings.messenger.live.com/</a>
api/1.0/messenger.js" type="text/javascript"
language="javascript">
</script>
<script
src="App_Scripts\MyMessengerScriptLibrary.js"
type="text/javascript" language="javascript">
</script>
<div id="divSignIn">
</div>
</body>
Inside MyMessengerScriptLibrary.js is the following JavaScript function creating a SignInControl instance passing the required parameters (to be discussed):
function AuthenticateUser()
{
    signinControl = new
<a href="http://Microsoft.Live.Messenger.UI">Microsoft.Live.Messenger.UI</a>.SignInControl(
'divSignIn',
'http://…/PrivacyPolicy.aspx',
'http://…/Channel.aspx', '');
}
Although Visual Studio 2008 introduces support for JavaScript debugging, which is fantastic for script writers, building a complete library of functionality in JavaScript is usually a cumbersome process given the lack of rich IntelliSense and lack of knowledge for the correct syntax. Fortunately, there is a product called Script# that significantly improves your productivity for building rich JavaScript functionality for your ASP.NET applications.
Turning C# Developers into Scripting Ninjas with Script#
Client-side scripting is a necessity with today’s AJAX-enabled applications-and working with the Messenger Library adds yet another reason for developers to learn JavaScript. The problem is that many server-side developers find client-side scripting to be something of a dark art. The coolest thing about Script# is that C# developers can implement JavaScript without writing JavaScript!
Script# is a C# compiler (at the time of this writing Visual Basic support does not exist) that generates JavaScript instead of MSIL. When you install Script#, it integrates into the Visual Studio IDE so that you can write libraries of functions in C# that are then compiled into JavaScript for deployment with your Web application. Here is a summary of the steps necessary to create a Script# library:
- Install Script#, which also installs several Visual Studio templates for creating script libraries.
- Create a new project using the Script# Class Library template. For convenience, include this project in a solution that also contains your Web application.
- Add a reference to Microsoft.Live.Messenger.dll, the core assembly containing the Messenger Library metadata.
- Begin writing C# functions to interact with the Messenger Library. Call those functions from any Web page in the dependent application.
- Copy the .js output of the compiled Script# library to the Web application that will use the library. You can automate this with a post build step for convenience.
As for the coding experience, the previous code snippet for the JavaScript function named authenticateUser() would look like this in the Script# library:
namespace MyMessengerScriptLibrary
{
  public class Authentication
  {
    public static void authenticateUser()
    {
      SignInControl signinControl = new
SignInControl("divSignIn",
"http://.../PrivacyPolicy.htm",
"http://.../Channel.htm", "");

    }
  }
}
To call this from a Web page, import the Script# library JavaScript file:
<script
src="App_Scripts\MyMessengerScriptLibrary.js"
type="text/javascript"
language="javascript"></script>
To trigger the authenticateUser() JavaScript function when a Web page is loaded, you use the fully qualified function name which includes the namespace and class name:
<body onload=
"MyMessengerScriptLibrary.Authentication.
authenticateUser()">
NOTE: Keep in mind that at the time of this writing, the Script# compiler changes Pascal case function names to Camel case names.
In this article, all code to work with the Messenger Library is written in a Script# library, and thus will be illustrated in C# using the steps just described. The compiled JavaScript is ultimately what Web pages invoke at run time-and given the richness of the Messenger Library, using Script# is the key to developer productivity. The Windows Live Messenger Library is a substantive library with over 70 classes for building Messenger-enabled applications. The remainder of this article will discuss three key scenarios related to working with users and sign in, contacts, and conversations.
Signing In and Working with Users
To leverage the power of the Messenger Library, you must first gain access to a user account. The library includes a single UI component, the SignInControl, which handles authentication of users against the Windows Live ID domain. Once it authenticates the user, you can gain access to the user identity and interact with the sign-in and sign-out process for that user. In addition, through the user identity you can access many other details related to the user’s Windows Live ID account-which makes it possible to replicate the messenger client in a customized Web interface.
To add Windows Live ID sign-in functionality to a page, create an instance of the SignInControl located in the Microsoft.Live.Messenger.UI namespace of the Messenger Library. The control constructor has four parameters:
-
controlId: The name of the <div> on the page where the control should be rendered. -
privacyStatementUrl: The URL of the Web application’s privacy policy, explaining how the application will use the user’s account details. -
channelUrl: A URL for a page containing JavaScript for safe cross-site scripting. See following reference for more details on how this secures communication between third-party sites and the Windows Live ID domain: <a href="http://msdn2.microsoft.com/en-us/library/bb735305.aspx">http://msdn2.microsoft.com/en-us/library/bb735305.aspx</a>. -
market: An optional culture code specifying which culture the control should use to display text.
You must write the code to create the SignInControl inside a JavaScript function, called by the page (most likely during load)-as discussed in the previous section. The UI representation of the SignInControl is shown in Figure 6. The user is presented with a Sign In button, which sends the user to the Windows Live ID login page. If the user has never signed in and saved a Windows Live ID cookie to the machine, they will be asked to log in as shown in Figure 6. If they have previously logged in and allowed their last authentication to be remembered, the SignInControl indicates that the user is already signed in.
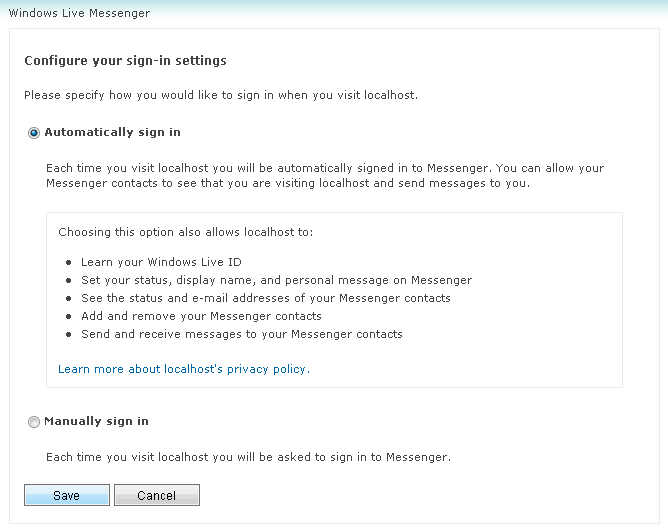
The first time that the user authenticates to Windows Live ID with their account, they are provided with a page where they can adjust their sign-in settings. Specifically, this determines if the user wants to be automatically or manually signed in for future authentication (see Figure 7). If they choose to be automatically signed in, Windows Live ID Web Authentication (http://dev.live.com/liveid) is used to authenticate the user with the Windows Live ID cookie stored on the machine.
NOTE: Windows Live ID Web Authentication is a free product you can also employ in your Web applications to authenticate users to your site using their Windows Live ID accounts, instead of employing a custom authentication mechanism.
While the SignInControl does provide core functionality for authentication, to fully leverage the Messenger Library you will have to write code to interact with the authentication process. Listing 3 includes the code necessary to create the SignInControl, interact with the authentication process, access the authenticated user’s identity, and, post sign in, access user’s account details. Table 1 explains the purpose of each function shown in the listing.
Essentially, you must hook the SignInControl’s AuthenticationCompleted event in order to do anything useful with the user’s account. This provides you with access to the user identity, which you can use to create an instance of the User class from the Microsoft.Live.Messenger namespace. This class is the root of the object model for the user’s account details including account settings, presence, contacts, conversations, and messaging. Before signing the user in, hook the SignInCompleted event of the User type so that you can verify a successful sign in prior to accessing properties of the user instance. You must also invoke the SignIn() function for the user instance to complete the sign-in process. The SignInCompleted event is fired once the user completes sign in-passing a result of Success or Failure.
In Listing 3, displayAccountDetails() is called upon successful sign in to update the page display and show account information. This listing shows only a subset of what the code sample illustrates, but Table 2 lists the type of information accessible through the User class hierarchy. Most of the functionality in a messenger-enabled application can trace its roots back to the User class. Beyond sign-in and sign-out functionality, through this class you can access and modify properties of the user account such as DisplayName, DisplayPictureUrl, Status, and PersonalMessage; access the contact list; interact with the user’s mailbox to add Web e-mail functionality to a site; and create and interact with messaging conversations with a particular set of contacts.
Working with Contacts
After a user logs in using the SignInControl, you can access the user’s contact list through the User instance. The User class exposes three collection properties to access the user’s contact list:
-
Contacts: A ContactCollection containing all contacts in the list. -
AllowedContacts: A ContactCollection containing only allowed contacts. -
BlockedContacts: A ContactCollection containing only blocked contacts.
You can use any of these ContactCollection instances to access a list of contacts as follows:
foreach (Contact c in userAccount.Contacts){…}

foreach (Contact c in
userAccount.AllowedContacts){…}

foreach (Contact c in
userAccount.BlockedContacts){…}
To organize contacts according to the groups they are associated with, you can also access a ContactCollection exposed by the Groups property of the User instance:
foreach (Group g in userAccount.Groups){
   foreach (Contact c in g.Contacts)
   {
   if (c.IsAllowed)
{…}
   }
}
Each ContactCollection contains a list of Contact instances that contain details about each contact. This information is useful for presenting the signed-in user’s contacts in the UI for them to interact with.
Listing 4 shows you how to present a list of contacts to the user after they sign in, organizing the list by group. In the SignInCompleted event, if sign in is successful, listContacts() is called to traverse the contacts within each group. The contact collection for the user and the list of contact IMAddress instances are saved for later use at the client. Then, the contact collection for each group is traversed-building an <a> element showing the address of the contact:
<a href='javascript:MyMessengerScriptLibrary.
ContactsByGroup.showContactDetails([contactIndex])
'>[contactAddress]</a>
The result is a list of links on the page that show the contacts within their group heading. When a user clicks the contact link, showContactDetails() is called passing the index of the contact to display their details in the page. The information displayed about the selected contact includes the following properties of the Contact class: Presence.DisplayName, Presence.PersonalMessage, Presence.IMAddress.Address, Presence.Status, IsAllowed, and IsBlocked.
You can use the collection to produce a contact list for the signed-in user to communicate with directly from the browser. You can filter this list to organize by groups, include only unblocked contacts, or even to produce UI to toggle contact properties, such as unblocking or blocking contacts using the Allow() and Block() functions (respectively) exposed by the Contact class. You can also provide messaging features for the signed-in user so they can exchange messages with their online contacts. Beyond messenger-like functionality, your Web applications can also provide other unique ways for signed-in users to interact with their contact list, such as inviting them to join the application or sending them a link to the content they are browsing. In this respect, you’ve created an instant social network for the user within the context of your Web application.
The Art of Conversation: Sending and Receiving Messages
Providing users with a way to send and receive messages is one of the primary features exposed by the Messenger Library. To send messages to a contact programmatically, you must have access to the signed-in User instance and a reference to the IMAddress of the contact to whom the message will be sent. The Conversation class provides functionality to create a new conversation and subsequently interact with that conversation by sending messages, handling received messages, adding contacts to the conversation for multiple party conversations, and other related features.
If you provide a user interface with a list of contacts and maintain a reference to the signed-in user and contact list as shown in Listing 4-your JavaScript functions will be able to access those references. The following code assumes the user invokes a function that passes an index for the correct contact to send a message to. The User instance is used to create a Conversation instance with a particular contact, by calling Create() on the Conversations collection for the user. A text message is subsequently sent by calling SendMessage() on the new Conversation instance.
IMAddress address = addressList[index];
Contact contact =
contactList.FindByAddress(address);

Conversation conv = userAccount.Conversations.
Create(contact.CurrentAddress);

conv.SendMessageFailed += new
SendMessageFailedEventHandler(
conv_SendMessageFailed);

conv.SendMessage(
new TextMessage("test message", null), null);
The message is sent to the Windows Live account associated with the IMAddress-and if they are signed in to the messenger client, a new conversation window will appear with the message. If you handle the SendMessageFailedEventHandler, you will be informed of any failed deliveries so you can present this information to the user.
SendMessage() supports three different types of messages-TextMessage, NudgeMessage, and ApplicationMessage-the latter of which provides an extensibility point for custom messages. You can send a nudge to the participants of a conversation as follows:
conv.SendMessage(new NudgeMessage(), null);
Messages sent from a messenger-enabled Web application will be sent to the messenger application where the user is signed in. They, in turn, will likely send messages back. In order to retrieve messages sent by conversation participants you must hook the MessageReceivedEventHandler of the Conversation class after creating the conversation:
Conversation conv = userAccount.Conversations.
Create(contact.CurrentAddress);

conv.MessageReceived += new
MessageReceivedEventHandler(conv_MessageReceived);
When messages are received, the event handler is passed a parameter, MessageReceivedEventArgs, that provides access to the Message object. Message is the base type for all message types including TextMessage and NudgeMessage. You can detect which type of message it is through the Type property and, subsequently, cast to the correct type to gather necessary information about the message to present to the user. Listing 5 illustrates this.
You can Close() a conversation instance to free the resource after sending a message or create a new conversation for subsequent messages. However, if you save a reference to the Conversation instance, you can send and receive messages as part of the same conversation for the user session. Furthermore, you can invite other contacts to join the conversation by calling the InviteAddress() function exposed by the Conversation class. Assuming that you have a reference to the active conversation instance, the following code checks the participant list via the Roster property, to verify if the invitee is already in the conversation. If not, InviteAddress() sends an invitation to this address:
Conversation conv = null;
if (activeConversation !=null)
{
  conv = activeConversation;
  foreach (IMAddress a in
activeConversation.Roster)
  {
    if (a.Address == address.Address)
      conv = null;
  }
}

if (conv != null)
  conv.InviteAddress(address, null);
Of course participants using the messenger client application may also invite additional participants. If you are presenting a list of participants to the user, you’ll need to know when they add or remove new participants. The Roster property of the conversation instance tracks these changes. You can handle the CollectionChanged event of the Roster as follows:
conv.Roster.CollectionChanged += new
NotifyCollectionChangedEventHandler(
Roster_CollectionChanged);
In the event handler, you can iterate through the Roster collection and present the current conversation participants. Likewise, the conversation instance exposes a History property that you can monitor for changes. The History property holds the collection of messages in the conversation and you can use it to display or save conversations.
NOTE: While you should always test and protect against Cross-Site Scripting (XSS) attacks, the need for secure code is heightened for scenarios like those discussed in this article since the Windows Live Messenger Library is accessed via JavaScript. For more information on protecting against XSS see the following resources: http://search.microsoft.com/results.aspx?mkt=en-US&setlang=en-US&q=XSS. The code sample for this article will also include appropriate measures to protect against XSS, so be sure to note those recommendations.
Conclusion
Unlike the simplicity of the Windows Live Messenger IM Control and Windows Live Messenger Presence API-the Windows Live Messenger Library provides an incredibly rich set of features for interacting with messenger accounts to produce a messenger-client experience on the Web. The IM control combined with the presence API play a very important role since they don’t require development expertise. Just put the control on a Web page and you have an instance presence on the Internet where others can reach you. Specifically, the IM control can be used by anonymous visitors and by non-Windows Live accounts. The Messenger Library is not considered an extension to the IM control-it serves a much different purpose with its rich SDK for building a social networking experience for a Web application. Although exposing a customized messenger client is one aspect of this, to increase the stickiness of an application-leveraging the SDK to provide extended features that enable users to interact with their social network is extremely compelling and quite powerful. From this article, you can only begin to appreciate the amount of functionality available through the Messenger Library-but the hope is that this inspires you to take a look at the code and play with the SDK yourself!
[Team sidebar + Steve Gordon’s photo is included with art for this article.]
Listing 1: The resulting HTML generated for the status icon, button, and IM window, with no themes applied.
<!-- HTML for status icon -->
<a target="_blank"
href="<a href="http://settings.messenger.live.com/Conversation/IMMe.aspx">http://settings.messenger.live.com/Conversation/IMMe.aspx</a>?
invitee=[unique id]@<a href="http://apps.messenger.live.com">apps.messenger.live.com</a>&mkt=en-US">
<img style="border-style: none;"
src="<a href="http://messenger.services.live.com/users/">http://messenger.services.live.com/users/</a>
[unique id]@<a href="http://apps.messenger.live.com/presenceimage">apps.messenger.live.com/presenceimage</a>?
mkt=en-US" width="16" height="16" /></a>
<!-- HTML for button -->
<script type="text/javascript"
src="<a href="http://settings.messenger.live.com/controls/1.0/">http://settings.messenger.live.com/controls/1.0/</a>
PresenceButton.js"></script>
<div
id="Microsoft_Live_Messenger_PresenceButton_[unique id]"
msgr:width="100"
msgr:backColor="#D7E8EC"
msgr:altBackColor="#FFFFFF"
msgr:foreColor="#424542"
msgr:conversationUrl="<a href="http://settings.messenger.live.com/">http://settings.messenger.live.com/</a>
Conversation/IMMe.aspx?invitee=[unique
id]@<a href="http://apps.messenger.live.com">apps.messenger.live.com</a>&mkt=en-US"></div>
<script type="text/javascript"
src="<a href="http://messenger.services.live.com/users/">http://messenger.services.live.com/users/</a>
[unique id]@<a href="http://apps.messenger.live.com/presence?mkt=en-">apps.messenger.live.com/presence?mkt=en-</a>
US&cb=Microsoft_Live_Messenger_PresenceButton_onPresence"></script>
<!-- HTML for IM window -->
<iframe
src="<a href="http://settings.messenger.live.com/Conversation/IMMe.aspx">http://settings.messenger.live.com/Conversation/IMMe.aspx</a>?
invitee=[unique id]@<a href="http://apps.messenger.live.com">apps.messenger.live.com</a>&mkt=en-US" width="300"
height="300" style="border: solid 1px black; width: 300px; height:
300px;" frameborder="0"></iframe>
Listing 2: Processing the JSON response with a JavaScript callback function.
<b><label id="lblName" ></label></b><br />
<b><img id="imgStatusIcon" /><label id="lblStatus"></label></b>
<script type="text/javascript" language="javascript">
function displaypresencedetails(presence)
{
var statusIcon = document.getElementById('imgStatusIcon');
statusIcon.src = presence.icon.url;
statusIcon.alt = presence.statusText;
statusIcon.style.border = 'none';
statusIcon.width = presence.icon.width;
statusIcon.height = presence.icon.height;
var status = document.getElementById('lblStatus');
status.innerText = presence.statusText;
var name = document.getElementById('lblName');
name.innerText = presence.displayName;
}
</script>
<script type="text/javascript" language="javascript"
src="<a href="http://messenger.services.live.com/users/">http://messenger.services.live.com/users/</a>
[messenger id hash]@<a href="http://apps.messenger.live.com/presence/">apps.messenger.live.com/presence/</a>?
cb=displaypresencedetails">
</script>
Listing 3: C# code illustrating how to create the SignInControl, handle authentication, and access user account details.
namespace MyMessengerScriptLibrary
{
  public class AccountDetails
  {
    private static SignInControl signinControl;
    private static User userAccount;

    public static void authenticateUser()
    {
      signinControl = new SignInControl("divSignIn",
"http://.../PrivacyPolicy.htm",
"http://.../Channel.htm", "");
      signinControl.AuthenticationCompleted += new
AuthenticationCompletedEventHandler(
signinControl_AuthenticationCompleted);
    }

    static void signinControl_AuthenticationCompleted(object
sender, AuthenticationCompletedEventArgs e)
    {
      userAccount = new User(e.Identity);
      userAccount.SignInCompleted += new
SignInCompletedEventHandler(userAccount_SignInCompleted);
      userAccount.SignIn(null);
    }

    static void userAccount_SignInCompleted(object sender,
SignInCompletedEventArgs e)
    {
      if (e.ResultCode == SignInResultCode.Success)
        displayAccountDetails();
    }

    public static void displayAccountDetails()
    {
      StringBuilder sb = new StringBuilder();
      sb.Append("<h1>Account Info</h1>");

      sb.Append("DisplayName: ");
      sb.Append(userAccount.Address.Presence.DisplayName);
      sb.Append("<br/>");

      sb.Append("DisplayPictureUrl: ");
      sb.Append(userAccount.Presence.DisplayPictureUrl.ToString());
      sb.Append("<br/>");

      sb.Append("PersonalMessage: ");
      sb.Append(userAccount.Address.Presence.PersonalMessage);
      sb.Append("<br/>");

      sb.Append("Address: ");
      sb.Append(userAccount.Address.Address);
      sb.Append("<br/>");

      sb.Append("LiveId: ");
      sb.Append(userAccount.Identity.LiveId);
      sb.Append("<br/>");

      sb.Append("Status: ");
      sb.Append(userAccount.Address.Presence.Status.ToString());
      sb.Append("<br/>");

      Document.GetElementById("divWelcome").InnerHTML =
sb.ToString();
    }
  }
}
Listing 4: Listing contacts by group and displaying contact details.
private static User userAccount;
private static IMAddress[] addressList;
private static ContactCollection contactList;

static void userAccount_SignInCompleted(object sender,
SignInCompletedEventArgs e)
{
  if (e.ResultCode == SignInResultCode.Success)
  {
    listContacts();
  }
}

public static void listContacts()
{
  StringBuilder sb = new StringBuilder();
  int index = 0;

  contactList = userAccount.Contacts;
  addressList = new IMAddress[userAccount.Contacts.Count];

  foreach (Group g in userAccount.Groups)
  {
    sb.Append("<h1>");
    sb.Append(g.Name);
    sb.Append("</h1>");

    foreach (Contact c in g.Contacts)
    {
      IMAddress address = c.CurrentAddress;
      addressList[index] = address;

      sb.Append("<a
href='javascript:MyMessengerScriptLibrary.ContactsByGroup.
showContactDetails(" + index + ")'>" + c.CurrentAddress.Address +
"</a><br />");
      index++;
    }
  }

  Document.GetElementById("divContactList").InnerHTML +=
sb.ToString();
}

public static void showContactDetails(int index)
{
  IMAddress address = addressList[index];
  Contact c = contactList.FindByAddress(address);

  StringBuilder sb = new StringBuilder();
  sb.Append("<h1>");
  sb.Append(address.Address);
  sb.Append("</h1>");

  sb.Append("DisplayName: ");
  sb.Append(address.Presence.DisplayName);
  sb.Append("<br/>");

  sb.Append("PersonalMessage: ");
  sb.Append(address.Presence.PersonalMessage);
  sb.Append("<br/>");

  sb.Append("Address: ");
  sb.Append(address.Presence.IMAddress.Address);
  sb.Append("<br/>");

  sb.Append("Status: ");
  sb.Append(address.Presence.Status.ToString());
  sb.Append("<br/>");

  sb.Append("<b>Contact</b><br/>");

  sb.Append("IsAllowed: ");
  sb.Append(c.IsAllowed.ToString());
  sb.Append("<br/>");

  sb.Append("IsBlocked: ");
  sb.Append(c.IsBlocked.ToString());
  sb.Append("<br/>");

  Document.GetElementById("divSelectedContact").InnerHTML +=
sb.ToString();
}
Listing 5: Handling received messages.
static void conv_MessageReceived(object sender,
MessageReceivedEventArgs e)
{
  string message = "";
  if (e.Message.Type == MessageType.TextMessage)
  {
    TextMessage textMessage = e.Message as TextMessage;
    message = textMessage.Text;
  }
  else if (e.Message.Type == MessageType.NudgeMessage)
  {
    NudgeMessage nudgeMessage = e.Message as NudgeMessage;
    message = "Nudge";
  }

  Document.GetElementById("divMessageLog").
InnerHTML += "<b>Received from " + e.Message.Sender.Address + ":
</b>" + message + "<br/>";
}
Table 1: The functions used to handle SignInControl authentication and access to user account details.
| Function Name | Description |
|---|---|
| authenticateUser() | Creates the SignInControl and hooks its AuthenticationCompleted event so that you can retrieve the user identity during sign in. |
| signinControl_AuthenticationCompleted() | Creates an instance of the User from the identity passed in; hooks the SignInCompleted event so that you can verify the status of the sign in; and invokes the SignIn() function to complete the sign-in process. |
| userAccount_SignInCompleted() | Verifies the success or failure of the sign-in process and, if successful, displays the user account’s details. |
| displayAccountDetails() | Accesses the user account’s details through the User object model. |
Table 2: A high-level look at the powerful features available through the User type in the Windows Live Messenger Library.
| Category | Description |
|---|---|
| Sign in and Sign out | Functions to sign in or sign out and events to interact with the process providing access to the user identity. |
| Account settings | Properties to interact with account settings related to privacy mode, the existence of a mailbox or special features such as mobile messaging, and other settings such as the ability to update the display name of the account. |
| Account details | Properties to interact with address settings, address capabilities, online status, presence details including display name and IM address, and the user’s identity. |
| Contacts | Access to the user’s contacts collection, the ability to add new contacts and access contact details, access to contact groups, and functionality to send messages to contacts. |
| Conversations | Functionality supporting creating new conversations with contacts, sending and receiving messages, and interaction with message generation and formatting. |
