


You have been given the task of creating some business objects for a new .NET project.
The UI has not been created (or designed) yet, so you start coding right away. After creating the first few objects, you decide that maybe you should do some unit testing. How?
You could create a new Windows Forms application using a default form. Then you could add several controls, a lot of code to instantiate your objects and call methods, and then populate your controls to see what was returned. Oh, but wait: what if you call a method with different parameters? What will be returned then?
The NUnit framework is a unit-testing framework that works with all .NET languages
OK, let's just change some code in the Form and try again. As you can imagine, this could be an ugly cycle. Do you have to create a new Form for each business object? Do you have to change code in the Form for several scenarios? This can turn into a big time consumer.
Is there a better way to test business objects? YES! It comes in a tool called NUnit. It is available (for free) from http://www.nunit.org. NUnit is a unit-testing framework that works with all .NET languages.
This article covers how to perform unit testing using the NUnit framework.
Getting Started
If you want to follow along with the samples presented in this article, go to http://www.nunit.org and download and install the application.
Creating a Business Object
Let's start with a simple bank account business object. It will have a field to store the current balance along with methods to deposit money into the account, withdraw from the account, and transfer money from one account to another. Listing 1 shows the beginning of the code for the Account class. Notice that at this point, only the Deposit method is implemented.
Creating the Test Class
Now you need to test the Deposit method. To do this, add another class to the project called AccountTest. Listing 2 shows the beginning code for the test class.
Here is where the NUnit framework is used to perform unit testing. Notice that the class and methods have attributes. These attributes are part of the NUnit framework as well as the Assert.AreEqual method. To use these, a reference to NUnit.Framework needs to be added to the project and the NUnit.Framework statement added to the class.
The TestFixture attribute is used to flag the class as containing test code. Any class using this attribute must have a default constructor.
The Test attribute is used to flag specific methods of a TestFixture class as a test method. These are the methods that will be executed by the NUnit testing process. These methods cannot have any parameters and cannot return any values. The class will compile, but any methods with the wrong signature will not run during the testing process.
The code in the TestDeposit method is pretty straightforward. It creates a new Account object and then deposits $100 into the account. After that, a call to the Assert.AreEqual method is made. The Assert class in the NUnit framework has several methods for testing values. These are described in more detail later. For now, just look at the AreEqual method. There are multiple overloads for this method. The one you are using compares two float values. The first parameter is the expected value and the second parameter is actual value (or test value). I'll describe the other overloads for the AreEqual method later in this article.
After the initial $100 deposit, deposit another $150 into the account. Then test the balance again to make sure it is $250. Now you are ready to run the test.
Performing the Tests
To perform the NUnit tests, first compile your project to create a DLL. Then start up the NUnit GUI application. From the File menu choose Open to open the newly created DLL. NUnit reads the assembly and, in a tree view, displays the TestFixture classes and all Test methods, as shown in Figure 1.
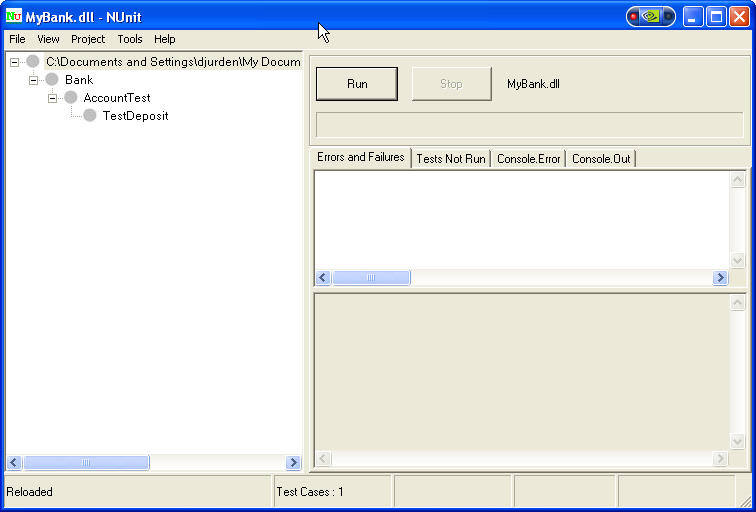
To run the test methods, click on the Run button. In this case, all tests passed, as indicated by the grey circles turning green.
The class will compile, but any methods with the wrong signature will not run during the testing process.
Now test the Withdraw method. Add the following method to the AccountTest class:
[Test]
public void TestWithdraw()
{
   // Create a new account, deposit $250
   Account account = new Account();
   account.Deposit(250.00f);

   // Withdraw $100
   account.Withdraw(100.00f);

   // See if we have $150 in the account
   Assert.AreEqual(150.00f, account.Balance);
}
Now build the solution. Note that you don't have to shut down the NUnit GUI application because it automatically detects changes to the DLL and refreshes the display as necessary. After rebuilding the DLL, a new node shows up in the tree view for the new Test method. After clicking on the Run button again to perform the tests, an error is indicated by the red circles near the test method(s) that failed, as shown in Figure 2.
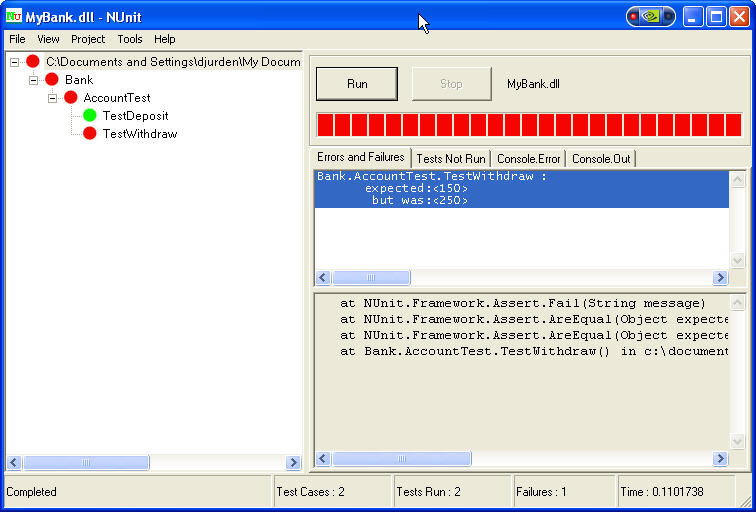
As you can see, you also get a message that shows the expected value and the actual value. Obviously, this error is because you have not implemented the Withdraw method. You can now go back to implement this method and run the tests again. The code for the Withdraw method is:
public void Withdraw(float amount)
{
   this._balance -= amount;
}
After rebuilding the DLL and rerunning the tests, all tests should pass. Now you can implement and test the Transfer method. The code for the Transfer method is:
public void Transfer(Account destAccount,
float amount)
{
   destAccount.Deposit(amount);
   this.Withdraw(amount);
}
The test method looks something like this:
[Test]
public void TestTransfer()
{
   // Create source and destination accounts
   Account source = new Account();
   Account destination = new Account();

   // Add some money to both accounts
   source.Deposit(250.00f);
   destination.Deposit(100.00f);

   // Transfer $50 from source to destination
   source.Transfer(destination, 50.00f);

   // Check balances in each account
   Assert.AreEqual(200.00f, source.Balance);
   Assert.AreEqual(150.00f,destination.Balance;
}
Now you can rebuild the assembly and run the tests again. It is possible to execute an individual test method by selecting that method in the tree view prior to clicking on the Run button. Also, if you have more than one TestFixture class in your assembly, you can execute the methods in just one of them by selecting the corresponding node prior to clicking on the Run button.
This is a good overview of the capabilities of the NUnit framework and the NUnit GUI. However, there are still some potential problems with the Account class, one of which is handling insufficient funds. I'll discuss how to handle this with the NUnit framework as I show you some additional features.
The NUnit Framework
The example above shows the features that you can use to handle testing simple business objects, but it will not be sufficient to test business objects used in today's robust applications. The NUnit framework has additional Assert methods and Attributes that you can use for more advanced testing situations.
Assertions
There are two categories of Assert methods; Comparisons and Condition Tests. In addition, there is a method that a developer can call at any point to generate a failure based on custom logic. I'll get into this a little later.
Comparisons
The Comparisons consist of the AreEqual and AreSame methods. As stated earlier, there are multiple overloads for the AreEqual methods. The overloads are fairly self-explanatory. Here they are:
//Compare Integer values
Assert.AreEqual(int expected, int actual);
Assert.AreEqual(int expected, int actual,
string message);

//Compare Decimal values
Assert.AreEqual(decimal expected, decimal actual);
Assert.AreEqual(decimal expected, decimal actual,
   string message);

//Compare Float values
Assert.AreEqual(float expected, float actual,
float tolerance);
Assert.AreEqual(float expected, float actual,
   float tolerance, string message);

//Compare Double values
Assert.AreEqual(double expected, double actual,
   double tolerance);
Assert.AreEqual(double expected, double actual,
double tolerance, string message);

//Compare objects
Assert.AreEqual(object expected, object actual);
Assert.AreEqual(object expected, object actual,
   string message);
As you might have noticed, the overloads handle the most common value types. However, you probably also noticed that there is not an overload for strings. String values are handled in the overload that accepts object parameters. In fact, the object overloads allow you to test values of different types. For example, you can compare the integer 1 with the decimal 1.0 so that Assert.AreEqual(1.0, 1) passes and Assert.AreEqual(1.1, 1) fails. The next version of NUnit (currently in Beta) allows comparing arrays using the AreEqual method. Two arrays test equal if they are of the same length and each corresponding element is equal. This only applies to arrays, not to other collection types, such as the ArrayList.
The AreSame method tests whether the same object is referenced by both arguments. Here are the overloads for the AreSame method:
Assert.AreSame(object expected, object actual);
Assert.AreSame(object expected, object actual,
   string message);
The following code shows the use of the AreSame method:
[Test]
public void TestAreSame()
{
   Account source = new Account();
   Account dest = new Account();

   // This evaluates to false because
   // source and dest are two different objects
   Assert.AreSame(source, dest, "First Test");

   dest = source;

   // This evaluates to true because
   // source and dest are now the same object
   Assert.AreSame(source, dest, "Second Test");
}
Note that if your method code contains several Asserts and one fails, the Test method stops executing at that point and no more assertions in that method are tested. Any remaining Test methods or TestFixture classes are executed.
Condition Tests
The Assert Condition test methods test for a specific condition. Each method accepts a parameter (of the appropriate type) and an optional message. It is advisable to provide a message when using these methods because no default message is displayed in the GUI if the test fails. Also, when one of these assertions fails, the test method aborts and any code in the same method following the failed assertion is not executed. Any remaining Test methods or TestFixture classes are executed.
Here are the Condition Test assertion methods:
// Tests for a true boolean expression
Assert.IsTrue(bool condition);
Assert.IsTrue(bool condition, string message);

// Tests for a false boolean expression
Assert.IsFalse(bool condition);
Assert.IsFalse(bool condition, string message);

// Tests the object to see if it is null
Assert.IsNull(object anObject);
Assert.IsNull(object anObject, string message);

// Tests the object to see if it is not null
Assert.IsNotNull(object anObject);
Assert.IsNotNull(object anObject, string message);
Assert.Fail
If the above assertion tests are not sufficient, the Assert.Fail method provides the ability to generate a failure based on your own logic. At any time in a test method, you can call the Assert.Fail() method to cause the test method to fail. Again, it is recommended that you pass a message to the Fail method to be displayed in the GUI. The Assert.Fail method call causes the Test method to abort and any remaining code in that method will not execute. Any remaining Test methods or TestFixture classes are executed.
Attributes
Two arrays test equal if they are of the same length and each corresponding element is equal. This only applies to arrays, not to other collection types, such as the ArrayList.
You have already used two attributes provided by the NUnit framework: TestFixture and Test. TestFixture is used to mark a class that contains testing methods. There are a few restrictions on classes marked with this attribute; the class must have a default constructor and the class must be public or the NUnit GUI will not be able to detect it.
The Test attribute is used to mark specific methods inside a TestFixture class as a test method. These methods must not accept any parameters and cannot return any values.
TestFixtureSetUp/TestFixtureTearDown
The TestFixtureSetUp attribute is used to flag an Init method for constructing the test environment. This method is executed prior to the first Test method. Common tasks that are included in this method are to create and initialize any common objects that the test methods will use, so each Test method does not have to initialize the objects. This can help speed up the testing process.
The TestFixtureTearDown attribute is used to flag a Dispose method that can be used to clean up any object references created during the testing process. This method is executed after all Test methods are executed.
A TestFixture class can only have one TestFixtureSetUp method and one TestFixtureTearDown method. If more than one of either method is included, the class can compile but will not run during the testing process.
Listing 3 shows another test class for testing the Account class using these two attributes.
As you can see, one method depends on the results of the prior method, since the TextFixtureSetup runs only once before the tests start. If you want to reset your environment prior to or after each test method, see the SetUp/TearDown section, next.
SetUp/TearDown
The SetUp and TearDown attributes are similar to the TestFixtureSetUp and TestFixtureTearDown attributes. The big difference appears when they are executed. The SetUp method runs prior to each test method and the TearDown runs after each test method. These methods can be used to reset the environment after each test.
It is possible to use the NUnit GUI as the debugging application in your .NET project.
If I changed the TestFixtureSetUp and TestFixtureTearDown attributes in the above code to SetUp and TearDown, most of the tests would fail because the source and destination objects are removed and recreated after each test method is executed. I would have to modify the test values in the AreEqual methods to account for this modification.
ExpectedException
The ExpectedException attribute causes a method to pass or fail based on whether the called method (in the business object) throws an exception of a specific type. If an exception of the expected type is thrown, the method passes. If the method throws an exception of a different type or no exception at all, the test method fails. It also fails if the thrown exception is inherited from the expected exception class. This attribute takes a parameter that is a Type. This is the Type of exception class it is expecting.
To illustrate this, I'll go back to the Account class and create a new exception class to be used to handle the Not Sufficient Funds problem. Add a new class called NotSufficientFundsException that inherits from the Exception class. Here is the code for this new class:
using System;

namespace Bank
{
   public class NotSufficientFundsException :
   Exception
   {
   }
}
Next, change the Withdraw and Transfer methods of the Account class, as shown in Listing 4.
Then add two more test methods to the test class to test for this exception. The code looks something like this:
[Test]
[ExpectedException(
typeof(NotSufficientFundsException))]
public void TestTransferWithNotSufficientFunds()
{
   this.source.Transfer(this.destination,
1000.00f);
}

[Test]
public void TestBalancesAfterException()
{
   Assert.AreEqual(100.00f, this.source.Balance);
   Assert.AreEqual(300.00f,
this.destination.Balance);
}
When this code runs, it calls the Transfer method to transfer $1,000 to the destination account. The Transfer method calls the Withdraw method, which checks the current balance and determines that there is not enough money in the source account. It then throws the custom exception. The Transfer method catches this exception and throws it on to the test method. In this case, the test method passes because it is expecting that exception. However, if you change the transfer amount to $10 and run it again, the test method fails because the NotSufficientFundsException is not thrown by the Transfer method because there is enough money in the account to transfer.
The purpose of the additional test method is to make sure that the balances did not change after the NotSufficientFundsException was thrown. If the Transfer method does not throw the exception and the transfer is allowed, this last test fails because the balances are different.
Ignore
The Ignore attribute tells NUnit not to run this test. It can be applied to either a TestFixture class or a Test method. Any TestFixture class or Test method using this attribute is flagged with a yellow indicator in the NUnit GUI after the tests are executed, showing that the test was skipped. These tests also show up on the Tests Not Run tab of the NUnit GUI. The Ignore attribute has an optional message that can be used to display a message on this tab to remind the user why the test is being skipped. The syntax for this is:
[Ignore("your message")]
Debugging
It is possible to use the NUnit GUI as the debugging application in your .NET project. Even though your project does not have a UI, you can run your business object project. This allows you to set a breakpoint in either your TestFixture code or your business object code. When the testing process hits the breakpoint, you'll be able to step through your code using the .NET debugger. To set this up, follow these steps:
After going through this process, you can set a breakpoint and press F5 to start a debugging session. After compiling your project, the NUnit GUI application starts. Click on the Run button. When the test process gets to your breakpoint, you will be able to use the debugger.
Summary
The NUnit framework is an excellent tool for testing business objects. It is very easy to construct test cases to test calling methods on a business object with several different parameter values to make sure that the methods return expected results each time. It is also capable of detecting expected exceptions; if you call a method in a way that you expect to throw a specific exception, you can test for this also.
Listing 1: The Account class to be tested
using System;

namespace Bank
{
   public class Account
   {
      private float _balance = 0.00f;

      public float Balance
      {
         get {return this._balance;}
      }

      public void Deposit(float amount)
      {
         this._balance += amount;
      }

      public void Withdraw(float amount)
      {
      }

      public void Transfer(Account account, float amount)
      {
      }
   }
}
Listing 2: The Test class
using System;
using NUnit.Framework;

namespace Bank
{
   [TestFixture]
   public class AccountTest
   {
      [Test]
      public void TestDeposit()
      {
         // Create a new account and deposit $100
         Account account = new Account();
         account.Deposit(100.00f);

         // Make sure we have $100
         Assert.AreEqual(100.00f, account.Balance);

         // Deposit $150
         account.Deposit(150.00f);

         // Make sure we have $250
         Assert.AreEqual(250.00f, account.Balance);
      }
   }
}
Listing 3: The Test class using TestFixtureSetUp and TestFixtureTearDown attributes
using System;
using NUnit.Framework;

namespace Bank
{
   [TestFixture]
   public class AccountTest2
   {
      private Account source;
      private Account destination;

      [TestFixtureSetUp]
      public void Init()
      {
         this.source = new Account();
         this.destination = new Account();

         this.source.Deposit(150.00f);
         this.destination.Deposit(300.00f);
      }

      [TestFixtureTearDown]
      public void Dispose()
      {
         this.source = null;
         this.destination = null;
      }

      [Test]
      public void TestOpeningBalances()
      {
         Assert.AreEqual(150.00f, this.source.Balance);
         Assert.AreEqual(300.00f, this.destination.Balance);
      }

      [Test]
      public void TestDepositWithdraw()
      {
         this.source.Deposit(50.00f);
         Assert.AreEqual(200.00f, this.source.Balance);

         this.destination.Withdraw(100.00f);
         Assert.AreEqual(200.00f, this.destination.Balance);
      }

      [Test]
      public void TestTransfer()
      {
         this.source.Transfer(this.destination, 100.00f);

         Assert.AreEqual(100.00f, this.source.Balance);
         Assert.AreEqual(300.00f, this.destination.Balance);
      }
   }
}
Listing 4: The Test class using TestFixtureSetUp and TestFixtureTearDown attributes
public void Withdraw(float amount)
{
   if (this._balance - amount >= 0)
   {
      this._balance -= amount;
   }
   else
   {
      throw new NotSufficientFundsException();
   }
}

public void Transfer(Account destAccount, float amount)
{

   try
   {
      this.Withdraw(amount);
      destAccount.Deposit(amount);
   }
   catch (NotSufficientFundsException oException)
   {
      throw oException;
   }
   catch (Exception oEx)
   {
      // handle other exceptions
   }
}
