


Today's world is about information. People want it wherever they are, in front of a television, at a PC, in a board meeting, or waiting for a bus.
The Internet is great on your PC, but when you want your data on the go, lugging a Pentium PC around in your coat pocket just isn't going to cut it. Enter the Wireless Application Protocol (WAP), a way to get data to mobile wireless devices.
WAP content is viewed on WAP devices, which are typically mobile phones, pagers or PDAs that include software called a “microbrowser.” There are several microbrowsers in phones today. Nokia's 7110 browser is popular in Europe and runs mostly on Nokia phones. UP.Browser is more popular in America and is found on a wider variety of wireless phones. Why is it important to know that there are different browsers? Well, since WAP isn't strict about the implementation of the markup language in browsers, pages that test well on one phone may look completely different on others. Language elements may display differently, or maybe not at all! Developing for many WAP devices is more difficult unless you have a well thought-out strategy.
Getting Started
To create WAP content, you don't need very fancy tools: just a web server, a text editor, and a phone to run it on. Fortunately, emulators are available, so you don't need to waste airtime testing applications. Software Development Kits also exist to assist you in the process of creating WAP pages. The Nokia SDK (for the Nokia browser at http://www.forum.nokia.com/) is the most complete kit, but, unfortunately, it's slow and buggy, and I can't get it to run on half my computers. The UP.Simulator (for the UP.Browser at http://developer.phone.com/download) is a pretty lightweight emulator and, since it emulates the most common browser in the US, is the simulator I use for the majority of this article. As for the web server, just about anything will do, as long as the WAP MIME types are configured correctly. The required extensions and MIME types are:
WML
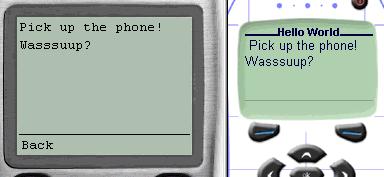
As I mentioned earlier, WAP defines its own markup language for presentation, known as the Wireless Markup Language (WML). To start off, like always, here is the “Hello World” sample, but this time with an appropriate modern twist:
<?xml version="1.0"?>
<!DOCTYPE wml PUBLIC "-//WAPFORUM//DTD WML 1.1//EN" "http://www.wapforum.org/DTD/xml_1.1.xml";>
<wml>
    <card id="main" title="First Example">
        <p>
            Pick up the phone!  Wasssup?
        </p>
    </card>
</wml>
Take a look at the first line. No, that's not a typo; it really is supposed to say “xml”. WML is an application of XML, meaning that the WML file itself is also an XML document. This is an advantage, since XML has a strict format and validating and parsing it will require less work for the slow device. For the same reason, all WML tags are in lower case. The second line is the Document Type Definition. If you're not up to speed on DTDs, don't worry. It isn't very important to understand it, other than to know it defines that we are using WML 1.1. So, you can't leave it out.
Next, we have the <wml> tag. It signifies that this is the beginning of the WML “deck”. It's called a deck because WML files can hold multiple pages, called “cards”, that are all downloaded together in the deck. The <card> defines where each card starts and the “id” attribute uniquely identifies each card. Another attribute in the card is the “title,” which brings with it the first lesson in browser differences. Evidently, no one said that a browser has to recognize the “title” attribute. Take a look at the first screen in Figure 1. Notice that the title “Hello World” is nowhere to be found on the UP.Browser's screen. Because of that, it's important that you don't rely on the title of a card to give directions to the user.
All of the content displayed in the main area of the screen should be between <p> or Paragraph tags. You can have multiple paragraphs if you'd like, but keep in mind that the screen size is not very large. In addition to starting a new paragraph to start a new line, you can also use the <br> tag, as in HTML. However, since this is XML too, you need more than
to keep a well-formed document, so either <br></br> or <br /> is needed.
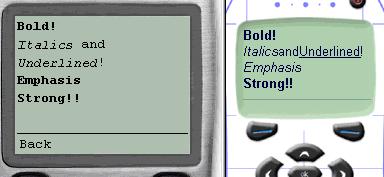
The tags for formatting text are similar to HTML. Italics, bold and underline are achieved with the <i>, <b> and <u> tags. Also, <em> and <strong> are available to format text in a generic way and leave the details to the browser. Finally, rounding out the set are the <big> and <small> tags, which can change font sizes.
Once again, remember that all browsers are different, so some formatting may be ignored by certain devices. To actually see this on your PC (assuming you have PWS or IIS, and the UP.Simulator installed), create a file with Notepad and store it at c:\InetPub\wwwRoot\format.wml with the following contents:
<?xml version="1.0"?>
<!DOCTYPE wml PUBLIC "-//WAPFORUM//DTD WML 1.1//EN" "http://www.wapforum.org/DTD/xml_1.1.xml";>
<wml>
  <card id="main">
    <p>
    <b>Bold!</b><br />
    <i>Italics</i> of <u>underlining</u>!
    </p>
    <p>
    <em>Emphasis?</em>
    </p>
    <p>
    <strong>Strong!!</strong>
    </p>
  </card>
</wml>
Launch the UP.Simulator and navigate to http://localhost/format.wml and your page should come up as in Figure 2.
WAP uses its own file format for images, and the pictures are currently black and white and uncompressed, because most WAP devices don't have the power to uncompress them locally. The file format is called Wireless Bitmap or WBMP. The tag syntax looks like this:
<img src="mike.wbmp" alt="one weird looking dude" />
Notice that since WAP is based on HTTP, a URL is used to locate the image in the "src' attribute. Browsers that don't support wbmp will use the “alt” text in place of the image.
When laying out your pages, keep in mind that some browsers are better at navigation than others. Also, the back button is very important, since the user always needs to be able to back out of a screen.
One way of navigating from card to card is by using hyperlinks, like HTML does. But, you need to learn two new tags. action.
<anchor>
  <go href="news.wml#page2" />
  Go to the new page!
</anchor>
The <go> instructs the browser to download “news.wml” and navigate to card “page2”. You can also specify just the deck, without a card, and the first card in the deck will be shown when the link is activated. Specifying a card without specifying a deck just navigates to a card in the current deck. That would look like this:
<go href="#page2" />
The following tag does exactly the same thing as the above code:
Go to the new page!
However, while links work well on the Nokia browsers, they're not that great on the UP.Browser.
<?xml version="1.0"?>
<!DOCTYPE wml PUBLIC "-//WAPFORUM//DTD WML 1.1//EN" "http://www.wapforum.org/DTD/xml_1.1.xml";>
<wml>
  <card id="main">
    <p>Here is alot of text with a<anchor>
    <go href="#next" />
    Link text
    </anchor>in the middle and then another
    one towards the end.
    </p>
  </card>
  <card id="next">
    <p>This is the second page</p>
  </card>
</wml>
The suggested navigation for the UP.Browser is to use

<?xml version="1.0"?>
<!DOCTYPE wml PUBLIC "-//WAPFORUM//DTD WML 1.1//EN" "http://www.wapforum.org/DTD/xml_1.1.xml";>
<wml>
  <card id="main">
    <do type="accept" label="Key1">
      <go href="#second" />
    </do>
    <do type="option" label="Key2">
      <go href="#second" />
    </do>
    <p>
      Here is some text
    </p>
  </card>
  <card id="second">
    <do type="accept" label="Key1">
      <go href="#third" />
    </do>
    <do type="option" label="Key2">
      <go href="#third" />
    </do>
    <do type="option" label="Key3">
      <go href="#third" />
    </do>
    <p>
      Here is some more text
    </p>
  </card>
  <card id="third">
    <do type="accept" label="Key1">
      <go href="#second" />
    </do>
    <do type="option" label="Key2">
      <go href="#second" />
    </do>
    <p>
      Here is a Link
    </p>
  </card>
</wml>
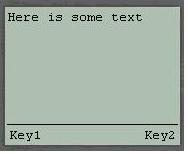
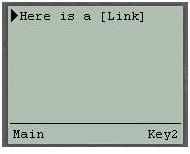
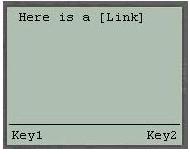
The images and captions in Figure 3 should explain the process. Note that a card can have only one Accept button, but it can have many Option buttons. The last page shows something different. Both soft keys are being used, plus a hyperlink. While a hyperlink is active, it takes precedence over the <do> tag for the Accept key. However, if the link became deselected, the Accept key would map back to the <do> tag.
The ability to retreat backwards is very important in your WAP applications. In the UP.Browser implementations, there is a “hard” button on the phone that acts as the Back button. Therefore, no soft keys or links need to be added. For the Nokia browser, use the <do> tag to create the Back Button:
<do type="prev">
  <prev/>
</do>
The new page, and it can be used where ever the <go> tag can be used.
Why use WML?
The question remains: Why wouldn't I just use basic HTML or my existing HTML web pages instead of creating new versions in a new language? To answer that, let's first look at the limitations of a mobile phone when compared to Internet Explorer or Netscape.
- Low Processor Speed and RAM
- Low Battery Life
- Low Bandwidth
- Small Screen
- Limited Graphics
- Slow and Difficult user input
First, the protocol. I said earlier that WAP is an optimized protocol for WAP devices, since they currently have very limited bandwidth compared to most other Internet machines. HTTP uses large blocks of text data that is too inefficient for the bandwidth challenged. WAP, however, uses binary transmission for greater compression, so it's optimized for the smaller bandwidths.
OK, but why the new markup language? If you look at the differences between WML and HTML, you can see that WML, as a well-formed XML document, can be validated and traversed faster than a poorly structured file. This is important when the processor is not that powerful.
The concept of Cards and Decks also address several of the above limitations. Because of the small screen, content is often crammed on it, resulting in a busy looking screen. To solve this problem, you should break your pages up into smaller pieces. But, hitting the server constantly after every tiny page is not a good idea, because the connection and download process is slow, and will drain your battery more quickly. With decks of cards, you are able to connect to the server once, download several pages that fit nicely in the small area provided, then move between them with speed and ease.
Another problem is the difficult and slow user interface when keying in words and numbers on the ten-key number pad. WML is optimized for one hand navigation by using a wide variety of user input shortcuts, like input formats and expected keystrokes. For example, say the application needs a dollar amount from the user. Naturally, it will want numbers instead of letters, so in this case, you can set up the input box to get the result you want. How about validating that input? Let's face it! User input is an error-prone procedure. WAP uses WMLScript validation to prevent unnecessary trips to the server, so time won't be wasted sending down a “redo” message.
The list literally goes on and on. Things that we've taken for granted on a $1000 personal computer just don't translate well to a $100 device that's about 2" wide by 3" long. Fortunately, WML is here to address those very specific problems.
Interacting with the User
As application builders, we're not gonna be satisfied with just static web sites that allow only navigation - we want data! To accept information from the user, WML uses Input boxes or Option lists.
An input box requires a new WML element, the <input> tag. The Input tag has several attributes that help minimize the amount of bad data a user can key in. You can use value attribute to define a default value for the control, “format” to create an input mask, and “maxlength” to limit the amount of text the control can receive. Format is probably the most useful, because it can guide the user to enter expected data formats, thus saving precious keystrokes. The following input box uses “format” to accept a value that resembles a date.
<?xml version="1.0"?>
<!DOCTYPE wml PUBLIC "-//WAPFORUM//DTD WML 1.1//EN"
"http://www.wapforum.org/DTD/xml_1.1.xml";>
<wml>
  <card id="main">
  <p>
    Please enter the date:<br />
    <input name="date" format="NN\/NN\/NN" value="01/01/01" />
  </p>
  </card>
</wml>
The name attribute of the <input> tag is required, and you'll soon see why. Also, notice there is no way to tell, using just WML, if a valid date was entered; because all numerics are acceptable, the value 52/99/54 is accepted.
Here are the basic format codes for :
Option lists are more popular in WAP applications than input boxes, because users don't enjoy typing words into their phones, and option lists make quick work of data entry. Here's a list that I'll refer back to in a moment:
<?xml version="1.0"?>
<!DOCTYPE wml PUBLIC "-//WAPFORUM//DTD WML 1.1//EN"
"http://www.wapforum.org/DTD/xml_1.1.xml";>
<wml>
  <card id="main">
    <p>
      <select>
        <option value="SOFTWARE">Web Software</option>
        <option value="NIC">Network Card</option>
        <option value="MODEM">Cable Modem</option>
        <option value="CABLE">Cat 5 Cable</option>
      </select>
    </p>
  </card>
</wml>
The value attribute of each option is optional. To actually use the information from the user, we must first discuss events and variables.
Events are raised in WML and can be trapped by the <onevent> tag, letting you associate an action with an event. The syntax is:
<onevent type="[eventtype]">
  [action]
</onevent>
The four events in WML are:
- onenterforward is triggered by navigating to a card by either a link or typing the URL in directly
- onenterbackward is triggered by navigating to a card after leaving the previous card with the back button.
- onpick occurs when an item is selected or deselected from an option list.
- ontimer happens when a
expires
In the example below, the user can choose to clear all the items he has selected. To avoid an accidental delete, a confirmation page is shown. If the user confirms, he is taken to a page that tells him that the delete happened. Most likely, the user will then hit “Back” to get back to where he was, but then the confirmation screen will be shown again. That's not very intuitive. By using the onenterbackward event, code can be added that will sense the page is shown because a back button was pressed. If that's the case, the user should be sent back another level in the browser history, making it less confusing to navigate. Below is an example of this behavior.
<?xml version="1.0"?>
<!DOCTYPE wml PUBLIC "-//WAPFORUM//DTD WML 1.1//EN"
"http://www.wapforum.org/DTD/xml_1.1.xml";>
<wml>
  <card id="main">
    <p>Clear Items
    </p>
  </card>
  <card id="confirm">
    <onevent type="onenterbackward">
      <prev/>
    </onevent>
    <do type="accept" label="Yes">
      <go href="#clear" />
    </do>
    <do type="option" label="No">
      <prev />
    </do>
    <p>Confirm clear items?</p>
  </card>
  <card id="clear">
    <p>Items cleared</p>
  </card>
</wml>
The onpick event can be added directly to an option in our option list as an attribute, indicating where the browser should navigate when an item is chosen. If we outfit the computer parts example with this attribute, it looks like this:
<select>
  <option onpick="#SOFTWARE">Web Software</option>
  <option onpick="#NIC">Network Card</option>
  <option onpick="#MODEM">Cable Modem</option>
  <option onpick="#CABLE">Cat 5 Cable</option>
</select>
Unfortunately, that's not very dynamic, since a card is required for each option. That's where WML variables come in.
WML Variables
Variables in WML are string values assigned to a name. The scope of the variable is global to the entire microbrowser. That means a user could leave a site and come back later to find that the environment is the same way she left it. Watch out, because you could also have your variables stepped on by another application using the same variable names. It's also possible to reset all those variables (and the browser history) by using the newcontext attribute of
<card newcontext="true">
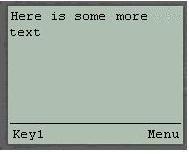
It's time for some more tags! The <setvar> tag will assign a value to a variable name, creating it if none exists. <setvar> is used inside a $. This simple example sets a variable and displays it in the same card.
<?xml version="1.0"?>
<!DOCTYPE wml PUBLIC "-//WAPFORUM//DTD WML 1.1//EN"
"http://www.wapforum.org/DTD/xml_1.1.xml";>
<wml>
<card id="main">
<onevent type="onenterforward">
<refresh>
<setvar name="firstname" value="Mike" />
</refresh>
</onevent>
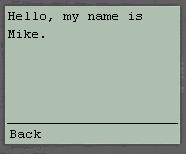
<p>
Hello, my name is $(firstname).
</p>
</card>
</wml>
The output is shown in Figure 4.
The next logical step is storing user input into variables for our application to use. It's not too hard. In fact, we've already done it! Including the name attribute of an <input> or <select> will automatically populate a variable by the same name with the element's value. So, earlier when I used
<input name="date" format="NN\/NN\/NN" value="01/01/01" />
a variable named “date” was created and populated with the contents of the input box.
To find the missing piece of the <input> puzzle, we need to find some way to actually send this data to a server. In HTTP you can use POST or GET to send information to the server. In WAP, you can use the POST and GET concepts, too, but you'll use different syntax. But, beware: there are a handful of devices that don't support “POST.”
How about some new tags? <postfield> can send data to the server and belongs in between <go> tags. This is where the anchor tag discussed earlier would come in useful:
<anchor>
  Post Data
  <go method="get" href="wml.asp">
    <postfield name="userid" value="$(userid)" />
  </go>
</anchor>
The above card uses GET (method="get") to send the variable userid to the ASP page.
Putting it together
Here is a basic application for mobile Support and Service technicians that allows a tech to “punch” in and out of the database back at company HQ when he arrives at or leaves from a client site. Meanwhile, back at the reception desk, a support clerk can use a desktop application to accurately find out which mobile units are currently on a job, and which ones are available.
The first thing created is a simple VFP table called logins.dbf, with 3 fields: UserID (character 10), and time fields TimeIn and TimeOut. Next, a VFP class was created with two methods: IsLoggedIn() and LogInOut(). Both methods accept a userid and are pretty much self-descriptive. The class was defined as OLEPublic so it could be compiled as a COM DLL that will be accessed by Active Server Pages. Here is the Visual Foxpro 7 class with the two methods:
DEFINE CLASS timecard AS Custom OLEPUBLIC

* This returns a true if the passed user is logged in
FUNCTION IsUserLoggedIn(cUserID AS String) AS Boolean
  LOCAL llReturn

  * Only proceed if we have a valid user
  IF VARTYPE(cUserID) = 'C'

    * Find out if there are any jobs that aren't timed out
    SELECT * ;
      FROM (JUSTPATH(_vfp.ServerName) + '\logins') ;
      WHERE userid = PADR(cUserID, 10) and EMPTY(timeout) ;
      INTO ARRAY laLogout

    * If there are, the user is logged in
    IF _tally > 0
      llReturn = .T.
    ENDIF

    * Clean up
    USE IN logins
  ENDIF
  RETURN llReturn

* This function will log a user out if he is in, and in if he is out
FUNCTION LogInOut(cUserID AS String)
  LOCAL llReturn
  * Only proceed if we have a valid user
  IF VARTYPE(cUserID) = 'C'
    * Find out if there are any jobs that aren't time out
    SELECT * ;
      FROM (JUSTPATH(_vfp.ServerName) + '\logins') ;
      WHERE userid = PADR(cUserID, 10) and EMPTY(timeout) ;
      INTO ARRAY laLogout

    * If there are, the user is logged in, log him out
    IF _tally > 0
      UPDATE (JUSTPATH(_vfp.ServerName) + '\logins') ;
        SET timeout = DATETIME() ;
        WHERE userid = PADR(cUserID, 10) and EMPTY(timeout)

    * Otherwise, log him in
    ELSE
      INSERT INTO (JUSTPATH(_vfp.ServerName) + '\logins') ;
        (userid, timein) VALUES (cUserID, DATETIME())
      llReturn = .T.
    ENDIF

    * Clean up
    USE IN logins
  ENDIF
  RETURN llReturn

ENDDEFINE
Lastly, the WML pages are created. However, this time only one of the screens will be stored in an actual wml file. Take note of the <input> the <postfield> tags. This is the main page, tc.wml.
<?xml version="1.0"?>
<!DOCTYPE wml PUBLIC "-//WAPFORUM//DTD WML 1.1//EN"
"http://www.wapforum.org/DTD/xml_1.1.xml";>
<wml>
  <card id="main">
    <do type="accept" label="Status">
      <go method="get" href="status.asp">
        <postfield name="userid" value="$(userid)" />
      </go>
    </do>
    <p>
      Please enter your UserID<br />
      <input name="userid" />
    </p>
  </card>
</wml>
The two other pages are the ASP files listed below.
<%Response.ContentType = "text/vnd.wap.wml" %>
<?xml version="1.0"?>
<!DOCTYPE wml PUBLIC "-//WAPFORUM//DTD WML 1.1//EN"
"http://www.wapforum.org/DTD/xml_1.1.xml";>
<wml>
  <card id="main">
    <%set oVFPObject = server.CreateObject("mobile.timecard")
    lcUserId = Request.QueryString("userid")
    llLoggedIn = oVFPObject.IsUserLoggedIn(lcUserID)
    if llLoggedIn then%>

    <do type="accept" label="Logout">
      <go href="login.asp">
        <postfield name="userid" value="$(userid)" />
      </go>
    </do>
    <p>
      You are logged in
    </p>
    <%else %>
    <do type="accept" label="Login">
      <go href="login.asp">
        <postfield name="userid" value="$(userid)" />
      </go>
    </do>
    <p>
      You are not logged in
    </p>
    <%end if%>
  </card>
</wml>
<%Response.ContentType = "text/vnd.wap.wml" %>
<?xml version="1.0"?>
<!DOCTYPE wml PUBLIC "-//WAPFORUM//DTD WML 1.1//EN"
"http://www.wapforum.org/DTD/xml_1.1.xml";>
<wml>
  <card id="main">
    <%set oVFPObject = server.CreateObject("mobile.timecard")
    lcUserId = Request.QueryString("userid")
    llLoggedIn = oVFPObject.LogInOut(lcUserID)
    if llLoggedIn then%>
    <p>
      You are now logged in
    </p>
    <%else %>
    <p>
      You are now logged out
    </p>
    <%end if%>
  </card>
</wml>
The only new concept here is just that the pages are being generated conditionally, based on the return value of the VFP COM object. There is one line worth mentioning, though:
<%Response.ContentType = "text/vnd.wap.wml" %>
This is required, since the browser uses it to understand what type of data it's receiving. Make sure you set the content type before you do anything else in the page.
Now, for another example that can be included in the same application. The remote tech can be given a list of all the products he can sell while on site. The application will allow items to be selected so a total can be kept to quote for the client. The list part is easy, and for now we'll use a static list, but we could also easily query the inventory database using ASP and VFP to create a dynamic list. The problem is, how are we going to total the prices of the chosen items? We can't do it directly within WML, because there's no way to do mathematical functions. We can't hit the ASP server every time an item is chosen with the price of the new product to add, since WAP devices don't support cookies (or lack the power too), and besides, that would be too slow. This is where WMLScript shines.
WMLScript
WMLScript is based on ECMAScript, the same standard that JavaScript is based on. If you're familiar with JavaScript, you will pick up WMLScript easily. WMLScript is stored in a “wmls” file separate from the deck that uses it. The deck and script files are not downloaded together, but are just retrieved when needed, unlike HTML and JScript. Another difference is that JavaScript can be run either as server-side or client-side scripts, but WMLScript is strictly a client-side script. Running script on the client may seem contradictory to the “slow processor” logic used elsewhere in WAP. However, it actually speeds up the application, since WMLScript can be used to do tasks that would otherwise require repeatedly connecting to the server. I'm not going to explore the syntax of WMLScript very much, but you'll be able to get a taste of it from this sample.
Here is the updated version of our old option list.
<?xml version="1.0"?>
<!DOCTYPE wml PUBLIC "-//WAPFORUM//DTD WML 1.1//EN"
"http://www.wapforum.org/DTD/xml_1.1.xml";>
<wml>
  <card id="list">
    <onevent type="onenterforward">
      <refresh>
        <setvar name="total" value="0" />
      </refresh>
    </onevent>
    <do type="option" label="Total">
      <go href="#total" />
    </do>
    <p>
      Total: $$$(total)<br />
      Items:
      <select>
        <option onpick="total.wmls#add(80, '',0)">Web Software</option>
        <option onpick="total.wmls#add(40, 'Cat 5 Cable', 10)">Network Card</option>
        <option onpick="total.wmls#add(120, 'Cat 5 Cable', 10)">Cable Modem</option>
        <option onpick="total.wmls#add(10, '', 0)">Cat 5 Cable</option>
      </select>
    </p>
  </card>
  <card id="total">
    <onevent type="ontimer">
      <prev />
    </onevent>
    <timer value="20" />
    <p>The total of your quote is:<br />$$$(total)</p>
  </card>
</wml>
We're doing some new things this time around. The second card has an example of the <timer> element and ontimer event. The timer length is set in tenths of seconds. After two seconds, the timer tag expires and the ontimer event sends the browser back to the list screen. Finally, in the onpick event of each option, there is a link that we haven't seen before. Instead of calling a deck and a card, we are calling a Script file (total.wmls) and one of its functions (add). The data in parentheses behind it are the parameters. Here's a look at the contents of the total.wmls file:
extern function add(nPrice, cSuggest, nSuggestPrice) {
  var nTotal = Lang.parseInt(WMLBrowser.getVar("total")) ;
  nTotal = nTotal + nPrice ;

  if (String.length(cSuggest) > 0 &&
    Dialogs.confirm("Would you also like to add " + cSuggest, "Yes", "No"))
    nTotal = nTotal + nSuggestPrice ;

  WMLBrowser.setVar("total", nTotal) ;
  WMLBrowser.refresh() ;
};
The first piece we should take a look at is the second line:
var nTotal = Lang.parseInt(WMLBrowser.getVar("total"))
That doesn't look like JavaScript to me. WAP devices that support WMLScript (not all do) have a collection of libraries available to the scripts. First, the “WMLBrowser” library is accessed for its getVar function. Variables in WML and WMLScript are not the same, and getVar is one way to let your scripts access the browser variables, by accepting the variable name and returning its value. Since WML variables are always strings and the value will be needed for addition, it will have to be converted to a number somehow. That's what parseInt in the Lang library does. The code after the actual addition is pretty interesting. The optional second and third parameters for add() allow items to be automatically suggested to the user when certain items are selected. So, adding “Cable Modem” to the total will cause the program to ask if you would like to automatically add an Ethernet cable for it. The method of asking you is done with the confirm function in the Dialogs library. Think of it as a simple MessageBox(). And finally, to close out the routine, the sum gets sent back to the WML variable using setVar, and the card is refreshed. The WML variables should now reflect the changes made by the WMLScript. One final note: just like in JavaScript, all the function and library names are case sensitive.
WAP's Future
What's in store for WAP? In the near future, the WAP Forum is looking at streaming media, improved security, improved PUSH technology, billing interfaces, smart card interfaces and a lot more. The user base is growing extremely fast, too. It has been forecast that in the next few years there will be hundreds of millions of WAP users worldwide. The arrival of third generation networks is also promising, as it should deliver greatly needed bandwidth to the wireless devices.
Other technologies that play with or against WAP right now should also be noted. XHTML is being eyed by many members of the WAP community for its modular design that could lend itself quite nicely to the existing WAP structure. And, you knew this was coming! .NET may play with WAP cards. The .NET Beta 2 is scheduled to include a tool called the “.NET Mobile Web Form Builder” that will allow you to create single web forms that display on a wide array of devices, especially those that support WML 1.1. Microsoft also has its own mobile phone browser on the way that supports both WML and full HTML capabilities.
Wireless is here and it's time to go outside!
| Extension | MIME Type |
|---|---|
| wml | text/vnd.wap.wml |
| wmls | text/vnd.wap.wmlscript |
| wmlc | application/vnd.wap.wmlc |
| wmlsc | application/vnd.wap.wmlscriptc |
| wbmp | image/vnd.wap.wbmp |
| Code | Description |
|---|---|
| A | Uppercase letter or punctuation |
| a | Lowercase letter or punctuation |
| N | Any numeric digit |
| X | Uppercase letter and not punctuation |
| x | Lowercase letter and not punctuation |
| M | Any character but expects uppercase |
| m | Any character but expects lowercase |
| \c | The character c is apart of the string at this position |
